_GOTOBOTTOM
World War II: Germany
Aircraft of Germany in WWII.
Hosted by Rowan Baylis
High Planes 1/72 Me 262 V3
magnusf
_VISITCOMMUNITY
Stockholm, Sweden
Joined: May 02, 2006
KitMaker: 1,953 posts
AeroScale: 1,902 posts
Posted: Tuesday, April 21, 2015 - 10:41 PM UTC
Time for a new challenge, this one is for the Schwalbe - Me262 Campaign. I've had the High Planes 262 prototype kits (there are two of them, the V1 and the V2/V3) in my stash for at least a decade so this feels like a golden opportunity to get one of them done! Consensus seems to be that the V1 was mostly natural metal finished - I'll go for the V2/V3 then !


High Planes two prototype boxings...


...of which I plan on doing this one in its V3-guise (lots of photos of that one!)...


...and here are the contents: blue plastic (I absolutely LOVE it!), white metal landing gear and one vacformed canopy (no margins for slipping here...). Finish it off with a tiny but complete decal sheet and we're set to go!

I have of course managed to do a bit of ceremonial glueing since the campaign started:


Cockpit (if we should be strict, no glueing involved but I am the ruler around here so the photo is allowed anyway!)...


...fuselage...


...and the rest of the bits and pieces!


Magnus
Joel_W
Staff MemberAssociate Editor
AUTOMODELER
_VISITCOMMUNITY
New York, United States
Joined: December 04, 2010
KitMaker: 11,666 posts
AeroScale: 7,410 posts
Posted: Wednesday, April 22, 2015 - 12:11 AM UTC
Magnus,
I gotta admit I've never heard of that kit manufacture before. And as you pointed out, it's quite a lovely shade of Blue.
Joel
magnusf
_VISITCOMMUNITY
Stockholm, Sweden
Joined: May 02, 2006
KitMaker: 1,953 posts
AeroScale: 1,902 posts
Posted: Wednesday, April 22, 2015 - 02:48 PM UTC
High Planes have been around for a while (20+ years I think) and while they today mainly market their "mainstream"-cast Mirages there is still a quite complete range of their older kits available. They weren't that prolific in 1/48 but you gotta admit that you do need an Avon-Sabre Joel!

Here's one completed build by me that pretty much sums it all up! Or follow along on the 262-ride to see it once again in real time !


Magnus
Joel_W
Staff MemberAssociate Editor
AUTOMODELER
_VISITCOMMUNITY
New York, United States
Joined: December 04, 2010
KitMaker: 11,666 posts
AeroScale: 7,410 posts
Posted: Wednesday, April 22, 2015 - 09:24 PM UTC

Quoted Text

High Planes have been around for a while (20+ years I think) and while they today mainly market their "mainstream"-cast Mirages there is still a quite complete range of their older kits available. They weren't that prolific in 1/48 but you gotta admit that you do need an Avon-Sabre Joel!

Here's one completed build by me that pretty much sums it all up! Or follow along on the 262-ride to see it once again in real time !


Magnus


Magnus,
I'll be following along for sure. I checked out your previous build link. Nicely done.
Joel
magnusf
_VISITCOMMUNITY
Stockholm, Sweden
Joined: May 02, 2006
KitMaker: 1,953 posts
AeroScale: 1,902 posts
Posted: Saturday, April 25, 2015 - 02:00 AM UTC
I've spent the last week doing some very typical High Planes-modelling-handiwork: making stuff fit! The engine nacelles needed the removal of quite a lot of plastic and the complex fit to the wing contour is far from perfect. I do however have an ample supply of Milliput that will come in very hand in this situation!

While on the subject of the nacelles, here is some further work:

The early prototypes doesn't seem to have had the same petrol starter motor in the inlet cone as the later aircraft but the cone is still there. Due to mismatching mould halves, these were easiest to do from a piece of sprue. The efflux cones are a bit more complex in shape and could be saved by careful filling and sanding.

The inlet cones and their blanking plates fitted quite well while the outlet channels were both uneven and far to short, making the efflux cones protruding too far out. I used Milliput to build up the channels, manipulating it using a very handy rubber-tipped sculpting tool, recommended by my friend Johan the Figurepainter and bought at a local art-supply shop!

The black threads going in all directions in the photo are florist's wire that I use for centering, holding parts together, and when all is glued they make a nifty handle as well!

The wheels have also been cleaned up and glued, more detailing to be added later in the project!


Magnus
AussieReg
Staff MemberAssociate Editor
AUTOMODELER
#007
_VISITCOMMUNITY
Victoria, Australia
Joined: June 09, 2009
KitMaker: 8,156 posts
AeroScale: 3,756 posts
Posted: Saturday, April 25, 2015 - 12:07 PM UTC
Nice work so far Magnus, and as always a very thorough description of the stages and problems faced. A great resource for anybody building this kit.

A point of order, florist wire does NOT count as a stick!

Thanks for sharing.

Cheers, D
GazzaS
#424
_VISITCOMMUNITY
Queensland, Australia
Joined: April 23, 2015
KitMaker: 4,648 posts
AeroScale: 1,938 posts
Posted: Saturday, April 25, 2015 - 02:17 PM UTC
Interesting subjects Magnusf. The florists wire is a great idea! I'll be following this build.
magnusf
_VISITCOMMUNITY
Stockholm, Sweden
Joined: May 02, 2006
KitMaker: 1,953 posts
AeroScale: 1,902 posts
Posted: Saturday, April 25, 2015 - 02:30 PM UTC
Damian and Gary! That's quite an Australian bunch of followers, thanks !

And I promise, I'll be able to cram a bit of sticks inte this build as well!


Magnus
Joel_W
Staff MemberAssociate Editor
AUTOMODELER
_VISITCOMMUNITY
New York, United States
Joined: December 04, 2010
KitMaker: 11,666 posts
AeroScale: 7,410 posts
Posted: Saturday, April 25, 2015 - 07:31 PM UTC
Magnus,
A most impressive start to a very shall we say challenging kit.

Nicely scratched out exhaust cones. Like you, I'm constantly finding uses for sprue on just about every build.

Joel
magnusf
_VISITCOMMUNITY
Stockholm, Sweden
Joined: May 02, 2006
KitMaker: 1,953 posts
AeroScale: 1,902 posts
Posted: Wednesday, April 29, 2015 - 12:49 PM UTC
Joel! Yep, it's a bit difficult but it is so good for your modelling Karma! I've done far too much mainstream kits lately (and they, as everyone knows, does NOTHING for the modelling Karma). You KNOW you need that 48-scale Avon-Sabre Joel!

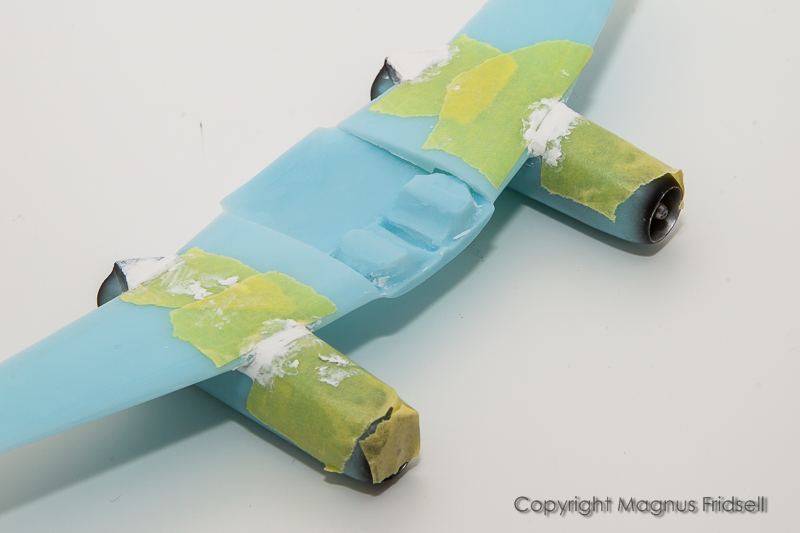
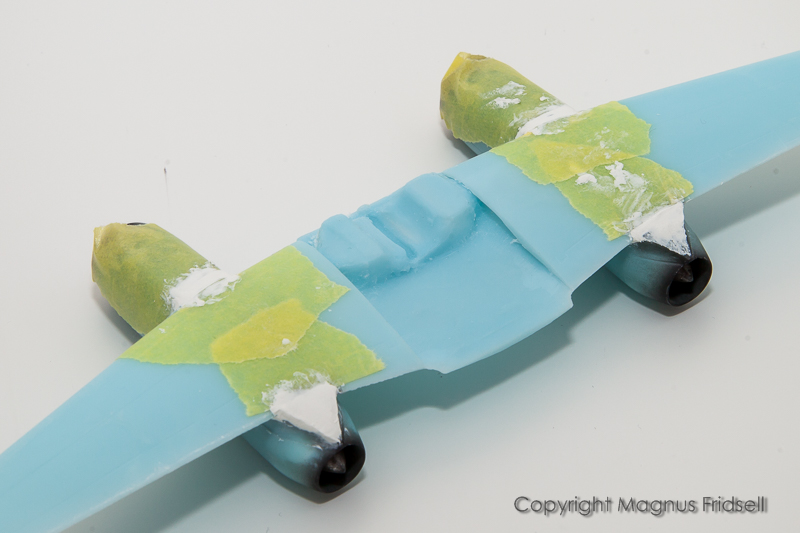
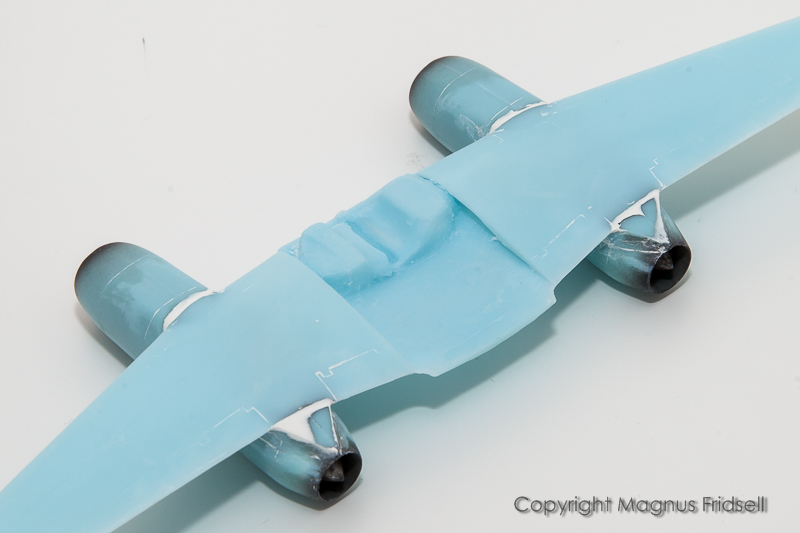
I've spent my time lately doing some rather sensitive panel-line restoration, the result of which doesn't lend itself that well to photography...

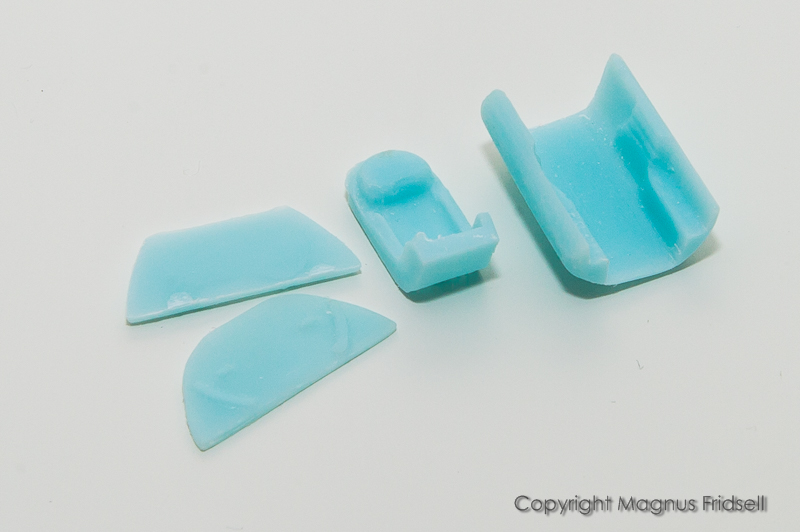
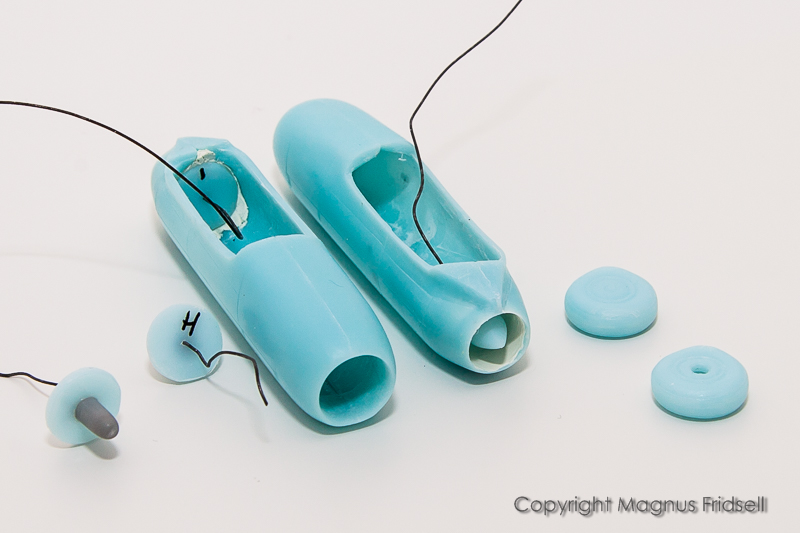
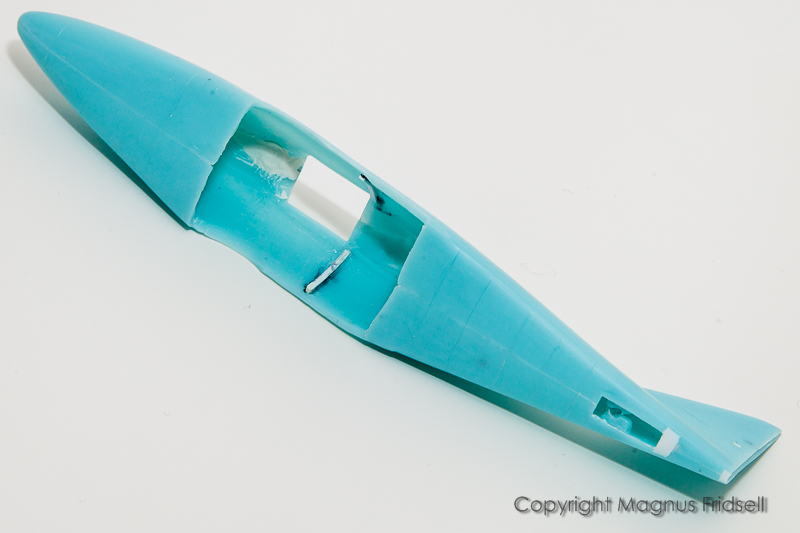
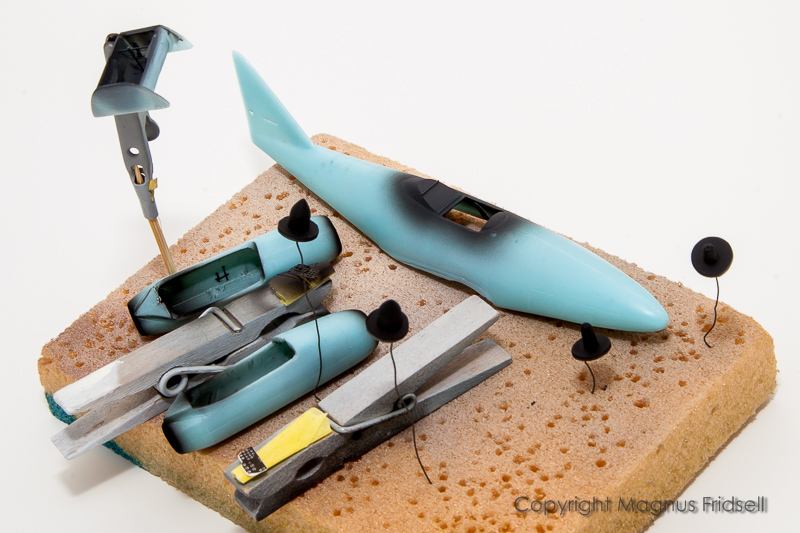
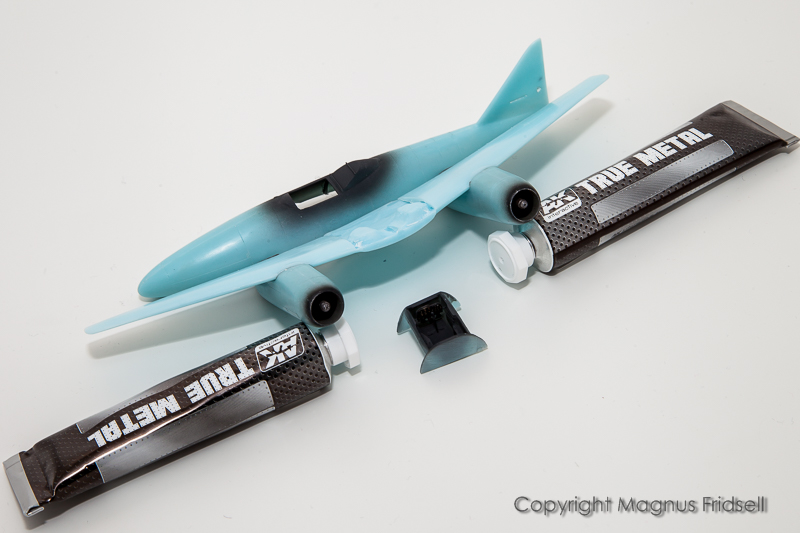
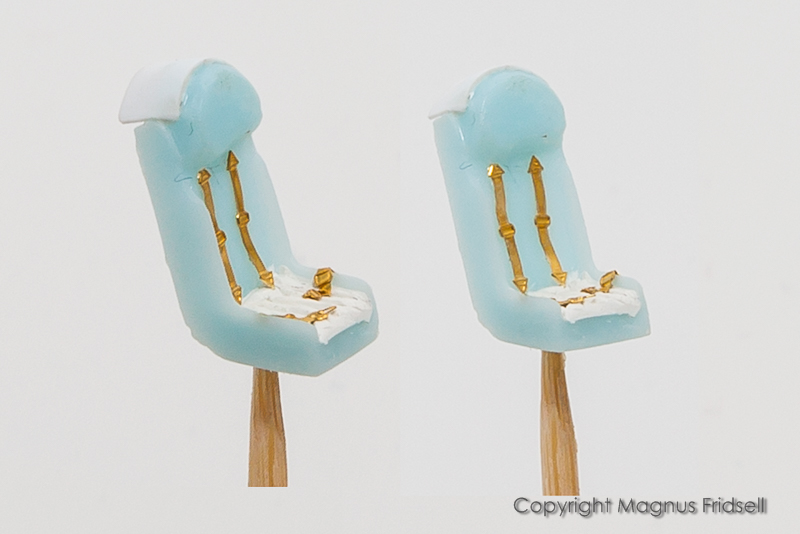
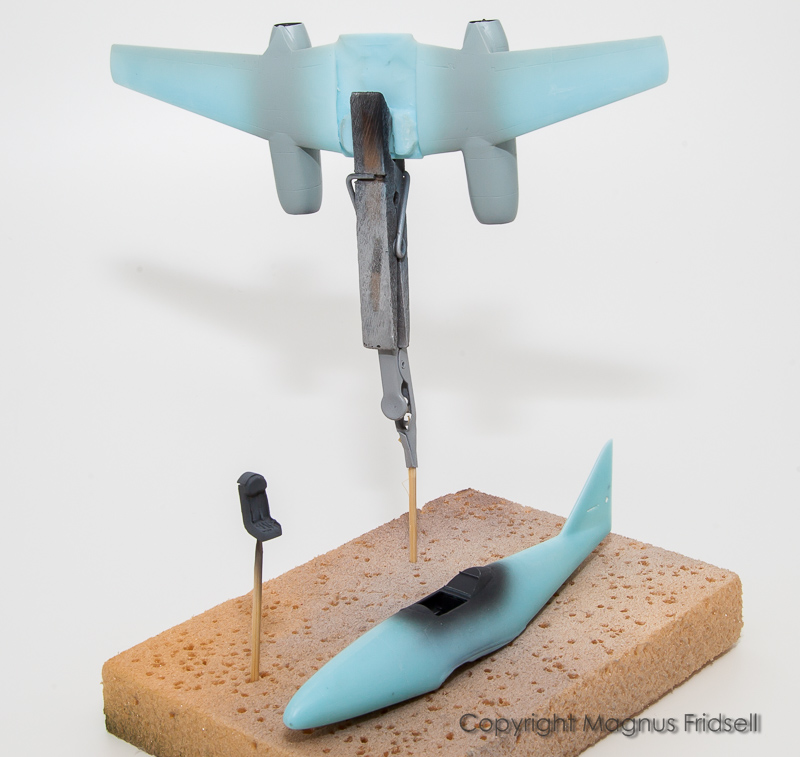
However, yesterday I finally turned my attention to the cockpit! The kit-supplied tub, combined with some fake detail painting, is probably OK under a closed canopy but I had all kinds of bits and pieces from some old Eduard etch sets (bought for next to nothing at a closing sale more than a decade ago, you never know when those things might come in handy!) that I could use to dress it up a bit further!


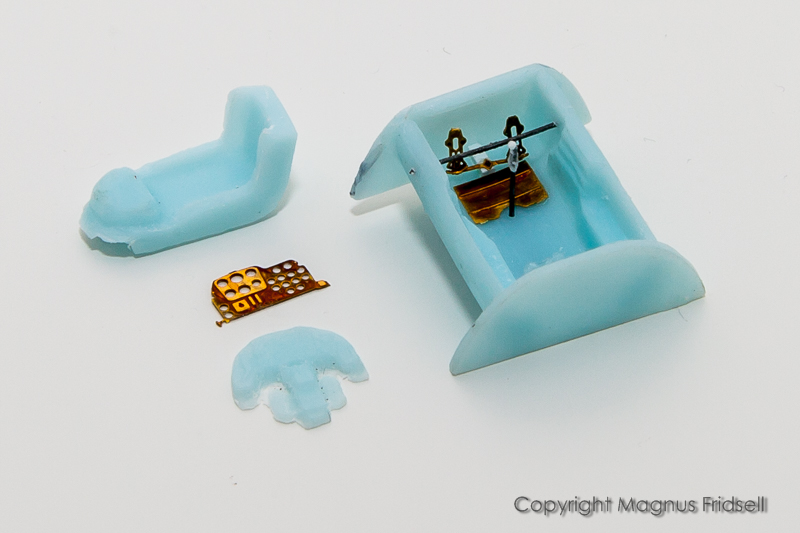
Stick is again from florist's wire (I have still not run out of my supply of it ) with a handle shaped from a blob of super glue. Etch from a 1990's vintage 262 two-seater set by Eduard. I haven't found any photos of the 262 prototype cockpit (even when checking my copy of "German aircraft interiors 1939-1945", the one volume my wife usually pulls out from the bookshelf with an amused smile just to demonstrate my level of madness ) but I assume it should look quite like the serial production machines sans gunsight and certainly without the central square part that extends below the panel that I am almost sure was the bomb selector panel. Used only for the bomber versions that at this stage of development were far into the future!

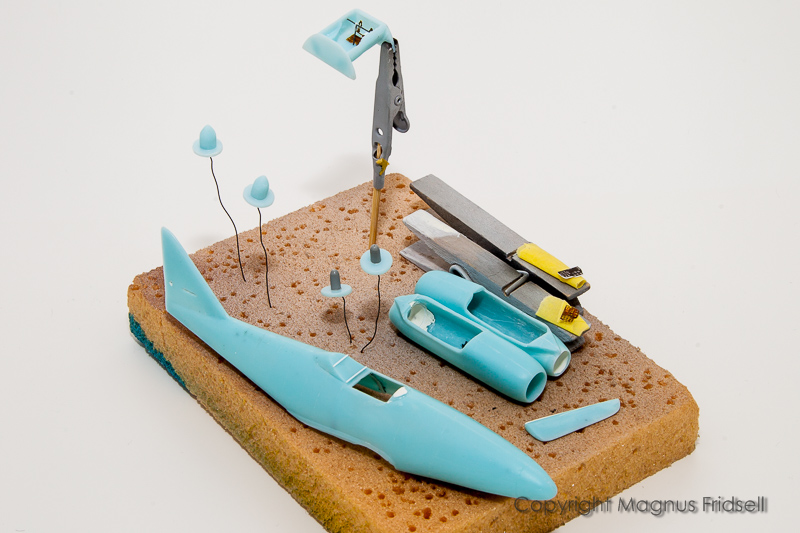
By the way: the deflected pedals are actually intentional, I'll set the rudder a bit offset to add some interest!


Magnus
magnusf
_VISITCOMMUNITY
Stockholm, Sweden
Joined: May 02, 2006
KitMaker: 1,953 posts
AeroScale: 1,902 posts
Posted: Wednesday, May 06, 2015 - 01:33 AM UTC
Spent tonight preparing for a painting session tomorrow!


Parts on sticks, at least the cockpit!


I've filled in the parts using pc where the plastic hasn't reached out into the corners of the moulds. I've also restored the panel lines on the lower surfaces, something I seldom bother with!


Magnus
AussieReg
Staff MemberAssociate Editor
AUTOMODELER
#007
_VISITCOMMUNITY
Victoria, Australia
Joined: June 09, 2009
KitMaker: 8,156 posts
AeroScale: 3,756 posts
Posted: Wednesday, May 06, 2015 - 02:47 AM UTC
Very nice work Magnus, great to see some more progress on this Aussie gem, and one stick!

Cheers, D
GazzaS
#424
_VISITCOMMUNITY
Queensland, Australia
Joined: April 23, 2015
KitMaker: 4,648 posts
AeroScale: 1,938 posts
Posted: Friday, May 08, 2015 - 03:30 PM UTC
Love the detail you've added, Magnus. That blue really messes with my mind. It looks very soft and un-model-like.
magnusf
_VISITCOMMUNITY
Stockholm, Sweden
Joined: May 02, 2006
KitMaker: 1,953 posts
AeroScale: 1,902 posts
Posted: Saturday, May 09, 2015 - 02:34 AM UTC
Damian! I've always had the greatest respect for what the Australians have given us: High Planes models and kangaroos! Thanks !

Gary! The colour betrays the model: it's really quite sharp! I reckon this is a lot easier than your B&V!


Finally a bit of paint!


Magnus
magnusf
_VISITCOMMUNITY
Stockholm, Sweden
Joined: May 02, 2006
KitMaker: 1,953 posts
AeroScale: 1,902 posts
Posted: Sunday, May 10, 2015 - 11:39 PM UTC
One major waypoint passed: engines have finally been mounted to the wings!


After painting the internals of the engine pods black for shadow, I used AK Interactive "True metal" for the intake bullets and the insides of the intakes themselves (I assume they were left in bare metal in order not to risk paint flakes going into the engine). The tubes came in very handy as a temporary support for the photos as well!


A close-up and also a view of the interior with instrument panel installed...


...and finally the rear end of the engine pods showing exhaust cones! A bit metallic-shiny but they'll be toned down using the airbrush later.

I suspect the "True metal" is the equivalent of "Rub'n Buff" (which I have never tried), it's a wax paste the consistency of thick oil paint that can be applied using a brush and then polished. I'll experiment more with it in the future but for the purpose of applying a metal finish to a small part it was very convenient!

Now on to filling around the pods...


Magnus
goodn8
_VISITCOMMUNITY
Berlin, Germany
Joined: October 12, 2008
KitMaker: 709 posts
AeroScale: 651 posts
Posted: Monday, May 11, 2015 - 08:05 PM UTC
Slow but steady progress, like it so far! And right, the intakes shold be (worn) bare metall/aluminum, while the exhaust nozzles and back inside are mostly painted dark grey/RLM 66 or they just "burnt" greyish.

Thomas
chukw1
_VISITCOMMUNITY
California, United States
Joined: November 28, 2007
KitMaker: 817 posts
AeroScale: 729 posts
Posted: Monday, May 11, 2015 - 08:22 PM UTC
You are a heroic modeler indeed, Magnus- cheers! I admire your methodical and creative approach to polishing simple kits into gleaming gems.
magnusf
_VISITCOMMUNITY
Stockholm, Sweden
Joined: May 02, 2006
KitMaker: 1,953 posts
AeroScale: 1,902 posts
Posted: Tuesday, May 12, 2015 - 07:34 PM UTC
Thomas! Thanks for the hint!

Chuck! Thanks!

Filling and sanding...


Using tape to limit...


...damage to the surrounding surfaces! I'm back to Milliput for this work, it fills both gaps and holes and containing no solvents it can be applied as thick as you need without shrinking or melting the plastic!


Not bad after an hour of sanding... I'll check final result under a coat of primer!


Magnus
Joel_W
Staff MemberAssociate Editor
AUTOMODELER
_VISITCOMMUNITY
New York, United States
Joined: December 04, 2010
KitMaker: 11,666 posts
AeroScale: 7,410 posts
Posted: Wednesday, May 13, 2015 - 12:32 AM UTC
Magnus,
Very nice results sanding and blending in all the Milliput. Of course it sure looks like you'll be so a fair amount of re-scribing on those flying surfaces, or is that just sanding dust?
Joel
AussieReg
Staff MemberAssociate Editor
AUTOMODELER
#007
_VISITCOMMUNITY
Victoria, Australia
Joined: June 09, 2009
KitMaker: 8,156 posts
AeroScale: 3,756 posts
Posted: Wednesday, May 13, 2015 - 08:19 AM UTC
Great progress report Magnus, really neat work on the filling/sanding technique and the results look very good.

A progression from "parts-on-sticks" to "sub-assemblies-on-tubes" represents a significant step forward in the build.

We have mobs of 'Roos around where I live, often bounding up the street right in front of our house or joining the kids and myself in the local park, but they might object to the climate change, so I just need to send you a little toy Kangaroo to put in the picture to complete the Aussie contribution to your leisure time!

Cheers, D
magnusf
_VISITCOMMUNITY
Stockholm, Sweden
Joined: May 02, 2006
KitMaker: 1,953 posts
AeroScale: 1,902 posts
Posted: Wednesday, May 13, 2015 - 01:23 PM UTC
Joel! Just dust - a toothbrush will suffice !

Damian! I'll prop the wheels on some sticks especially for you later on. And feed the 'roos a few carrots from me !


Magnus
magnusf
_VISITCOMMUNITY
Stockholm, Sweden
Joined: May 02, 2006
KitMaker: 1,953 posts
AeroScale: 1,902 posts
Posted: Monday, May 18, 2015 - 01:19 AM UTC
I've had a nice family weekend but now I'm back at it once again!


The seat... This is, as far as I understand, not an ejection seat (I think the V1 was so equipped but I have to read up on that one!), it is just an odd-looking fixed seat ! I've been working from photos, adding some kind of shroud extending rearwards, a cushion (Fritz Wendel does look kind of skinny in photos so I suspect he needed one) and a set of belts from an old ExtraTech etched sheet I found in the etch dungeon...

And the sticks of course, two of them thanks to trick photography! Enjoy !


Magnus
Joel_W
Staff MemberAssociate Editor
AUTOMODELER
_VISITCOMMUNITY
New York, United States
Joined: December 04, 2010
KitMaker: 11,666 posts
AeroScale: 7,410 posts
Posted: Monday, May 18, 2015 - 07:50 PM UTC
Magnus,
Two seats on a stick Looking quite good.
Joel
magnusf
_VISITCOMMUNITY
Stockholm, Sweden
Joined: May 02, 2006
KitMaker: 1,953 posts
AeroScale: 1,902 posts
Posted: Tuesday, May 19, 2015 - 11:57 PM UTC

Nacelles and lower surfaces of wings "primed" using Gunze RLM 76. No reason to make things complicated! I'll need to touch-up some blemishes at the rear end of the nacelles but otherwise things looks just fine! Seat is ready for detail painting - stay tuned!


Magnus
Merlin
Staff MemberSenior Editor
AEROSCALE
#017
_VISITCOMMUNITY
United Kingdom
Joined: June 11, 2003
KitMaker: 17,582 posts
AeroScale: 12,795 posts
Posted: Wednesday, May 20, 2015 - 12:11 AM UTC
Hi Magnus

I'm filled with admiration by this build. It's encouraging me to dig into my Stash for my old Kiwi Wings Boomerang that had a similar style of moulding.

All the best

Rowan
 _GOTOTOP