_GOTOBOTTOM
World War II: Great Britain
Aircraft of Great Britain in WWII.
Hosted by Rowan Baylis
Airfix 1/24 Typhoon for HOotM Campaign
MichaelSatin
Staff MemberCampaigns Administrator
AEROSCALE
_VISITCOMMUNITY
Colorado, United States
Joined: January 19, 2008
KitMaker: 3,909 posts
AeroScale: 2,904 posts
Posted: Saturday, February 28, 2015 - 11:23 PM UTC
And so it begins, the Airfix 1/24 Hawker Typhoon 1b
for the Hot Out of the Molds I Campaign!

 photo unstartedpic_zps1dfba614.jpg

I'm starting by going through the instructions and trying to figure out what multiple part assemblies will be aluminum and gluing them together before painting. Meanwhile, I painted the fuselage interior flat black inside the cockpit as indicated by Airfix, which leads to my first stumbling block. The wing center section is the "floor" of the cockpit. Airfix does not indicate a color for that bit. Anyone out there know if it's supposed to be black as well?

Thanks! REALLY looking forward to this kit!

Michael
MrMtnMauler
_VISITCOMMUNITY
Washington, United States
Joined: January 15, 2011
KitMaker: 224 posts
AeroScale: 223 posts
Posted: Saturday, February 28, 2015 - 11:36 PM UTC
I am really looking forward to your build Michael. My brother and I are planning a mini group build of the Typhoon in the near future so yours is going to be a valuable resource. Thanks again and take care. Jim
RussellE
#306
_VISITCOMMUNITY
Victoria, Australia
Joined: June 27, 2010
KitMaker: 3,959 posts
AeroScale: 598 posts
Posted: Sunday, March 01, 2015 - 01:17 AM UTC
Hi Michael

Watching with interest!

Awesome kit, that was added to the stash as soon as it came out!

Russ
c4willy
#305
_VISITCOMMUNITY
Christchurch, New Zealand
Joined: February 01, 2006
KitMaker: 1,673 posts
AeroScale: 1,517 posts
Posted: Sunday, March 01, 2015 - 02:04 AM UTC
Hi Michael, the Tiffie cockpit is one of "those" questions from what I can gather. Little remains in the way of original air frames and the cockpit colours are a best guess scenario. I did find this information here on aeroscale though.
MichaelSatin
Staff MemberCampaigns Administrator
AEROSCALE
_VISITCOMMUNITY
Colorado, United States
Joined: January 19, 2008
KitMaker: 3,909 posts
AeroScale: 2,904 posts
Posted: Sunday, March 01, 2015 - 02:19 AM UTC
Thanks all, no pressure!

Thanks Chris. I went ahead and painted it black but plan to stick to the instructions where they call something out.

Michael
Joel_W
Staff MemberAssociate Editor
AUTOMODELER
_VISITCOMMUNITY
New York, United States
Joined: December 04, 2010
KitMaker: 11,666 posts
AeroScale: 7,410 posts
Posted: Sunday, March 01, 2015 - 07:10 PM UTC
Michael,
Good luck on the build. While I can't help you with colors, here's the link to Grem's build blog that should answer all your questions throughout the build.

Grem's Typhoon Build Blog

Joel
SGTJKJ
#041
_VISITCOMMUNITY
Kobenhavn, Denmark
Joined: July 20, 2006
KitMaker: 10,069 posts
AeroScale: 3,788 posts
Posted: Thursday, March 05, 2015 - 01:00 PM UTC
Interesting kit. I will be great to follow this one and see how one of the big new kits from Airfix goes together.

Looking forward to see more
Holdfast
Staff MemberPresident
IPMS-UK KITMAKER BRANCH
#056
_VISITCOMMUNITY
England - South West, United Kingdom
Joined: September 30, 2002
KitMaker: 8,581 posts
AeroScale: 4,913 posts
Posted: Thursday, March 05, 2015 - 01:24 PM UTC
looking forward to seeing this progress, it is a wonderful kit.
I have produced a set of paint masks for this. My PC is getting fixed at the moment, so I will post some pictures when I get it back.
MichaelSatin
Staff MemberCampaigns Administrator
AEROSCALE
_VISITCOMMUNITY
Colorado, United States
Joined: January 19, 2008
KitMaker: 3,909 posts
AeroScale: 2,904 posts
Posted: Sunday, March 08, 2015 - 03:47 AM UTC
Thanks everyone, and if you haven't already you should definitely go have a look at Mal's Tiffie! He's done his usual excellent job.

Not a lot to report from me, I'm in the pre-painting phase. I normally like my aircraft to look like they're ready for the pilot to jump in and take off, so despite all the lovely engine and gun detail mine's going to be all closed up. It's also out-of-the-box, no aftermarket for me on this one (I don't think it needs any.) I'll be doing Wing Cdr. Charles Green's aircraft on D-Day.

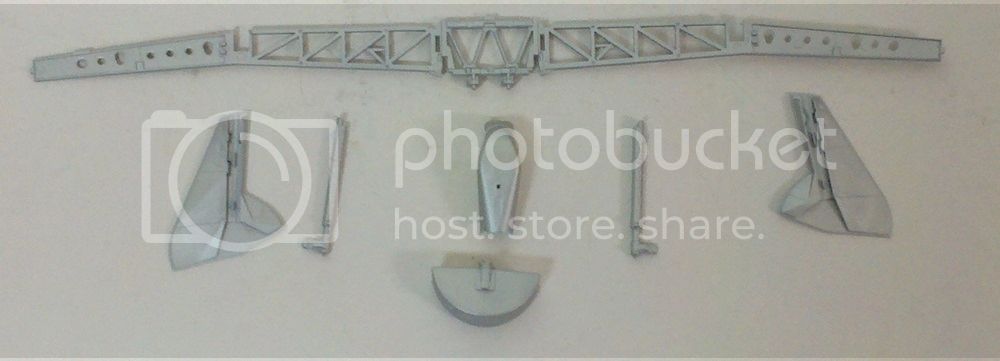
First I marked all the trees with a masking tape tab with the tree letter on it. This will make the many parts easier to find. Then I went through the instructions and picked out all the multi-part assemblies that needed to be aluminum and glued them together. Really only the air intake duct, oil tank, main gear doors, main gear legs and main spar:


 photo 2015-03-08_16-16-29_612_zpsqtsytksb.jpg

Then I airbrushed Tamiya flat aluminum (I almost always use Tamiya paints these days, when I can), flat black (interior of fuselage around cockpit), semi-gloss black, dark gull gray (XF-54, the seat), and medium sea grey (the insides of the chin intake) as per the instructions. I'm now into the detail painting phase.

The thing's so big I can't take pics of all I've done. As I get some construction done, I'll post sub-assemblies. Here are my two main references:

 photo 2015-03-08_16-17-58_327_zpsrpsc95dh.jpg

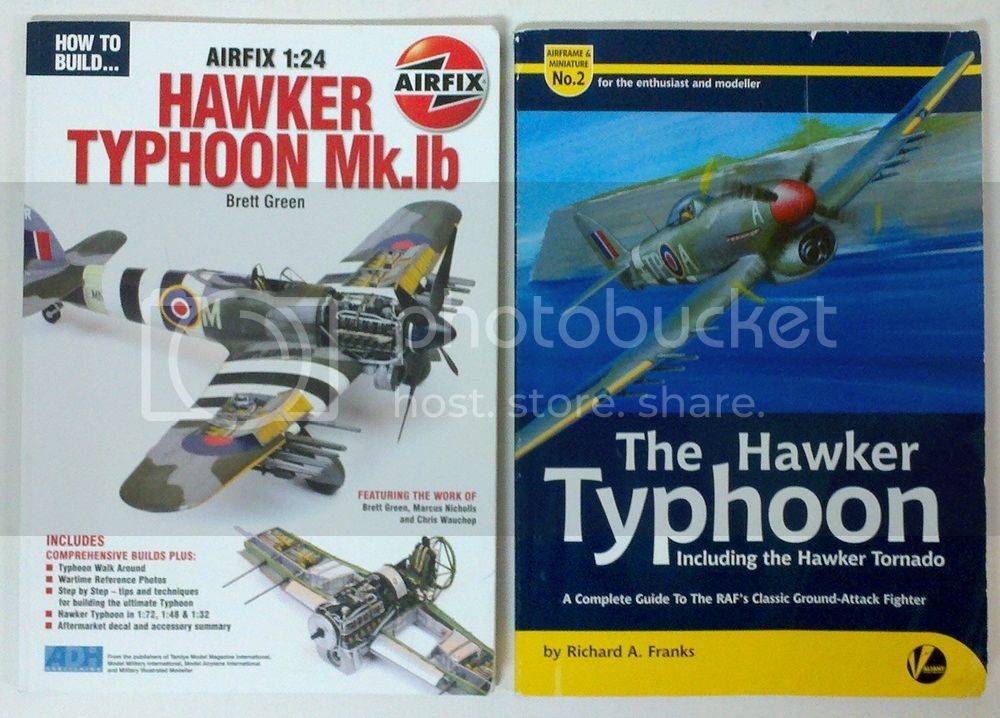
Both have been a big help so far.

Thanks for looking!

Michael
JClapp
#259
_VISITCOMMUNITY
Massachusetts, United States
Joined: October 23, 2011
KitMaker: 2,265 posts
AeroScale: 1,715 posts
Posted: Sunday, March 08, 2015 - 04:40 AM UTC
Off you go then. Will be monitoring this thread. monitor.jpg

Ill have to build a whole bunch of HOOTM Welsh models resin kits to even hold a candle up to that project.

I bet that kit weighs more than my entire stash of over 100 1/144 scale models kits.
MichaelSatin
Staff MemberCampaigns Administrator
AEROSCALE
_VISITCOMMUNITY
Colorado, United States
Joined: January 19, 2008
KitMaker: 3,909 posts
AeroScale: 2,904 posts
Posted: Saturday, March 14, 2015 - 04:19 AM UTC
Haven't weighed it, but it's definitely a big box with a lot of plastic!

I've seen a few builds of this beast on line and the most famous picture seems to be of the basic cockpit/spar build-up, the first four steps in the instructions. Here are my contributions:

 photo 2015-03-14_15-57-59_241_zpscjkuhtwl.jpg

 photo 2015-03-14_15-58-05_22_zpszfzxhdnz.jpg

 photo 2015-03-14_15-58-13_753_zpsutnozxwf.jpg

 photo 2015-03-14_15-58-30_690_zpsrke7bv6y.jpg

And here's one you don't normally see, the instrument panel with the kit decals rather than the Airscale ones (which I'm sure are very nice, but which all of us don't have):

 photo 2015-03-14_16-01-28_298_zpsbuny6xrh.jpg

After I actually inserted the instruments into the panel, there are definite clear surrounds showing, so I recommend painting the back of the insert black. Heck, you can probably paint the front of it black before you put the decals on. Not sure why they made it clear, actually. If you put the decals on the back of it the clear would be way too thick. I overpainted the instrument decals with clear gloss before I inserted it into the panel to make sure they stayed on and to make it look like glass.

Loving it so far!!

Michael
MichaelSatin
Staff MemberCampaigns Administrator
AEROSCALE
_VISITCOMMUNITY
Colorado, United States
Joined: January 19, 2008
KitMaker: 3,909 posts
AeroScale: 2,904 posts
Posted: Sunday, March 15, 2015 - 05:07 AM UTC
OK, some more work done on the cockpit area today. Finished up to step 21.

Here's the finished instrument panel (which proved frustratingly difficult to photograph today, sorry):

 photo 2015-03-15_17-49-01_368_zpszt121gav.jpg

I have several shots of the framework as I went along, but it gets kind of confusing. The instructions are not always easy to follow, the arrows pointing where things attach are the kind that sort of zig-zag around before they get to where they belong. Each step seems to show the previously mounted part in red to give you an idea how it's supposed to look, which helps some. Anyway:

 photo 2015-03-15_11-45-03_983_zpsm2bml5qp.jpg

 photo 2015-03-15_11-45-26_227_zpsijmhsj7h.jpg

 photo 2015-03-15_11-45-45_975_zpsaxkq8vwg.jpg

 photo 2015-03-15_13-01-16_788_zpshrxcbii6.jpg

 photo 2015-03-15_16-53-11_756_zpsf2qmiy8x.jpg

The plastic seat belts and harness actually look pretty good, though I'm not sure they're the correct version. I think the Typhoon continued to use the Sutton harness. But I said out of the box, and out of the box it shall be!

Michael
Holdfast
Staff MemberPresident
IPMS-UK KITMAKER BRANCH
#056
_VISITCOMMUNITY
England - South West, United Kingdom
Joined: September 30, 2002
KitMaker: 8,581 posts
AeroScale: 4,913 posts
Posted: Sunday, March 15, 2015 - 11:56 AM UTC

Quoted Text

The instructions are not always easy to follow


I found them particularly easy? You need to get your head around the 3D nature of the drawings; a bit like those drawings that you can see different things depending how you look at them!


Quoted Text

The plastic seat belts and harness actually look pretty good, though I'm not sure they're the correct version. I think the Typhoon continued to use the Sutton harness. But I said out of the box, and out of the box it shall be!

Michael


The seat harness will be correct, believe me, I know of the research that went into this model
Holdfast
Staff MemberPresident
IPMS-UK KITMAKER BRANCH
#056
_VISITCOMMUNITY
England - South West, United Kingdom
Joined: September 30, 2002
KitMaker: 8,581 posts
AeroScale: 4,913 posts
Posted: Sunday, March 15, 2015 - 11:57 AM UTC
Oh, I forgot to say Michael, make sure that you clean the mould line from the engine mounts?
litespeed
Staff MemberNews Reporter
AEROSCALE
_VISITCOMMUNITY
England - North West, United Kingdom
Joined: October 15, 2009
KitMaker: 1,976 posts
AeroScale: 1,789 posts
Posted: Monday, March 16, 2015 - 02:56 AM UTC
Excellent progress Michael, such a great looking aircraft the Typhoon. Inspired decision by Airfix to release the Tiffie in 1/24.
tim
MichaelSatin
Staff MemberCampaigns Administrator
AEROSCALE
_VISITCOMMUNITY
Colorado, United States
Joined: January 19, 2008
KitMaker: 3,909 posts
AeroScale: 2,904 posts
Posted: Saturday, March 21, 2015 - 08:41 PM UTC
Thanks all! Mal, I have filed down the mold lines on the engine mounts, per your suggestion. Though I won't be displaying the engine, I will want to make sure that what there is fits correctly for the sake of the prop and exhausts. I wish Airfix would give the builder the option to install a minimal engine frame to support those and allow you to build the full engine outside the airframe, it really is awfully nice!

Here's yesterday's progress. Cockpit without the instrument panel:

 photo 2015-03-21_16-36-27_142_zpsk85cm4ig.jpg

 photo 2015-03-21_16-36-37_289_zpszyn8dpel.jpg

 photo 2015-03-21_16-36-46_711_zpsbbvyns4d.jpg

And with the instrument panel installed:

 photo 2015-03-21_16-40-27_261_zps0d525uit.jpg

 photo 2015-03-21_16-40-37_394_zpsenmhezzx.jpg

I know what Mal means about getting used to the instructions, but I still find following the arrows to where the ends of the various pipes/wiring go can be a little confusing. Hope they ended up in the right places! I'm not sure brown is the technically correct color, but it adds a little variety to the black/silver cockpit.

Thanks for watching!

Michael
Holdfast
Staff MemberPresident
IPMS-UK KITMAKER BRANCH
#056
_VISITCOMMUNITY
England - South West, United Kingdom
Joined: September 30, 2002
KitMaker: 8,581 posts
AeroScale: 4,913 posts
Posted: Sunday, March 22, 2015 - 12:28 PM UTC
Looking good Michael I know what you mean about the engine but that would necessitate more parts and therefor further cost!
 _GOTOTOP