_GOTOBOTTOM
World War II: Germany
Aircraft of Germany in WWII.
Hosted by Rowan Baylis
Bf110E-2 Tropical build
BigfootV
_VISITCOMMUNITY
Colorado, United States
Joined: December 24, 2005
KitMaker: 1,624 posts
AeroScale: 385 posts
Posted: Friday, November 28, 2014 - 10:20 PM UTC
Good morning everyone, or Good evening to our friends acrossed the pond and all points East of Colorado.

Longtime Kitmaker and Armorama reviewer, first time kit reviewer here.
Over the next few weeks I'll be doing this little piece......


Nothing special going into the build, straight OOB.
I must admit, this is not like the kits I used to build back in the day. More detailed these days.

I hope to get cracking on it sometime day, first photos should be rolling out later tonight or tomorrow.

See ya in the funnies..................
JPTRR
Staff MemberManaging Editor
RAILROAD MODELING
#051
_VISITCOMMUNITY
Tennessee, United States
Joined: December 21, 2002
KitMaker: 7,772 posts
AeroScale: 3,175 posts
Posted: Saturday, November 29, 2014 - 12:26 AM UTC
Brian,

I look forward to watching you work your magic on it!
AussieReg
Staff MemberAssociate Editor
AUTOMODELER
#007
_VISITCOMMUNITY
Victoria, Australia
Joined: June 09, 2009
KitMaker: 8,156 posts
AeroScale: 3,756 posts
Posted: Saturday, November 29, 2014 - 03:03 AM UTC
I'm on board following this one as well Brian, looking forward to watching it come together.

Cheers, D
BigfootV
_VISITCOMMUNITY
Colorado, United States
Joined: December 24, 2005
KitMaker: 1,624 posts
AeroScale: 385 posts
Posted: Saturday, November 29, 2014 - 05:43 AM UTC
Thanks guys for the positive waves.

So, I'm going through the instruction sheet to see what needs to be done, chopped, removed, etc., and came acrossed this little part...


As seen on the instructions........


Here's an E-2 with the door in question in Sicily or is the ID incorrect and this is a different model like the C/D?


I just want to get things straight before I start craving up this kit and come to found out there was no reason to do that. Saving the viewer/reader from a lot.

See ya in the funnies.................
Joel_W
Staff MemberAssociate Editor
AUTOMODELER
_VISITCOMMUNITY
New York, United States
Joined: December 04, 2010
KitMaker: 11,666 posts
AeroScale: 7,410 posts
Posted: Saturday, November 29, 2014 - 08:40 PM UTC
Brian,
Looking forward to your Bf110E-2 build/review.

As to your question about that access panel. 1st you would need to find out what it affords access to, then scratch out something along those lines. The rivets around it would indicate to me that there is a mounting lip right behind it, which is how they attach it to the fuselage, so you would have to scratch that out as well. Also, you're going to have to deal with the thickness of the fuselage and thin it out to a more visually acceptable thickness.

Seems to me that since you're planning a basically OOB build, the final overall presentation should be your focus right through the entire build. Leaving it closed would be the best course.

Joel
BigfootV
_VISITCOMMUNITY
Colorado, United States
Joined: December 24, 2005
KitMaker: 1,624 posts
AeroScale: 385 posts
Posted: Saturday, November 29, 2014 - 09:45 PM UTC
Hello Joel,

Thanks for the reply.

I can putty it up with some backing on the back side of the fuselage, however the question still is why is the instruction sheet telling the builder to do this step? To me it just seem like an unnecessary step if nothing is going into that space other than putty. I guess the rivet counter in me would like to know.

Almost forgot, started on the cockpit area last night. Should have photos later day or tomorrow.

See ya in the funnies.......................
Joel_W
Staff MemberAssociate Editor
AUTOMODELER
_VISITCOMMUNITY
New York, United States
Joined: December 04, 2010
KitMaker: 11,666 posts
AeroScale: 7,410 posts
Posted: Saturday, November 29, 2014 - 10:28 PM UTC

Quoted Text

Hello Joel,

Thanks for the reply.

I can putty it up with some backing on the back side of the fuselage, however the question still is why is the instruction sheet telling the builder to do this step? To me it just seem like an unnecessary step if nothing is going into that space other than putty. I guess the rivet counter in me would like to know.

Almost forgot, started on the cockpit area last night. Should have photos later day or tomorrow.

See ya in the funnies.......................


Brian,
Who knows. You find some really weird things on many of the instruction sheets coming out of China.
Joel
BigfootV
_VISITCOMMUNITY
Colorado, United States
Joined: December 24, 2005
KitMaker: 1,624 posts
AeroScale: 385 posts
Posted: Sunday, November 30, 2014 - 12:10 AM UTC
Hello Joel,

True, very true.

I've got a PM into Merlin who help with the Technical on this kit. I'll see what he says about the panel.

In the meantime, cockpit is coming along. Almost had a fight with the carpet monster already and had to break out with the magnifying glass to get the sight app. on the instrument panel. Painting is going to a challenge since I'll be doing it by hand.

See ya in the funnies...............
BigfootV
_VISITCOMMUNITY
Colorado, United States
Joined: December 24, 2005
KitMaker: 1,624 posts
AeroScale: 385 posts
Posted: Sunday, November 30, 2014 - 08:19 AM UTC
Hello Folks,

Day 1: Cockpit:

Had to make a cut to the cockpit floor.


Here we have Part F36 and F10. Note F10's size next to the notch were it is to be placed. I had to trim it down at the base of F10 in order for it to fit. This was very little, and I didn't want to force it. The notch on the right side is larger than the left.


Cockpit ready for the sides and some paint.


I think I've left somethings out that needed some mentioning. I'll go over my notes tonight to see. That's it for today.

See ya in the funnies..............
Joel_W
Staff MemberAssociate Editor
AUTOMODELER
_VISITCOMMUNITY
New York, United States
Joined: December 04, 2010
KitMaker: 11,666 posts
AeroScale: 7,410 posts
Posted: Sunday, November 30, 2014 - 08:47 PM UTC
Brian,
Nice start to the cockpit. The PE does seem to make quite a difference.

As for the carpet monster. I just found the nose gear bay actuating rod that I dropped a few days ago. Of course it's going to be 10 times harder to install, as I glued the door on at slightly the wrong angle.
Joel
BigfootV
_VISITCOMMUNITY
Colorado, United States
Joined: December 24, 2005
KitMaker: 1,624 posts
AeroScale: 385 posts
Posted: Sunday, November 30, 2014 - 11:28 PM UTC
Hello Joel,

Thank you. The PE does make it look cleaner.
One thing that I did not mention yesterday was the installation of the 20mm gun bay.
I put it together as one piece as per instruction and found that it was very tight getting it into the space. Parts F10 blocked the bay from being dropped in correctly, the 20mm ammo drums were hitting Parts F10.
I'll have more details comments with photos later day.

See ya in the funnies...................
JPTRR
Staff MemberManaging Editor
RAILROAD MODELING
#051
_VISITCOMMUNITY
Tennessee, United States
Joined: December 21, 2002
KitMaker: 7,772 posts
AeroScale: 3,175 posts
Posted: Sunday, November 30, 2014 - 11:46 PM UTC
Hi Brian,

You are really going to town - er, aerodrome - on this! Exciting work so far.
BigfootV
_VISITCOMMUNITY
Colorado, United States
Joined: December 24, 2005
KitMaker: 1,624 posts
AeroScale: 385 posts
Posted: Monday, December 01, 2014 - 12:27 AM UTC
Thank you Fred.

It's been a fun, yet type build.
I won't be posting like I'd thought later day because I've got culinary school today and tomorrow. Two major projects, finishing one today and starting the other tomorrow.
I'll be back at it on Wednesday. I'll see if I can sneak a hour in somewhere in between.

See ya in the funnies.................
BigfootV
_VISITCOMMUNITY
Colorado, United States
Joined: December 24, 2005
KitMaker: 1,624 posts
AeroScale: 385 posts
Posted: Wednesday, December 03, 2014 - 07:45 AM UTC
O.k. folks, I did a little bit of work on the rest of the cockpit today. Getting ready to put together the front gun bay.

I found that there is a piece missing from the kit.


I looked for over two hours trying to find it and it's not to be found.

Another thing I've noticed is the color chart, it's missing some color number as seen below.....


Also, when doing the wind screen frame, their are holes drilled on the underside of Part F35, which need to be drilled through as shown here:


BE VERY CAREFUL! You may break through the wall sides of the piece. My advise would be taking a straight pin or very small drill bit to poke through.

Finally, I had to make a part since the carpet monster got it. That part is F5 x4, has seen here..........


This was made from a striped down wire tie.

Tomorrow: Installing cockpit/nose gun bay to fuselage.

See ya in the funnies.................
WoodshedWings
_VISITCOMMUNITY
Ontario, Canada
Joined: October 11, 2012
KitMaker: 141 posts
AeroScale: 139 posts
Posted: Wednesday, December 03, 2014 - 08:06 AM UTC
I have found that Cyber Hobby instructions can be spurious to say the least. Whole steps and parts omitted amid much confusion and head scratching. Looking good so far though.
BigfootV
_VISITCOMMUNITY
Colorado, United States
Joined: December 24, 2005
KitMaker: 1,624 posts
AeroScale: 385 posts
Posted: Wednesday, December 03, 2014 - 09:01 AM UTC
Hello Mike,

Thanks.
Yep, I'm finding that out with this build. A few dry runs and I think it will get figured out.

Thanks for dropping in.

See ya in the funnies..................
Joel_W
Staff MemberAssociate Editor
AUTOMODELER
_VISITCOMMUNITY
New York, United States
Joined: December 04, 2010
KitMaker: 11,666 posts
AeroScale: 7,410 posts
Posted: Wednesday, December 03, 2014 - 11:37 PM UTC
Brian,
You're making steady progress, feeling your way through each step.

I've never understood how companies can have multiple omissions and errors on instructions sheets. Doesn't anyone actually use them to build the model before production commences?

Joel
BigfootV
_VISITCOMMUNITY
Colorado, United States
Joined: December 24, 2005
KitMaker: 1,624 posts
AeroScale: 385 posts
Posted: Thursday, December 04, 2014 - 12:39 AM UTC
Hello Joel,

Thanks.

I think the instruction are just put in from another similar kit, perhaps the C/D model, this is only a guess on my part. Now to say this is a true statement is anyone's guess and open for discussion and debate through out the modeling world with any kit.

I've noticed some pieces that are not going on the build that are for different version of the aircraft. I'll try to address these the further along I get into the build. As of now the aforementioned posted are what I've run into. Your results may vary.

I'll have progress photos tomorrow.

See ya in the funnies...............
BigfootV
_VISITCOMMUNITY
Colorado, United States
Joined: December 24, 2005
KitMaker: 1,624 posts
AeroScale: 385 posts
Posted: Friday, December 05, 2014 - 02:04 AM UTC
Hello gang.

I've got paint on the cockpit interior, 1st coat, and painted engine blocks, 1st coat, also.
Applying 2nd coat later today or tomorrow.

Color for interior is Model Master Olivgrun, RLM80. My apologizes if it not the correct color, but it does come close I think.

So here we are........


Looks rough, hand painted, not happy with it right now.
It only the first coat.

See ya in the funnies.......................

Oh, pointers on painting the instrument panels. I've got some Black Sharpies, fine tips, would that work? No decal set in the kit.

BigfootV
_VISITCOMMUNITY
Colorado, United States
Joined: December 24, 2005
KitMaker: 1,624 posts
AeroScale: 385 posts
Posted: Sunday, December 07, 2014 - 02:58 AM UTC
Hello gang.

I must apologize for the lack of updates. Batteries for cam went out. Replacing them later today. Going to do a repaint on cockpit, LHS run tomorrow for that and other supplies.
Progress very slow, hope to be back on track soon.
Noticed some broken pieces also. Will address that later.

See ya in the funnies.................
Remember Pearl.........
BigfootV
_VISITCOMMUNITY
Colorado, United States
Joined: December 24, 2005
KitMaker: 1,624 posts
AeroScale: 385 posts
Posted: Wednesday, December 10, 2014 - 12:15 AM UTC
Hey gang,

Ok, we're back. Had to get this out of the way for school.


Yes, it all chocolate. Ok, stop licking the screen now. FOCUS!!

So, I got new color on the cockpit today, waiting for it to drying. Here's what it looks like now..........


Note the gun bay for the nose wasn't repainted, I'm going to keep it that way to show a contrast between the lighter colors.

See ya in the funnies.........................
JPTRR
Staff MemberManaging Editor
RAILROAD MODELING
#051
_VISITCOMMUNITY
Tennessee, United States
Joined: December 21, 2002
KitMaker: 7,772 posts
AeroScale: 3,175 posts
Posted: Wednesday, December 10, 2014 - 03:42 AM UTC
Hi Brian,

It is coming along!

I have used white and silver Prismacolor pencils on instrument panel details. I have a wash-technique that can work if the panel detail is raised sufficently:

1. Paint the panel white.

2. Once dry flood it with washes of black or gray or whatever.

Did you paint the interior RLM02 or Hellblau?

The chocolate looks good. Elegant!
BigfootV
_VISITCOMMUNITY
Colorado, United States
Joined: December 24, 2005
KitMaker: 1,624 posts
AeroScale: 385 posts
Posted: Wednesday, December 10, 2014 - 05:08 AM UTC
Hello Fred,

Thanks.

Interior color is Lightblau RLM 76 with the under coat of Olivgrun RLM 80. I'll see how it dries before putting the cockpit together.
I didn't get the Hellbrau, which I had in my hand, and choose the Lightblau instead. Grrrrr.

In the meantime, I'll be getting the motors ready for install and doing other stuff to get it moving along with the build.

See ya in the funnies..............
BigfootV
_VISITCOMMUNITY
Colorado, United States
Joined: December 24, 2005
KitMaker: 1,624 posts
AeroScale: 385 posts
Posted: Thursday, December 11, 2014 - 12:57 AM UTC
Hey gang,

Another day and yet WE HAVE A COCKPIT!!! Took a while.
Assembled one motor last night also. Put more paint on in order to get ready for fuselage/cockpit install.


Which takes me back to this................


As I stated before the instruction sheet says to cut out and patch this access panel. Based on the photo above should this be done? This may become clearer when I go to put the half's together for the fuselage.

See ya in the funnies.................
BigfootV
_VISITCOMMUNITY
Colorado, United States
Joined: December 24, 2005
KitMaker: 1,624 posts
AeroScale: 385 posts
Posted: Thursday, December 11, 2014 - 08:17 AM UTC
Hello again everyone.

I figured it was time for a review of the cockpit install. Have made notes on the instruction sheet and will try to explain what happened when putting the sides on the cockpit.

So, first we have the instruction sheet.


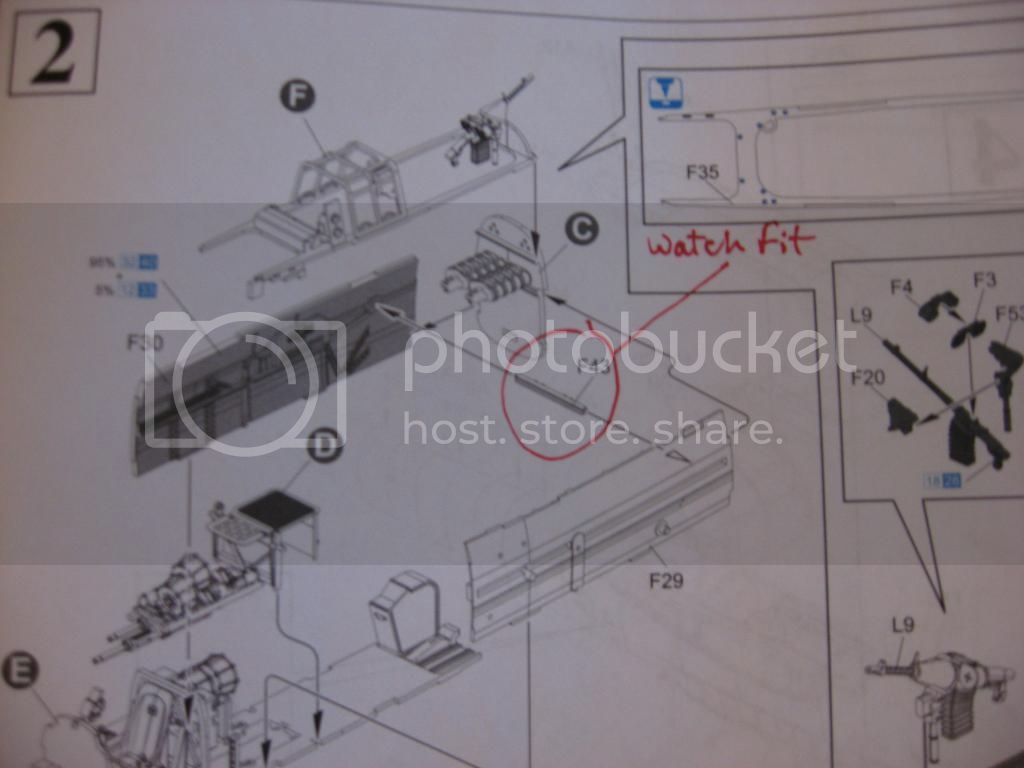
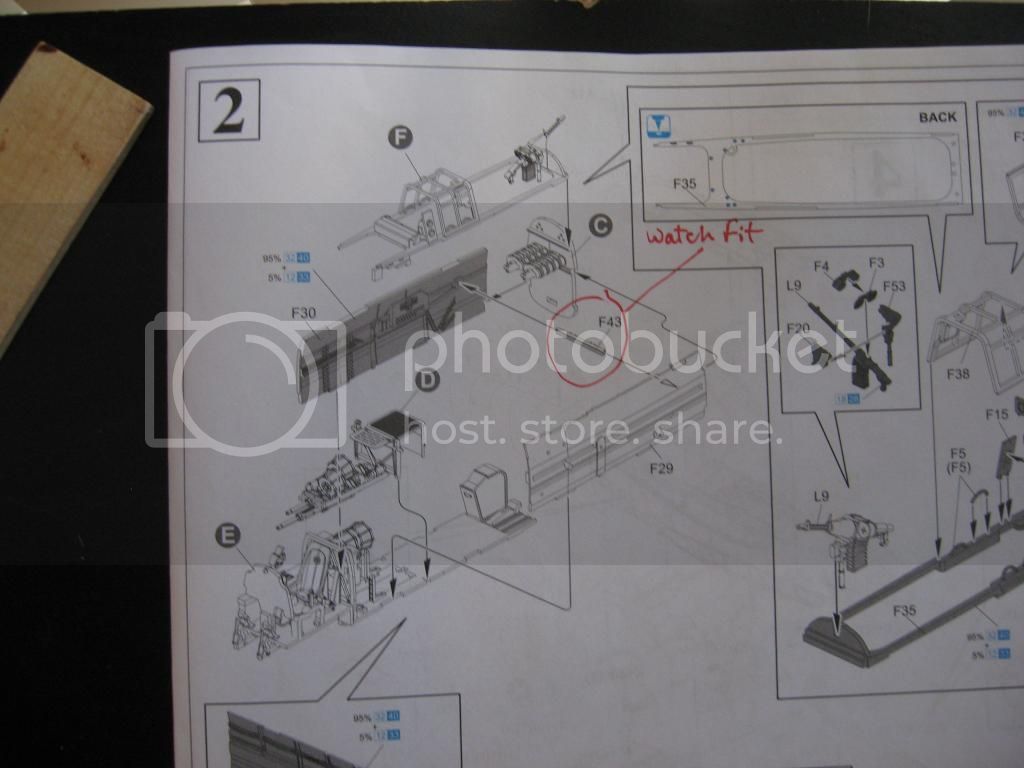
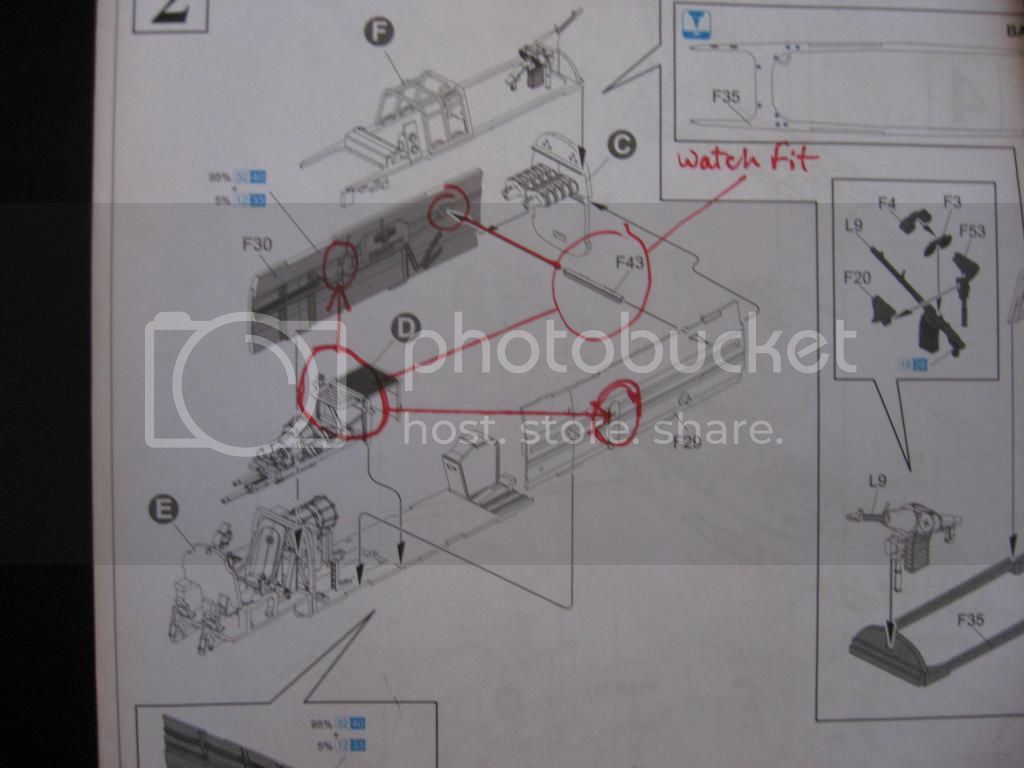
The red circles are were the tabs need to line up with the sides. The radio operator/gunner seat needs to be inline along with the spare ammo can rack for the rear machine gun or the sides will not fit and they will bow out or even bend or break. Part F43 is the main concern since it is placed under the ammo cans.

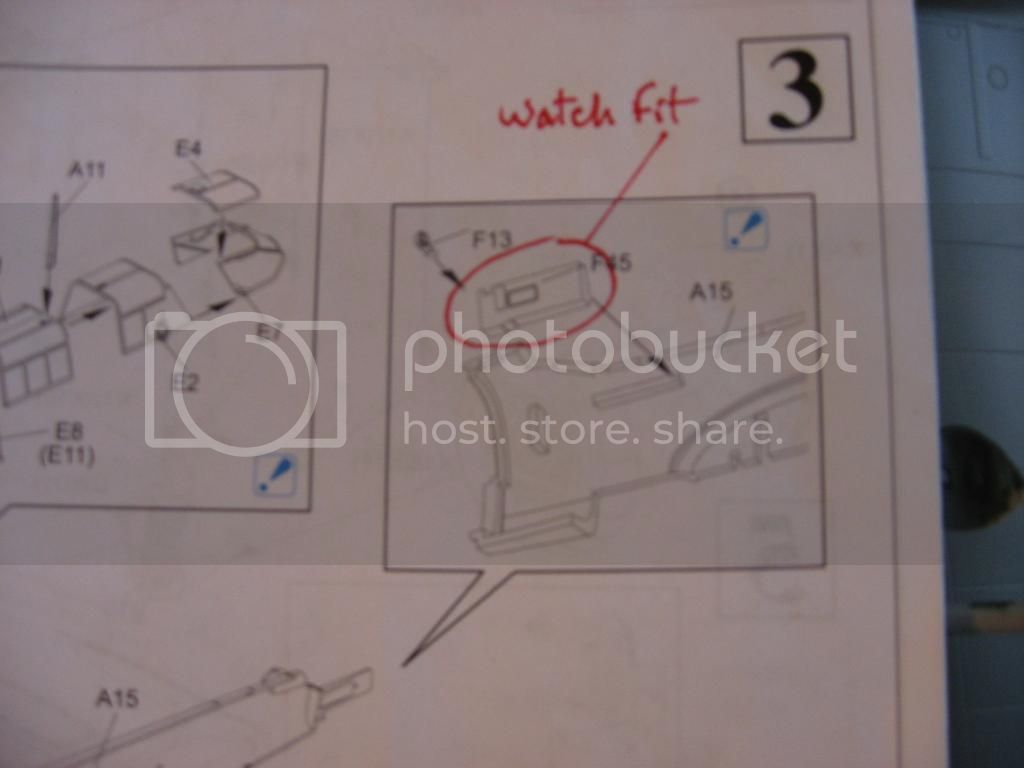
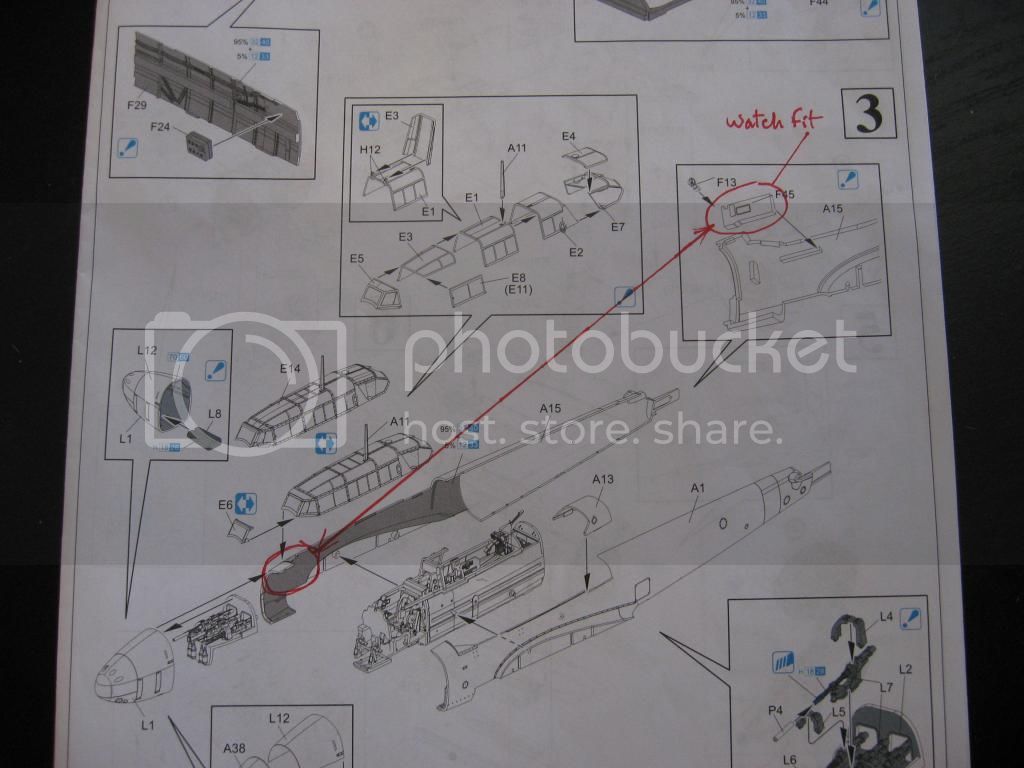
Part F45, this is place on Part A15, fuselage, right-side, and is part of the pilot's area. When I did the dry fit I noticed that I had to bend the fuselage nose area back, away from me, in order to get the part flush and in place so everything fit right with the cockpit.

When installing section "F" to the cockpit section please have the sides lined up with the tabs and flush with the outside of Parts F29, F30. Dragon has might this section very difficult to match up if the above mentioned is done incorrectly.

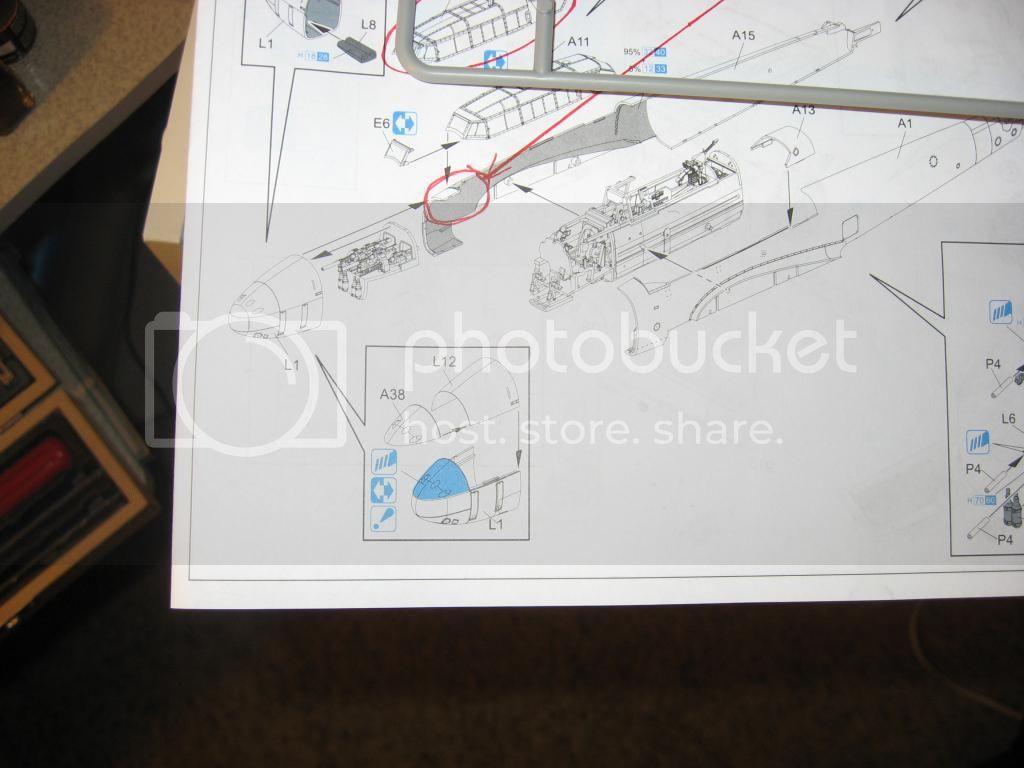
Next we have the nose gun ports to discuss. Dragon has done something here that really had me scratching my head until I start to put it together. Note instruction sheet below. See anything odd...........


Well, this is what happened....................


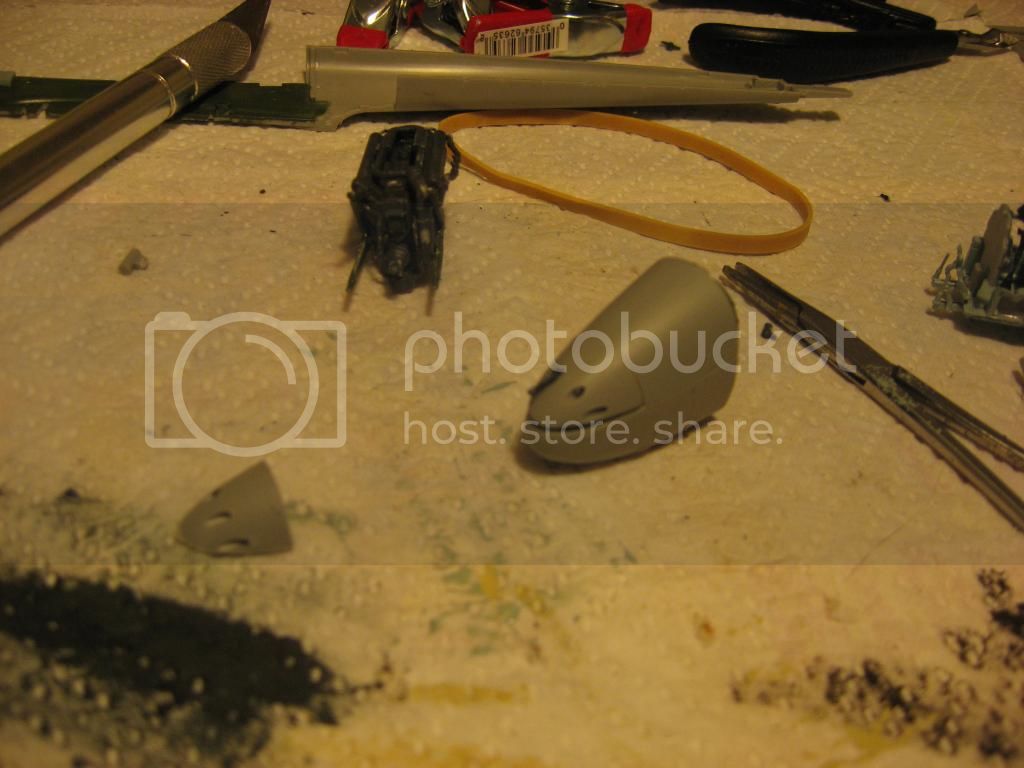
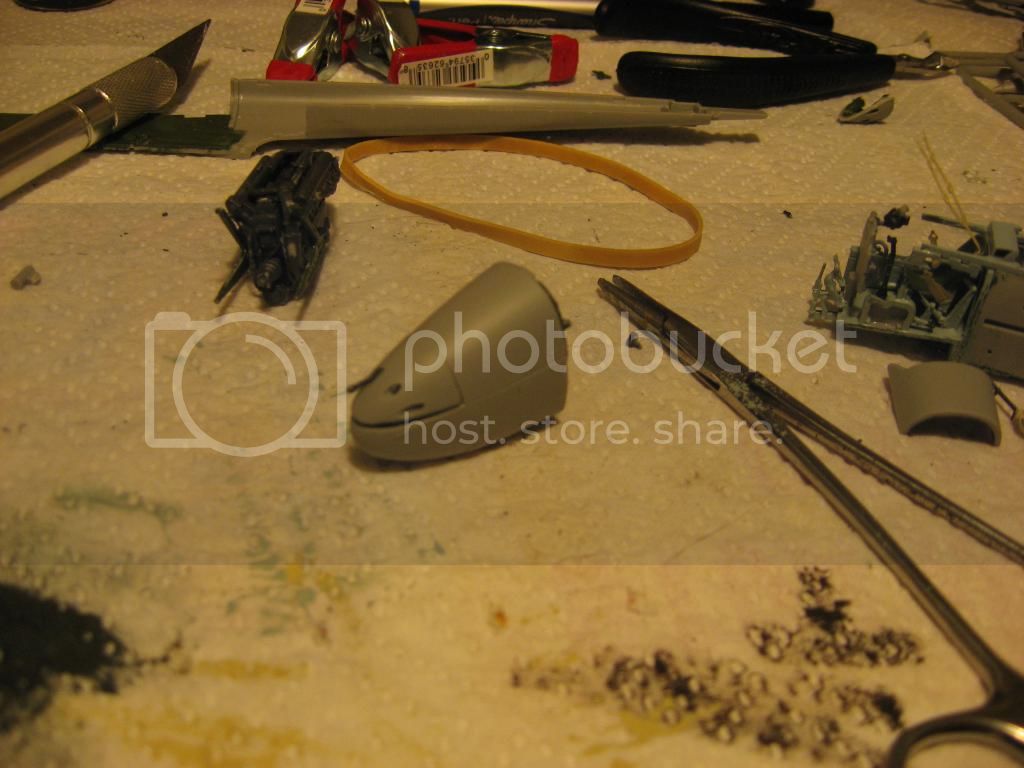
In the top photo on the left, we have the old gun ports. A38 is to replace it, which is on the right, dry fitted. What the difference? Well, with the nose piece not being modified in this manner, the guns will not go into the ports thus bending the barrels and causing the guns to be lifted off the mounts. As you can see we have a giant gap that needs to be filled with A38 in place. BTW, that gap is about 1/16 inch wide.

That does it for now. Now to figure out how to fill the Grand Canyon in the nose.

See ya in the funnies...........
 _GOTOTOP