_GOTOBOTTOM
Pre-Flight Check
Constructive critique of your finished or in-progress photos.
Eduard Spitfire IXc late version. 1/48th
Sheehan1
_VISITCOMMUNITY
Queensland, Australia
Joined: May 27, 2014
KitMaker: 135 posts
AeroScale: 124 posts
Posted: Monday, September 15, 2014 - 06:32 PM UTC
My third kit has arrived. It is the Eduard Spitfire iXc(late version). Highly recommended from my research. I hope to get some good practice with camo painting. The first thing I noticed is how small some of the parts are. Wow I will have to be very careful. The Spitfire must have been quite a small plane by modern standards.
I have just completed wiping down the parts on the sprue with some Isopropyl. I cant start working on the cockpit as I have to order some paints that I dont have. The interior of the cockpit require some cockpit green and the seat requires a russet colour. So it will be a few days before that arrives. In the meantime I might see if there is some other parts I can pre assemble.
I also have to order the camo colours and intend to order Tamiyas Medium sea gray (XF 53. the Dark sea grey XF 54. The Ocean Gray XF 82 and the RAF Dark Green XF61. I take it those are the correct colours from my research.
I have a couple of questions. Firstly I saw an article where the pattern of the camo was outlined with blue tack rolled into small rolls and then the inside covered in masking tape. I was going to give that a go. Also can anyone advise me if there are any parts that it is better to pre paint before construction. e.g. the wings or the fuselage.
PeeJay74
#363
_VISITCOMMUNITY
Pennsylvania, United States
Joined: January 08, 2014
KitMaker: 425 posts
AeroScale: 401 posts
Posted: Monday, September 15, 2014 - 10:32 PM UTC
Nice choice of kits, Laurie. Eduard's Spitfire was one of the nicest I have ever built. My only word of advice or caution would be to consider gluing the cockpit sidewalls to their respective fuselage sides and then build it. If you look at Jean-Luc's build in the World War II forum here you will see what I am refering to. i did not do that when I built mine, and it was very difficult to keep all of the cockpit parts aligned as a result. Eduard's assembly sequence could have been designed a little better for the cockpit.

Outstanding kit though. I'm looking forward to seeing what you do with it.
TheBeastman
_VISITCOMMUNITY
England - South West, United Kingdom
Joined: September 12, 2013
KitMaker: 18 posts
AeroScale: 13 posts
Posted: Monday, September 15, 2014 - 10:34 PM UTC
One trick I've been using recently is to obtain some kids play-dough and use that - you can use a relatively blunt knife to cut the flattened shapes in and it allows you to press the shape closer to the surface for tighter lines on the camo.

Good luck with the small parts
TheBeastman
_VISITCOMMUNITY
England - South West, United Kingdom
Joined: September 12, 2013
KitMaker: 18 posts
AeroScale: 13 posts
Posted: Monday, September 15, 2014 - 10:38 PM UTC

Quoted Text

One trick I've been using recently is to obtain some kids play-dough and use that - you can use a relatively blunt knife to cut the flattened shapes in and it allows you to press the shape closer to the surface for tighter lines on the camo.

Good luck with the small parts


I've often found blu-tac to be to tacky and, since I mostly use Vallejo Air, it can pull off the base color easily! Its cheaper too than blu-tac and probably more re-usable

FinneganBojangles
_VISITCOMMUNITY
New Jersey, United States
Joined: May 01, 2013
KitMaker: 60 posts
AeroScale: 56 posts
Posted: Tuesday, September 16, 2014 - 07:20 AM UTC
Nice! I just picked up two of their Spitfire IXe's, one for my father and one for myself, I'm looking forward to watch yours come together!
Sheehan1
_VISITCOMMUNITY
Queensland, Australia
Joined: May 27, 2014
KitMaker: 135 posts
AeroScale: 124 posts
Posted: Tuesday, September 16, 2014 - 08:42 AM UTC
Thanks for the interest. I will give the play dough a try. At least I have some experience with play dough although I cant remember too much about it.
I notice on the colour markings at the rear just forward of the tail of the plane there is a section which is painted a Sky colour. The instructions give a Gunze paint code which is obviously wrong as it is a egg shelled sky blue which is like a yellow colour. Anyway I cant find a light blue equivalent in the Tamiya chart that is that light. I imagine if you mixed some white with the light blue you will get a much lighter blue?

Regards

Laurie
Joel_W
Staff MemberAssociate Editor
AUTOMODELER
_VISITCOMMUNITY
New York, United States
Joined: December 04, 2010
KitMaker: 11,666 posts
AeroScale: 7,410 posts
Posted: Thursday, September 18, 2014 - 06:46 AM UTC
Laurie,
Excellent choice of a excellent kit. Paul's suggestion of using the one fuselage half to assemble the cockpit is the right way to go. I had a very difficult time of it doing it as a separate assembly.

The best RAF Interior Green paint that I've found is Model Master's enamel paint # 2062.

Looking forward to following your build.
Joel
Sheehan1
_VISITCOMMUNITY
Queensland, Australia
Joined: May 27, 2014
KitMaker: 135 posts
AeroScale: 124 posts
Posted: Thursday, September 18, 2014 - 08:57 AM UTC
Hi Joel and others. I am just finalising my order for paints etc. Just working through to see what I need as I am trying to reduce the freight costs. In the meantime I have started on the Hasegawra F 104C Starfighter just to pass the time. Nice looking plane. Heaps of parts and fit in some places not that great.

Regards

Laurie
Joel_W
Staff MemberAssociate Editor
AUTOMODELER
_VISITCOMMUNITY
New York, United States
Joined: December 04, 2010
KitMaker: 11,666 posts
AeroScale: 7,410 posts
Posted: Friday, September 19, 2014 - 05:23 AM UTC

Quoted Text

Hi Joel and others. I am just finalising my order for paints etc. Just working through to see what I need as I am trying to reduce the freight costs. In the meantime I have started on the Hasegawra F 104C Starfighter just to pass the time. Nice looking plane. Heaps of parts and fit in some places not that great.

Regards

Laurie


Laurie,
The F-104C has been around for a while, so just take your time. Work through each fit issue the best you can before you glue the parts together, it will save you a ton of time in the long run. The more you work on the F-104, the more you will appreciate the Spit IXc.
Joel
Sheehan1
_VISITCOMMUNITY
Queensland, Australia
Joined: May 27, 2014
KitMaker: 135 posts
AeroScale: 124 posts
Posted: Saturday, September 20, 2014 - 09:46 AM UTC
Have ordered some paints and cant do much until they arrive. Expected around 25/9/14. Been doing a few fittings that can be done without the paint etc. Made the wheels and fitted the masking to the cockpit covers. Then I decided to fit the pieces comprising the exhaust manifold. Couldnt work out how the bloody things fits. Instructions are very vague so I decided to do some googling and discovered that I was not the only idiot to have trouble with these parts. Each side has 4 parts. The exhaust manifold, another piece that has some lugs that fit into some grooves on the manifold. Another piece with some saw like edge and another very small end piece which appears to lock it in. Tried for hours trying to work out which way it goes but after drinking a bottle of shariz trying to work it out, the shariz worked and I gave up and went to sleep. Tried again this morning and still not 100 per cent sure.
Anyone have an ideas. I see this part has been criticised by a few modellers. In the meantime I will move on with a few other parts.
TheBeastman
_VISITCOMMUNITY
England - South West, United Kingdom
Joined: September 12, 2013
KitMaker: 18 posts
AeroScale: 13 posts
Posted: Wednesday, September 24, 2014 - 08:36 PM UTC
Shouldn't that be Shiraz?
Mcleod
_VISITCOMMUNITY
Alberta, Canada
Joined: April 07, 2010
KitMaker: 1,028 posts
AeroScale: 939 posts
Posted: Thursday, September 25, 2014 - 05:23 AM UTC

Quoted Text

Shouldn't that be Shiraz?


It all depends on when you were sucking on the ba-ba!
There's 'Shariz ell is good!', followed by 'Shiraz ell gave me a headache!'.
Sheehan1
_VISITCOMMUNITY
Queensland, Australia
Joined: May 27, 2014
KitMaker: 135 posts
AeroScale: 124 posts
Posted: Thursday, September 25, 2014 - 10:36 AM UTC
Yes Shiraz. I was pretty well under the weather. Maybe I was still affected when I made the post.
Well all my paints arrived and I have been doing a bit of gluing and painting off the sprue and onto the cockpit sides walls. I noticed Paul's warning about fitting the cockpit sides first. I will see if I can do it now. I see Joel agrees. However I have searched but cant find Jean Luc's build. Can anyone help with a link. I will try to search again the meantime.
I was getting a bit scared of this model as I didnt realise the parts were so small. However I am getting better at fitting those minute parts and it is actually good fun.
I dont know where it is by the book but I was using a tooth pick to paint some of the tiny parts and I found I couldnt get the brusih fine enough..

I will post some pictures shortly

Regards

Laurie
Sheehan1
_VISITCOMMUNITY
Queensland, Australia
Joined: May 27, 2014
KitMaker: 135 posts
AeroScale: 124 posts
Posted: Sunday, September 28, 2014 - 05:12 PM UTC
Here are some latest photos


Sorry about the quality of the photos. I will have to read a bit more about taking proper photos.
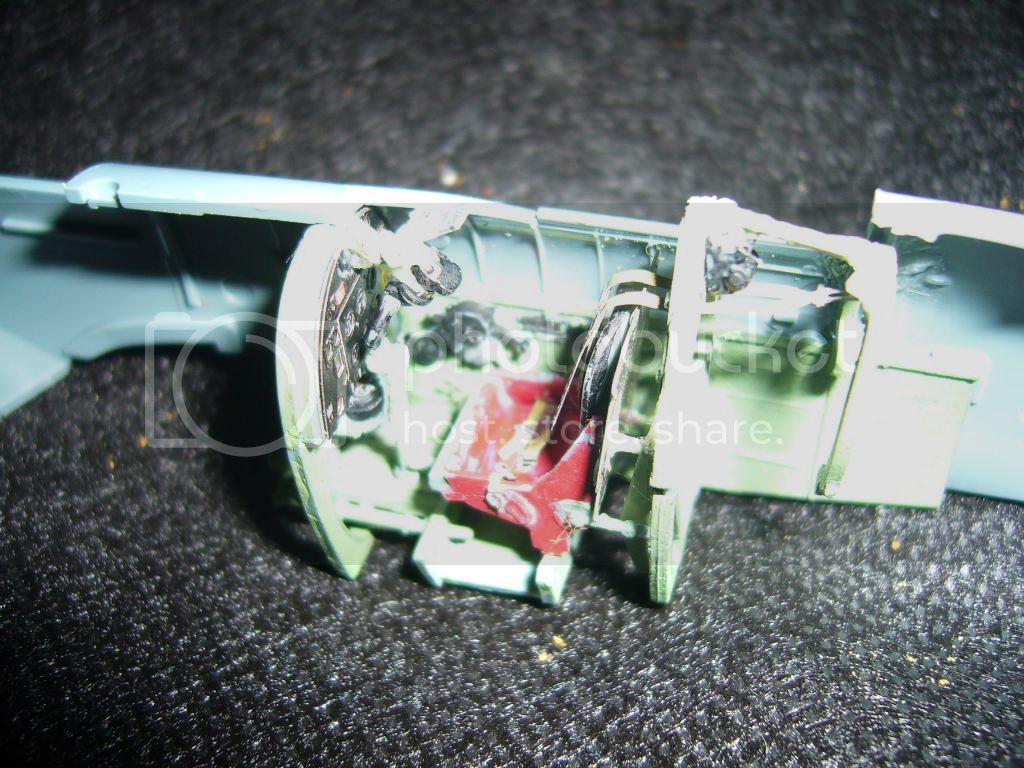
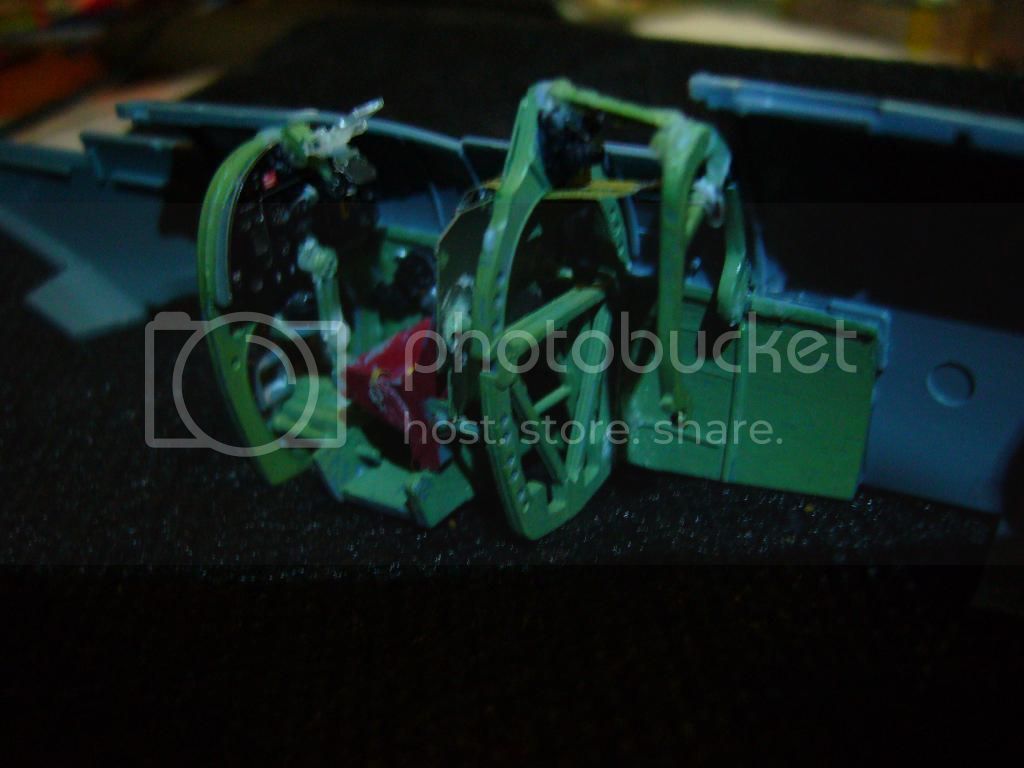
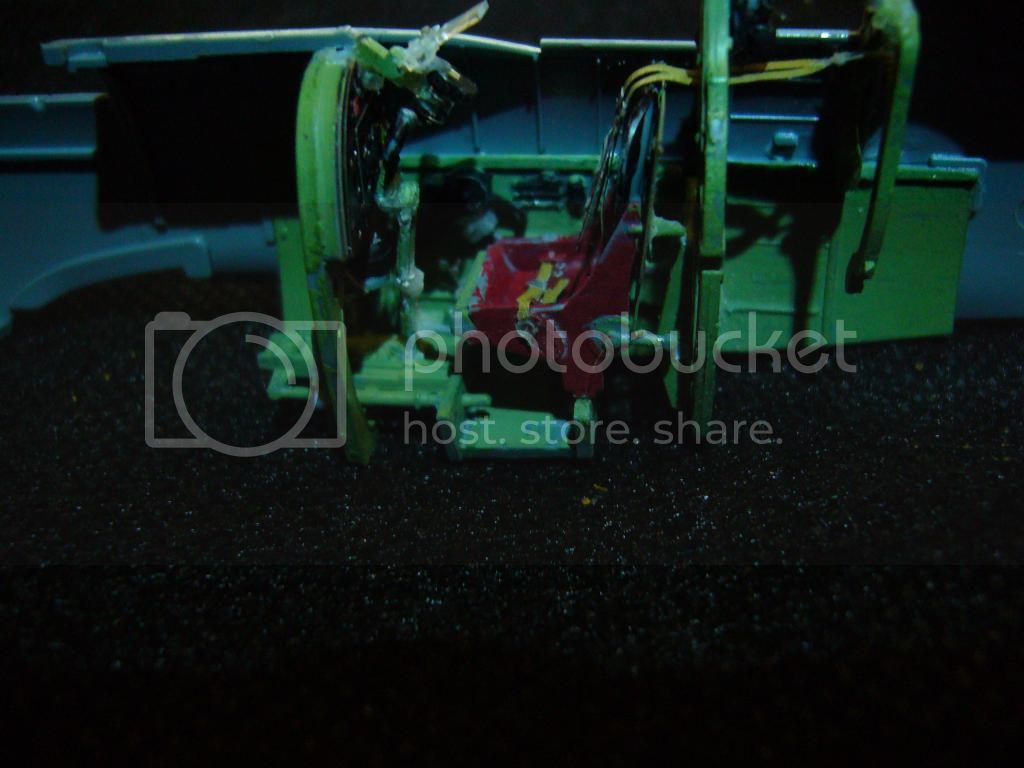
The green shown in the photos is nothing like the colour. It is cockpit green from Tamiya that I used and looks authentic. Still cant get over how small the parts are. Luckily I only had one problem with the cockpit. There is a little photo etched metal part No. PE 8. It is about half the size of a wing of a mosquito. I had it on a pad of paper ready to apply the page just lifted slightly and it disappeared. I think it actually floated away. But I havent found it since. The only other problem was they show as A9 (on the clear sprue) But there is no A9 on the sprue so must just be a mistake.
Found the cockpit very daunting but good experience.
Next problem Ihave had that the joy stick snapped in half so I had to do a rough glue job.
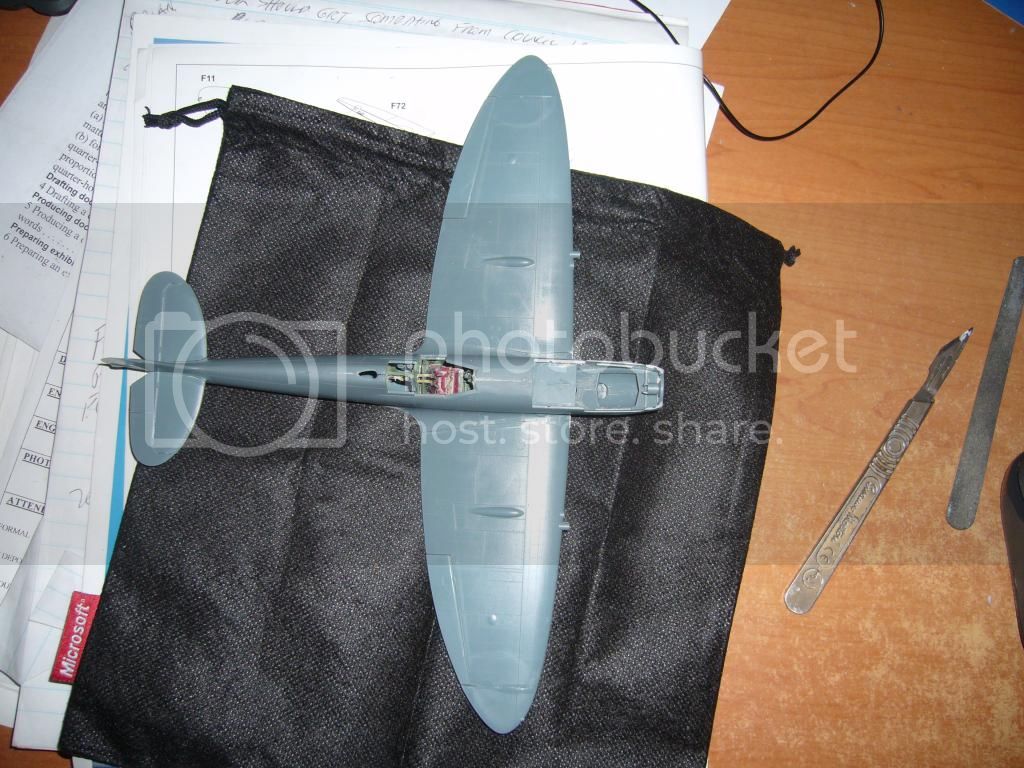
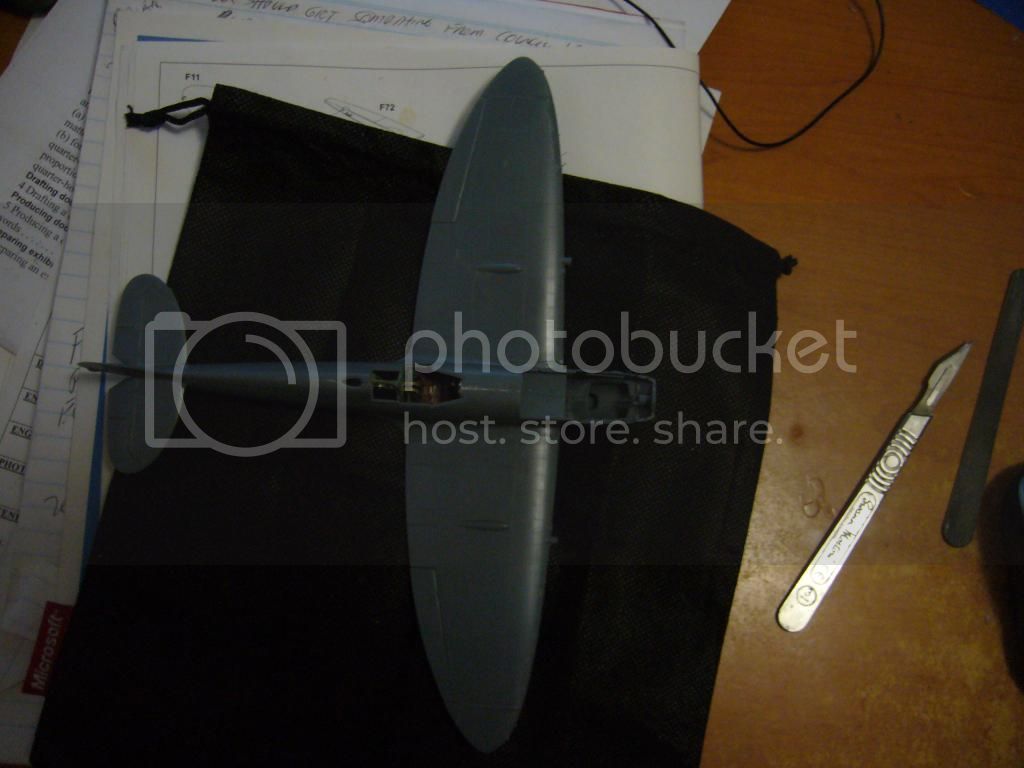
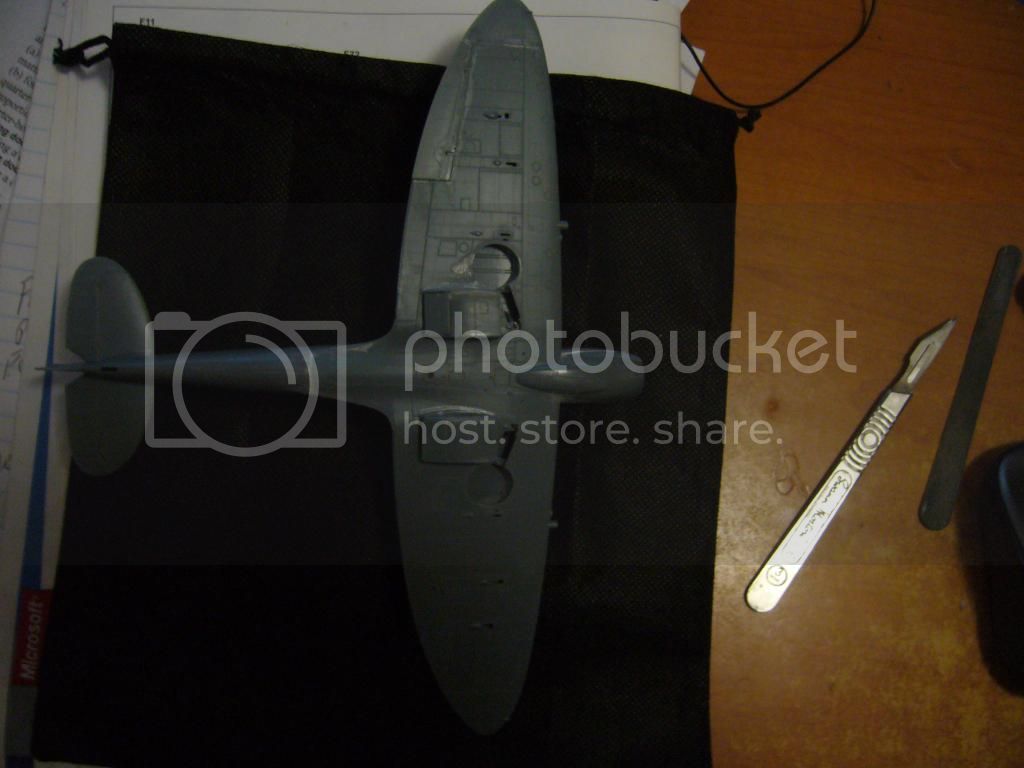
rest of it went together reasonably well. A few little gaps which I have repaired.
I had great difficulty in working out how to assemble the manifolds. As I said previously I have ready many post about how a lot of people had a similar problem. The instructions are very confusing. I eventually just studied so many photos and eventually worked it out.
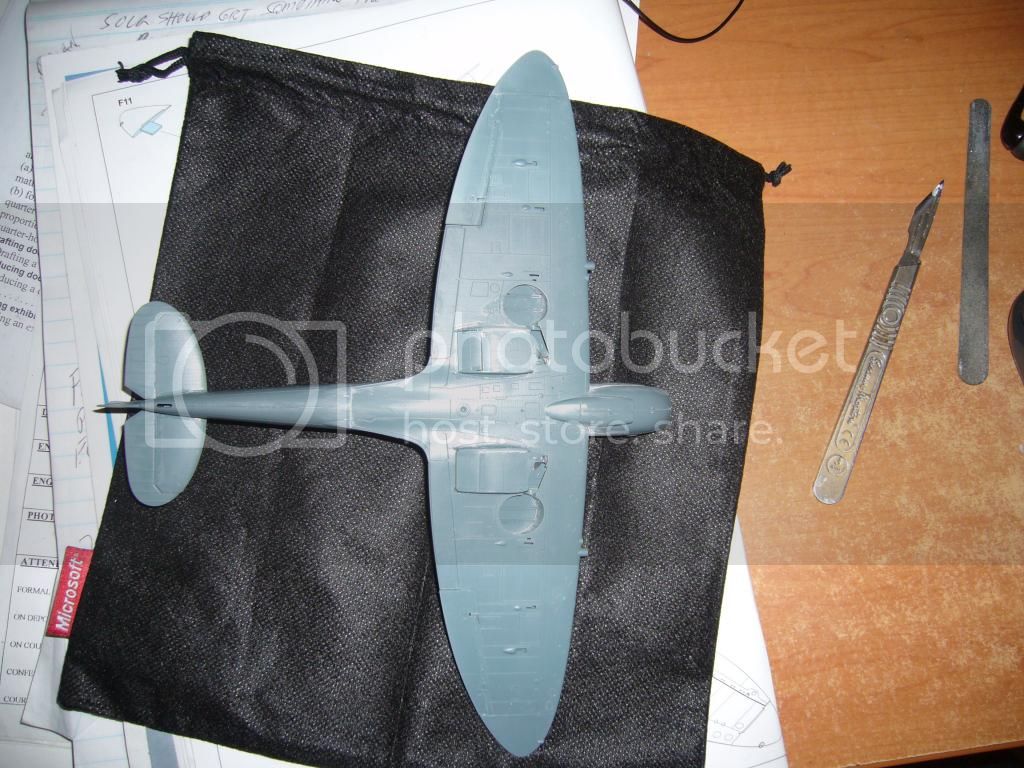
The model is at the painting stage so here are my further questions which I hope you can help me with
I saw some used a grey undercoat. But I noticed Jean Luc on his model says he used a Flat Black light undercoat.
Not sure why he did that. Was it just to make sure the coverage of the next coat stands out or is it to give some effectc underneath the first coast of the ocean grey.
The paint scheme I have chose is B which does not have the D day stripes. It has an ocean grey underside and camo on the top.
Questions:
1. How do I mask the top when painting the bottom. does the masking tape run along the seam lines when I glued the two wings together
2. What is a good technique to stop any bleeding under the masking tape

I noticed Jean Luc applied a black accent paint after he finished sealing his model. So I assume you apply the camo paints and then seal it with a matte clear finish. Then you apply the decals and then seal the decals. Then do you just apply the black accent wash over the various rivets, panel lines etc. and then wash it off with the mineral turps.

Any help would be greatly appreciate

BTW: I forgot a big boo boo I made. I read a previous post about the problems with fitting the fuselage together after fitting the cockpit. I was so worried about it that I test fitted it and made a few adjustments and after a while I was happy that it would fit ok so I went ahead and used my Mr. Cement S glue and glued it. Then I went back to the instructions and found I had forgotten to fit the part just in front of the cockpit that the manifold part sits on and also the little part near the tail which you push the rear wheel into. I was took scared to prise the fuselage apart and it was well set. I was able to get the manifold support in through a gap at the front near the propeller. Not sure what I will do with the rear wheel. Perhaps position it and super glue it in. Bugger.

Regards

Laurie
Joel_W
Staff MemberAssociate Editor
AUTOMODELER
_VISITCOMMUNITY
New York, United States
Joined: December 04, 2010
KitMaker: 11,666 posts
AeroScale: 7,410 posts
Posted: Tuesday, September 30, 2014 - 04:14 AM UTC
Laurie,
As far as your photographs go, I'm assuming that you're using a decent digital camera, and shooting in JPEG format. Your camera should have come with a manual that explains how to adjust several of the settings. There should be a few settings that allow you to take close up/Macro pictures, and will auto adjust your flash to some degree. The other thing is to go online and download a 3rd party free photo editing program so that you can have greater control over editing process. Right now it's very hard to see exactly where and what you've done with the Spitfire.

As you said, the color of the interior looks wrong in the pictures. The only British Interior Green I've ever used is a Model Master's enamel.

For now, stick to your basic priming using the Tamiya Gray Primer. Using black will add some color modulation to lighter shades in recesses which is why he used the black.

Do yourself a big favor and paint the bottom 1st. Masking it to paint the top is much easier especially since it's a hard edged camo scheme.
Joel
Joel_W
Staff MemberAssociate Editor
AUTOMODELER
_VISITCOMMUNITY
New York, United States
Joined: December 04, 2010
KitMaker: 11,666 posts
AeroScale: 7,410 posts
Posted: Tuesday, September 30, 2014 - 04:20 AM UTC
Laurie,
Taking a 2nd look at your pictures, some are with flash, and some are with no flash. For now try taking pictures outside in the daylight or right next to a window. That will really help with the lighting issue.
Joel
PeeJay74
#363
_VISITCOMMUNITY
Pennsylvania, United States
Joined: January 08, 2014
KitMaker: 425 posts
AeroScale: 401 posts
Posted: Tuesday, September 30, 2014 - 07:42 AM UTC
Not sure if this is too late for your build as I can't load pics atm. Here is Jean-Luc's build I had mentioned.

Sorry I should have just linked it to begin with for you.

~Paul
Sheehan1
_VISITCOMMUNITY
Queensland, Australia
Joined: May 27, 2014
KitMaker: 135 posts
AeroScale: 124 posts
Posted: Tuesday, September 30, 2014 - 09:03 AM UTC
Thanks for the interest Joel and Paul.
Yes I tdhink my problem with the photographs is that my work desk is in a home office and is very dark. I will take the pictures outside from now on. I am using a Panasonic Lumix Digital camera which has a macro option. The seat and the cockpit colour are nothing like shown in the photo. The seat is a browny red and the green is the same as other posts I have seen. I am just waiting for some paints from my supplier and hopefully will get a chance to undercoat tomorrow.
Paul I did notice your post and found that build from Jean Luc but I was looking for some dialogue about fitting the cockpit. I see now that he just pre fitted it to the fuselage. Actually I followed your advice and did it the same.

Regards

Laurie
Sheehan1
_VISITCOMMUNITY
Queensland, Australia
Joined: May 27, 2014
KitMaker: 135 posts
AeroScale: 124 posts
Posted: Tuesday, September 30, 2014 - 12:50 PM UTC
Hi Guys,
Most of my paint orders arrived. I bought some Alclad Lacquer Grey Primer and Microfiller and will use it for the undercoat. I am thinking of painting the D- day colour scheme with the black and white stripes. I read a few posts and some have trouble with bleeding. I recall from my boat building days that you can avoid this by painting the white stripes. Then masking the white stripes off and before painting the black stripes applying some more white paint along the masking tape. Theoretically the white should fill any gaps under the masking tape and you will only get white bleeding which will not be obvious.
I was also going to roll down the masking tape with some tooth picks or some other suitable tool
Any thoughts would be appreciated as I have seen a lot of these stripes applications go wrong on the posts

regards

Laurie
Joel_W
Staff MemberAssociate Editor
AUTOMODELER
_VISITCOMMUNITY
New York, United States
Joined: December 04, 2010
KitMaker: 11,666 posts
AeroScale: 7,410 posts
Posted: Wednesday, October 01, 2014 - 08:54 AM UTC
Laurie,
Your camera has a lot of adjustable settings via the menu. You can use whatever lighting you have in your office with your camera mounted on a tripod, just change the WB for that type of light. Leave it on auto when you shoot out doors.
Joel
Joel_W
Staff MemberAssociate Editor
AUTOMODELER
_VISITCOMMUNITY
New York, United States
Joined: December 04, 2010
KitMaker: 11,666 posts
AeroScale: 7,410 posts
Posted: Wednesday, October 01, 2014 - 09:05 AM UTC

Quoted Text

Hi Guys,
Most of my paint orders arrived. I bought some Alclad Lacquer Grey Primer and Microfiller and will use it for the undercoat. I am thinking of painting the D- day colour scheme with the black and white stripes. I read a few posts and some have trouble with bleeding. I recall from my boat building days that you can avoid this by painting the white stripes. Then masking the white stripes off and before painting the black stripes applying some more white paint along the masking tape. Theoretically the white should fill any gaps under the masking tape and you will only get white bleeding which will not be obvious.
I was also going to roll down the masking tape with some tooth picks or some other suitable tool
Any thoughts would be appreciated as I have seen a lot of these stripes applications go wrong on the posts

regards

Laurie


Laurie,
How does the Alcad Gray primer compare to the Tamiya Gray primer? Both are lacquer based. I'm pretty sure that the Alcad primer is already pre-thinned for airbrushing, so that should make it easier to use, but you'll go through the bottle much quicker, thus being more expensive in the long run.

As for the invasion stripes. you use a base of white, then mask off for the black stripes. I use Tamiya tape that I burnish down with a burnishing tool, or you can use the rounded top of a paint brush to gently burnish down the tape. Not sure if rolling a toothpick will do what you want it to do.

Bleeding under the tape is generally caused by a combination of the tape not being firmly burnished down, and the 1st coat of paint being applied to wet and to heavy. Start with a few mist coats, that will seal the edges. Then slowly build up the black paint. There is another step you can use to really seal the edges, and that's applying a coat of clear. I really don't like doing that as it adds to the overall thickness between the two colors, and will require rubbing out to kill the resulting lip.

Joel

Sheehan1
_VISITCOMMUNITY
Queensland, Australia
Joined: May 27, 2014
KitMaker: 135 posts
AeroScale: 124 posts
Posted: Wednesday, October 01, 2014 - 11:00 AM UTC
Thanks Joel for that great advice. There are two sets of D day stripes. On the other version the black and whie stripes dont go right around the fuselage and I think that looks a little better but seems more complicated. I am still thinking about it
I am now trying to decide whether to fit the canopies before painting. I read one article where the poster was adamant that it was better to fit them first as the finish is cleaner. I can see his point. My canopy will be in the open position and I can see some paint getting in the gap between the inner canopy and the open one that sits on top (if you know what I mean) I suppose you have to cut a very small piece of masking tape to put in that gap or maybe some play doh or something. I read another article where the poster suggested wetting some tissue paper and pushing that into the cockpit area before taping over with masking tape
BTW In respect to the open canopy position the instructions call for a small metal photoetch part to be fitted just under the top of the covering canopy. Again it is a very minute piece and at first I couldnt work it out. But with a magnifying class I could see how you bent it and there were two little lugs (I mean little) and it appears that had to be glued to the upper rim of the outside canopy piece. I couldnt pick the piece with tweezers as it was too small and I could see it disappearing into space. Then I got a tooth pick and attached a small blob of blue tak. I then push it on the end and applied a minute dob of super glue on the canopy and push and held the photo etch part to where I thought the glue was. Success. So I have learnt a new skill using the blue tak for those small pieces. Much better than picking them up with tweezers. Muy previous experience with that is when suddenly the tweezer lose their grip you have lost the part.
Looking forward to trying the painting on this model. Havent decided yet whether to use play doh to mark the camo design or try and make a paper mask. I note an article on this website by Vince Haworth. What do you think

Regards

Laurie
Holdfast
Staff MemberPresident
IPMS-UK KITMAKER BRANCH
#056
_VISITCOMMUNITY
England - South West, United Kingdom
Joined: September 30, 2002
KitMaker: 8,581 posts
AeroScale: 4,913 posts
Posted: Wednesday, October 01, 2014 - 06:48 PM UTC
Hi Laurie,
I noticed this in your description about the paint scheme:

Quoted Text

The paint scheme I have chose is B which does not have the D day stripes. It has an ocean grey underside and camo on the top.


The underside is medium sea grey the upper surface camo is ocean grey and dark green.

Also in your cockpit pictures I noticed that the gun sight is angled down. The sight itself should be vertical, so the pilot can see through the glass. Don't worry about it if it can't be fixed (you may do more harm than good!), just a note for next time
Holdfast
Staff MemberPresident
IPMS-UK KITMAKER BRANCH
#056
_VISITCOMMUNITY
England - South West, United Kingdom
Joined: September 30, 2002
KitMaker: 8,581 posts
AeroScale: 4,913 posts
Posted: Wednesday, October 01, 2014 - 07:03 PM UTC
You mentioned PE part PE8, that you lost that is the brake handle, and probably wont be seen very easily anyway
Quoted Text

There is a little photo etched metal part No. PE 8. It is about half the size of a wing of a mosquito. I had it on a pad of paper ready to apply the page just lifted slightly and it disappeared. I think it actually floated away. But I havent found it since. The only other problem was they show as A9 (on the clear sprue) But there is no A9 on the sprue so must just be a mistake.


A9 is the gun sight glass, which you have fitted? Are you talking about something else?

Another method for "carrying" small PE parts is to use a damp paint brush.
Sheehan1
_VISITCOMMUNITY
Queensland, Australia
Joined: May 27, 2014
KitMaker: 135 posts
AeroScale: 124 posts
Posted: Thursday, October 02, 2014 - 11:27 AM UTC
Hi Mal, Thanks for your interest and advice. Actually I got it mixed up. I have the medium sea gray for the underneath section. Your notes on the gun sight are noted. The bloody thing broke off and I will have to try and glue it back so hopefully I can manager to maneouvre it into the right place.
I am thinking of airbrushing the main colours and perhaps handbrushing the black and white stripes that certainly would reduce any chance of bleedings although Joel's advice seems to guarantee no bleeding. I noticed some post which said the D-Day stripes were brushed on in reality. I will take advice on this

regards

Laurie
 _GOTOTOP