

Here is my new project. I will be doing the Hasegawa 1/48 Scale Hawker Typhoon IB Bubble Top. After researching various Typhoon's I have decided to do one from 439 Squadron Royal Canadian Air Force piloted by Flying Officer Hugh Fraser.
First some background information:
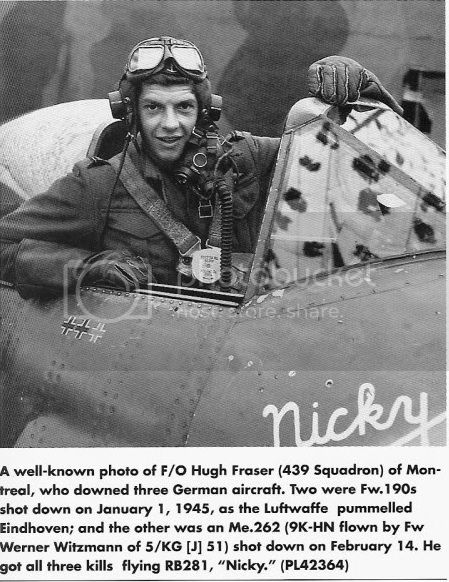
Hugh Fraser's Typhoon carried the markings of 5V-X and serial number RB281. This aircraft was delivered to 439 Squadron on 28th December, 1944 and was a late production Typhoon. Because of this fact It most likely had the larger tempest tailplanes and 4 blade propeller. Among the first action to be seen by this aircraft was on 1 January 1945 when Hugh Fraser engaged a large number of FW190's destroying two of them in the process during a low level dogfight. on 14 February 1945 Hugh Fraser, flying 5V-X along with F/L Lyell Shaver engaged two ME262's from 5./kG 51 flying below them at roughly 3000 feet. They dove to engage the Luftwaffe aircraft, Shaver hit one which blew up while Fraser poured 20 mm rounds into the other ME262 which started belching smoke and tumbled down through the clouds. Both pilots from KG51 FW Werner Witzmann and Lt Hans-George Richter were killed, falling about 20 miles north of Coesfeld, Germany. On 2 March, 1945 while returning from a mission 5V-X RB281 suffered an engine failure and crash landed near Eindhoven. Fraser survived as did the aircraft which was repaired but eventually written off just after the war.
Pre-Flight Check
Constructive critique of your finished or in-progress photos.
Constructive critique of your finished or in-progress photos.
Hosted by Jim Starkweather
Hawker Typhoon IB "Nicky" 439 SQN RCAF 1/48

Totalize

Joined: February 04, 2009
KitMaker: 743 posts
AeroScale: 151 posts
Posted: Wednesday, January 01, 2014 - 06:19 AM UTC
Totalize
Joined: February 04, 2009
KitMaker: 743 posts
AeroScale: 151 posts
Posted: Wednesday, January 01, 2014 - 06:24 AM UTC
Here's a shot of Fraser in Nicky with some additional details about his kills.
Note the one German Kill marking in white versus the other two. This perhaps denotes
that he was awarded a probable kill for the ME262 at the time this picture was taken instead of
a confirmed kill.
Hawker Typhoon IB "Nicky" 439 Squadron RCAF
Note the one German Kill marking in white versus the other two. This perhaps denotes
that he was awarded a probable kill for the ME262 at the time this picture was taken instead of
a confirmed kill.
Hawker Typhoon IB "Nicky" 439 Squadron RCAF

Totalize
Joined: February 04, 2009
KitMaker: 743 posts
AeroScale: 151 posts
Posted: Wednesday, January 01, 2014 - 06:30 AM UTC
For this build I have added the following upgrades to bring the Hasegawa kit up to the standards of a late Typhoon.
Ultracast Tempest tailplanes
Ultracast Typhoon exhasuts
Ultracast 4 blade propeller. The kit comes with a 3 bladed prop.
Airies Typhoon bubble top cockpit for Hasegawa kit.
Barracuda cast Typhoon main wheels and anti flutter tail wheel
Eduard Canopy mask set
Aeromaster decals Storms in the sky Part II with decals for Nicky
Bombs set with pylons graciously donated by Terry AKA Airframes. The Hasegawa kit does not provide a set of bombs.


Jessie_C

Joined: September 03, 2009
KitMaker: 6,965 posts
AeroScale: 6,247 posts

Posted: Wednesday, January 01, 2014 - 08:20 AM UTC
Oh, this one's going to be good!
Totalize
Joined: February 04, 2009
KitMaker: 743 posts
AeroScale: 151 posts
Posted: Monday, January 13, 2014 - 05:45 AM UTC
Thanks Jesse,
This is my first Typhoon and my second 1/48 scale Aircraft.
Here are some progress shots.
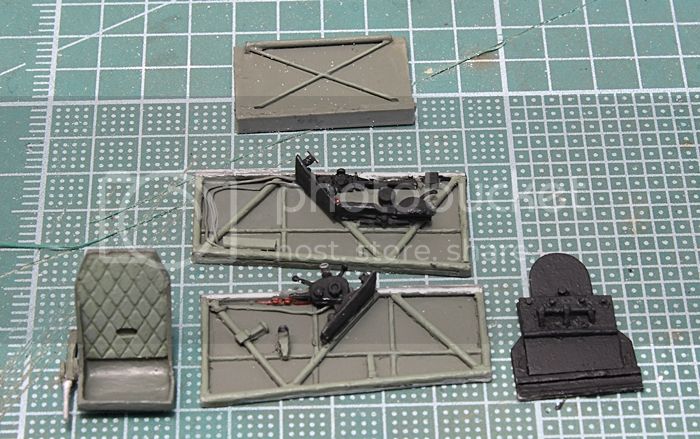
Some work done on the Airies cockpit.
Sorry for the less than steller pictures. My picture taking is usually much better. Got to make some adjustments in this area.
My plan right now is glue the floor and left side which you see to the airframe, then add the armour plate and cockpit seat then the front firewall and instrument panel last. From my dry fitting this looks to be the best way to mount the cockpit.
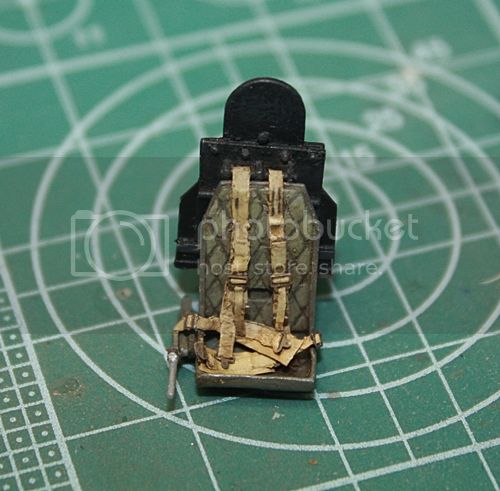
I am going to use a late type QL type harness as these were often seen on Typhoons by March 1945. For this I have ordered a late harness set from HGW which they make for a late spitfire.
Scatchbuilding:
I modified the aires armour plate by adding an extra piece of evergreen styrene card, then built the rod and mounts which the seat belts pass through and adding some .4mm rivets along the top of the amour plate above the seat belt rod.
I also built the seat adjustment handle on the right side of the cockpit seat from styrene card and rod.
Added some lead wire to the right and left side of the cockpit panels.
This is my first Typhoon and my second 1/48 scale Aircraft.
Here are some progress shots.
Some work done on the Airies cockpit.
Sorry for the less than steller pictures. My picture taking is usually much better. Got to make some adjustments in this area.
My plan right now is glue the floor and left side which you see to the airframe, then add the armour plate and cockpit seat then the front firewall and instrument panel last. From my dry fitting this looks to be the best way to mount the cockpit.
I am going to use a late type QL type harness as these were often seen on Typhoons by March 1945. For this I have ordered a late harness set from HGW which they make for a late spitfire.
Scatchbuilding:
I modified the aires armour plate by adding an extra piece of evergreen styrene card, then built the rod and mounts which the seat belts pass through and adding some .4mm rivets along the top of the amour plate above the seat belt rod.
I also built the seat adjustment handle on the right side of the cockpit seat from styrene card and rod.
Added some lead wire to the right and left side of the cockpit panels.

thegirl
Joined: January 19, 2008
KitMaker: 6,743 posts
AeroScale: 6,151 posts
Posted: Tuesday, January 14, 2014 - 01:13 AM UTC
Nice job on the pit so far , looking forward to the next up-date .
Terri
Terri
Totalize
Joined: February 04, 2009
KitMaker: 743 posts
AeroScale: 151 posts
Posted: Friday, January 17, 2014 - 05:54 AM UTC
Thanks Terri,
No build updates but do have an acquistion update.
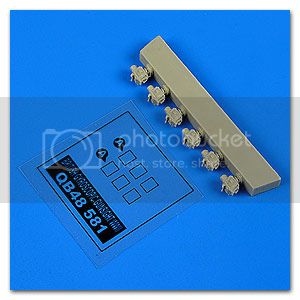
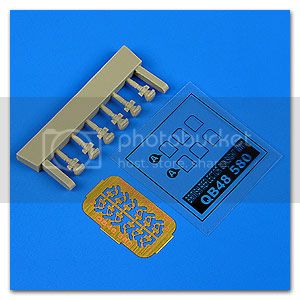
Just purchased the following Quickboost gunsights. These are newly released.
I wanted the gyro set for this build but figured I would get the reflector sights as well for future builds.
Here they are;
No build updates but do have an acquistion update.
Just purchased the following Quickboost gunsights. These are newly released.
I wanted the gyro set for this build but figured I would get the reflector sights as well for future builds.
Here they are;
Joel_W

Joined: December 04, 2010
KitMaker: 11,666 posts
AeroScale: 7,410 posts
Posted: Friday, January 17, 2014 - 06:04 AM UTC
Dave, a very nice start to the cockpit. Will be following along with interest.
Joel
Joel

Totalize
Joined: February 04, 2009
KitMaker: 743 posts
AeroScale: 151 posts
Posted: Friday, January 24, 2014 - 06:01 AM UTC
Joel,
Thanks very much for checking in and taking the time to post your comments.
Late war Typhoons often had the QS or QL type cockpit harness as opposed to the earlier sutton type harness. To get this type of harness I decided to get the HGW set for the late spitfire which was essentially the same type of harness.
In fact I just received the following seat belt harness set for the buld from HGW.
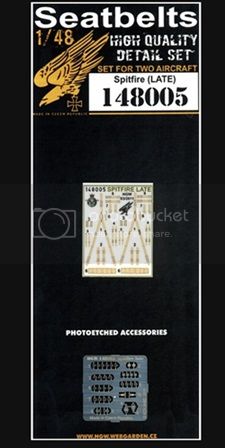
I hope to get it installed this weekend and will show some progress pic's soon.
Cheers,
Dave.
Thanks very much for checking in and taking the time to post your comments.
Late war Typhoons often had the QS or QL type cockpit harness as opposed to the earlier sutton type harness. To get this type of harness I decided to get the HGW set for the late spitfire which was essentially the same type of harness.
In fact I just received the following seat belt harness set for the buld from HGW.
I hope to get it installed this weekend and will show some progress pic's soon.
Cheers,
Dave.
Holdfast

#056

Joined: September 30, 2002
KitMaker: 8,581 posts
AeroScale: 4,913 posts
Posted: Friday, January 24, 2014 - 08:33 PM UTC
Nice one Dave, I interested on seeing how this develops 
Are you aware about fitting the fuselage upper decking pieces to the separate fuselage halves and not as the instructions suggest? It is explained on the second page of my article
Storm Warning
Are you aware about fitting the fuselage upper decking pieces to the separate fuselage halves and not as the instructions suggest? It is explained on the second page of my article
Storm Warning

Totalize
Joined: February 04, 2009
KitMaker: 743 posts
AeroScale: 151 posts
Posted: Monday, January 27, 2014 - 06:06 AM UTC
Hi Mal,
Thanks for having a look at the build.I indeed noticed this gapping in the upper decking. I will add a piece of plastic card when I get to that point and cut and sand it down.
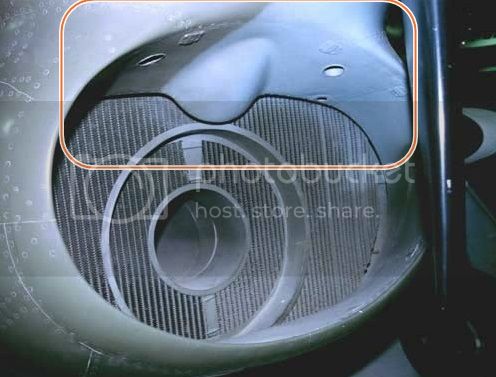
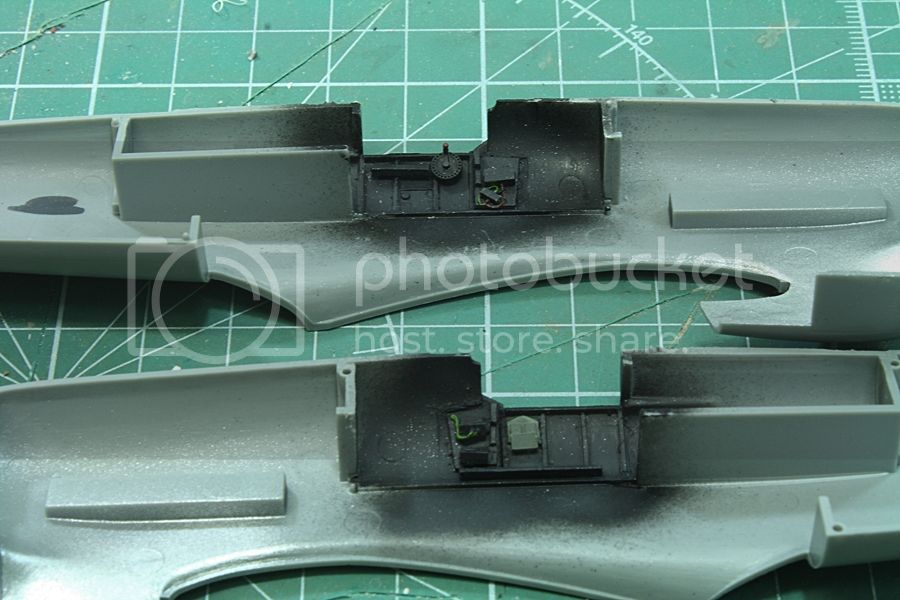
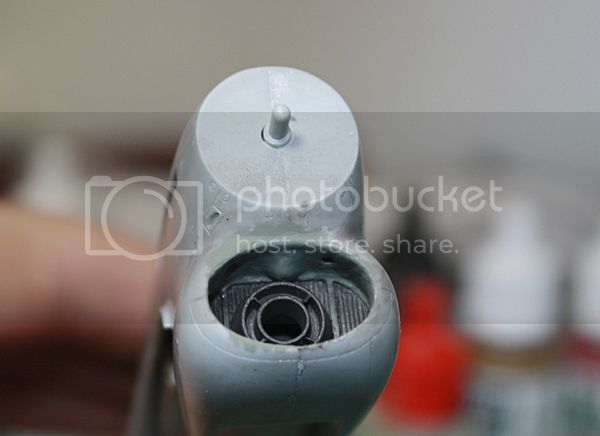
The issue I am having at the moment is with the intake. I purchased the kit from some guy who said all parts were in the kit. I checked it when I received it and everything looked like it was there however, the plastic piece that goes over the intake radiator (Part A6 or B6 I think) is missing.When I put the two fuselage halves together there is a noticable gap above the radiator. The only way to fix this would be to cut piece of plastic card and somehow mount it around the radiator. Here's a picture of what I am talking about. Did the part that came with the kit cover up this gap like it is suppoe to?
Thanks for having a look at the build.I indeed noticed this gapping in the upper decking. I will add a piece of plastic card when I get to that point and cut and sand it down.
The issue I am having at the moment is with the intake. I purchased the kit from some guy who said all parts were in the kit. I checked it when I received it and everything looked like it was there however, the plastic piece that goes over the intake radiator (Part A6 or B6 I think) is missing.When I put the two fuselage halves together there is a noticable gap above the radiator. The only way to fix this would be to cut piece of plastic card and somehow mount it around the radiator. Here's a picture of what I am talking about. Did the part that came with the kit cover up this gap like it is suppoe to?
thegirl
Joined: January 19, 2008
KitMaker: 6,743 posts
AeroScale: 6,151 posts
Posted: Monday, January 27, 2014 - 12:58 PM UTC
Yes , the part should have been in the kit and it doesn't fit very well either .
Terri
Terri
Totalize
Joined: February 04, 2009
KitMaker: 743 posts
AeroScale: 151 posts
Posted: Saturday, February 01, 2014 - 07:31 AM UTC
Terri,
I am not surprised. This kit actually has some fit issues for sure. In addition to the other points mentioned the fuselage halves have very few attachment points which makes it a pain when dry fitting things.
I am not surprised. This kit actually has some fit issues for sure. In addition to the other points mentioned the fuselage halves have very few attachment points which makes it a pain when dry fitting things.
Totalize
Joined: February 04, 2009
KitMaker: 743 posts
AeroScale: 151 posts
Posted: Saturday, February 01, 2014 - 07:38 AM UTC
Here's another update.
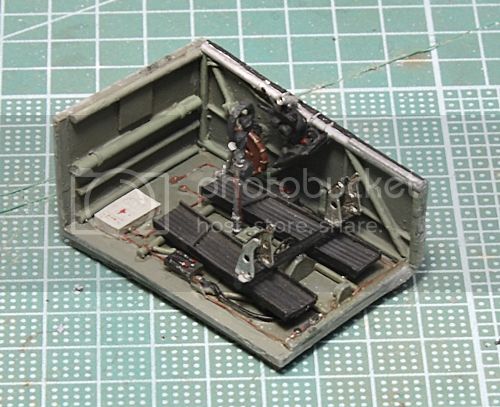
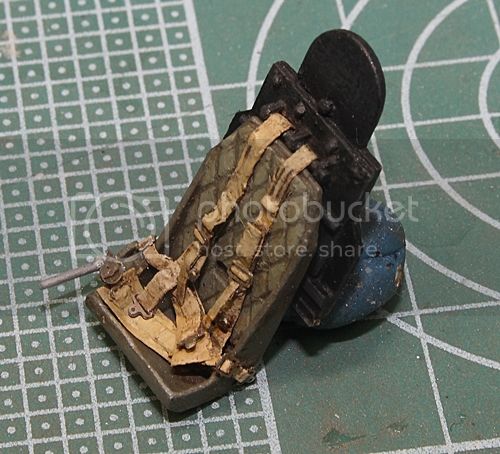
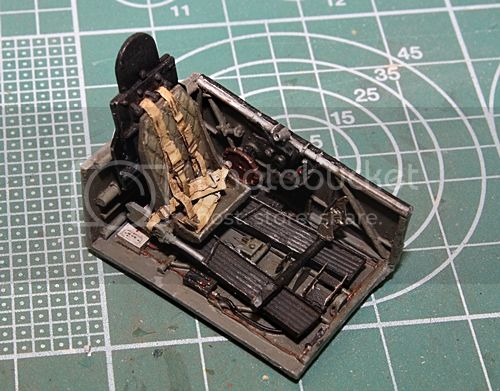
Have been working on the cockpit harness and also took a shot at providing some more detail on the radiator.
once I get the lap belts on I will give the seat and belts a good wash. For the radiator I plan to lighten the Tamiya Iron that I painted it with to add some highlights then give it a wash as well.
Joel_W
Joined: December 04, 2010
KitMaker: 11,666 posts
AeroScale: 7,410 posts
Posted: Saturday, February 01, 2014 - 10:14 AM UTC
Dave I'm really impressed with the shoulder harnesses.
Joel
Joel
Totalize
Joined: February 04, 2009
KitMaker: 743 posts
AeroScale: 151 posts
Posted: Sunday, February 02, 2014 - 04:24 AM UTC
Thanks Joel,
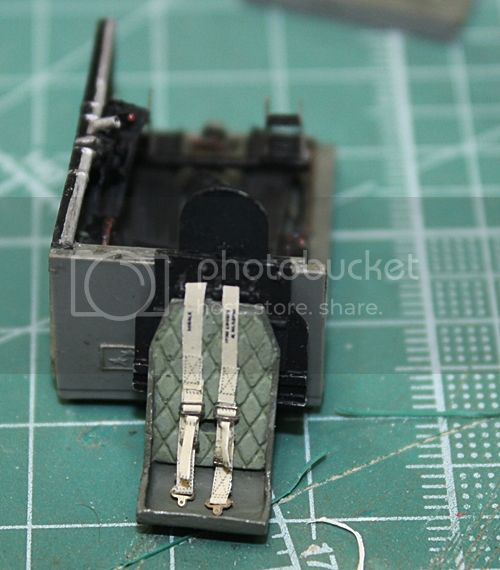
I wanted to be accurate with the harness as even the resin seats I have seen have the harness going over and behind the seat whereas it was actually secured through a horizontal bar on the amour plate of the cockpit. Like so.
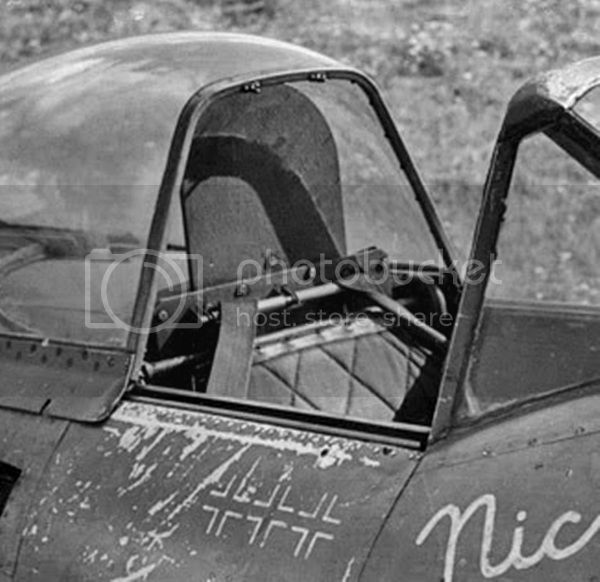
I wanted to be accurate with the harness as even the resin seats I have seen have the harness going over and behind the seat whereas it was actually secured through a horizontal bar on the amour plate of the cockpit. Like so.
Joel_W
Joined: December 04, 2010
KitMaker: 11,666 posts
AeroScale: 7,410 posts
Posted: Sunday, February 02, 2014 - 04:57 AM UTC
Dave, you nailed it. Looks exactly like the photograph.
Joel
Joel
Totalize
Joined: February 04, 2009
KitMaker: 743 posts
AeroScale: 151 posts
Posted: Friday, February 28, 2014 - 11:33 AM UTC
Hey Joel,
Thanks for your comments. Much appreciated.
Thanks for your comments. Much appreciated.
Totalize
Joined: February 04, 2009
KitMaker: 743 posts
AeroScale: 151 posts
Posted: Friday, February 28, 2014 - 11:44 AM UTC
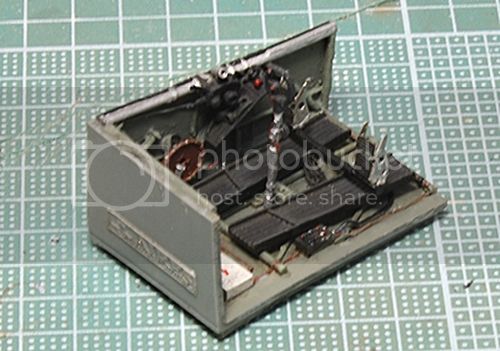
Back with some updates.
I got the harness done and weathered up.
Let me know what you think.
I got the harness done and weathered up.
Let me know what you think.
Joel_W
Joined: December 04, 2010
KitMaker: 11,666 posts
AeroScale: 7,410 posts
Posted: Friday, February 28, 2014 - 11:52 AM UTC
Dave,
You painting and weathering of the seat and harness are perfect. Damn!! Do they ever look real.
Joel
You painting and weathering of the seat and harness are perfect. Damn!! Do they ever look real.
Joel
Jessie_C
Joined: September 03, 2009
KitMaker: 6,965 posts
AeroScale: 6,247 posts
Posted: Friday, February 28, 2014 - 12:38 PM UTC
That seat looks excellent! Looking back up the thread, I'm thinking that a late Tiffie would have the "Cuckoo doors" over the intake.
Totalize
Joined: February 04, 2009
KitMaker: 743 posts
AeroScale: 151 posts
Posted: Saturday, March 01, 2014 - 03:51 AM UTC
Thanks Joel,
Glad you like it. Hopefully it will look good once installed.
Cheers,
Glad you like it. Hopefully it will look good once installed.
Cheers,
Totalize
Joined: February 04, 2009
KitMaker: 743 posts
AeroScale: 151 posts
Posted: Saturday, March 01, 2014 - 04:01 AM UTC
Quoted Text
That seat looks excellent! Looking back up the thread, I'm thinking that a late Tiffie would have the "Cuckoo doors" over the intake.
HI Jessie,
Thanks for checking in and having a look at my build. You may be quite right about the cuckoo doors but the reason I chose not do it is that RB281 was in the 6th batch(out of a total of 7) of Typhoons to be delivered and I read that this particular aircraft was delivered to 439 squadron around December 1944 so it was a very late Typhoon and could very well have not been fitted with the cuckoo filter. Also, many of the late Typhoons that served in France had the cuckoo filters installed because of dust and debris that was experienced flying from improvised fields in France.I would assume that when they moved to hardened airfields in the Netherlands near the end of the war they were simply left on.
439 Squadron flew our of Eindhoven in the Netherlands and mud and water (ie flooding) were the main elements to contend with not dust and field debris. So having been a very late delivered Typhoon and having been sent to a hardened airstrip similar to those in England I figured it was quite possible that RB281 didn't have a cuckoo door/filter. Unfortunately, there are no pictures of RB281 to confirm either situation. I think if someone want to do RB281 with cuckoo doors it would be okay too.
Jessie_C
Joined: September 03, 2009
KitMaker: 6,965 posts
AeroScale: 6,247 posts
Posted: Saturday, March 01, 2014 - 07:20 AM UTC
Fair enough, and sound reasoning. If there's no photographic evidence, then nobody can call you wrong
Totalize
Joined: February 04, 2009
KitMaker: 743 posts
AeroScale: 151 posts
Posted: Saturday, March 08, 2014 - 04:53 AM UTC
Hi Folks back with an update.
Got a lot done since the last update.
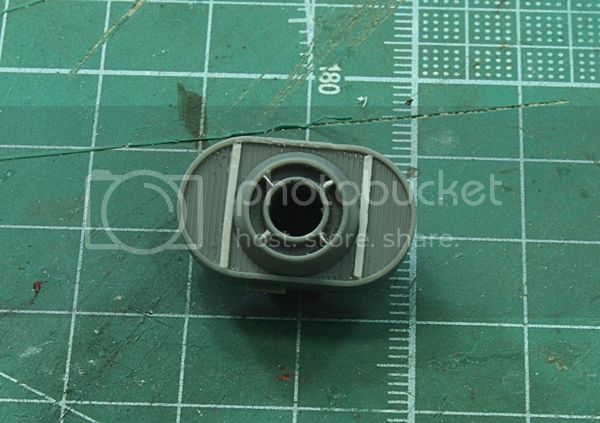
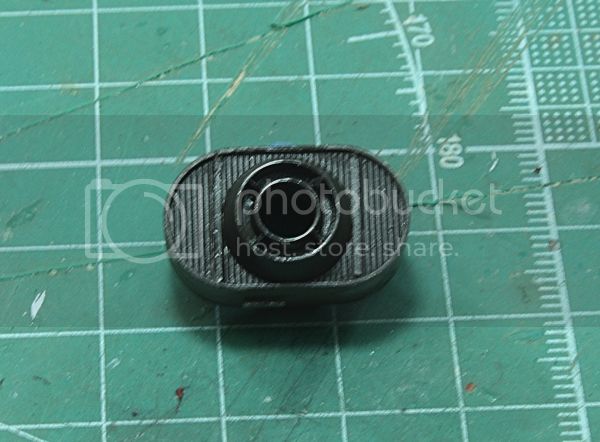
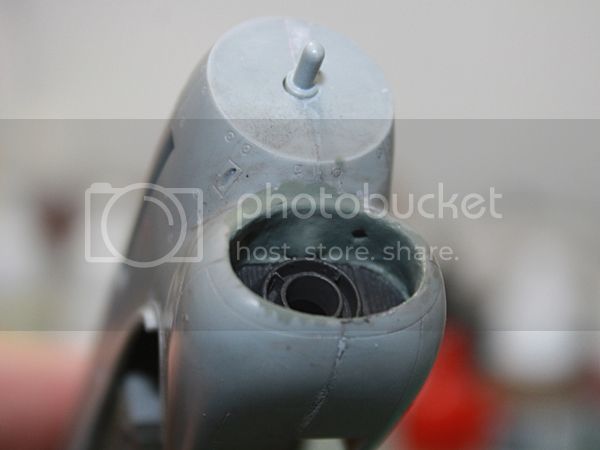
I completed the rebuild of the air intake surround. Here are some shots.
I used some plastic card and brass sheet to make the surround on the top of the air intake. I added the two holes on the top which is seen on typhoon intakes.

I then used some epoxy sculpt to mold the rest of the surround on the top and sides including the fairing over the circular intake
And then I used some mr.surfacer 500 to smooth out the rough spots.
Got a lot done since the last update.
I completed the rebuild of the air intake surround. Here are some shots.
I used some plastic card and brass sheet to make the surround on the top of the air intake. I added the two holes on the top which is seen on typhoon intakes.
I then used some epoxy sculpt to mold the rest of the surround on the top and sides including the fairing over the circular intake
And then I used some mr.surfacer 500 to smooth out the rough spots.
 |

WEB HOSTING BY


Copyright ©2021 AeroScale and Kitmaker Network, a subsidiary of Silver Star Enterprises
All Rights Reserved. Please read our Conditions of Use and Privacy Policy.
All Rights Reserved. Please read our Conditions of Use and Privacy Policy.