

The 1:24th scale kit. Decent, in spite of a few shortcuts and inaccuracies. Looks good built out of the box and is a good starting point for those that want to super-detail.
This will be a replica of Black 13, a March 1942 production aircraft, flown by Oberst Gunther Rall from 8./JG 52, in the summer of 1942.
Sadly the engine is badly undersized, so it is to be discarded, Measuring 2,158 mm in real life, that would mean 89.91 mm in 1:24th. The one supplied is 20 millimeters too short. Width is better, but still... it measures 29 millimeters versus 31.6 (760 mm life size).
There are some minor issues with the cowlings, the cockpit and the rudder outline, other than that it will be a pretty straightforward build log.
Hosted by Rowan Baylis
Black 13, Bf109G-2 early

FlorinM

Joined: August 01, 2011
KitMaker: 385 posts
AeroScale: 173 posts
Posted: Monday, December 16, 2013 - 07:02 AM UTC
FlorinM
Joined: August 01, 2011
KitMaker: 385 posts
AeroScale: 173 posts
Posted: Monday, December 16, 2013 - 07:27 AM UTC
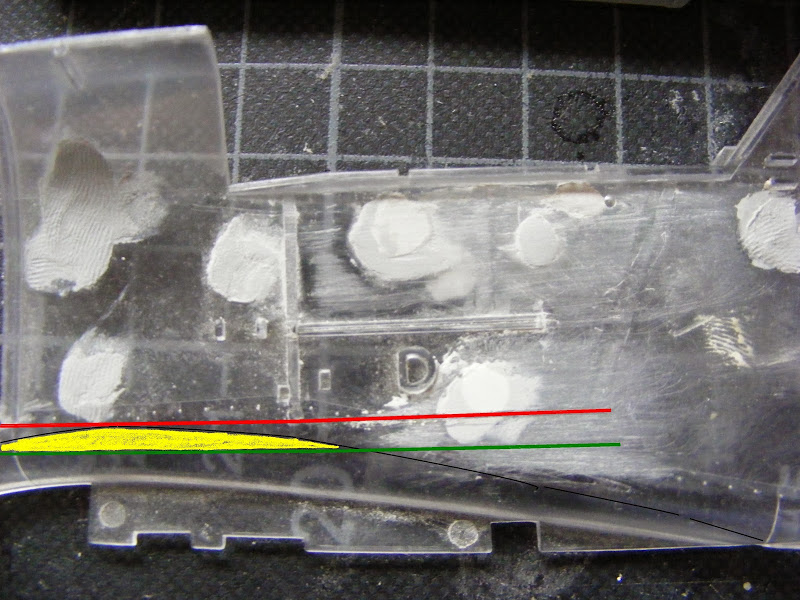
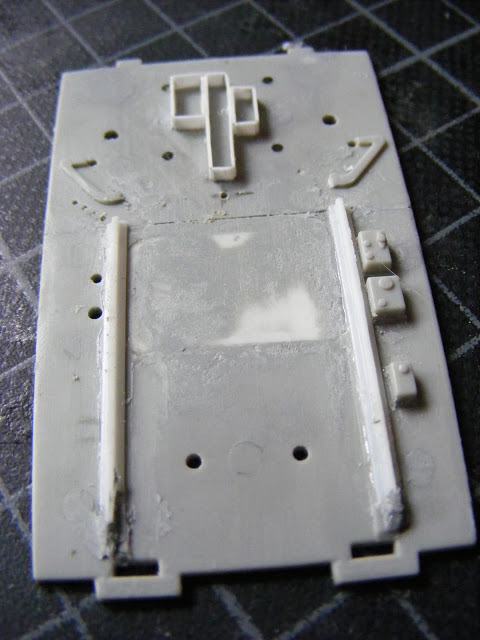
The cockpit. A shortcut was taken by the engineers of the kit, and the wall follows the wing airfoil instead of going all the way down. This plays havoc with the position and size of various components. First the floor is placed 3 millimeters too high, the red line in the picture. The correct position is represented by the green line. But by placing the floor in this position would mean that a nasty hole would be visible (the yellow colored area).
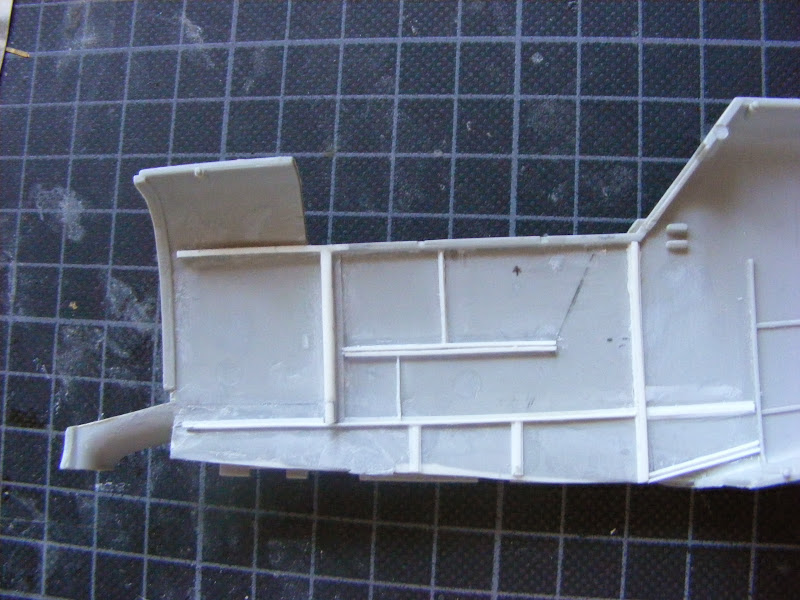
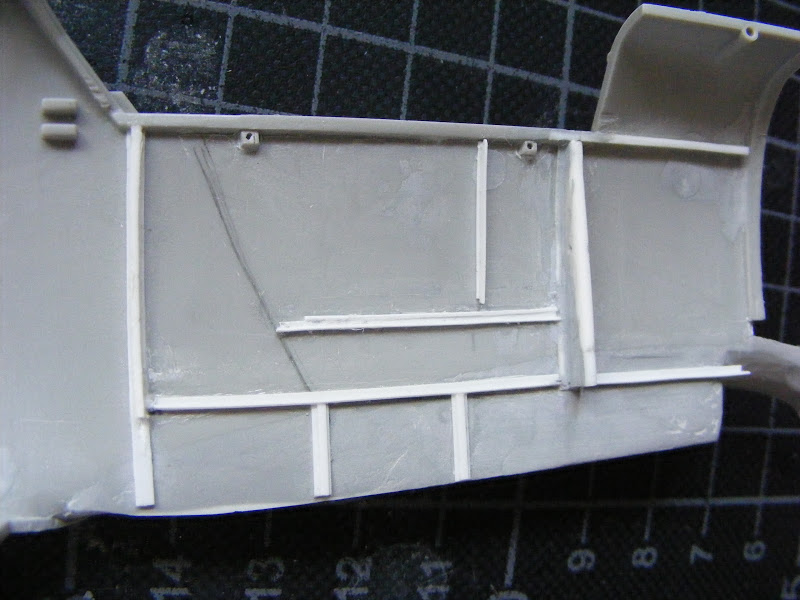
An easy fix, add styrene and putty over. All molded details on the interior had to be shaved off because of the floor sits too high issue and the fact that they do not match the corresponding rivet detail on the outside, being offset by 4 millimeters to the rear.
The right side now looks like this:
... and the left:
The Ersatzteil-Liste BF 109G, the March 1942 edition was used as a reference.
Joel_W

Joined: December 04, 2010
KitMaker: 11,666 posts
AeroScale: 7,410 posts
Posted: Monday, December 16, 2013 - 08:09 AM UTC
Florin, this is going to be one excellent build to follow. I'm really looking forward to it. You didn't take the short cut that the kit designers did. That re-fabrication of the fuselage walls with new stringers and formers looks outstanding.
Joel
Joel

FlorinM
Joined: August 01, 2011
KitMaker: 385 posts
AeroScale: 173 posts
Posted: Monday, December 16, 2013 - 06:53 PM UTC
What can I say? This is my second favorite prop driven single seat fighter and I do have a tremendous respect for Günther Rall, the man that not only walked again, but flew to rise to be the third highest scoring ace in history after having his back broken in three places...
FlorinM
Joined: August 01, 2011
KitMaker: 385 posts
AeroScale: 173 posts
Posted: Tuesday, December 17, 2013 - 12:03 AM UTC
The floor of the cockpit was lowered by cutting the rear wall in two and inserting a strip of styrene between the resulting pieces. You may notice the fact that the footrest, molded as an integral part with the floor, was removed because it sat between the rails instead of being on top of these.
FlorinM
Joined: August 01, 2011
KitMaker: 385 posts
AeroScale: 173 posts
Posted: Tuesday, December 17, 2013 - 05:47 PM UTC
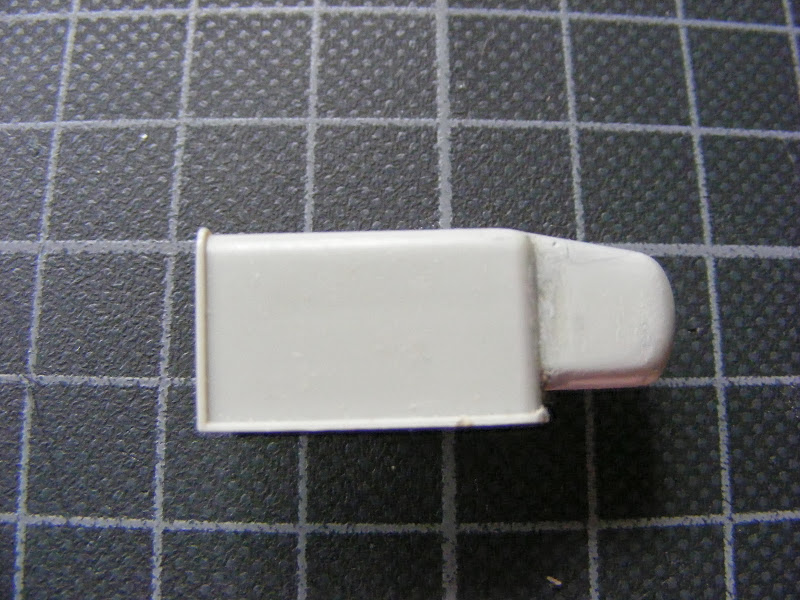
The undersized footrest was removed, cut in half and a strip of styrene brought it to a more accurate width. A semi-circular notch at the front was filed in as it was missing.
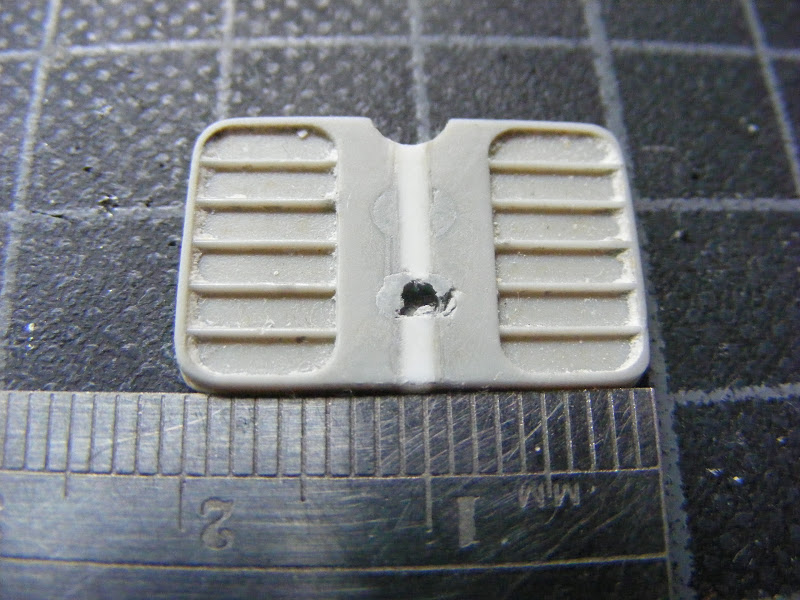
It was then used to make an aluminum copy that shall be used in its stead
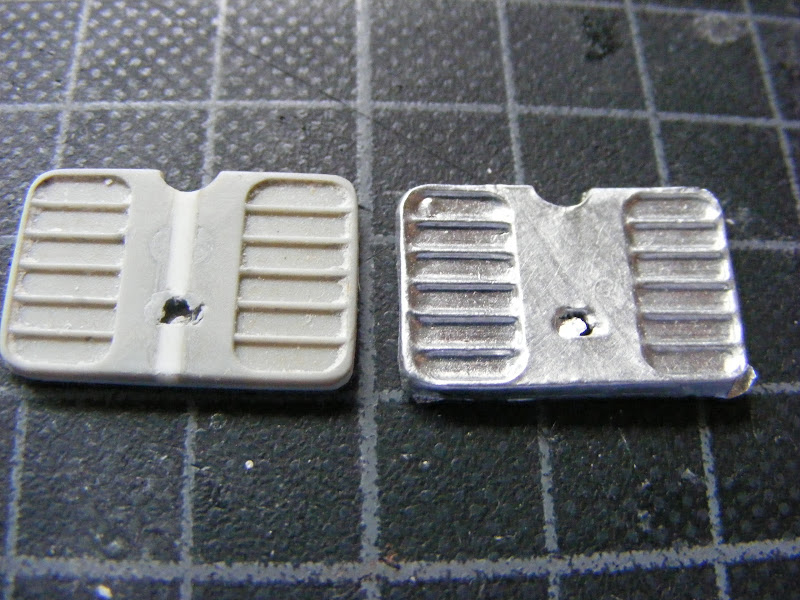
It was then used to make an aluminum copy that shall be used in its stead
FlorinM
Joined: August 01, 2011
KitMaker: 385 posts
AeroScale: 173 posts
Posted: Wednesday, December 18, 2013 - 07:50 PM UTC
The cockpit floor being too high is the most likely cause for the footrest being placed between the rails instead of being on top. The seat pan was also made too shallow to hide this inaccuracy.
A new seat pan was built, that has a more accurate shape and a thickness more true to scale.
A new seat pan was built, that has a more accurate shape and a thickness more true to scale.
Joel_W
Joined: December 04, 2010
KitMaker: 11,666 posts
AeroScale: 7,410 posts
Posted: Thursday, December 19, 2013 - 02:32 AM UTC
Florin, Your solutions to those basic cockpit details worked perfectly. The footrest really looks good in Aluminum, and the new seat pan has a much better scale look to it.
Joel
Joel

Merlin

#017


Joined: June 11, 2003
KitMaker: 17,582 posts
AeroScale: 12,795 posts

Posted: Thursday, December 19, 2013 - 02:46 AM UTC
Hi Florin
Neat work! Is that aluminium foil? I've never tried that technique to produce a copy.
I can see I'll learn a trick or two from this thread. Keep the updates coming!
All the best
Rowan
Neat work! Is that aluminium foil? I've never tried that technique to produce a copy.
I can see I'll learn a trick or two from this thread. Keep the updates coming!
All the best
Rowan

Joel_W
Joined: December 04, 2010
KitMaker: 11,666 posts
AeroScale: 7,410 posts
Posted: Thursday, December 19, 2013 - 03:36 AM UTC
Quoted Text
Hi Florin
Neat work! Is that aluminium foil? I've never tried that technique to produce a copy.
I can see I'll learn a trick or two from this thread. Keep the updates coming!
All the best
Rowan
Curious myself as to how the footrest was made. Don't think it's Aluminum foil as it's solid.
Joel
FlorinM
Joined: August 01, 2011
KitMaker: 385 posts
AeroScale: 173 posts
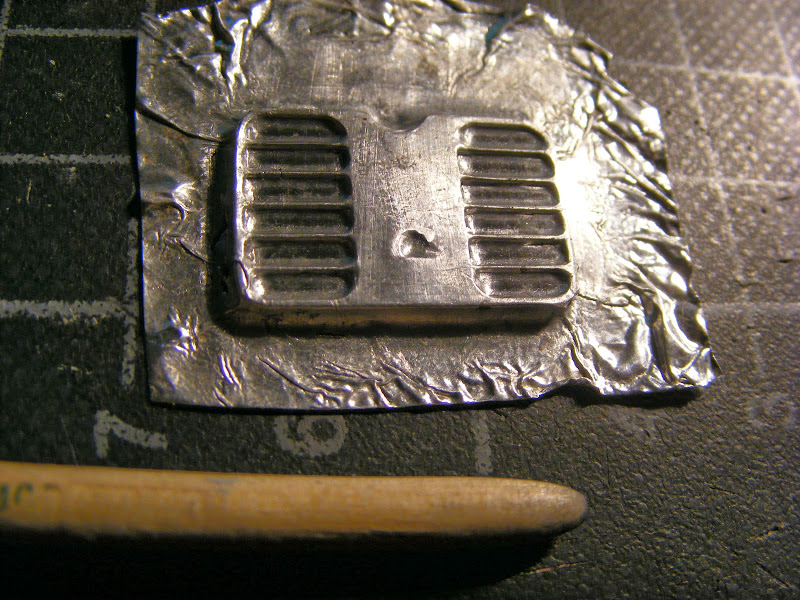
Posted: Thursday, December 19, 2013 - 05:01 AM UTC
Merlin is right, it is aluminum foil, a really thick one. There are food trays made from a thinner sheet, it should work, all you need to do is straighten the material...
The idea was that the piece would look more like a stamped part than the original with the bonus of its natural color.
It is really, really simple, first you carefully follow the contours of the piece...
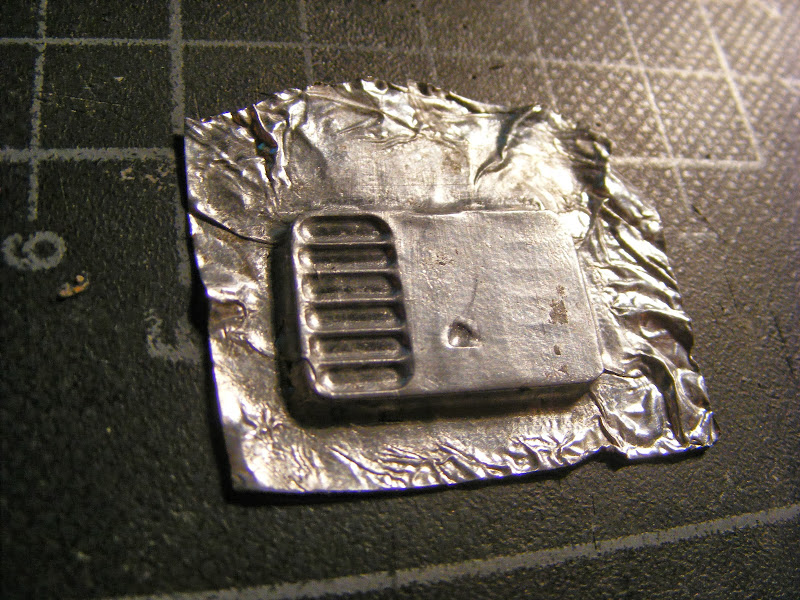
...and then press in the details by using a wooden implement such as a toothpick, match or in this case the tail end of a brush. Remove excess material. Optionally fill the piece with Milliput or resin for strength. It's that easy!
The idea was that the piece would look more like a stamped part than the original with the bonus of its natural color.
It is really, really simple, first you carefully follow the contours of the piece...
...and then press in the details by using a wooden implement such as a toothpick, match or in this case the tail end of a brush. Remove excess material. Optionally fill the piece with Milliput or resin for strength. It's that easy!
Joel_W
Joined: December 04, 2010
KitMaker: 11,666 posts
AeroScale: 7,410 posts
Posted: Thursday, December 19, 2013 - 05:24 AM UTC
Florin, what a great idea/method. My apologies to Rowan. It just never occurred to me to fill in the hollow back. I can already see all sorts of uses for this technique.
Joel
Joel
FlorinM
Joined: August 01, 2011
KitMaker: 385 posts
AeroScale: 173 posts
Posted: Thursday, December 19, 2013 - 08:59 PM UTC
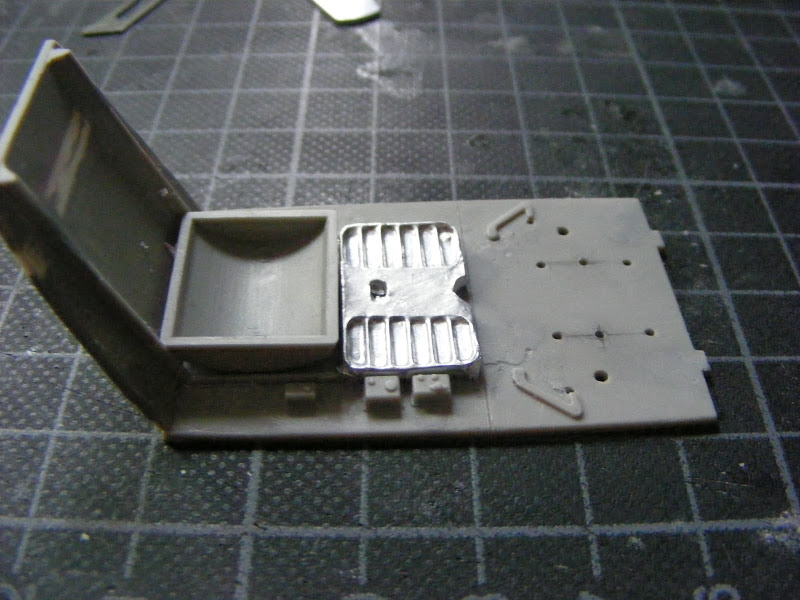
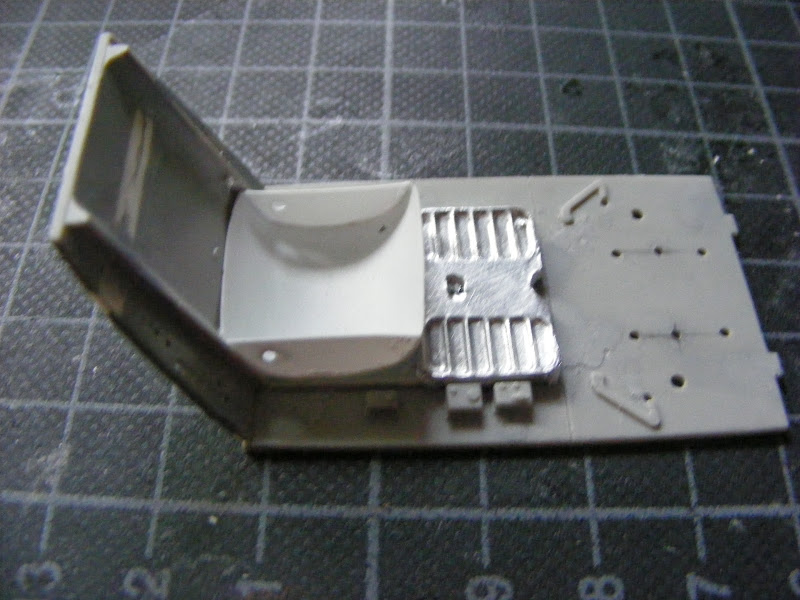
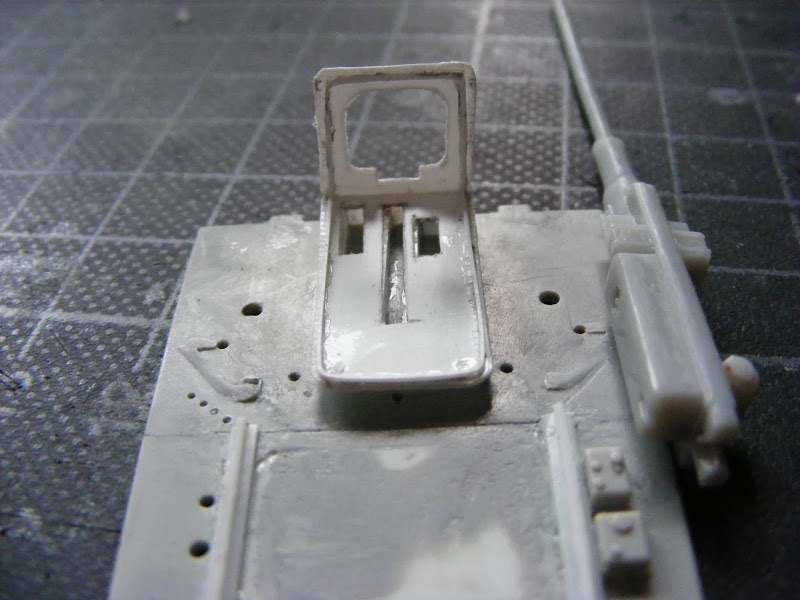
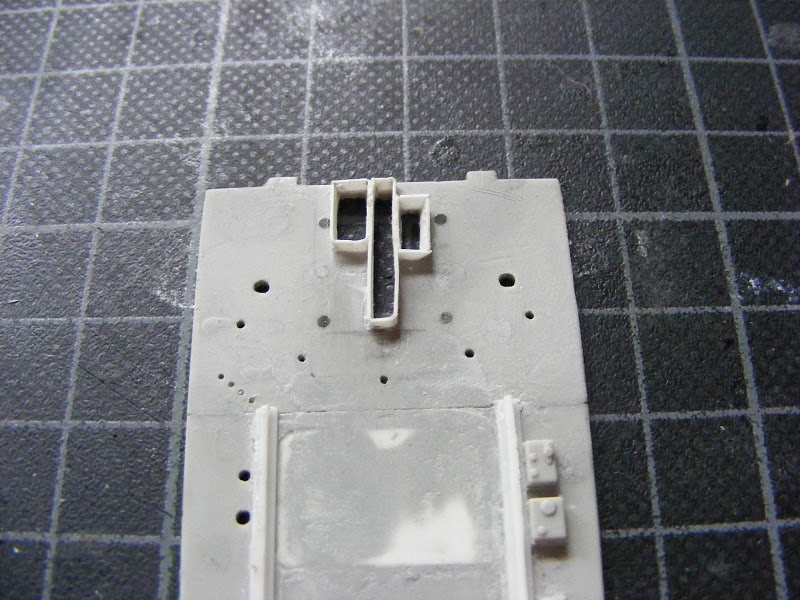
The "rails" were replaced, having a wrong profile. The central piece served both as a spacer/mount for the MG151/20 and as a support for the rudder pedal/brake assembly
Merlin
#017
Joined: June 11, 2003
KitMaker: 17,582 posts
AeroScale: 12,795 posts
Posted: Thursday, December 19, 2013 - 10:48 PM UTC
Hi again Florin
Thanks for the explanation. I'll definitely give foil a try - it looks a very handy technique to master.
All the best
Rowan
Thanks for the explanation. I'll definitely give foil a try - it looks a very handy technique to master.
All the best
Rowan
FlorinM
Joined: August 01, 2011
KitMaker: 385 posts
AeroScale: 173 posts
Posted: Wednesday, December 25, 2013 - 02:17 AM UTC
A little more work on the gun breech cover, it now has its bottom section. The MG 151/20 comes from the old Airfix FW 190 A-5/A-6 kit waiting for its turn in the stash. The Trumpeter one needs to be replaced as it hardly resembles the real thing.
FlorinM
Joined: August 01, 2011
KitMaker: 385 posts
AeroScale: 173 posts
Posted: Thursday, January 09, 2014 - 07:12 PM UTC
The rudder pedal/wheel brake assembly, under-detailed and placed too far back needs to be rebuilt completely. Molded on details were shaved off the cockpit floor.
Holdfast
#056

Joined: September 30, 2002
KitMaker: 8,581 posts
AeroScale: 4,913 posts
Posted: Thursday, January 09, 2014 - 09:42 PM UTC
Hi Florin, (Two Bob  )
)
Great start, this is definitely one to watch I too admire the way that you created the foot rest and I'm looking forward to see what else you do
I had to smile when I read this as you seem to be almost completely rebuilding the cockpit If this is straight forward when does it get complicated, that says something for your skills
)Great start, this is definitely one to watch
I too admire the way that you created the foot rest and I'm looking forward to see what else you do Quoted Text
There are some minor issues with the cowlings, the cockpit and the rudder outline, other than that it will be a pretty straightforward build log.
I had to smile when I read this as you seem to be almost completely rebuilding the cockpit
If this is straight forward when does it get complicated, that says something for your skills 
FlorinM
Joined: August 01, 2011
KitMaker: 385 posts
AeroScale: 173 posts
Posted: Thursday, January 09, 2014 - 11:18 PM UTC
It's nothing special really, I'm sure that any modeller with average skills can replicate my results or even do a better job...
FlorinM
Joined: August 01, 2011
KitMaker: 385 posts
AeroScale: 173 posts
Posted: Thursday, January 09, 2014 - 11:34 PM UTC
More corrective stuff, this time on the breech cover itself. As supplied in the kit it is a two piece affair with the front section of adequate length. The rear part, a short cuboid is missing three millimeters in length. A section was added, fixing the issue. Filler was then used to create the downward slope. The 90 degree corners were then rounded. It still requires some straps and a couple of weld lines, but it looks decent shape-wise.

greif8

Joined: January 17, 2006
KitMaker: 673 posts
AeroScale: 492 posts

Posted: Tuesday, January 14, 2014 - 07:11 PM UTC
Florin, you are doing some outstanding scratchbuilding. A real joy to look at!
Ernest
Ernest
FlorinM
Joined: August 01, 2011
KitMaker: 385 posts
AeroScale: 173 posts
Posted: Tuesday, January 14, 2014 - 10:19 PM UTC
Well, the Aircraft more than deserves it!
FlorinM
Joined: August 01, 2011
KitMaker: 385 posts
AeroScale: 173 posts
Posted: Thursday, August 28, 2014 - 08:53 PM UTC
A step back from the intricacies of the cockpit, a little work on the wings:
first the unconvincing bulge on the wings specific to the G-6 version had to be covered:
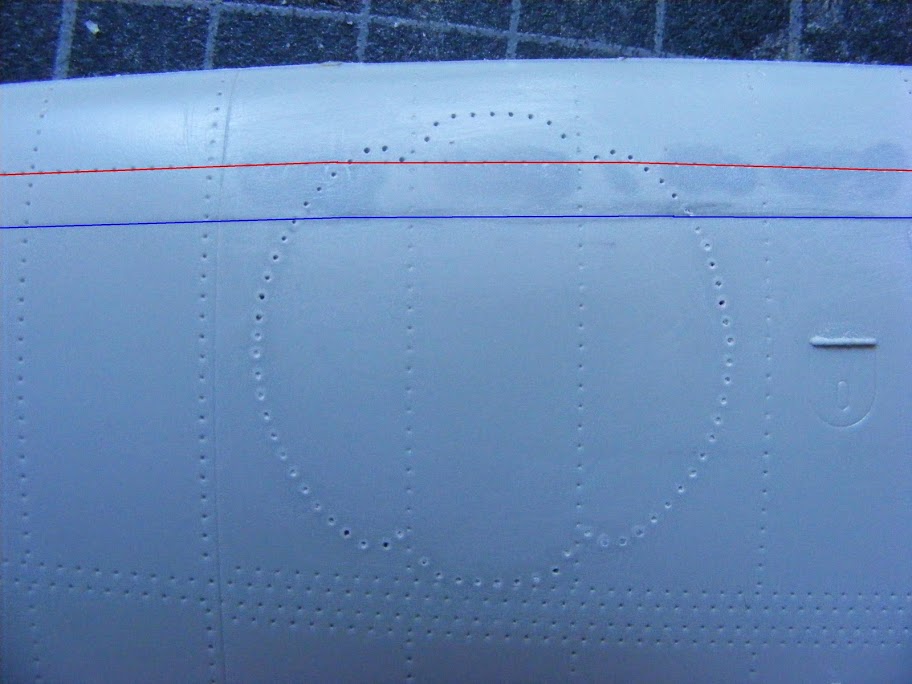
Doing the circular patterns on the top of the wings has led to the discovery of the fact that most of the rivet lines are wrong and have to be redone:
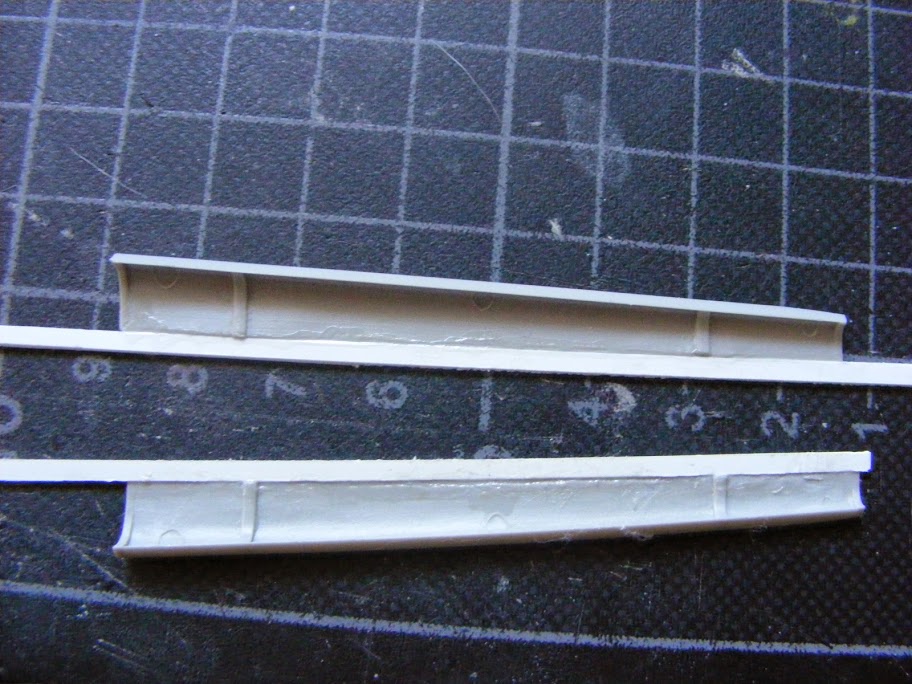
Also the automatic slats need 2 more millimeters to be accurate:
first the unconvincing bulge on the wings specific to the G-6 version had to be covered:
Doing the circular patterns on the top of the wings has led to the discovery of the fact that most of the rivet lines are wrong and have to be redone:
Also the automatic slats need 2 more millimeters to be accurate:
Joel_W
Joined: December 04, 2010
KitMaker: 11,666 posts
AeroScale: 7,410 posts
Posted: Friday, August 29, 2014 - 04:53 AM UTC
florin,
Redoing all those rivets will certainly be a major undertaking.
Joel
Redoing all those rivets will certainly be a major undertaking.
Joel
FlorinM
Joined: August 01, 2011
KitMaker: 385 posts
AeroScale: 173 posts
Posted: Friday, August 29, 2014 - 05:15 AM UTC
One more thing on the "to do" list, it has to be done and it's not rocket science. Fill in the old holes, mark lines and use riveting tool then drill to ensure uniformity... Not that easy will be to cut the wings so that the corrected slats would fit. I thought this kit is a pretty straightforward job other than cockpit and tail. Turns out it's not the case, like so many Trumpeter plastics...
FlorinM
Joined: August 01, 2011
KitMaker: 385 posts
AeroScale: 173 posts
Posted: Saturday, September 06, 2014 - 07:15 PM UTC
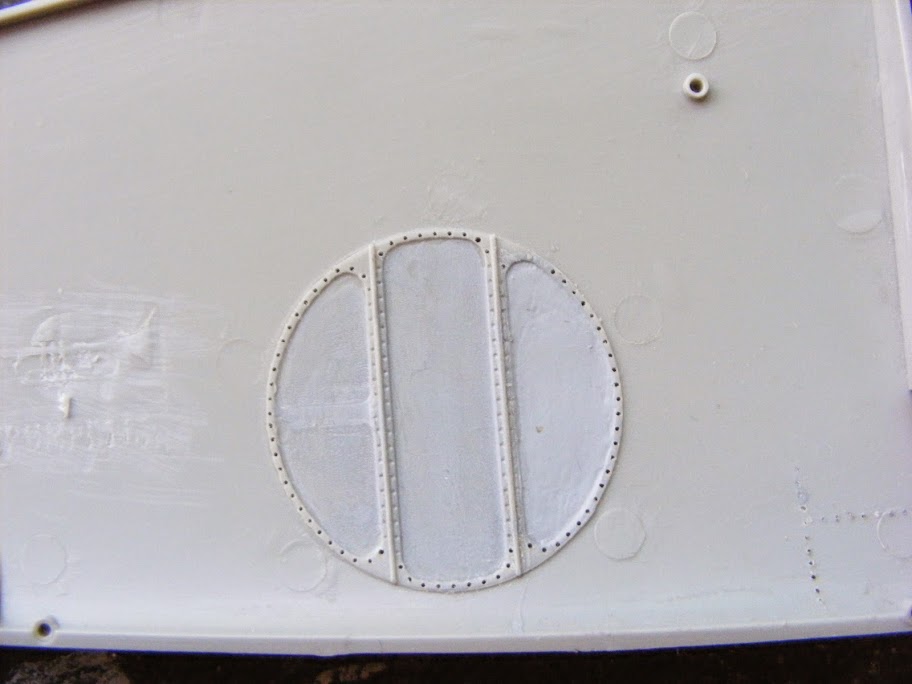
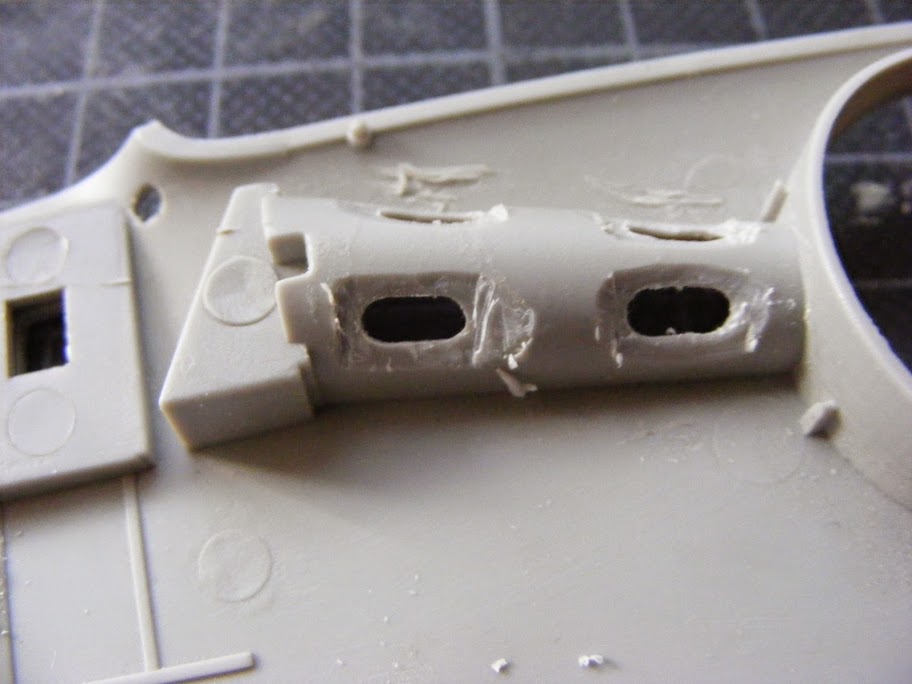
The underside of the wings is an area rendered in a 1:72nd scale manner: the vent for the spent MG151/20 ammo bin is shown as a rectangle, it was cut and will receive its gills. Behind and to its right the two holes are for the auxiliary fuel tank. In front of the MG 17 ejection slots you can see one of the two holes for the oil breather outlets that will receive a short section of tubing. The landing gear bay also lack detailing. The specific ovoid holes, represented as indentations were drilled.
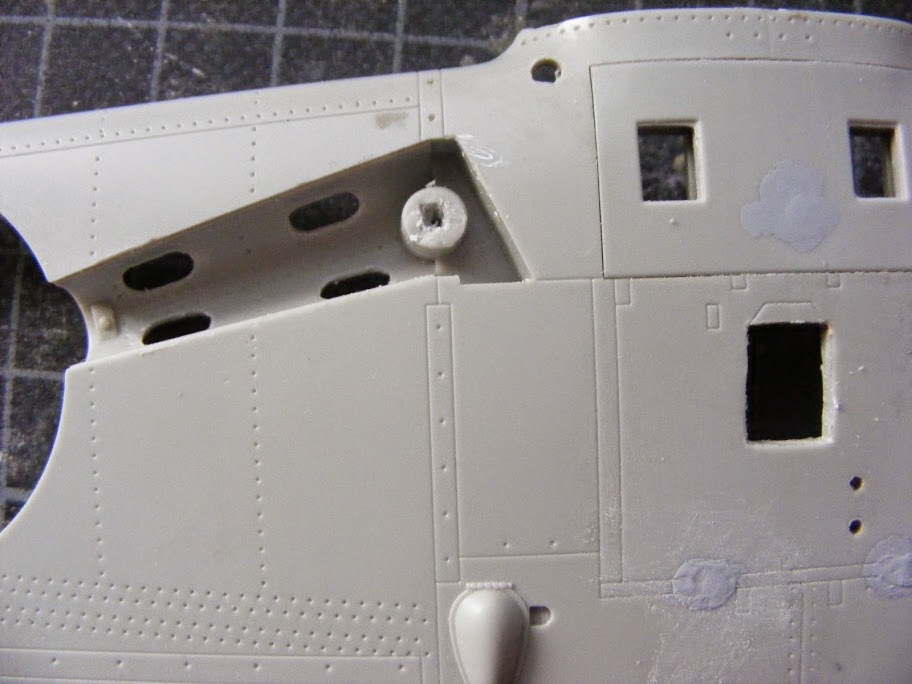
The walls of the gear bay have a thickness of more than 2.5 millimeters that needed to be thinned for a scale accurate look.
The walls of the gear bay have a thickness of more than 2.5 millimeters that needed to be thinned for a scale accurate look.
 |

WEB HOSTING BY


Copyright ©2021 AeroScale and Kitmaker Network, a subsidiary of Silver Star Enterprises
All Rights Reserved. Please read our Conditions of Use and Privacy Policy.
All Rights Reserved. Please read our Conditions of Use and Privacy Policy.