_GOTOBOTTOM
Rotary Wing
Discuss helicopters and other rotary wing aircraft from any era.
1/35th WW/SM MH-47E Online Build
FloydWerner
_VISITCOMMUNITY
Maryland, United States
Joined: February 19, 2006
KitMaker: 144 posts
AeroScale: 141 posts
Posted: Monday, November 04, 2013 - 03:55 AM UTC
Werner’s Wings/Storm Miniatures 1/35th MH-47E Conversion Online Build


Before I even begin I’d like to personally thank some people who have helped make this project happen. First off and certainly the biggest reason for this conversion is the outstanding work of Andriy Bass from Storm Miniatures. Most of the work that you see here is his. Without him and his dedication this set would not have come to fruitition.

Then there is Norbert who did some CAD work that helped out immeasurably.

There are some people who are behind the scenes that either helped with casting and with information. You know who you are. Thanks for your expertise in casting. Thanks to the guys who provided information and for your service. This set is dedicated to you and your fellow Night Stalkers.

It is time to start building the Werner’s Wings/Storm Miniatures 1/35th MH-47E Conversion for the Trumpeter CH-47D. Many have asked if they can use the CH-47A, unfortunately no you can’t, the rear pylon is totally different.

Here is a picture of the Werner’s Wings/Storm Miniatures Conversion set


Here is the list of what I have so far for the build.
Trumpeter 1/35th scale CH-47D
Werner’s Wings/Storm Miniatures MH-47E Super Conversion
Eduard CH-47D Cargo Seats
Cobra Company Aft Pylon Upgrade
Cobra Company CH-47D Upgrade
Legends M-134 and Master Barrels Turned metal barrels. I have listed these two until Live Resin releases their remarkable sets for this conversion.
Aluminum tubing ¼” by 19” long. I used K&S but any aluminum tubing will work. It MUST be aluminum.


There will be some scratch building that the modeler will have to do but we’ve tried to keep that to an absolute minimum. Obviously any conversion of this magnitude is only recommended for experienced modelers.

Before I began I looked over the photos and there are some things that can be done prior to even receiving the conversion set. Things in red need to be removed by cutting and sanding. Items in black are either a place for a conversion part or are panels that need to be added by rescribing. All of these things are easier to do now while the parts are separate.

Starting on the left side. The forward fuselage requires removal of a few antenna mounts.


Mid to aft fuselage. The big thing here is the removal of the bumps for the ‘clothesline’ HF antenna mounts. The MH-47 has a smaller antenna.


Left side Aft Pylon.
This requires some rescribing on the panel lines. The grill needs to be filled. There are also a bunch of parts that will eventually go on back here. This area will be built up shortly so you can see what gets added and what gets filled.


An item that may or may not be there on your particular model is the enlarged rear windows. I’m going to add them to both sides so you can see how it is done. I have pictures that show bulged round windows on both side, some with just a single window on the right side, and finally both sides with the enlarged windows. So either check your references or go with what you are comfortable with. Personally the ‘norm’ appears to be both enlarged.


FloydWerner
_VISITCOMMUNITY
Maryland, United States
Joined: February 19, 2006
KitMaker: 144 posts
AeroScale: 141 posts
Posted: Monday, November 04, 2013 - 03:56 AM UTC
Now onto the Right side

The forward fuselage, including the door. There are just a few panels that will need to be removed and some added. A grab handle will have to be added to one spot.


Here is a close up of where the mounts for the hoist belong.


Same goes for this enlarged window


Then there is the upper pylon. Same as before this will be developed as we get involved in the conversion


NIGHTSTALKER06
_VISITCOMMUNITY
Alpes-Maritimes, France
Joined: November 29, 2008
KitMaker: 13 posts
AeroScale: 11 posts
Posted: Monday, November 04, 2013 - 07:08 AM UTC
Dddaaammmnnnnn!!!! Can't wait to get mines !!!! One grey and one dark green with folded rotor...
You're a Master Floyd !!!!
For the next one... Can we get a MH-60K conversion?
Thanks for what you do!
HeavyArty
_VISITCOMMUNITY
Florida, United States
Joined: May 16, 2002
KitMaker: 17,694 posts
AeroScale: 1,728 posts
Posted: Monday, November 04, 2013 - 07:26 AM UTC
Outstanding!!! I'll be watching this. Congrats on getting it out Floyd.
J8kob_F
_VISITCOMMUNITY
Stockholm, Sweden
Joined: October 24, 2012
KitMaker: 202 posts
AeroScale: 92 posts
Posted: Monday, November 04, 2013 - 09:54 AM UTC
Looks like it's going to be an awesome build will definitely follow this build

Jakob
FloydWerner
_VISITCOMMUNITY
Maryland, United States
Joined: February 19, 2006
KitMaker: 144 posts
AeroScale: 141 posts
Posted: Thursday, November 07, 2013 - 07:12 AM UTC
Update #2

I decided to work on the aft pylon which would require some work

The first thing I did was to fill the holes on select panels which are unique to the MH-47. Then using a beading tool, (http://www.fdjtool.com/ProductInfo/53.2E_160.aspx) which is significantly cheaper than other ‘rivetting tools’, to replicate the fasteners on the panels. This was followed up by some scribing access panels around the pylon and using a needle to create the screw heads. I think I could have used some Archer rivets if I chose to do so. I like the effect as it is.

Pylon Parts added


I filled the holes for the HF antenna that is different on this aircraft with superglue and accelerator once the proud part of the antenna mount was removed.

Then the first parts of the conversion were added to the pylon, the AVR-2, APR-39, CMWS antennas and the lifting point. Fit of these parts is simple as they are just added to the surface with superglue.

The square aft window, which is much larger on the MH-47 than a normal CH-47, had to be created. The first thing I did was to chain drill the area that I had measured out. Just for those who are anal retentive, the window is 42 inches long and 27.75 inches high in real life according to my measurements. Your mileage may vary. The window sits slightly lower than the round window. Once the chain drilling was done the part was cut out with nippers. Clean up starts with a BAF (Big A** File). This keeps the surface flat. I was able to use it on all sides but it made the corners square which was not what I was after. I then mixed up some Apoxy Sculpt and smushed it in the corners. A knife blade holder was moistened slightly and pressed into the corner. This has the effect of rounding off the corner and making sure that all four corners are the same. A sharp knife blade was used to trim away any excess Apoxy Sculpt. This was then left to dry overnight. A couple of swipes with a fine sanding stick will blend the corners once dry.

Chain Drilled Window


Cleaned Up Window


Finished Left Side Pylon


On the inside of the fuselage, some Apoxy Sculpt was used to fill the remains of the window. Then a saw was used to finish off the insolation blanket pattern on the wall.

That is all of this side. I’ll start to work on the right side now.


FloydWerner
_VISITCOMMUNITY
Maryland, United States
Joined: February 19, 2006
KitMaker: 144 posts
AeroScale: 141 posts
Posted: Wednesday, November 13, 2013 - 08:45 AM UTC
Update #3

Finished up the right side. It is exactly the same as the left side. No big suprises except I sanded away too much of the base for the lifting point. I had to replace that with some styrene. Not a big deal and totally my fault.

Again here is how the rear widows were chain drilled out.


The right side in the middle of being modified


How I scribe some of the panels. Dymo tape is your friend.


The modified left front door. Note the small spot where the HF antenna mount was removed. That was done on a couple of other points on the model as well.


Cutting off the upper pylon looked daunting but it was actually very easy. I used a Tiger saw blade and cut the rear portion flush. Then I used a scribing tool to scribe the attachment point to the top of the fuselage. Make sure the cut is on the doghouse and not the fuselage. This was deepened until I thought it was sufficient and then the saw was used to remove the remainder. Simple. This hasn’t even been sanded flush.


The completed fuselage left side. It is starting to look like a beast.


Now to finish up the right side and start working inside the cockpit area.
HeavyArty
_VISITCOMMUNITY
Florida, United States
Joined: May 16, 2002
KitMaker: 17,694 posts
AeroScale: 1,728 posts
Posted: Wednesday, November 13, 2013 - 02:53 PM UTC
Its looking great Floyd. Keep the updates coming.
FloydWerner
_VISITCOMMUNITY
Maryland, United States
Joined: February 19, 2006
KitMaker: 144 posts
AeroScale: 141 posts
Posted: Thursday, November 14, 2013 - 07:18 AM UTC
Update #4
The right front fuselage is the focus of this update.

Sorry it is blurry but these panels were added as well as the grab handle.


The doghouse was removed the same way as the other one, with a Tiger Saw that I picked up from UMM Models.


Close up of the hoist mounts. These will be the most challenging part of the conversion, I think.


Exterior Right side fuselage prepped for the rest of the build.


A motivational photo to see how the upper pylon would fit. It is held in place with a couple of strips of styrene to support it from the bottom, but the fit looks pretty good for just sitting there and no sanding.


Now onto the cockpit.
FloydWerner
_VISITCOMMUNITY
Maryland, United States
Joined: February 19, 2006
KitMaker: 144 posts
AeroScale: 141 posts
Posted: Saturday, November 16, 2013 - 02:40 AM UTC
Update #5
A pretty exciting day for me, test fitting the cockpit. The first thing I did was the pedals. After cleaning them up I noticed that they were too long for the troughs.

This is how they are provided


This is after they were modified


I used a drill and pin vise to drill all the way through the parts so that the pedals could be pivoted until I was ready to set them in place


This is the pedals as seen through the side window. I will add the brake lines later.


Here is the cockpit put together with just a few drops of glue to hold the parts in place. They are not permanently attached. I am still working on the ‘correct’ way to attach the glare shield. This is not it but it does show up nice.


Now to see how it fits inside the clear nose piece. I’m pretty happy with the fit.


FloydWerner
_VISITCOMMUNITY
Maryland, United States
Joined: February 19, 2006
KitMaker: 144 posts
AeroScale: 141 posts
Posted: Thursday, December 05, 2013 - 08:12 AM UTC
Sorry for the delay. I’ve been busy packaging both the MH-47s and Avia S-199s for shipment. You would be surprised by how long it takes. There are still some of you waiting for their Night Stalker Chinook. I am getting more parts from the caster as I had issues with some things. I haven’t forgot you if you haven’t heard from me yet.

Time to start getting some color into the cockpit area.

First off I’ve added the Multi-Function Displays (MFD) to the backside of the instrument panel. I want to add some brake lines as well but haven’t done that yet.


Here are the parts looking from the pilot’s view. I think it looks impressive.


After washing in a grease removing dish detergent and rinsing in warm water, the cockpit was given a coat of Alclad grey primer. This is my favorite primer period. Notice how everything comes together.


A coat of Tamiya zinc was applied to the floor and some components. Then a sponge was used to dab some chips on the paint with Mr. Maskol. These will be removed later during the weathering stage.


While that was drying I did some work with glare shield. I wasn’t sure if I should recommend the Cobra Company CH-47D cockpit set just because I wasn’t sure what it adds. Well I changed my mind. I highly recommend the set. It has a bunch of useful stuff. Here I’ve attached the compass from the kit and the blue lights under the instrument panel.


I also took this time to prep the kit parts for the cockpit floor. First off I cut the kit cockpit off. I sawed at a 45 degree angle taking care to leave the holes for the tabs on the kit broom closet. This ensured that would fit properly.


Then I had to remove the floor support on the fuselage halves and the small L shaped bracket on the right fuselage half.


Finally after I was done with that it was time to add various shades of black. I used Tamiya NATO Black for the instrument panel and boxes. Lifelike Cockpit Black was used for the floor. The insulation was painted Tire Black. These are initial colors and there will be weathering and other things going on but for now it looks pretty black and cool.


That is where I left off. Now to do some other little detail painting prior to weathering with Mig Pigments and SIN filters.
FloydWerner
_VISITCOMMUNITY
Maryland, United States
Joined: February 19, 2006
KitMaker: 144 posts
AeroScale: 141 posts
Posted: Tuesday, December 10, 2013 - 07:23 AM UTC
Well the color, black, was painted and the details were picked out. It is a shame that most of this will not even be seen on the finished aircraft. I know it is in there though.

Here is the complete cockpit minus the seats. There are no less than seven different blacks in there. The overall color was Lifelike Deep Cockpit. That was given a filter of SIN Grey for Panzer Grey. When that was dried, a dry brush of Model Master Steel to give it a metallic feel. Then small sponges were used with Tamiya Zinc and Model Master Steel to replicate the wear patterns in around the cockpit. This was enhanced with some Mig Pigments, Desert Sand. Apple Barrel paints were used for the various colors around the cockpit. The instruments were added from aeroscale. Grey pencil was used to pick out the MFD knobs and some other minor items. Tamiya Clear Green, Smoke, and Clear Blue were used on various MFDs.


The seats were painted with Tamiya Flat Black with a very light dusting of grey. They are fabric so they shouldn’t be worn. The belts were painted with Apple Barrel paints. When dried the shoulder harnesses were given SIN filters of Blue for Panzer Grey. The seatbelts got SIN’s Brown for Desert Brown filter. The buckles were painted with Model Master Aluminum.


Here is the completed cockpit subassembly.


FloydWerner
_VISITCOMMUNITY
Maryland, United States
Joined: February 19, 2006
KitMaker: 144 posts
AeroScale: 141 posts
Posted: Thursday, December 12, 2013 - 09:50 AM UTC
Update 8
Just a quick update. I forgot to add the circuit breaker panels so here they are installed. I had to move the fire extinquisher forward slightly.


I added brake lines to the pedals but these will never be seen. I know they are there


The avionics shelf and area were the next little project I took on. I used the Cobra Company CH-47D Update set. I think this is an essential set now that I’ve been building the model.


Here are the shelves themselves.


Now I’m taking on the aft transmission area before I tackle the interior. I’ll be using the Cobra Company set for this as well.


HeavyArty
_VISITCOMMUNITY
Florida, United States
Joined: May 16, 2002
KitMaker: 17,694 posts
AeroScale: 1,728 posts
Posted: Thursday, December 12, 2013 - 09:39 PM UTC
Looking great Floyd. Keep up the great work.
FloydWerner
_VISITCOMMUNITY
Maryland, United States
Joined: February 19, 2006
KitMaker: 144 posts
AeroScale: 141 posts
Posted: Wednesday, January 08, 2014 - 10:39 AM UTC
Update 9
This update has more to do with Cobra Company stuff than the Werner’s Wings/Storm Miniatures MH-47E Conversion. Might as well do the whole enchilada while I’m doing it. I’m sorry it is taking me so long but you know how having family and the holidays get. The granddaughters significantly cut into my modeling time.

Before I could do any work I had to fill the strange shaped mold marks. I used Perfect Modeling Putty. This stuff is really good. Let it dry thoroughly and then dry sand it and the stuff is pretty perfect. A good tool to add to your box.

You’ll note that I decided to use the Cobra Company Aft Pylon set (Catalog # 35025). I liked the set but the instructions leave a little bit to be desired. Here is the way that I elected to put it together.


I found that my transmission cover was too short. I probably built something wrong but I decided to replace it with a cover of my own. It was easy enough to make and it looks good, especially after some paint.


The Cobra Company set offers a lot of nice stuff for the back end of your Chinook. This is visible on the finished model so I decided to do some work back here. I ended up scratch building some frame work because what is in the kit is not very accurate. Evergreen styrene was used for the various boxes and structural panels.

Left Side


Right Side


Once the structural framework was built up I added some of the Cobra Company items. This is not all that needs to be added but I left some of that off until later. All the resin pieces come in the Cobra Company set.

I did add a piece from the Werner’s Wings set, the Hydraulic Panel on the right sidewall. A word of caution here. The panel is made to actual scale not to fit the model. You can either live with this or do as I did which was sand the panel from the left side. I took off one row of circuit breakers. This allows the panel to sit into the structural framework, although it is still a little big. I liked the look. If you got the Cobra Company set you can use the one that is included in there as it is smaller and designed to fit the kit. Your call.

A coat of Alclad Grey Primer allowed me to correct anything that needed fixing. This stuff is my go to primer. It dries by the time you clean out your airbrush. Super highly recommended.
Left Side


Right Side


Once I was happy with the primer, I pre-shaded the entire area with Tamiya NATO Black. Any black will do but I like NATO Black.
Left Side


Right Side


Then a coat of Tamiya Dark Grey was sprayed on. I know it isn’t an exact match out of the bottle but after the weathering it will be a dead ringer. The grey was lightened with some White and thinned down some more. Then details and streaks were added to add visual interest. It still needs a wash and dry brushing but it is good for now.
Left Side


Right Side


Once the wash and dry brushing are done I’ll start adding tubing and wiring. It may not be 100% accurate but it will be representative of the real thing and will look busy.

Here is a start on the next part, the cabin area. I have started to remove the overhead panel supports in preparation for the Cobra Company interior set (Set Number 35022, unfortunately it is out of production).


More to come. Almost time for the big conversion stuff. Just have to finish up the cabin and aft pylon area. Then time to add the heavy fuel cells and other things that will make this a different Chinook.


FloydWerner
_VISITCOMMUNITY
Maryland, United States
Joined: February 19, 2006
KitMaker: 144 posts
AeroScale: 141 posts
Posted: Friday, January 24, 2014 - 02:29 AM UTC
Update 10-The interior
After cleaning up the roof to remove the molded on detail it was time to add the Cobra Company framing set. I don’t think this set is available anymore. I did this process without the aft portion attached to the fuselage. It just made it easier to handle. I just followed the instructions to get the vertical parts in place. I elected to cut the parts in half as it would be easier to deal with. This required me to fill the small gap between the cuts. Here is what it looks like with the parts installed. I used styrene plugs to cover the joins. Most are from the backside but the first two are on both the front and backside as they are seen both ways.


Before I installed the horizontal supports for the seats and anything else I thought it was time to add the aft pylon to the fuselage. This wasn’t difficult as long as you take your time and make sure the fit is good. I flat sanded the ends to make sure they fit well. Then it was a matter of clamping and gluing the parts together. There was very little need for filler.

Here are the frames after the front and back have been joined.


And just to make sure that it all fits properly and to motivate me I taped the fuselage halves together.


Now I thought was a good time to add the external fuel tanks. I knew I had to support the weight of them and the model. The tanks are unfortunately heavy because of the shape and casting. Test fitting them revealed a slight problem. The tanks are slightly short. It is important to align the tanks properly at the front and at the rear round window. Here is what I mean.


If you align the front the window is off. I’m not going to say it is blank mm short as your mileage may vary do to the sanding of the fuselage halves. Either way, I came up with a relatively easy fix. I cut the fuel tank in half. Aft of the pump assembly, which while I’m thinking about it, I’m sorry there is a bubble there. It is on everyone’s copy. Mine included. It is a limitation in the molding process. You will have to repair it. Sorry. Anyhow back to the cut. I used a saw and separated the pieces.


Once the tank was in two pieces I simply added styrene to get it to the proper length. I used some clamps and a BAF (big a* file). My BAF is very straight so I simply clamped it to file. This made sure that there was no twist in the tank and that they were aligned along the bottom, which in theory should align everything. While the tank was attached to the file I put a horizontal support on the backside of the tank. There is plenty of room and you’ll never see it so you don’t have to be especially neat. I then drilled four holes for wire support, two in front and two aft of the cut. This held everything in place. Then it was as any other seam, filler, sand and repeat. If you do it properly it should look like this.


Then it is just a matter of checking the size against the model.

Getting the tank to attach to the fuselage is pretty easy. I drilled four holes in inconspicuous spots, two below the floor line and then some mid fuselage that you probably won’t be able to see. You’ll note the aft most ones are near the bulkheads. This will hide it from the back and will allow me to add stuff (seats or gear) to cover the holes.


I attached the wire through the holes and attached the studs with epoxy. I let it dry overnight and then I’ll go back in with super glue and Apoxy Sculpt and fair the tank in. Repeat for the other side.

It is starting to look like a behemoth that it is. This ain’t your father’s Chinook anymore.
FloydWerner
_VISITCOMMUNITY
Maryland, United States
Joined: February 19, 2006
KitMaker: 144 posts
AeroScale: 141 posts
Posted: Sunday, February 09, 2014 - 06:42 AM UTC
Update 11- Sit down but still not happy
I had the framework in and now it was time to put some seats down. I had the Cobra Company resin seats and the Eduard photo etch ones. I liked them both but finally decided on the Eduard ones. Folding them was easy enough with a Small Tool Company Folding Tool. Here are some photos of the seats.


Test fitting the seats to the floor


There are more sets coming but I wanted to get a ‘feel’ of how they would look


Well after getting the interior framing in there and talking with some Night Stalkers they informed me that there was always insulation in the cabin. So now what to do? So I took to drinking. Then after literally dreaming about how to accomplish this for two nights, the drinking hit me. Martini & Rossi Asti Spumante has foil around their bottles and it looks like a quilt pattern on it. BINGO! In a drunken and sleep deprived state of mind I concocted how to make this happen, but I better test it before I screw the model up.

I was never real happy with the avionics shelf as had been pointed out on ARC, that is normally covered with insulation blankets. I tore out the shelves as they would no longer be used and covered the area with plastic card and foil. I figured if it worked on the plastic card it would work the other way. Just in case I screwed up too bad I could always get another one from my other kit. Thank God, I liked it. I did find out after gluing it in place that I should have left the shelves in and rolled the insulation down to reveal the avionics. Oh well live and learn. It is staying like this, but you can do whatever you like.


Now it was time to see if the ceiling and side walls could be covered in insulation. The framework would work to my advantage and provide the mounts for the insulation. Since I would now have relief in the cabin I needed to make up the area where the first aid kits and the ramp controls would be positioned. The insulation attaches to them so they needed to be thicker than normal. I scratch built a couple of rectangular boxes out of .030 x .100 plastic strip. Then just attached and glued them in place. Here you can see the resulting areas.


The insulation itself is easy enough. First use tracing paper and measure and cut to the shape that you need between the frames. I broke it down into an upper and a lower insulation blankets. It looked right to me. Once the shape is good on the paper then double sided tape was added to it and on top of that the bottle foil was added. Make sure to orient the pattern the same on all the blankets. Attach them the blankets with super glue. VIOLA! I tried to not use an area with the name or stamp on it but there are some places where I said f it. It is in the middle and damn near impossible to tell. My liver can only do so much work. Another benefit of the insulation was that any holes I made for the fuel cell mounts were now covered with no additional filling.


Now that I had a sandwich it was time to fit the first pieces. Here they are installed with a first aid kit just sitting in position to see if it would look right. I'm very happy that it does, at least to me anyhow.


Another essential part would be that the insulation fits around the windows. You will have to glue in the windows now. Make sure you use the correct windows for the aircraft you are building. Normally, and I hate to use that with TF160th aircraft, the first two windows are flat, then the aft round window is the bulged type, followed by the rectangular one. I cut a piece of the foil and did not do the sandwich, maybe I should have, but with just the foil rolled around something of suitable size (15mm). I placed it in place and when I was happy with the set up I used white glue to hold it in place. Perfect. Well perfect to my mind’s eye. The rectangular widow presented the most unique challenge as the insulation blanket flares out to meet the framework on the kit tail. Nothing too bad. I used four pieces and cut them tapered then bent to fit. I was really happy.


Now it was just a matter of doing the entire side. Here is the right side as I still have to do the left one. You get the idea though. Any stuff that was longer on the bottom I trimmed with a brand new blade.


It is now time to do the left side the same way. Once I’m done with the left side, I will add .010 plastic ‘dots’ that are used to attach the blankets. I’ll also add some removable panels of insulation. Those are just scabbed on the existing blankets.

The Live Resin pieces should be here by the time I finish the insulation and then things will be progressing quickly. I’ll have to prime and paint the interior shortly after working with the Live Resin gun mounts. Don’t forget to mask the windows first, that could be disastrous. We’ll start dealing with more of the MH-47 conversion soon. Things like the weather radar boom and the in-flight refueling boom will cause me some more sleepless nights. Stay tuned.
Live-Resin
_VISITCOMMUNITY
California, United States
Joined: August 14, 2011
KitMaker: 808 posts
AeroScale: 11 posts
Posted: Monday, March 10, 2014 - 02:23 AM UTC
Live Resin CH-47 Chinook weapons and mounts for Floyd project and all others 1/35 CH-47
You can order right now http://models-hobby.com/?p=3
LRE35168 CH47 Chinook Back Ramp Weapon Mount with M240D


LRE35167 CH47 Chinook Window Weapon hand made Mount with M240D


LRE 35164 CH47 Chinook Window M134D Minigun mount


LRE35163 CH47 Chinook Door M134D Minigun mount


FloydWerner
_VISITCOMMUNITY
Maryland, United States
Joined: February 19, 2006
KitMaker: 144 posts
AeroScale: 141 posts
Posted: Sunday, April 13, 2014 - 01:33 PM UTC
Update 12

Sorry it has been a while since I updated. Medical and family issues are the typical detractors. I also had to finish a review build in there, but now I’m back on the build.

I finally got both sides of the fuselage insulated. Overall I’m pretty happy with the results. I finally got the Eduard Photo Etch seats built. I built them too long but didn’t figure that out until after I was test fitting. Better now than when they are glued in. I tested my first bit of soldering on the legs. I was happy with the results. I need more practice though.


Here is my second attempt at soldering, a Stokes litter completely scratch built. This was a fun six hour exercise. I learned a lot and will have to do it again. Yes I know it isn’t perfect, however, once filled up you can’t notice the framework. It just looks cool. I’m doing Razor 1 from Takur Gar and I’m not sure if the Stokes was used or a Skedco. For my model I will have a Stokes litter.


Part of the MH-47E’s cabin area will be occupied with equipment. Here is a load of things I have set up for the model. This was a mild detraction and well spent time. I could not have gotten some of this stuff if it wasn’t for some friends on the internet who hooked me up with some of the items or at least pointed me in the right direction.

Some of you will notice the folding chairs. I have a source that says they are used by the gunners. Should be interesting. I’ve learned a lot about this helicopter. I’ll try to point out the things that you’ll find cool too. So I’ll have a water cooler, tool box, four folding chairs, water cans, medical bags, back board, Stokes, stretchers (one folded and hanging and the other opened under the Stokes), two storage boxes, a couple of M-4s, four 40mm ammo cans which are used for the extra ammo for the M-134. Speaking of M-134s, Razor 1 did not have the extra battery pack or the extra M-134 can. They used the 40mm cans. While I’m thinking of it, Razor 1 also had an M-60 at the rear windows, not an M-249. Same mounts but different guns. Razor 1 also had a ramp M-60 with spade grips. I’ll make those additions as I go along. That reminds me of yet another point, 475 had a rectangular window on the right side and a round bulged window on the left. I will have to live with my two rectangular windows.


Here are the seats with the seatbelts installed. I opted to make them all the low style, instead of over the shoulder. I did this thinking that operators would have a lot of crap and a shoulder strap would get caught on everything. I started to use the Eduard seatbelts but found that they couldn’t be folded realistically enough for me. So I made my own belts out of masking tape. This would have been easier if they weren’t a dark green color. Anyhow that was easy enough to handle with some paint. I liked the look of the seats and belts. Now if they will just fit as well as they look.

Left side


Right side


In model building you can replicate or represent when scratchbuilding. In this instance I elected to represent the wiring and tubes. Solder or tubing was used to make the lines. I’m overall happy with the results. Andriy’s ramp area will replicate it but I just don’t have the time or patience for that.


Here is a close up of the aft end with the caution and warning decals in place. The first aid kits look the part as does the ramp control which is a leftover cyclic. All these decals, plus more, will be available from Werner’s Wings in the Night Stalkers Part 2 decals. These decals were made for me by Joseph Osborn from Fireball Modelworks because I couldn’t wait for the new decals. By the way, they will definitely be available at the Nats. If you are building an 1/35th scale Werner’s Wings/Storm Miniatures MH-47E and want to get it done for the Nats, let me know. If I can get you the decals in time I will, but no promises.

Here I’m test fitting the seats to see how they look in place. The tops still need to be folded down an secured in place.


With that you are brought up to date. I’ll start the Live Resin bits soon. I want to finish the right side fuselage plumbing and wiring first. It is coming along and almost ready to join halves. This is getting exciting. I have to make notes for myself so I don’t forget to do stuff before I shut up the fuselage. I know a lot of this stuff won’t be seen again but I know its in there and as accurate as I can make it.


FloydWerner
_VISITCOMMUNITY
Maryland, United States
Joined: February 19, 2006
KitMaker: 144 posts
AeroScale: 141 posts
Posted: Monday, April 14, 2014 - 01:20 PM UTC
Update 13

Just a quick update. I installed the left side seats. I initially thought this was going to be a pain but it was actually pretty easy. I’m really happy with the seats on this side. Time to work on the other side.


Here you can see how the decals, first aid kits, and hoist control add to the visual interest.


How does it look from the outside? Pretty realistic if you ask me.


FloydWerner
_VISITCOMMUNITY
Maryland, United States
Joined: February 19, 2006
KitMaker: 144 posts
AeroScale: 141 posts
Posted: Saturday, July 05, 2014 - 08:06 AM UTC
Update
It was time to start checking out the Live Resin stuff. One of the first things I had to do was re-read the book “Robert’s Ridge” which stated the back guns were M-60s and not the M-249 that Live Resin has. It is easy enough to do. I used a Vietnam Weapons set from Dragon which has enough M-60s for the back windows and the ramp gun. The guns are actually pretty phenomenal in plastic. Still the Live Resin would be used to build the mounts. The Live Resin sets are fragile on the smaller parts but a new blade makes quick work of it. The mounts fit perfectly. Superglue was used to join the parts. Simple easy and quick. I learned something, use new superglue. Old superglue may not work as well as desired.


Weathering of the flooring took place now. I used Ammo pigments and washes to do the floor. It was set in place with Pigment fixer. Overall I was pretty happy with the look of the floor. It looks dirty and used. I used dried mud, dark mud, and desert sand. Time to get this baby packed up for the mission.


I started with the left side first because it would have the most equipment on it.

Then I checked with my sources as to what was carried in the back of the cargo bay. A couple of different configurations were discussed. Finally we went with one that was pretty typical. It was not without a little issue. I had installed an additional set of seats forward on the left side. I had to remove it. It was not as big an issue as I thought it would be. Another thing that was discovered was that the floors had straps from the front to the back that operators or equipment can be secured to. I added mine by cutting masking tape and painting it a dark green. You can do dark green, black or off white. Then I drilled holes into the appropriate tiedown points and ran a length of wire through each to replicate the tiedown rings. Then the tape was tied down to the appropriate spots.


The area aft of the forward window was a catch all and the mission equipment. Since my aircraft was going to do the CASEVAC I needed plenty of medical gear. I sourced a bunch from my Werner’s Wings UH-72 and UH-60 Medevac sets. A stretcher was attached to the railing with some masking tape. Marc Rocca was nice enough to provide me with some rucksacks and other items that I could use. The Night Stalkers would hang a rucksack on the overhead railing to take with them if they had to leave the helicopter quickly. I used Meng and Live Resin stuff to fill the area. Much of this will not be seen but I know it will be there. One thing that was essential to a cargo helicopter was the inclusion of cargo straps. I would need some photo etched brass ones from a guy on Armorama. Marc was nice enough to provide me with some rubber gloves that I could use for the cargo straps. The flexible material is perfect for what I needed to do. Some of you will notice that I did not include my Stokes Litter. I couldn't find any place that mentioned a Stokes litter but they did use a Skedco. That was included on the stretcher.


Before I got too far I decided it was a good time to add the radar pod on the left fuselage side. This was actually very easy. I held it in place and drilled three holes to provide some strength. Note that the pod does not join flush on the bottom or the back. Some minor scratch building was done on the bottom of the pod. If you don’t do it noone would notice but you.


That is all for now. More to come shortly.
justsendit
_VISITCOMMUNITY
Colorado, United States
Joined: February 24, 2014
KitMaker: 3,033 posts
AeroScale: 60 posts
Posted: Saturday, July 05, 2014 - 08:24 AM UTC
Floyd,
That is a lot of fine detailing, for sure! Thank you for sharing this build.

--mike
FloydWerner
_VISITCOMMUNITY
Maryland, United States
Joined: February 19, 2006
KitMaker: 144 posts
AeroScale: 141 posts
Posted: Wednesday, July 30, 2014 - 03:34 PM UTC
Update 15
A word of advice- Pin EVERYTHING to the structure to keep it securely fastened while handling. I’ll explain later.

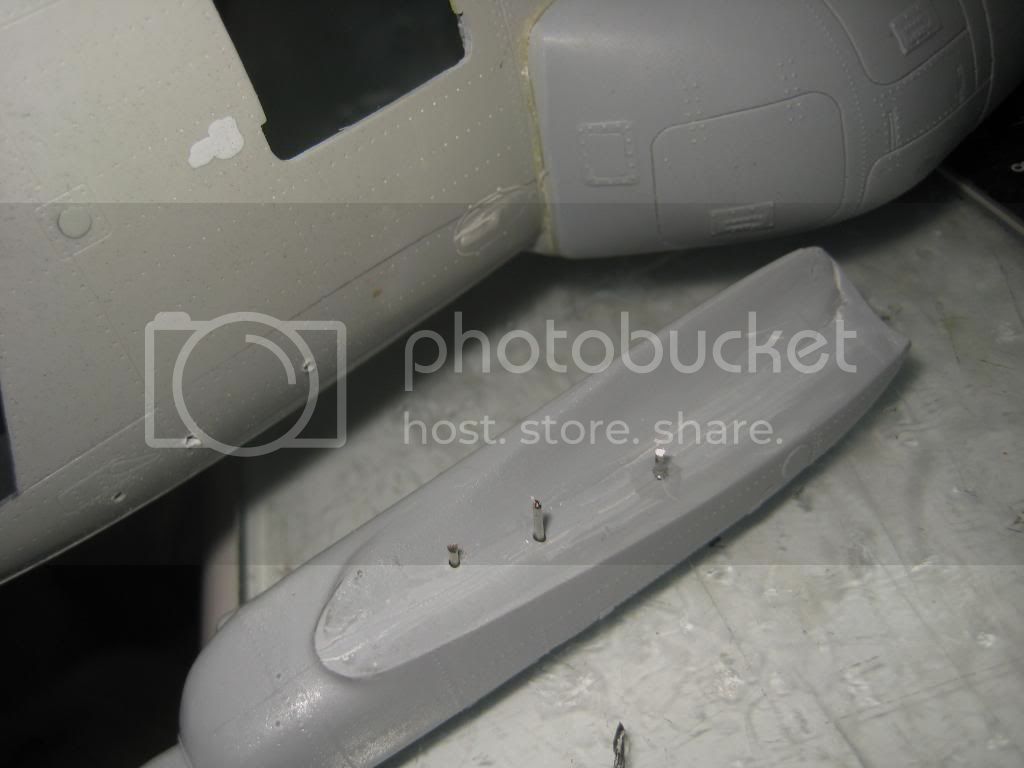
Before I joined the fuselage up I wanted to add the Weather Radar pod. The fit is good. The key is to align the top and keep that flush with the fuselage. The bottom will have a gap as will the aft portion where it fairs around the fuel tank. They are suppose to be there. I drilled though the fuselage in three places within the avionics shelves. This will provide strength and hide the attachment points. I faired my pod in with Apoxy Sculpt and Perfect Putty. There are two attachment points on the bottom of the pod that I scratchbuilt. It is a simple mount. Most will never notice it.


OK it was a moment of truth. I added the stowage and flyaway gear. Cargo was strapped down as in the real thing. How to do this? I used some brass PE buckles from CSM Designs. They are perfect. At first I primed them in the hope to paint them….brass. Duh. So I scraped off the primer and was quite happy with the look of the tiedowns.


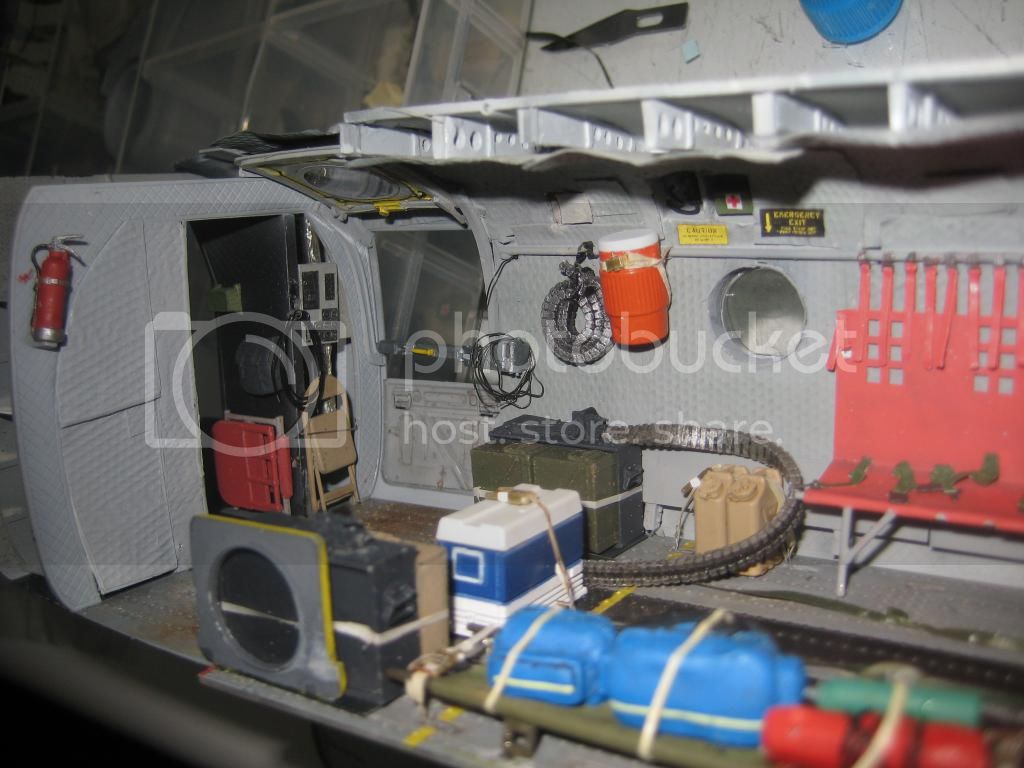
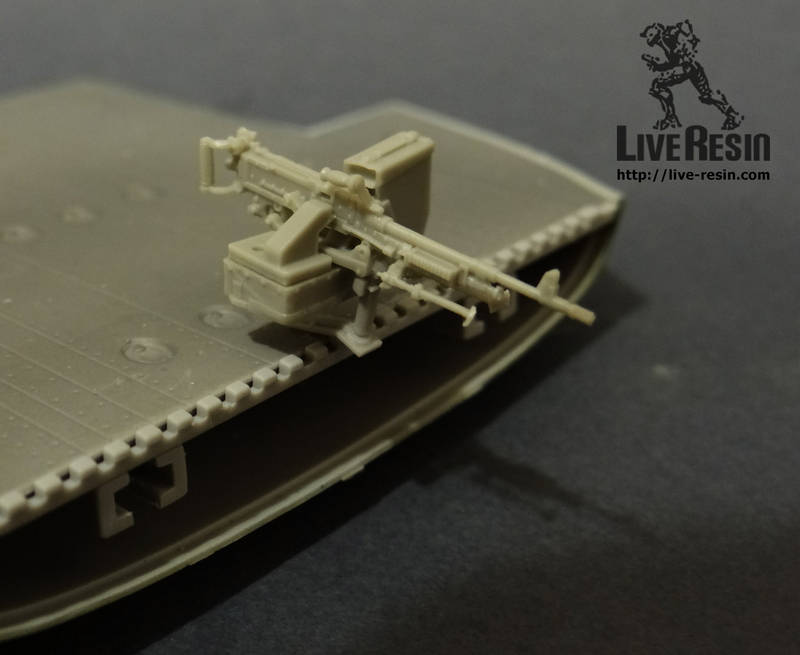
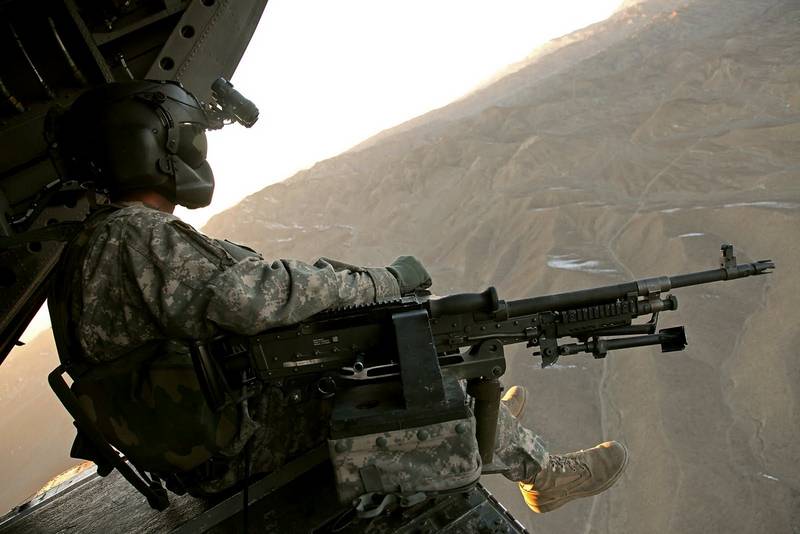
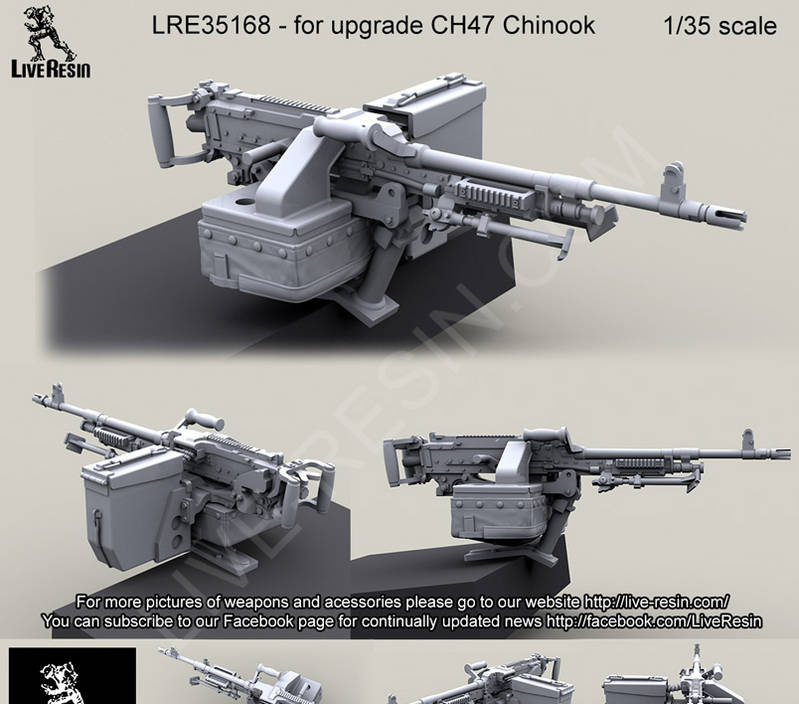
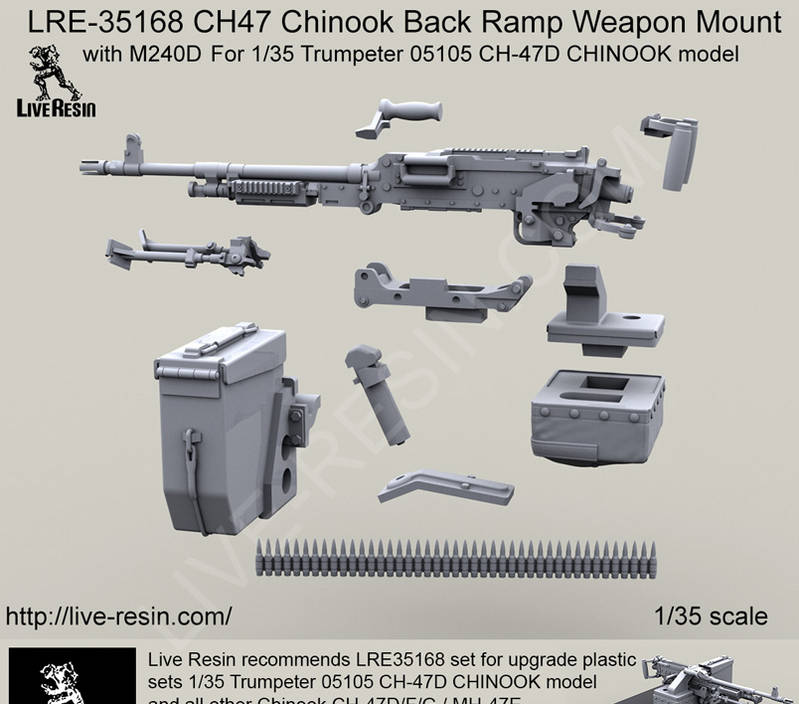
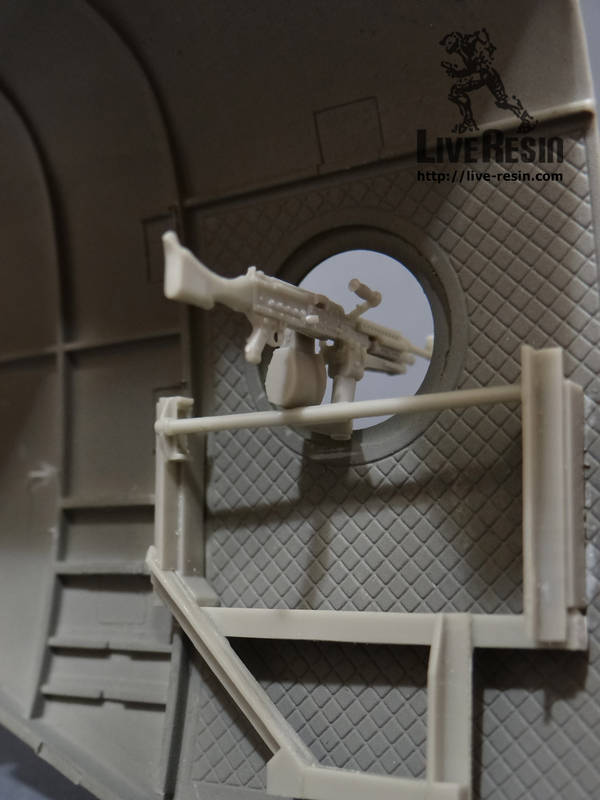
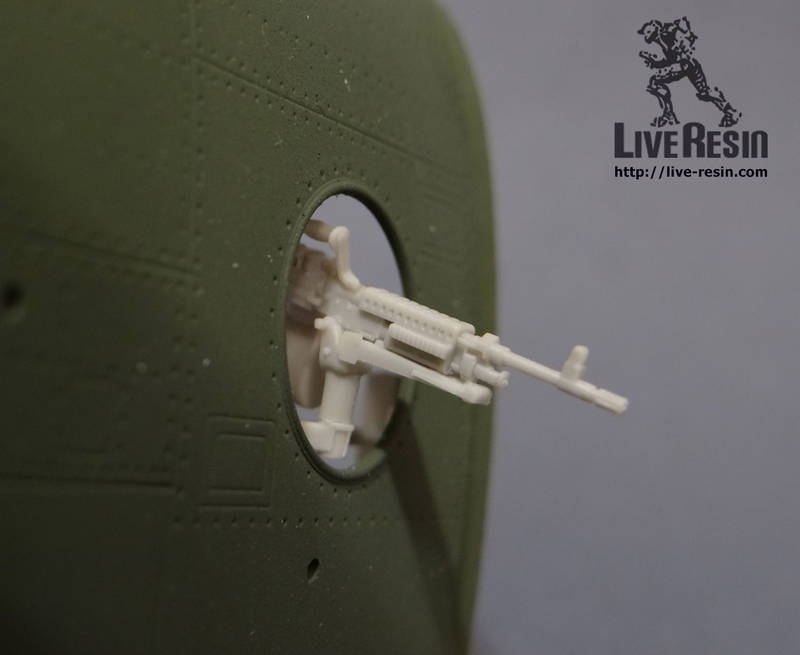
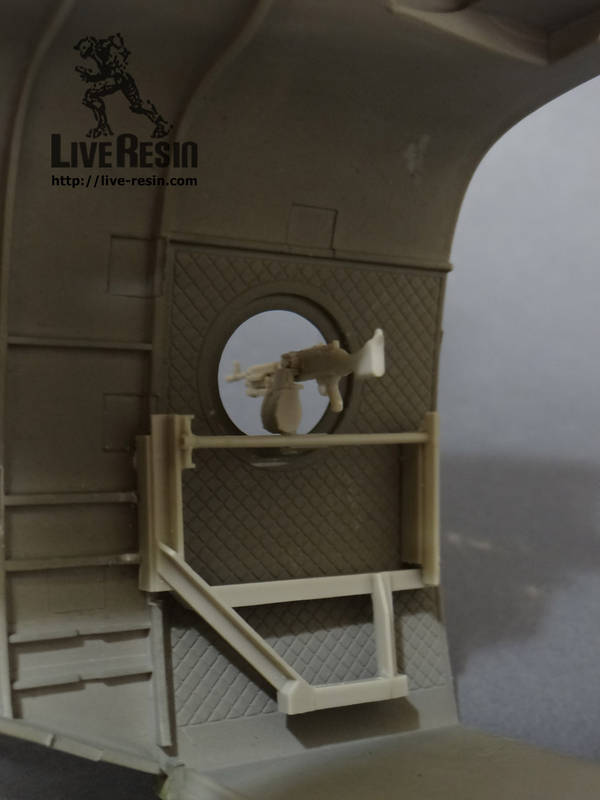
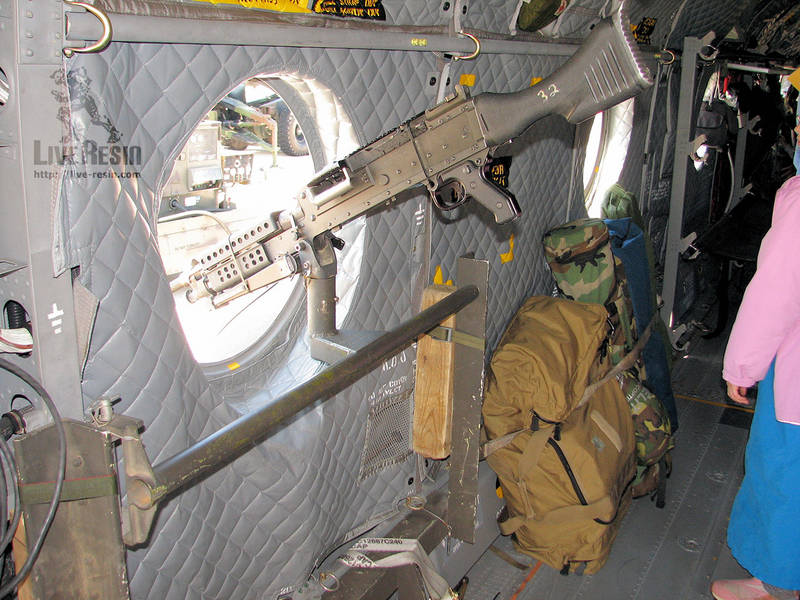
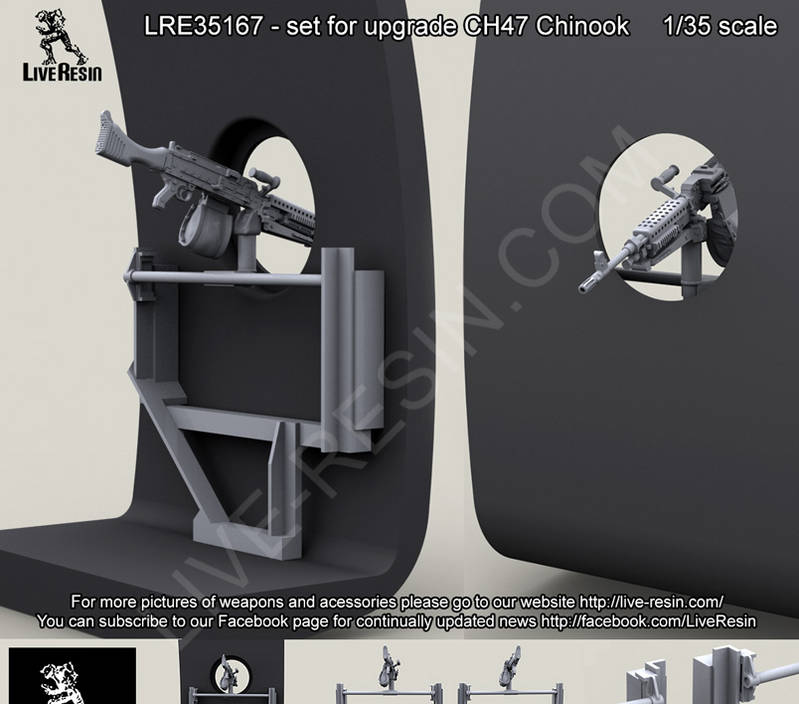
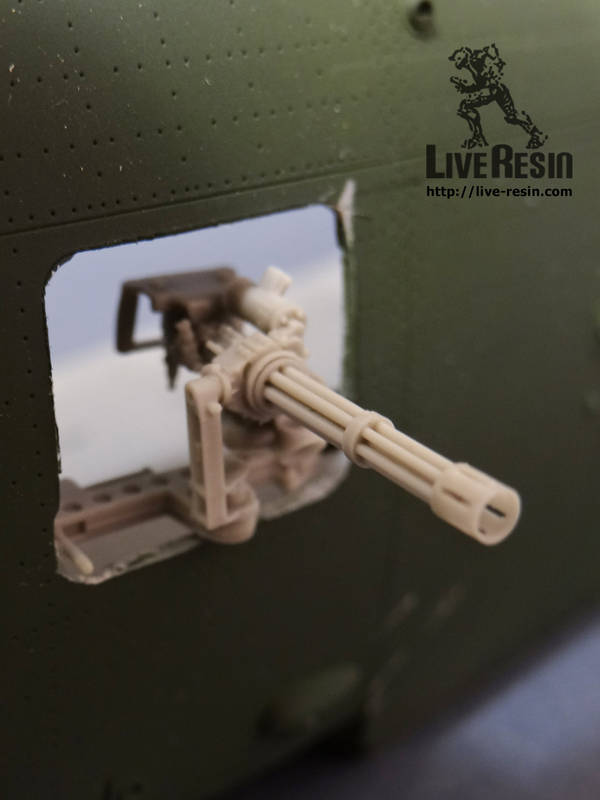
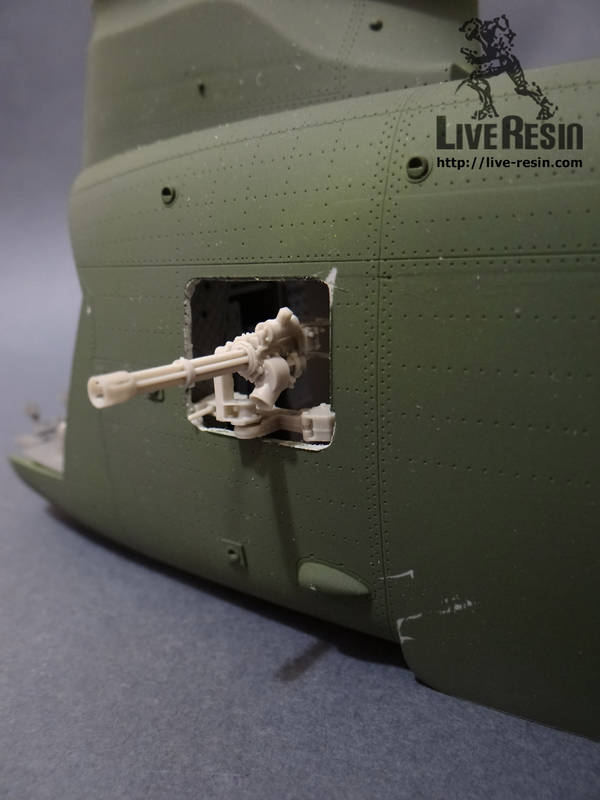
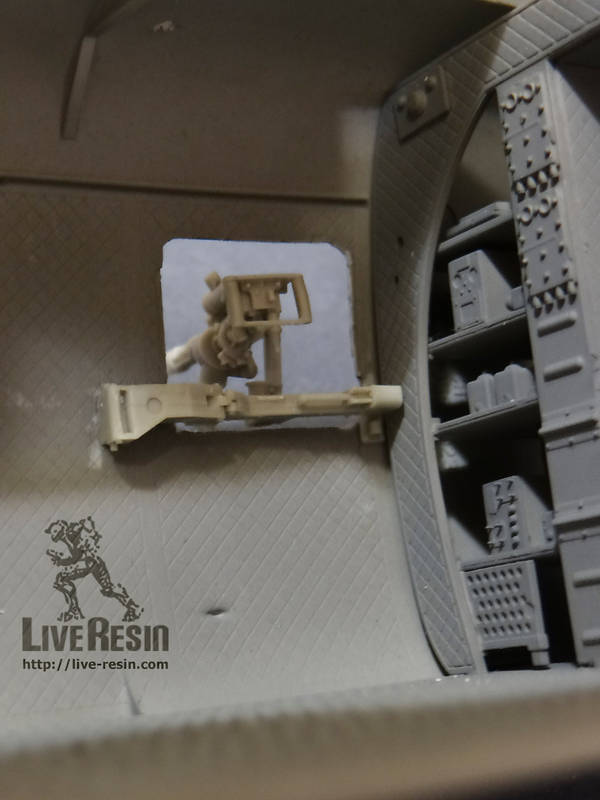
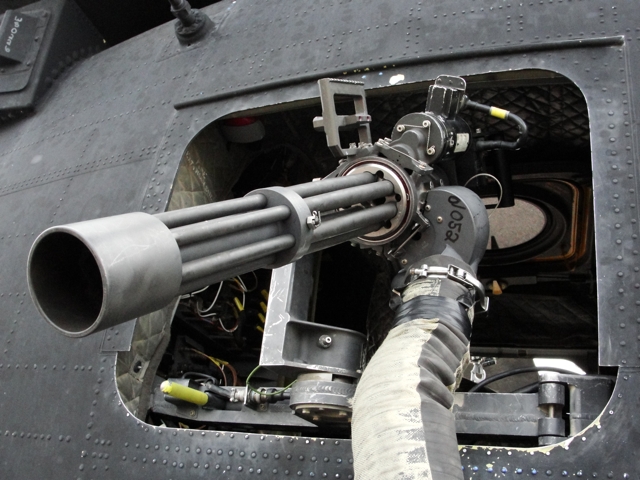
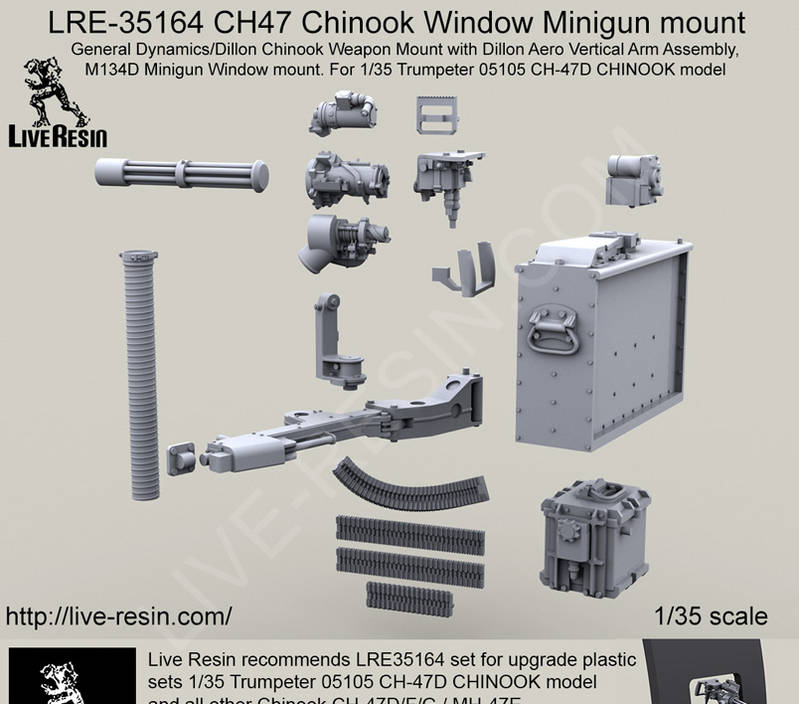
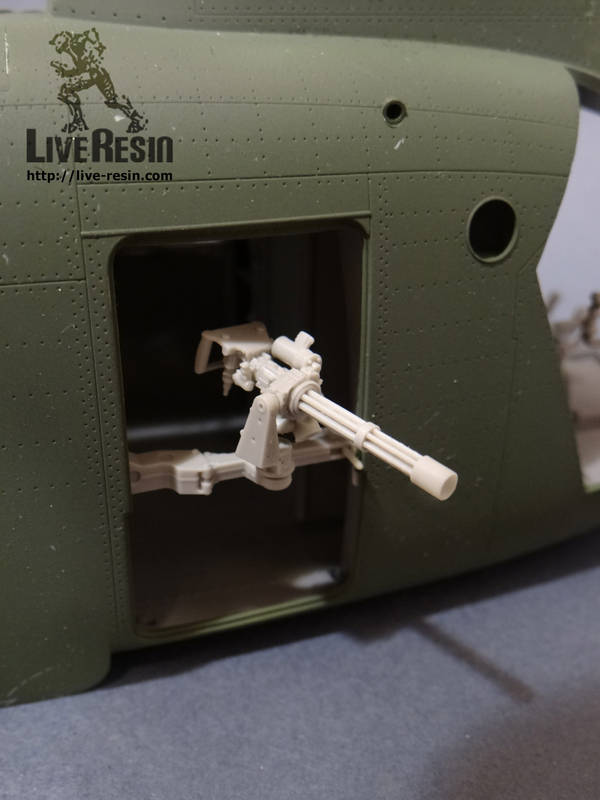
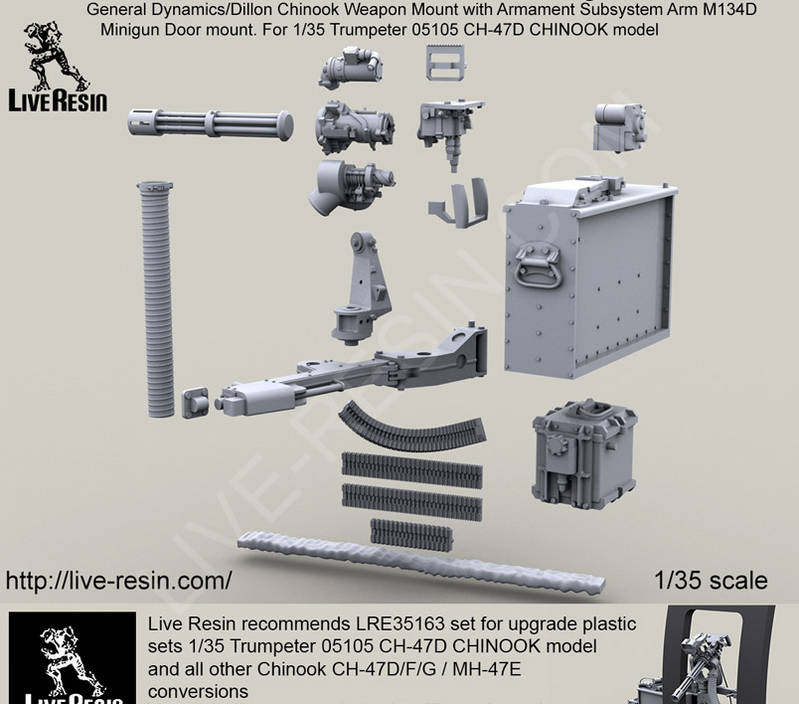
The floor was attached to the right side as it had the most seats and would be the hardest to get to plus it had the opening for the heater closet. I learned that the refueling panel was located in the heater closet. See the pictures for where it is located. I used a Cobra Company panel from their aft pylon set. It looked the part and fit perfectly on a sheet of styrene. Another thing that I did was I decided to use flexible ammo chutes from the Cobra Company as the chutes provided by Live Resin were too small to fit from the ammo cans to the breaches of the guns. Besides the chutes have to be heated and molded into place, this was beyond my capability. I was able to maneuver them with a heat gun to get the big curve but without the guns installed there was no way I was going to get them to fit once installed. A hint when using the flexible ammo chutes is to tape the chutes outside the door opening.

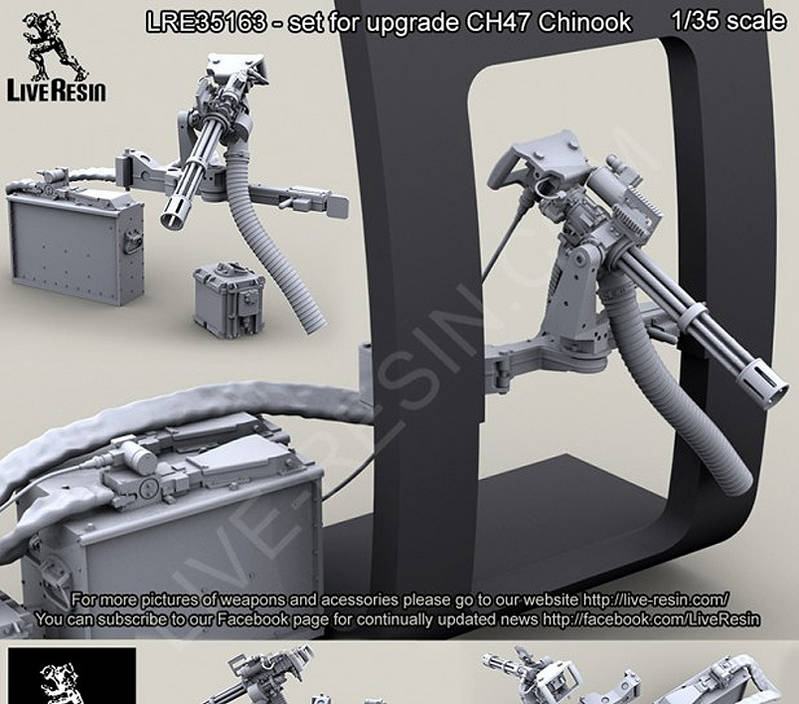
The ammo cans are not attached to the floor by straps. They are actually attached to a semi-rectangular piece of aluminum which fits into the tiedowns on the floor. The ammo cans are then strapped to that, maybe a spare ammo can and a water can or two. The MH-47E only had one ammo can per side and no battery boxes. They were powered from the aircraft. The battery box and extra ammo can was added at a later date and to the MH-47G. My aircraft did not have the can and battery box.

One thing that I found out was that the gunners used folding chairs on combat missions. I used the folding chairs from the Tamiya Command Group set. They are old but they look the part. They are held in place by bungee chords. One person has told me that the Task Force aircraft, especially the MH-47s, are Velcro and bungee chorded together.

I was also told that every MH-47 that was deployed had an American flag in the cabin affixed to the roof. I printed one out on paper and glued it in place. I’ve seen them tacked in place and also secured with straps.


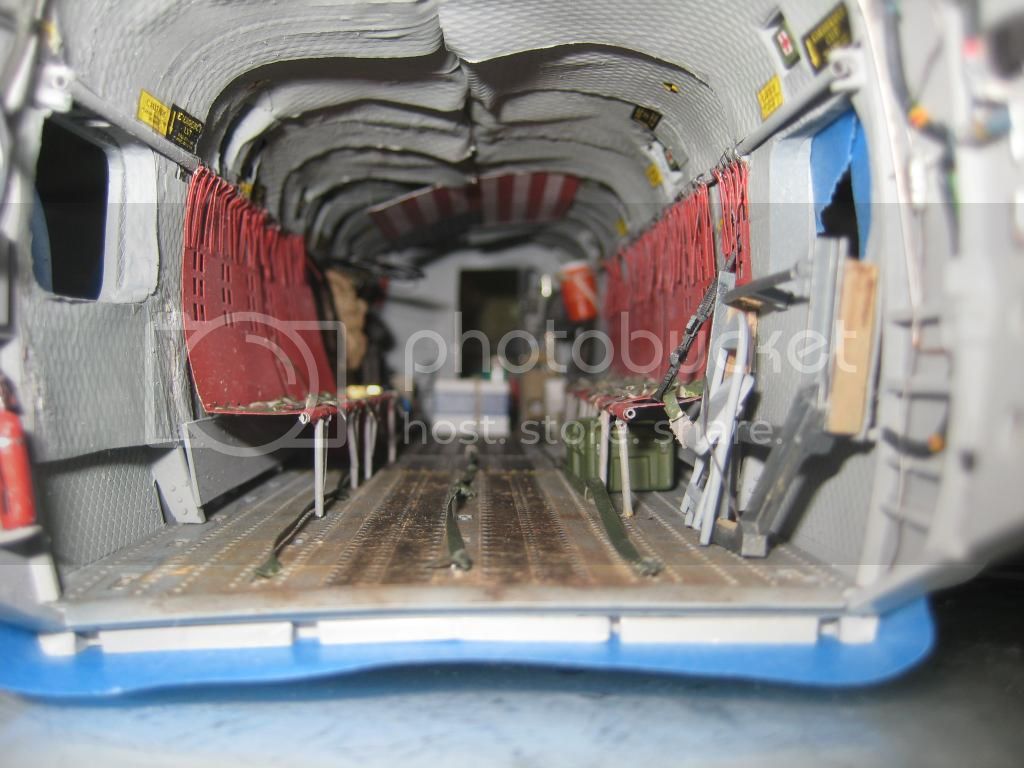
I used a very thin strip of blue tape which is not very sticky to hold the left side seats up while I moved the flooring together so as not to break off the legs. Very carefully I moved the fuselage halves together. The fit was troublesome, but not too bad. The fit of my components was actually very good. One of the Live Resin rear guns moved slightly and fouled the fit. It ended up breaking off. It was not the only thing that broke off.

When I turned the model over a few more things broke free, most noticeably the left side ammo can. This required me to completely rip off the passageway and heater closet to reattach it. I ended up leaving out the two water cans as I couldn’t figure a way to add them after they broke free. They cannot even be noticed. I actually felt better after parts were put back together.

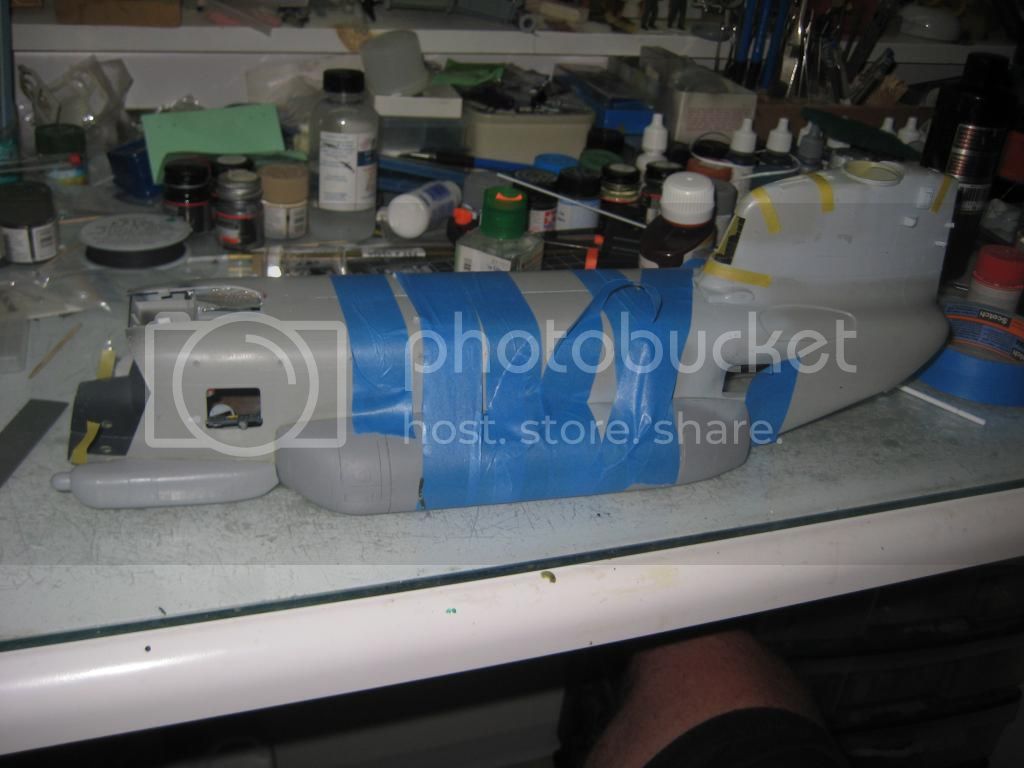
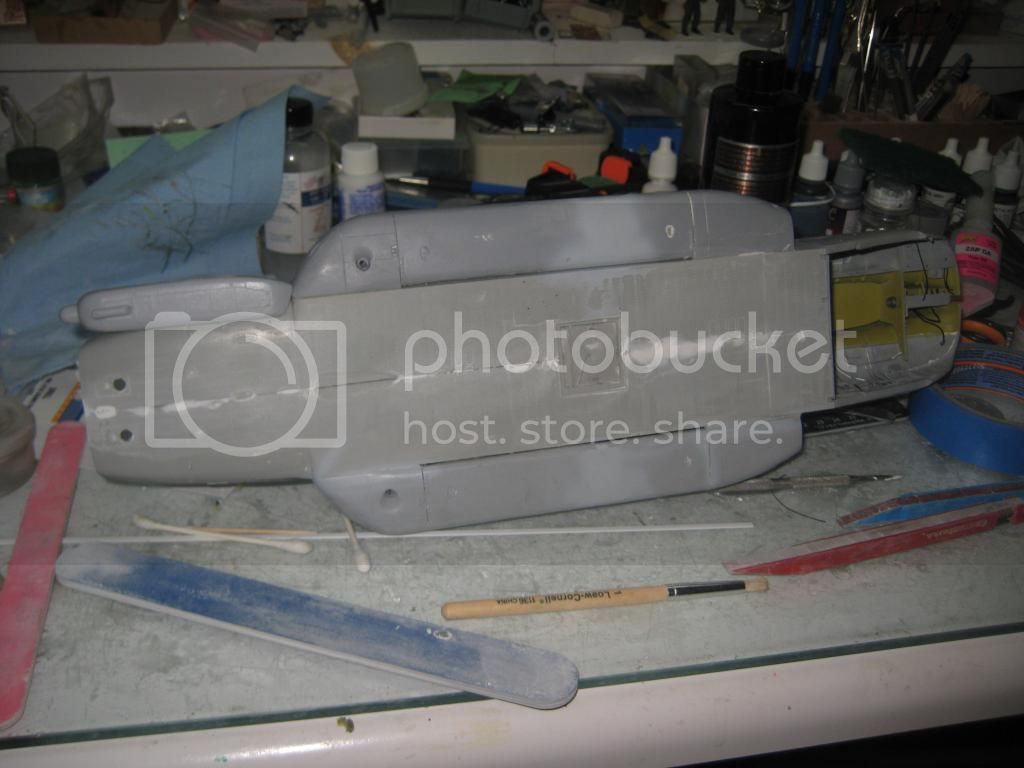
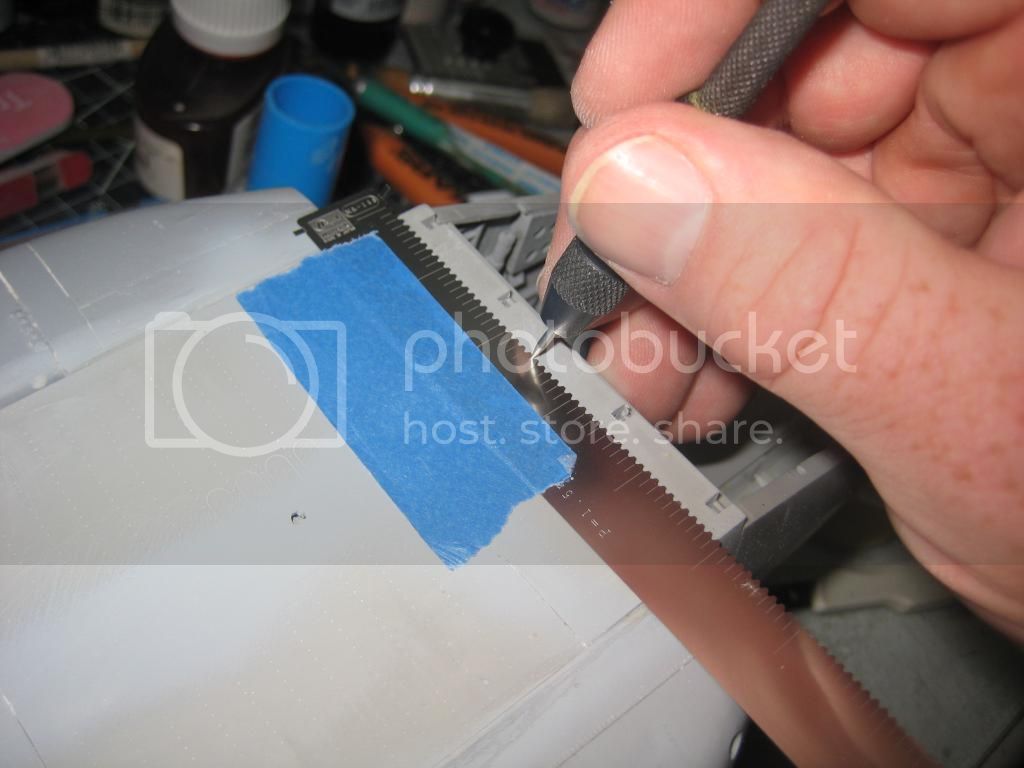
The fuselage halves were held together with painters tape then glued in place with Tamiya cement and superglue. The fit of the bottom was not as good as I would have liked but certainly not anything too bad. I’ve seen worse. They were filled with superglue and Apoxy Sculpt. Once it was all filled up there was need to rescribe and re-rivet the belly. This was a tedious task but it worked out nicely.

Painter’s tape holding it together.


Belly after filling


Re-riveting the belly of the beast


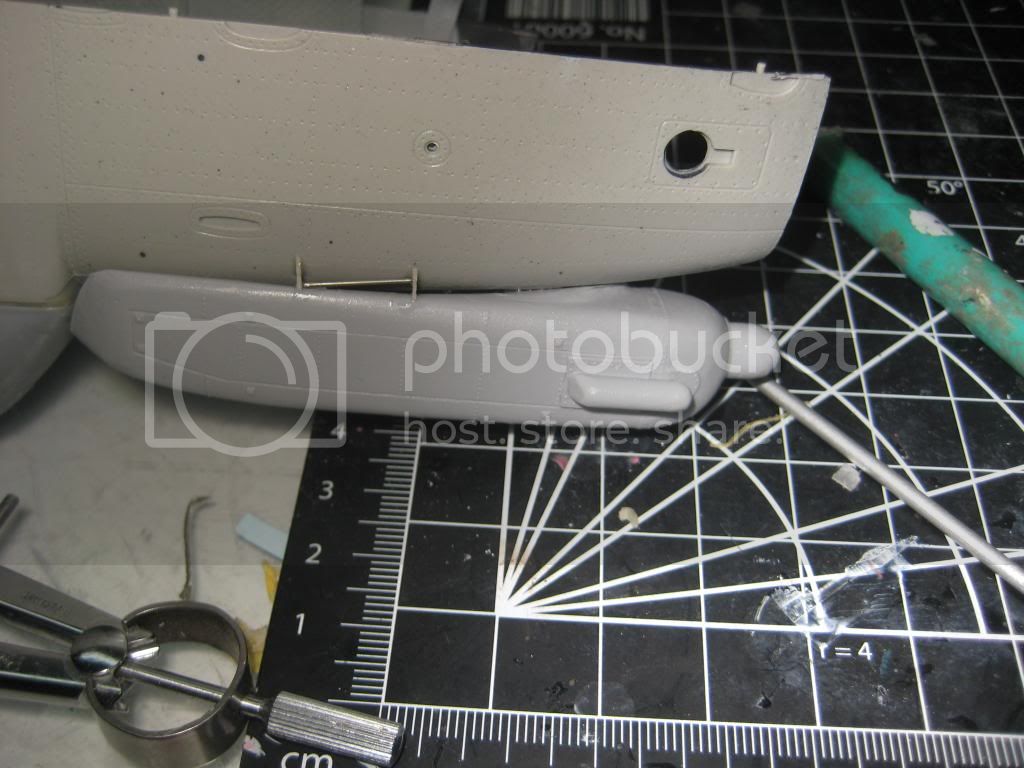
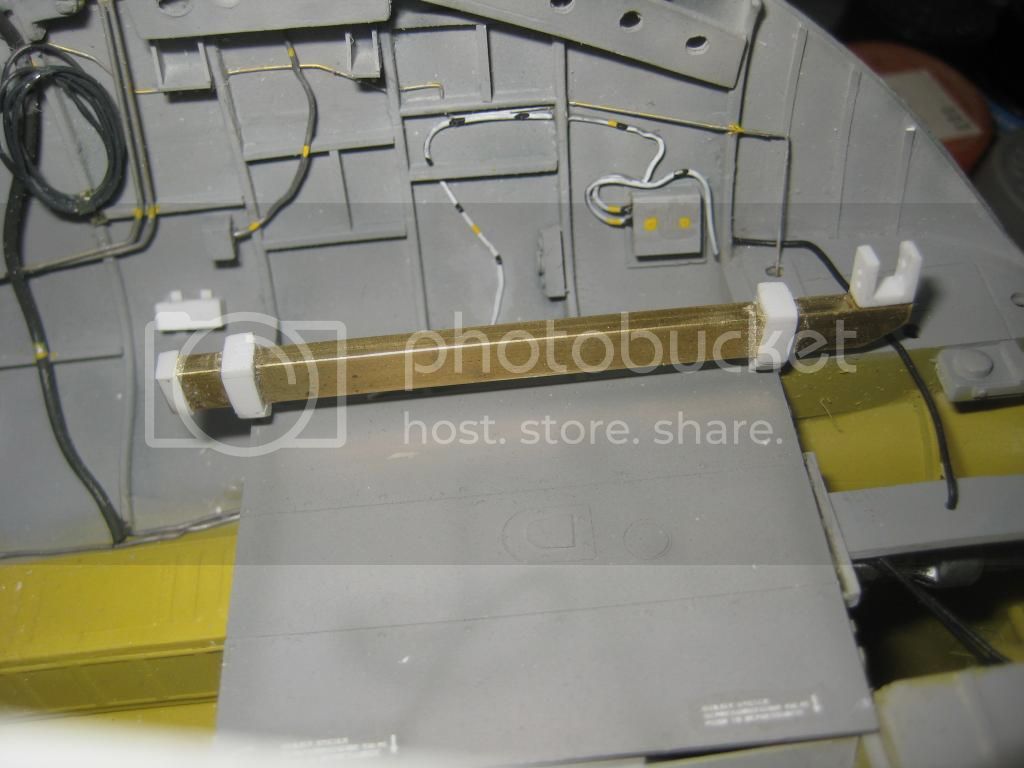
Most MH-47s have Fast Rope attachments in the back of the helicopter. Since I had the helicopter upside down now was the time to scratchbuild it. I used some brass beam and sanded an angle into them. After that I used styrene to build up the mounts and the mounts. Holes were drilled into the model to accept the attachment at any time. I used 90 weight parachute rope for the actual fast ropes. They come in three sizes on the real aircraft, 30, 60 and 90 foot lengths depending on the mission. I was really happy with the results.


I will sell the rope to anyone who wants it. Contact me at [email protected] . I’ll sell them in scale 60 foot lengths with two per package for $10USD.

It was time to add the landing gear. Now I figured that this would be no problem. Was I wrong. The forward gear seems to be made from a very strong white metal. That can’t be said for the aft landing gear or the lower part of the forward gear. They are fragile and literally fall apart. I am lucky that I had two D model kits because I needed both of them. Even then some I had to be glued to hold in place. Overall they went together fine after a breakage here and there. I sure wish Scale Aircraft Conversions would come out with a set that wouldn’t fall apart.

I used Cobra Company’s wheels and brake cylinders as they are nicer and easier to use than the kit vinyl ones.

Front landing gear after being modified and pinned in place.


It was time to add the back portion of the fuel tanks. These are easy to add and fair in. I did paint the area behind and under them as they would be difficult to get to later.

That is all with this update. More to follow as I can get to it. Next iteration, the cockpit and canopy.


FloydWerner
_VISITCOMMUNITY
Maryland, United States
Joined: February 19, 2006
KitMaker: 144 posts
AeroScale: 141 posts
Posted: Wednesday, July 30, 2014 - 03:38 PM UTC
Update 16

Now that the model had wheels it was time to add the cockpit/canopy area. Before that can happen I had to ‘experiment’ with the canopy. I polished the cockpit windscreens inside and out with MicroMesh. Then they were sprayed with Future. I couldn’t get my Future to work. It was obviously my fault as another modeler, Dave Hoernle, had no issue after he polished his. I used Mr. Super Gloss Clear. It worked out just as well as Future for me. I was told by the caster that if you sand the canopy with 800 or 1000 grit sandpaper that the Future would work as well. So it is your call on what you use. Either one works and it makes the windows clearer.


Once dried the interior was masked off and then painted on the inside. I used Lifecolor Deep Cockpit to paint the basic interior. The rest was painted with Applebarrel and Vallejo paints to pick out the details. DON’T FORGET TO REMOVE THE INTERIOR MASKS PRIOR TO CLOSING UP THE CANOPY. More on that later.


Some research showed that the combat aircraft carried armored side panels in the lower portion of the door outside the seat and one smaller panel in the lower chin bubble. I did both of these with styrene. The are grey in the pictures I have so I painted mine Tamiya Neutral Grey. The larger side panel has stenciling on it. How do you replicate that? Well I’m glad you asked. The new Werner’s Wings Night Stalker-Part II sheet has them and some other interior markings for the Chinook. They look great and fit perfectly. Thanks again to Mason Doupnik. I added these panels with a tiny drop of superglue. Luckily it didn’t fog the area.

See anything wrong with this picture?


I added the glare shield to the interior. While I was at it I also added some photo etch power levers to the overhead panel. You will probably not even notice them but I know they are there.


Time to bring the front together, I added the cockpit to the front of the model with five minute epoxy. It just has to butt join the rear of the opening. After it dried, I checked the fit of the clear nose piece. The fit was surprisingly good. It did need some sanding here and there. I did add a piece of plastic to the one side. The clear canopy was added with five minute epoxy. The canopy was held in place with tape and fingers until it set up. Then any resulting gaps were filled with Apoxy Sculpt and Perfect Plastic Putty faired in the canopy.


I primed the area with Tamiya flat black which would be seen on the inside of the canopy. This was followed up with Alclad Grey primer. There were a few areas that needed to be touched up, but nothing too drastic. These were taken care of and then the area was retouched up. Some scribing had to take place as well as some riveting. I’ll wait on the rivets until I’m done with the model just prior to priming.


Overall I was happy with the resulting canopy to fuselage join. Even with a kit canopy you would still have to fill lots of seams so I was pretty happy with the aftermarket canopy. Now onto other things.
FloydWerner
_VISITCOMMUNITY
Maryland, United States
Joined: February 19, 2006
KitMaker: 144 posts
AeroScale: 141 posts
Posted: Thursday, August 14, 2014 - 02:30 AM UTC
Update 17

With the canopy behind me it was time to start doing smaller things that would bring it all together. I felt that I had two big hurdles left before painting, the in-flight refueling boom and the hoist.

I figured I could work on the In-flight refueling boom relatively quickly. I used the supplied aft portion of the conversion and the tube provided. The fit was perfect. Now how to get it attached to the fuselage? Utilizing the parts provided in the conversion I added the fuselage attachment points. This was a non-issue. The mounts slip onto the tube easily so I moved them to the approximate points. There are four mounts on the front boom mount. I figured out that the two middle ones next to the fuselage would work just fine if I sanded the mounts to allow them to wedge together with the ones on the tubing. This served two purposes, the first, and most important, is that the mount is secure and, secondly, in turn provides the alignment of the tube.


I did scratch build some things for the tube. I used piano wire that slipped into the aft mount, some styrene and Model Car Garage fittings to add the supply hose. A hole was drilled into the fuel tank for the piano wire to slide into. With that, surprisingly the in-flight refueling probe was done. I removed the tubing to be inserted later prior to painting. Well it was done until I broke the mount off while handling the model. Then it was go through the process again. Such is model building.

I thought now was the time to add the top of the front pylon. The front pylon required a little bit of styrene to fill the area around the edge of the cutout that I did early in the construction. It was easy enough to do just cut styrene to shape and attach with liquid cement. This provides a stable mount for the resin part. Test fitting the driveshaft cover showed me that I needed to add some styrene to the aft part of the resin pylon. Nothing drastic just cut a piece of styrene and glue it in place. Once set it was sanded to shape.


With the canopy in place it was now time to fair the upper pylon onto the area. This was done with super glue and Apoxy Sculpt. The area was faired in just like any other part. Apoxy Sculpt, superglue, putty and Mr. Surfacer.


I wanted the FLIR to be a nice addition to the belly. I thought it was a little simplistic so I added some connectors and wiring to ‘attach’ it to the aircraft.


The last really big event was going to be the hoist. Would I be able to put it on and keep is secure. I used .6mm needles and held the hoist in the approximate position in relationship to the mounts that I added early in the build. Then I poked the point into the hoist. This provided a pilot hole for drilling the hole. Then it was just a matter of getting the bottom two mounts to work first to support the weight of the hoist and then the others were easy. The bottom mounts are actually 38 and 39 inches long and 1¾ diameter. I found the needles worked well in allowing two, and sometimes three, rods fitting on the same mount. Surprisingly, the hoist is very robust. It would still need to be ‘plumbed’ but that would be later.


One of the salient features of the MH-47 is the myriad of Chaff/Flare buckets along the sides. I did have to scratch build the dual mounts, but the two separate launchers have resin mounts supplied. Building the flare mounts is really simple and mounting them is just as simple. I added the connectors and the wiring. Overall they look very effective.
Single bucket


Aft bucket mounts


Mid fuselage mounts


Masking and Primer

Marveling at the immense size of this project


Masks applied


First coat of primer


 _GOTOTOP