REVIEW
Siemens Schuckert D.III
Colorado, United States
Joined: January 25, 2004
KitMaker: 11,669 posts
AeroScale: 11,011 posts
Posted: Monday, September 09, 2013 - 09:04 AM UTC

Issued first in 1992 their SSW D.III kit was Eduard''s first WWI kit. While it took a bit of work it was very buildable. It the following years they have up graded their qaulity considerably. Now as we approach their
100th kit issue I wanted to recall their first. Here is hope to the future.
Link to ItemIf you have comments or questions please post them here.
Thanks!
". . .The most important thing is to know why you build and then get the most that you can out of building." via D.D.
Colorado, United States
Joined: January 25, 2004
KitMaker: 11,669 posts
AeroScale: 11,011 posts
Posted: Monday, September 09, 2013 - 09:31 AM UTC
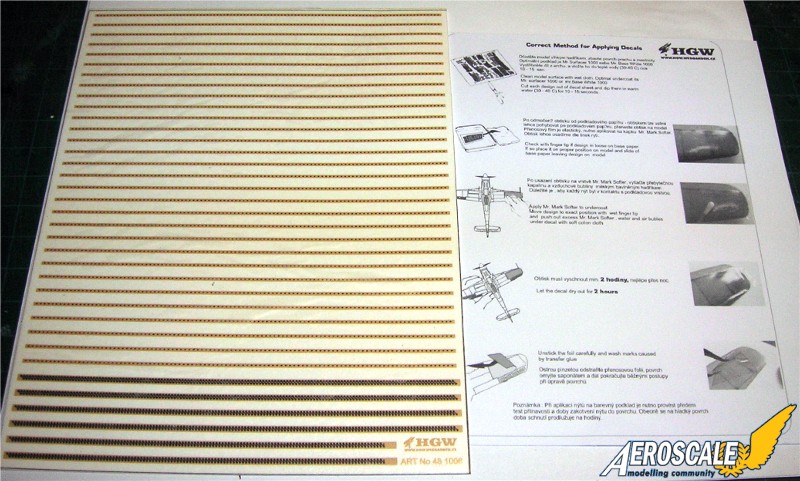
For this build I will add the HGW ribtapes.
 Review here.
". . .The most important thing is to know why you build and then get the most that you can out of building." via D.D.
Alberta, Canada
Joined: January 19, 2008
KitMaker: 6,743 posts
AeroScale: 6,151 posts
Posted: Monday, September 09, 2013 - 11:13 AM UTC
Currently I'm building this very kit , but not using the PE parts for the cockpit . Scratching the cockpit instead so I will be following along with interest on this one Stephen . I noted that you have Dick Bennett's article # 123 , very useful , but is of the early production . Did he ever finish part 2 of this article ?
Terri
Colorado, United States
Joined: January 25, 2004
KitMaker: 11,669 posts
AeroScale: 11,011 posts
Posted: Monday, September 09, 2013 - 12:04 PM UTC
I was thinking about hitting him up for that. If you don't want the PE let me know and I strike a trade for it.
". . .The most important thing is to know why you build and then get the most that you can out of building." via D.D.
Colorado, United States
Joined: January 25, 2004
KitMaker: 11,669 posts
AeroScale: 11,011 posts
Posted: Tuesday, September 10, 2013 - 10:33 AM UTC
Karaya has released a fine resin 1:48 kit of the 11 cylinder Siemens Halske SH III rotary. This late war production engine was seen on production SSW D.III & IV , Pfalz D.VIII, Albatros D.XI 1st prototype and many experimental Siemens, Pfalz and Fokker prototypes of late 1917 through all of 1918. Below is the Karaya 1:48 kit with the existing items it is replacing. At bottom left the resin Rosemont version at bottom right is the old Eduard item from their 1992 release of the SSW D.III.
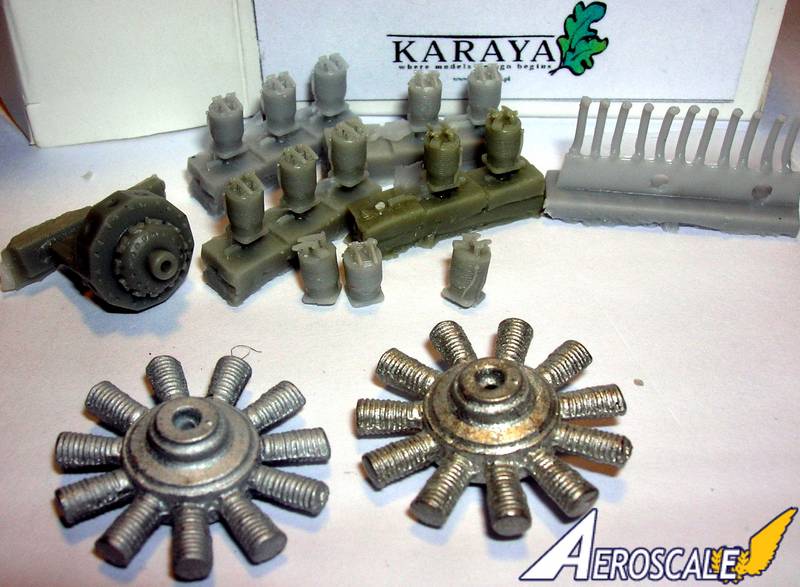
With some modifications it will fit under an Eduard SSW D.III Cowling.
 Karaya resin motor Review
". . .The most important thing is to know why you build and then get the most that you can out of building." via D.D.
Colorado, United States
Joined: January 25, 2004
KitMaker: 11,669 posts
AeroScale: 11,011 posts
Posted: Friday, September 13, 2013 - 10:55 AM UTC
Here is the flash cleanup on the lower wings.


". . .The most important thing is to know why you build and then get the most that you can out of building." via D.D.
Alberta, Canada
Joined: January 19, 2008
KitMaker: 6,743 posts
AeroScale: 6,151 posts
Posted: Friday, September 13, 2013 - 11:19 AM UTC
Fair bit of flash on the parts , definitely showing her age during the production run . Wasn't there three production runs on this kit . I know of the orange boxing and grey one , grey one being at a later date ( 1994 ) and of course there's the FlashBack kit . Nice work on the clean up , scallops can be damaged if not careful . Learn't my lesson on this . . .Will you be thinning the wings down and using the rib tapes ? That's a lot of sanding , I know ! The lower wing still needs a bit more thinning but I got tied of sanding .
Terri
Colorado, United States
Joined: January 25, 2004
KitMaker: 11,669 posts
AeroScale: 11,011 posts
Posted: Saturday, September 14, 2013 - 06:33 AM UTC
Quoted Text
Fair bit of flash on the parts . . .Will you be thinning the wings down and using the rib tapes ? That's a lot of sanding , I know ! The lower wing still needs a bit more thinning but I got tied of sanding .
Terri
Certainly, thats the plan. Going at it from the under surface will keep it quick and help keep the trailing edges thin.
". . .The most important thing is to know why you build and then get the most that you can out of building." via D.D.
Alberta, Canada
Joined: January 19, 2008
KitMaker: 6,743 posts
AeroScale: 6,151 posts
Posted: Thursday, September 19, 2013 - 11:43 AM UTC
You sunk in a picture

Nice job on the engine Stephen and your review as well . Would the same measurement be used on the induction pipes as well for trimming ?
Which mount are you planning for this one ?
Terri
Colorado, United States
Joined: January 25, 2004
KitMaker: 11,669 posts
AeroScale: 11,011 posts
Posted: Thursday, September 19, 2013 - 01:15 PM UTC
I am thinking yes, but - They are on the same resin plug and I have a trick up my sleeve to explain. Coming soon.
". . .The most important thing is to know why you build and then get the most that you can out of building." via D.D.

#439
Washington, United States
Joined: November 05, 2005
KitMaker: 4,950 posts
AeroScale: 3,192 posts
Posted: Thursday, September 19, 2013 - 02:52 PM UTC
Never heard of this plane before this week and now 2 different folks have been talking about it this week. Someone had a model he'd build years ago. Something about the engine and the prop counter rotated to cancel out the torque. Pretty nifty engineering for 1918.
Hanger Queens in Waiting:
Monogram 1/72 F8F-1
Corsair the Sky Pirate - 1/72 Ace A-7D
Century Series - Airfix 1/72 F-105G
Anti Shipping - Academy 1/72 PBJ-1D
Academy 1/72 F-84E
Alberta, Canada
Joined: January 19, 2008
KitMaker: 6,743 posts
AeroScale: 6,151 posts
Posted: Friday, September 20, 2013 - 11:31 AM UTC
Quoted Text
Never heard of this plane before this week and now 2 different folks have been talking about it this week. Someone had a model he'd build years ago. Something about the engine and the prop counter rotated to cancel out the torque. Pretty nifty engineering for 1918.
Hi Mark ,
It is a wonderful kit in ways , in other ways not so much . It is the only injection kit in 48 scale on the market . Eduard has two runs with this kit . The orange boxing as picture of the beginning of the thread was released in 1992 . Eduard them did a second run but the box is grey and the info on the instructions are different . The Grey boxing has a resin replacement engine , but not a lot of detail . Koster has released this kit in vac form of the D.III and D.IV . Both excellent kits and I think Koster still produces them .Flash Back also released this kit , but it is the Eduard Boxing with different resin parts and a lot less PE parts . Flashback is an apperent company of Eduards , but are no longer around .
It is an interesting subject and still a lot of answered questions and many arguments have started over this . Many changes made in the first production run and the same with the late D.III production run . The engine was way a head of its time and if they used better oil instead of the synthic development would have continued .
Terri and all my spelling errors !
#439
Washington, United States
Joined: November 05, 2005
KitMaker: 4,950 posts
AeroScale: 3,192 posts
Posted: Friday, September 20, 2013 - 11:43 AM UTC
I don't recall the source of the kit, but he seemed to have scratch built a lot of details and decals.
I seem to recall that many early war planes use castor oil for lubrication. Kinda took some of the glamour out of being a pilot back then...

Hanger Queens in Waiting:
Monogram 1/72 F8F-1
Corsair the Sky Pirate - 1/72 Ace A-7D
Century Series - Airfix 1/72 F-105G
Anti Shipping - Academy 1/72 PBJ-1D
Academy 1/72 F-84E
Colorado, United States
Joined: January 25, 2004
KitMaker: 11,669 posts
AeroScale: 11,011 posts
Posted: Friday, September 20, 2013 - 02:06 PM UTC
Quoted Text
". . .I seem to recall that many early war planes use castor oil for lubrication. Kinda took some of the glamour out of being a pilot back then...
Rotary engined aircraft required castor oil for lubrication. Germany had to resort to a synthetic version in mid - late 1918, because of the British blockade.
". . .The most important thing is to know why you build and then get the most that you can out of building." via D.D.
Colorado, United States
Joined: January 25, 2004
KitMaker: 11,669 posts
AeroScale: 11,011 posts
Posted: Sunday, September 22, 2013 - 12:25 PM UTC
As has been said before when you modify a kit it sets in motion alterations that will follow in the subsequent steps. Now that I am adding the Karaya SH.III I have to
modify the resin engine and the Eduard SSW D.III kit to be compatable with each other. We can all agree that building kits is something of a compromise. The thickness of the plastic in a basic kit is something you have to contend with especially when it comes to cockpits and and engines. This axiom explains why we see kit cockpit components and engines that are often smaller in size (and so following in scale) than their originals.

The way this will have to work is; After adding the unmodified kit "firewall" to the partially finished resin engine, I checked the application of the "cowling". This told me about how much of the engine "cowling" I had to whittle away for a good fit. Note the blunt nosed cutter I used in my motor tool.

Here is the back side of the engine cowlings I have (1 kit and 1 spare) after I have done some cutting. When ready I will have to slide the front engine cross support (seen in the image below in the upper right)over the front brass spindle and tack it down so its centered. The "cowling" must sit freely over this as a whole to look right.

". . .The most important thing is to know why you build and then get the most that you can out of building." via D.D.
Colorado, United States
Joined: January 25, 2004
KitMaker: 11,669 posts
AeroScale: 11,011 posts
Posted: Saturday, September 28, 2013 - 02:53 PM UTC
Ok a small modification the the kit fire wall.

Then the assault on the kit chin pan and their louvres.

A little more work.

Here the pilot's left side is almost done.

I ground out the interior with the same cutting tool I used earlier on the engine cowling.

". . .The most important thing is to know why you build and then get the most that you can out of building." via D.D.
Alberta, Canada
Joined: January 19, 2008
KitMaker: 6,743 posts
AeroScale: 6,151 posts
Posted: Sunday, September 29, 2013 - 12:51 AM UTC
I wasn't brave enough to use my motor tool for grinding away the plastic . I used sand paper wrap around a dowel to keep the shape consistence . Louvers are looking good so far and I do like how the fire wall turned out .
Terri
Colorado, United States
Joined: January 25, 2004
KitMaker: 11,669 posts
AeroScale: 11,011 posts
Posted: Sunday, September 29, 2013 - 05:24 AM UTC
Quoted Text
I wasn't brave enough to use my motor tool for grinding away the plastic . I used sand paper wrap around a dowel to keep the shape consistence . Louvers are looking good so far and I do like how the fire wall turned out .
Terri
Thanks Terr! In the future when it comes to a motor tool and plastic just practice on some scrap. It takes a lighter touch. But it sure cuts down on the time.
". . .The most important thing is to know why you build and then get the most that you can out of building." via D.D.
Colorado, United States
Joined: January 25, 2004
KitMaker: 11,669 posts
AeroScale: 11,011 posts
Posted: Sunday, September 29, 2013 - 11:18 AM UTC
Just bring this back for a good look on a small scale kit. 1:72 Toko's SSW D.III.
Very decent build. 
John Mckenzie wrote about this model.
"Unfortunately, the modeller has fallen down on his research and has wasted such a lot of time and effort to make the propeller turn in the opposite direction to the crankcase / cylinders. It is a fact that with this Siemens Halske type Sh.III , 11 cylinder motor,
the propeller / hub, is fixed to an extension of the crankcase front cover plate, and does actually rotate at the SAME speed and direction as the crankcase / cylinders.
It is the "crankshaft" which revolves at the same speed but Opposite direction to the the cylinders via differential gears located in a drum type housing at the rear of the motor, and which incorporates parts of the rear motor mounting flanges.
It was the Earlier Siemens Halske motors that had the differential gearing in the front and so had propeller / cylinder rotation as per this model. Just not the 11 cylinder Sh III motor."
". . .The most important thing is to know why you build and then get the most that you can out of building." via D.D.
Colorado, United States
Joined: January 25, 2004
KitMaker: 11,669 posts
AeroScale: 11,011 posts
Posted: Monday, September 30, 2013 - 05:58 PM UTC
Working on the chin pan / lower wing union to the fuselage. The stock kit chin pan needs to be blended to the fuselage (that has the lightly scribed chine pan edge where it should be. The red lines are where the stock part edge falls.

". . .The most important thing is to know why you build and then get the most that you can out of building." via D.D.
Colorado, United States
Joined: January 25, 2004
KitMaker: 11,669 posts
AeroScale: 11,011 posts
Posted: Sunday, October 06, 2013 - 02:32 PM UTC
Ok, the HGW rib tapes are next in my build.


Normally these would go down on a base coat and then there would be a a coat of camouflage paint over the whole surface. The rib stitching would be more prominent on the upper surface so in my application I'll just put the HGW strips on the upper surfaces since I will be applying 5 colour lozenge and there respective rib tapes.
". . .The most important thing is to know why you build and then get the most that you can out of building." via D.D.
Alberta, Canada
Joined: January 19, 2008
KitMaker: 6,743 posts
AeroScale: 6,151 posts
Posted: Thursday, October 10, 2013 - 11:05 AM UTC
Your a brave soul going all in with double the rib tapes. I will be facing this myself in the near future. Is the stitching detail raised? The chin pan panel line is something folks seem to miss, nice to see this corrected. Louvers look sharp! And if I may , Your cut out in the fire wall, shape? Don't ever recall this and you have me puzzled at the moment. The shroud top would set to high ...
Terri
Colorado, United States
Joined: January 25, 2004
KitMaker: 11,669 posts
AeroScale: 11,011 posts
Posted: Monday, October 14, 2013 - 09:02 AM UTC
Quoted Text
Your a brave soul going all in with double the rib tapes. I will be facing this myself in the near future. Is the stitching detail raised? The chin pan panel line is something folks seem to miss, nice to see this corrected. Louvers look sharp! And if I may , Your cut out in the fire wall, shape? Don't ever recall this and you have me puzzled at the moment. The shroud top would set to high ...
Terri
Thanks Terri. The rib stitching on the upper surface of the wings stands slightly proud. More of an experiment on my part. The HGW stitching / tapes worked well on their 1:32 attempts.
The cut-outs in the "firewall" are similar to the factory drawings. I traced them back from Roden and a couple of good PE attempts where the designers went to the factory drawings and a couple of images that are not in the public domain. Here is the Roden 1:32 sprue for an example.

". . .The most important thing is to know why you build and then get the most that you can out of building." via D.D.
Colorado, United States
Joined: January 25, 2004
KitMaker: 11,669 posts
AeroScale: 11,011 posts
Posted: Saturday, October 19, 2013 - 06:38 PM UTC
Starting the prep work for the PE. I am going a bit old school here. First starting with a few passes of the 600 - 800 grit.


Trying to focus on what will be painted what colours.
". . .The most important thing is to know why you build and then get the most that you can out of building." via D.D.
Colorado, United States
Joined: January 25, 2004
KitMaker: 11,669 posts
AeroScale: 11,011 posts
Posted: Saturday, November 16, 2013 - 04:19 PM UTC

Here is my build starting to add the Wood & Wire 5 colour Lozenge.
See the review on these lozenge decals
here. ". . .The most important thing is to know why you build and then get the most that you can out of building." via D.D.


