_GOTOBOTTOM
World War II: USA
Aircraft of the United States in WWII.
Hosted by Rowan Baylis
My first P-47 D-30 (Revell 1/72)
PanosT
_VISITCOMMUNITY
California, United States
Joined: March 18, 2009
KitMaker: 36 posts
AeroScale: 22 posts
Posted: Saturday, April 18, 2009 - 08:21 AM UTC
I was always amazed by the natural metal finish planes, but so far I wasn’t satisfied by the result painting my models with metal colors. Something was missing. I couldn’t achieve that metal look! I decided for the first time to use the aluminum foil technique, since in our hobby we improve our skills and have fun through trying new things.
For that purpose I thought nothing will be better than a P-47 Thunderbolt and I bought Revell’s P-47 D-30 1/72.
The kit generally is really good and a few detail needed at certain areas, mostly in the cockpit. I’ll try (as much as I can) to built it “out of the box” since in the way I see it it’s going to be an “educational-practice built”.
Here are some photos from the build so far…

Some detail added at the cockpit such as cables, the box for the maps,seat belts e.t.c.


Your comments are more than welcome I hope u will enjoy it...
lampie
#029
_VISITCOMMUNITY
England - East Midlands, United Kingdom
Joined: December 23, 2005
KitMaker: 6,249 posts
AeroScale: 3,270 posts
Posted: Saturday, April 18, 2009 - 08:31 AM UTC
Hi Panos.
Nice job on the extra cockpit detail.
I built a couple of the these kits earlier in the year.Great value for money.
The only thing to look out for really is the fit of the engine into the cowling. You'll probably have to sand some of the cylinders away to get it to fit.
I also cut open the hole for the radio mast but instead of fitting it when the fusalage halves are joined, I glued a piece of plastic card in place to stop the mast falling through, and then fitted it at the end of the build to avoid breaking it off.
Everything fits together nicely and you wont need any filler
Are you doing this for the P-47 Group Build?
Nige
PanosT
_VISITCOMMUNITY
California, United States
Joined: March 18, 2009
KitMaker: 36 posts
AeroScale: 22 posts
Posted: Saturday, April 18, 2009 - 08:56 AM UTC
Thanks Nigel ! i really appreciate the advice! I have noticed also that the radio mast, must be placed a little bit on the right (viewing from the back) from the dorsal fin? Please correct me if I'm wrong! As about the group build i will be glad to participate! Can you post me a link for it?
Oops, Sorry i found it !
lampie
#029
_VISITCOMMUNITY
England - East Midlands, United Kingdom
Joined: December 23, 2005
KitMaker: 6,249 posts
AeroScale: 3,270 posts
Posted: Saturday, April 18, 2009 - 09:06 AM UTC
Hi Panos.
The radio mast sitting to the starboard side of the centre line is correct.
I hope you'll find all the information you need on the Aeroscale P47 SIG Website
Nige
Emeritus
_VISITCOMMUNITY
Uusimaa, Finland
Joined: March 30, 2004
KitMaker: 2,845 posts
AeroScale: 1,564 posts
Posted: Saturday, April 18, 2009 - 09:52 AM UTC
Very nice work.
I've buit two of these T-bolts and but I built both almost straight from the box. Really nice kits.
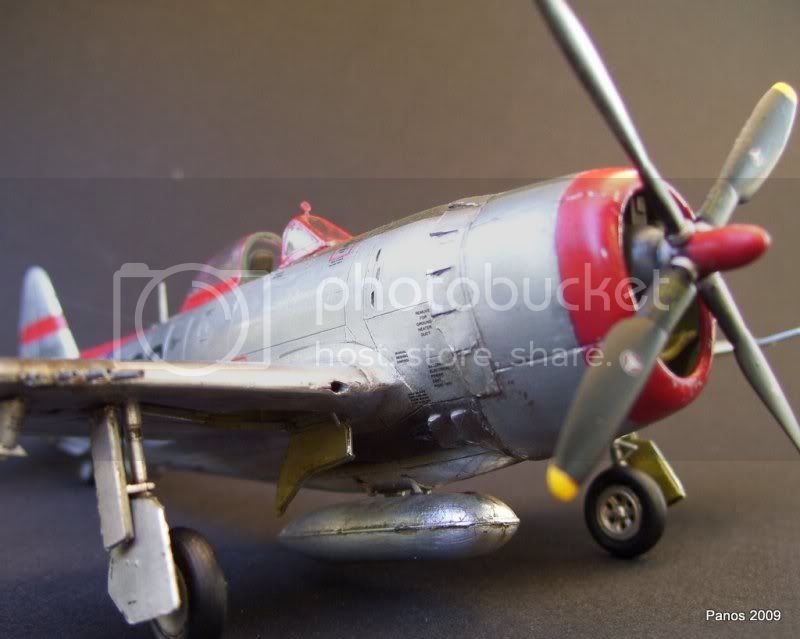
I second Nigel about the antenna mast, it's about the only thing in the kit I don't like. As I always end up knocking off parts like that, I usually make new ones from scratch, preferably from something robust likle hypodermic needles.

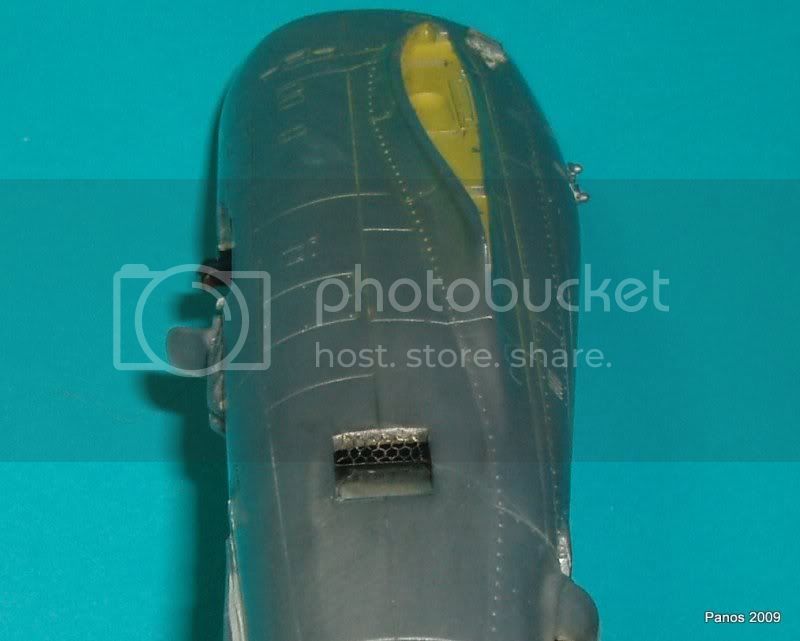
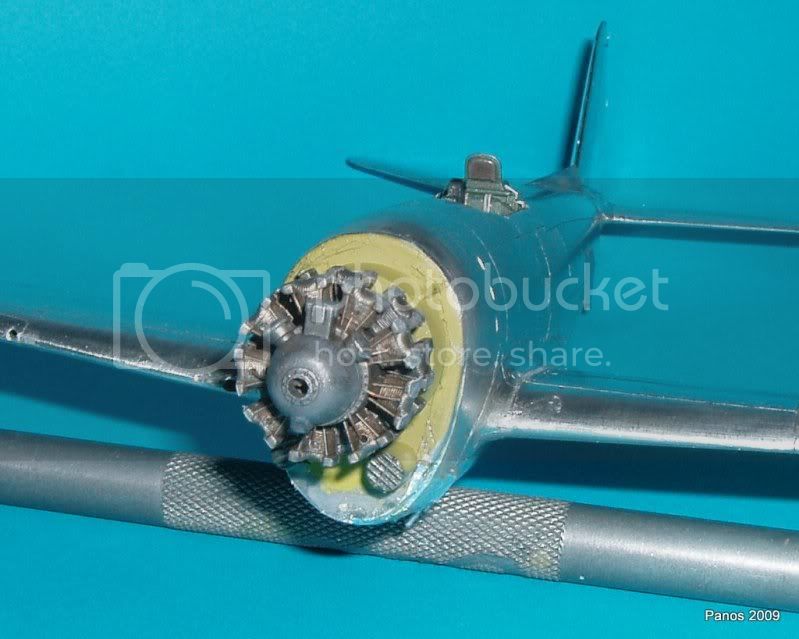
In addition to the engine cylinders needing some filing to get the cowling fit over them, I remember the cowling sitting a bit too high out of the box. Trimming the locators slightly took care of that.

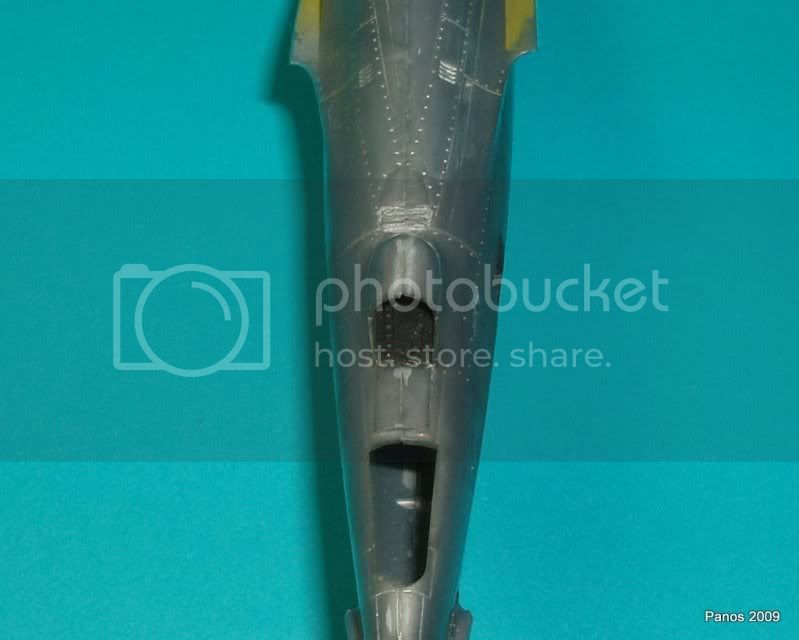
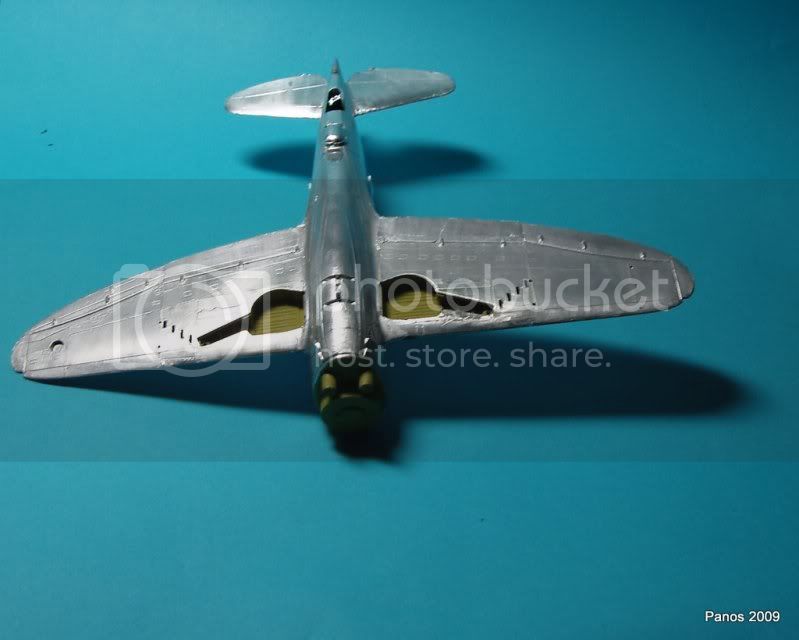
Not a fit issue, but a thing to look out for is the supercharger outlet under the rear fuselage. As it's part of the fuselage and not a separete insert, there's a hard-to-reach seam in bottom of the outlet. Instead of trying to putty and smooth it, I cut piece of the thinnest styrene sheet I had to neatly cover the area.

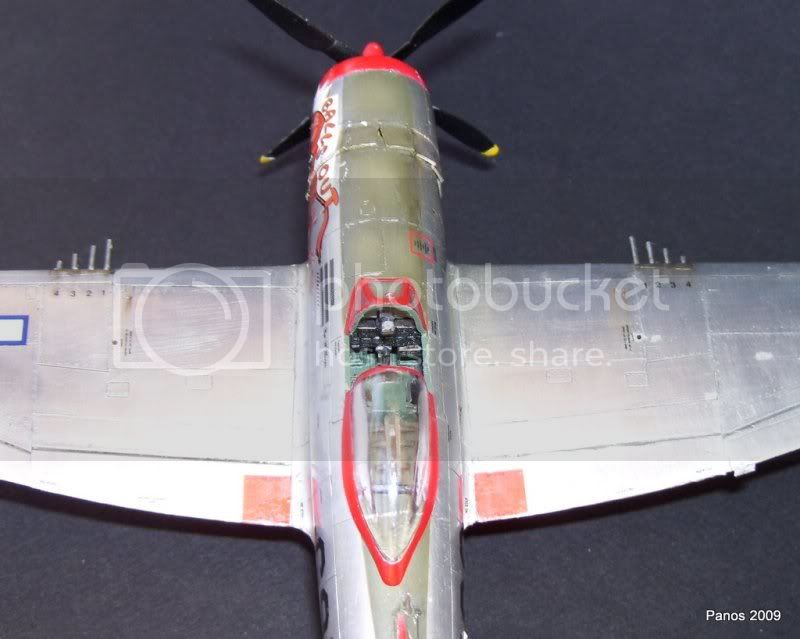
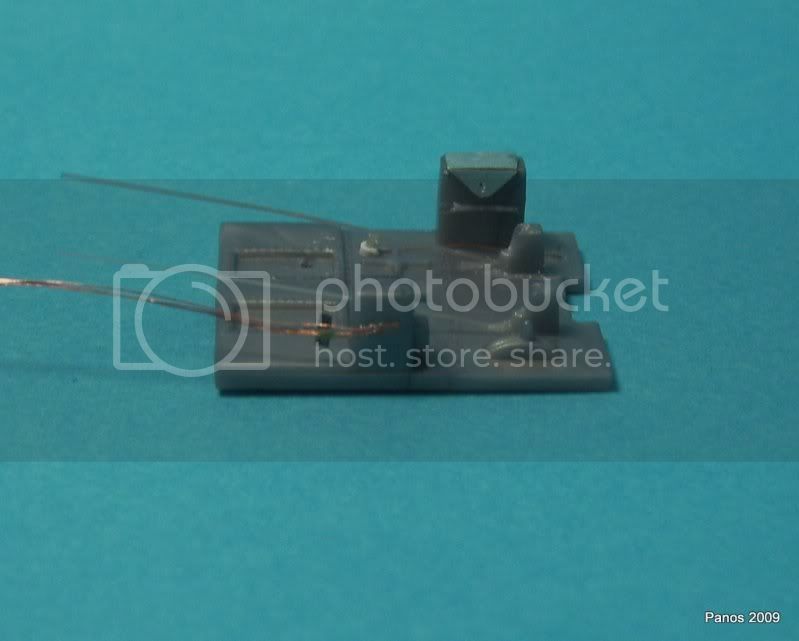
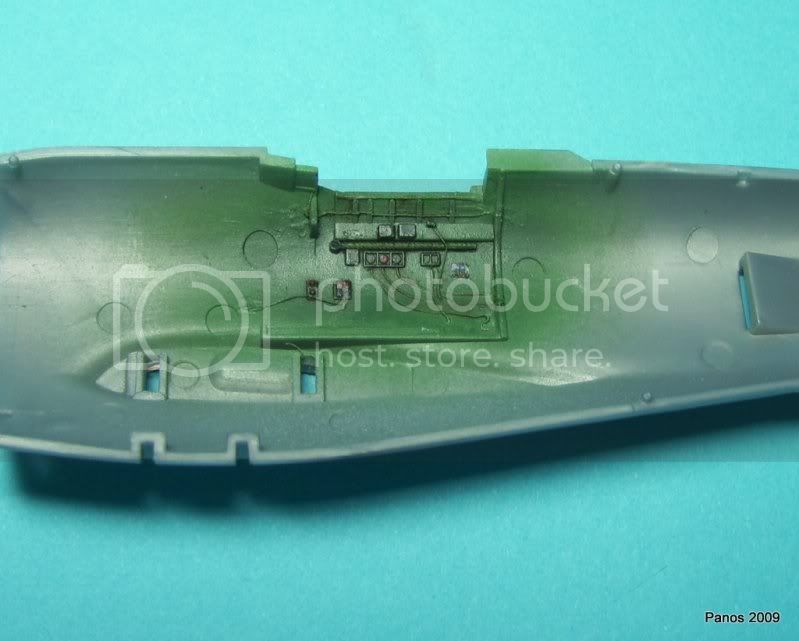
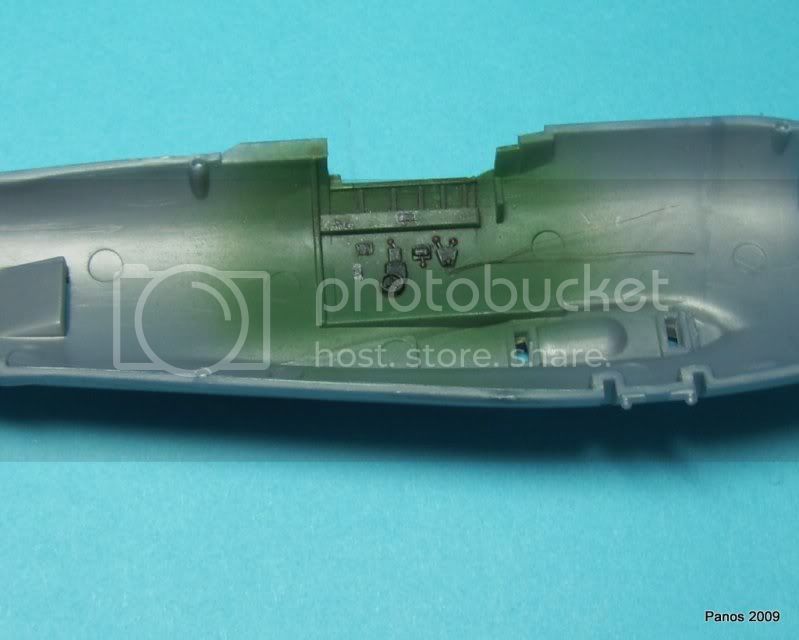
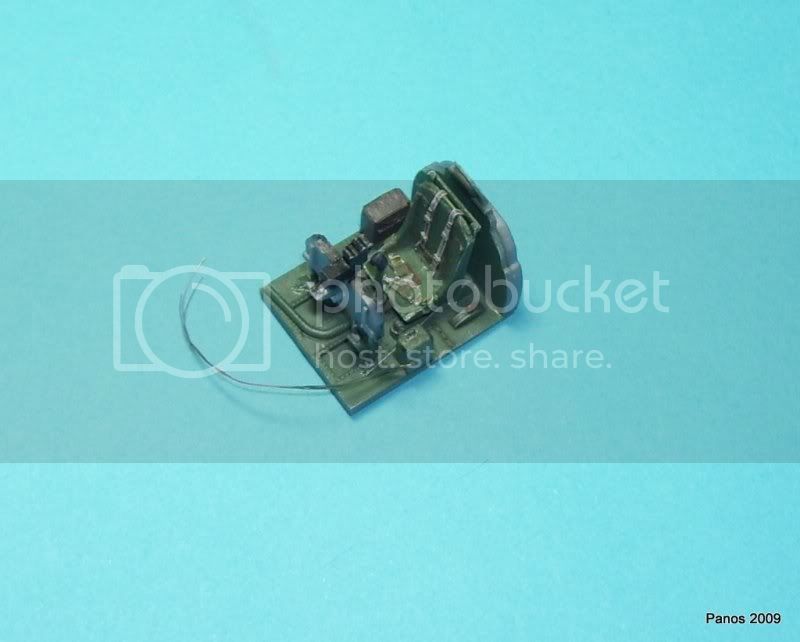
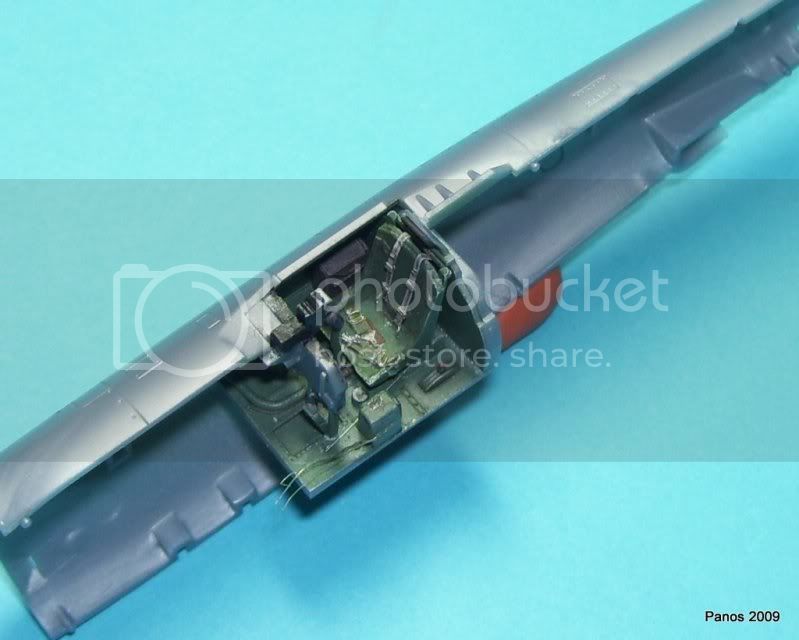
Oh, one more thing. With all the nice details you've added to the cockpit, replacing the moulded-in reflector sight glass with a piece of acetate sheet would be nice final touch to the office.

Keep up the good work.
Btw, what paint scheme are you planning to do?
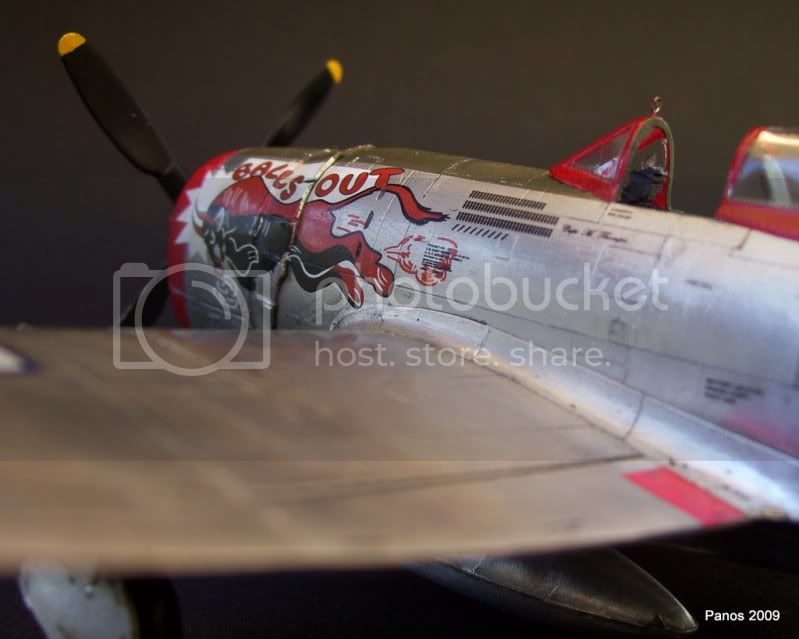
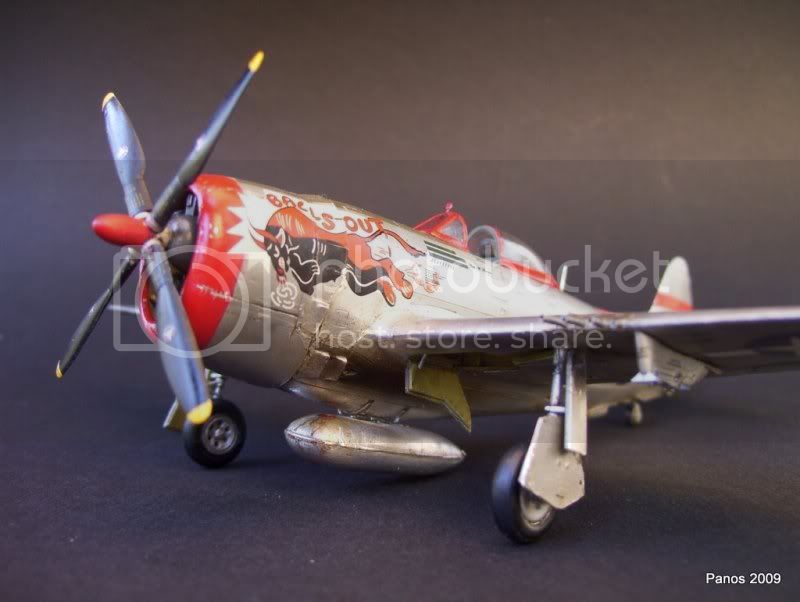
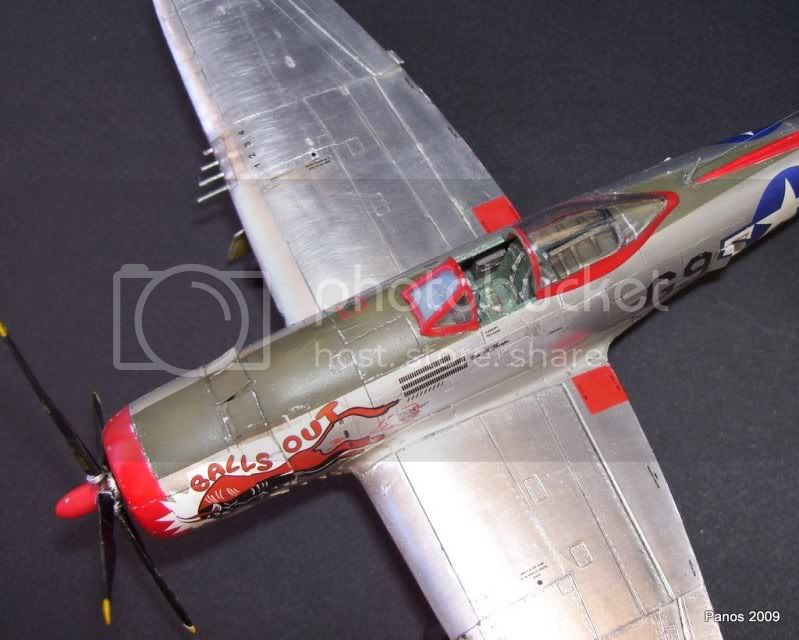
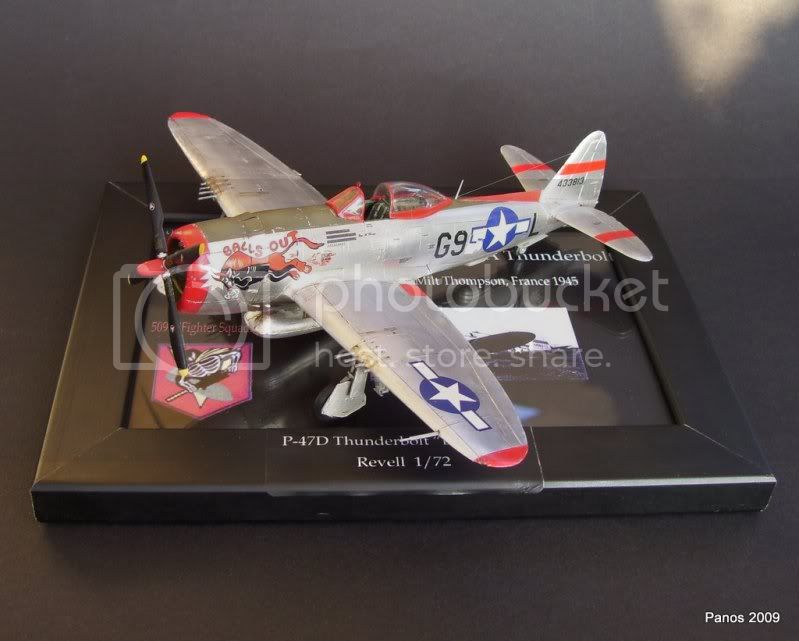
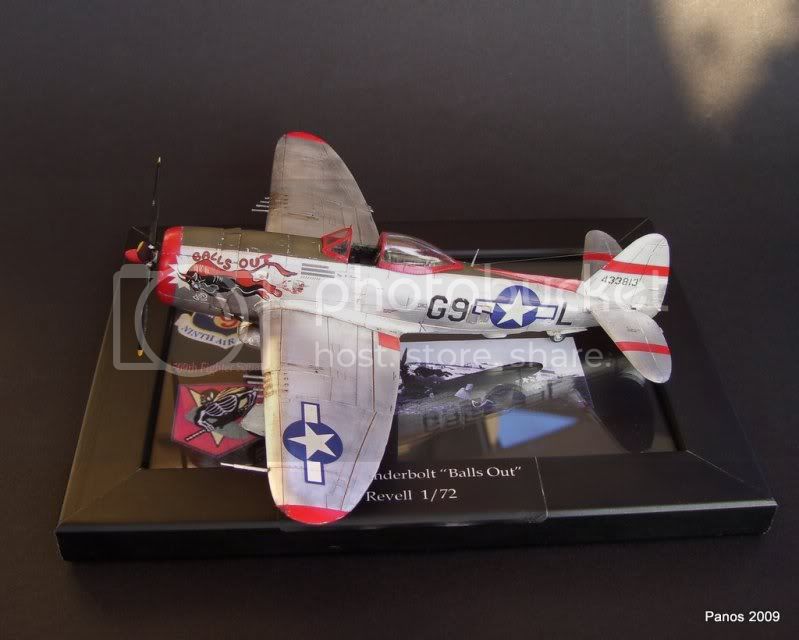
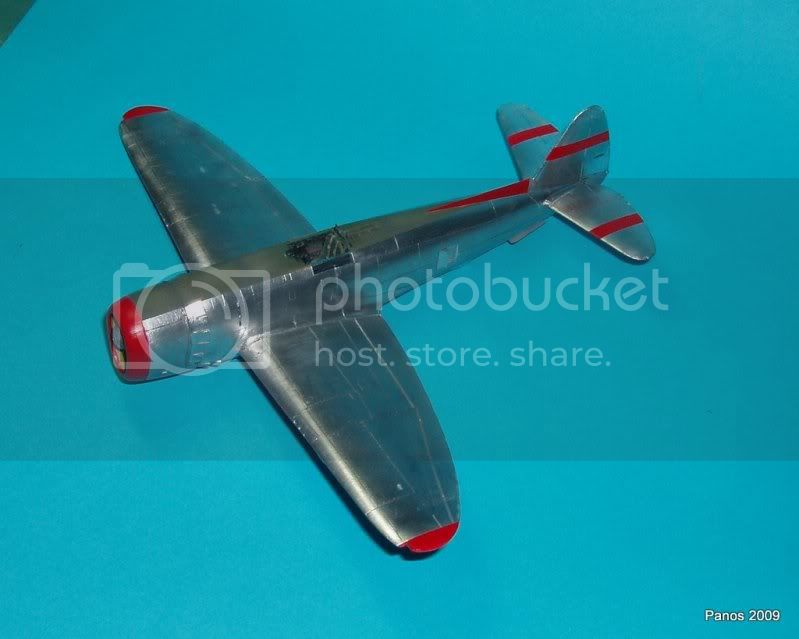
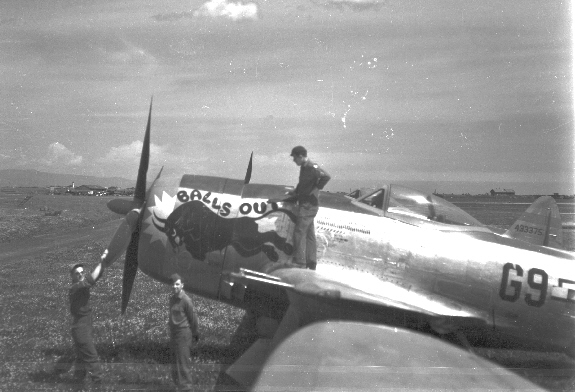
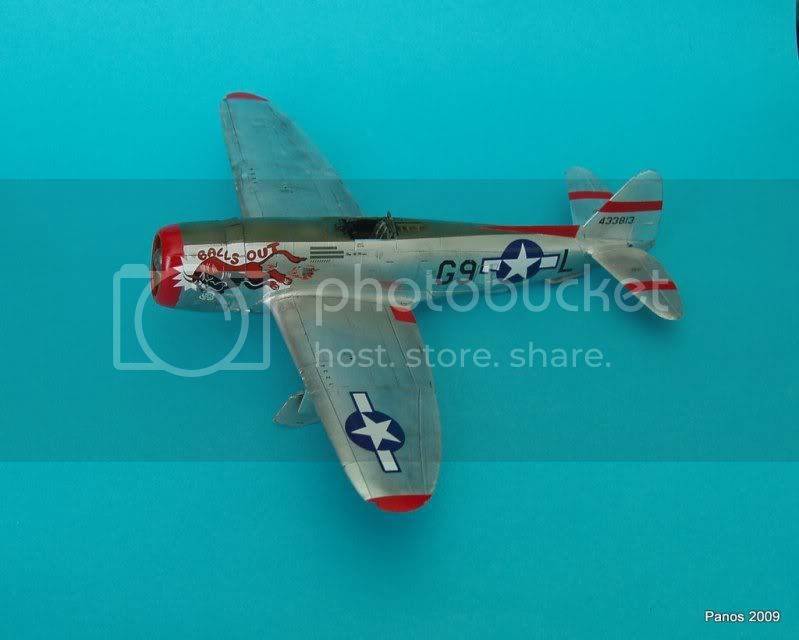
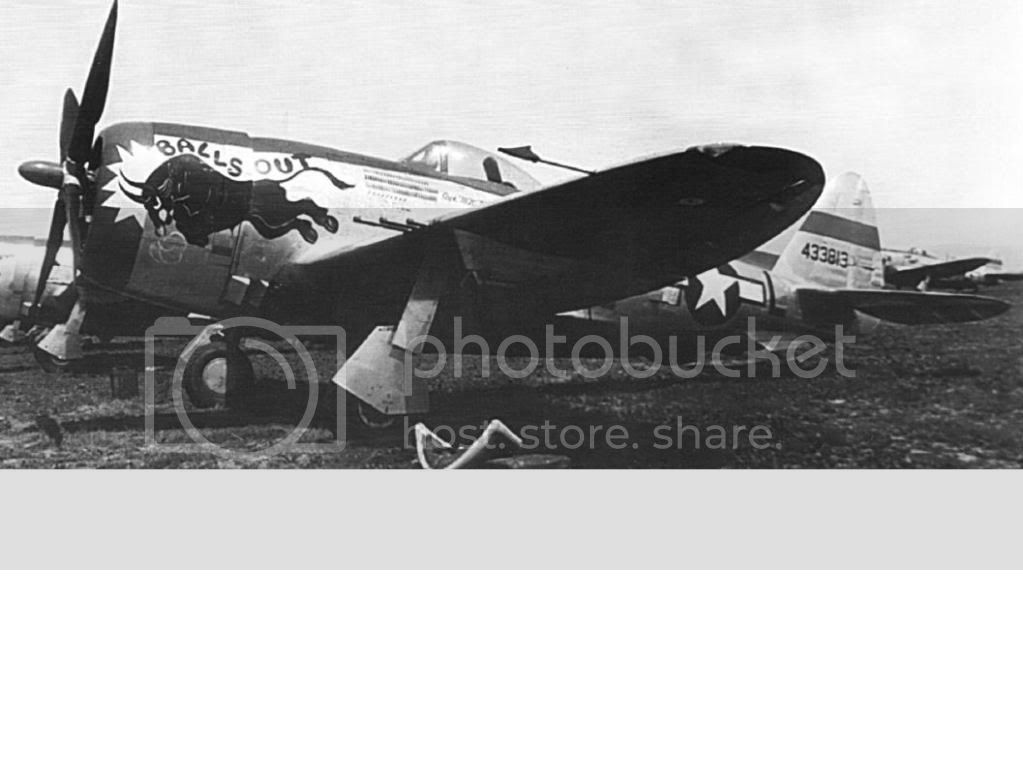
Was this the boxing with the natural metal bird with a bull nose art on the box top?

PanosT
_VISITCOMMUNITY
California, United States
Joined: March 18, 2009
KitMaker: 36 posts
AeroScale: 22 posts
Posted: Monday, April 27, 2009 - 11:49 AM UTC

Quoted Text

Was this the boxing with the natural metal bird with a bull nose art on the box top


That's exactly what I'm planning to do Emeritus!

Soon I'll post photos of my progress!
Thanks again for the advices! Panos
PanosT
_VISITCOMMUNITY
California, United States
Joined: March 18, 2009
KitMaker: 36 posts
AeroScale: 22 posts
Posted: Wednesday, May 06, 2009 - 04:52 PM UTC
Here are some photos of my progress... slow but steady...
Considering that i was almost ready to give up on my build cause of the aluminum foil technique!


I haven't cut the "new" cowl flaps yet...


I hope you like it!
Panos
robot_
_VISITCOMMUNITY
United Kingdom
Joined: March 08, 2009
KitMaker: 719 posts
AeroScale: 691 posts
Posted: Wednesday, May 06, 2009 - 07:03 PM UTC
Wow, that finish is really impressive!
How do you get the foil to go into all the panel lines without tearing?
magnusf
_VISITCOMMUNITY
Stockholm, Sweden
Joined: May 02, 2006
KitMaker: 1,953 posts
AeroScale: 1,902 posts
Posted: Wednesday, May 06, 2009 - 07:35 PM UTC
Hi Panos!

I am also following this with great interest!

What kind of foil are you using? Is it self-adhesive like Bare-Metal foil or are you using foil and some kind of glue?


Magnus
PanosT
_VISITCOMMUNITY
California, United States
Joined: March 18, 2009
KitMaker: 36 posts
AeroScale: 22 posts
Posted: Thursday, May 07, 2009 - 11:30 AM UTC
Hi guys!
- Ben the way i get the foil going into the panel lines without tearing is by pushing it gently with a toothpick (not the edge though) and then by rubbing it with steel wool (0000) reducing the shine of the foil as well.
- Magnus I use household foil with the Micro Metal Foil Adhesive (Microscale).

Thank you guys for your time!
Panos
PanosT
_VISITCOMMUNITY
California, United States
Joined: March 18, 2009
KitMaker: 36 posts
AeroScale: 22 posts
Posted: Monday, May 11, 2009 - 08:00 AM UTC
Finally foiling is done!!!
And after i finished the engine...


...I sprayed a generous coat of future to seal my work...


... the next step was to mask and paint the olive drab and the red...


I don't know why? But Revel's paint scheme doesn't show any red stripes on the tail wings. Anyway I had to paint them , since the Balls Out P-47 seems to had them... (I hope I'm right).

Next step following is the application of the decals. Your comments are more than welcome!!!
Panos
lampie
#029
_VISITCOMMUNITY
England - East Midlands, United Kingdom
Joined: December 23, 2005
KitMaker: 6,249 posts
AeroScale: 3,270 posts
Posted: Monday, May 11, 2009 - 08:39 AM UTC
Looking great Panos!
Maybe one day I will be brave ( or foolish) enough to try this foil technique!
Looking forward to seeing the decals added.

The photo I have to hand of "Balls Out" doesnt show the horizontal stabilisers.

You can see the red band on the tail fin of the aircraft behind.
The wingtip isnt clear, and its inconclusive as to weather or not the tips are painted red. I checked in Reg Noltes " Thunder Monsters Over Europe" and while it shows the tail fin as being part of the standard markings for the 405th FG, theres no mention of any other red bands.
This isnt to say that some aircraft didnt have them painted on though, as example of individual pilots/squadron markings are many and varied.

Keep up the good work
Nige
PanosT
_VISITCOMMUNITY
California, United States
Joined: March 18, 2009
KitMaker: 36 posts
AeroScale: 22 posts
Posted: Tuesday, May 12, 2009 - 02:00 PM UTC
Thank you Nigel for your immediate response to my question !
I 've decide to leave the red bands at the horizontal stabilizers after a quick research of profiles from other P-47s from the same F.S. (they seem to have them).

A quick update of my progress...


Looks quite nice but I'm a little disappointed because of the decals (the bull I think it should be black?) and from the lifting of the edges on some panels.
Panos
FalkeEins
_VISITCOMMUNITY
England - South East, United Kingdom
Joined: March 07, 2005
KitMaker: 868 posts
AeroScale: 690 posts
Posted: Thursday, May 14, 2009 - 03:57 AM UTC

..looks very nice Panos! ...& here's a better view of the wingtips and stabilisers...I think you can see the red wingtips, but as for the stabilisers, who knows..? This is from the Warpaint 'special' on the P-47. Unfortunately the Revell decals seem to be incorrect in one or two places - the bull is black overall - as per the close up in the Warpaint booklet. I'm also not sure about the white background to the lettering on the decals...

.
PanosT
_VISITCOMMUNITY
California, United States
Joined: March 18, 2009
KitMaker: 36 posts
AeroScale: 22 posts
Posted: Wednesday, May 27, 2009 - 04:18 PM UTC
Finally the end!

I hope you enjoy it!


Panos
robot_
_VISITCOMMUNITY
United Kingdom
Joined: March 08, 2009
KitMaker: 719 posts
AeroScale: 691 posts
Posted: Thursday, May 28, 2009 - 11:03 AM UTC
Amazing finish for a 1/72 model!


I love the details in the fuselage in this shot that still look crisp even through the foil. Great job!
FalkeEins
_VISITCOMMUNITY
England - South East, United Kingdom
Joined: March 07, 2005
KitMaker: 868 posts
AeroScale: 690 posts
Posted: Saturday, May 30, 2009 - 07:47 AM UTC
..very nice indeed ..like the display base...was that 'my' pic you used...? .just finishing one of these myself as it happens...

my only comment would be the colour of the interior framing of the canopy - would expect it to be in NMF or interior green ..anyone know..? Don't think the radio antenna wire was necessary either...

I think I've put my finger on where this Revell kit falls down a little too - the gear isn't raked forward enough which results in a strange 'sit' ..
PanosT
_VISITCOMMUNITY
California, United States
Joined: March 18, 2009
KitMaker: 36 posts
AeroScale: 22 posts
Posted: Saturday, May 30, 2009 - 10:52 AM UTC
Hi Neil!
Thank you for your Help and comments!


Quoted Text

my only comment would be the colour of the interior framing of the canopy


You are absolutely right, but i was over it (from foiling n final result) and lazy to mask the interior of the canopy!
The picture is from the book Warpaint Specials No.1Republic P-47 Thunderbolt .


Quoted Text

the gear isn't raked forward enough which results in a strange 'sit'


Do you have any scheme (angle) of the landing gear in order to prevent future mistakes? If you do, would be so kind to post it please?
Thanks again for your comments!
Panos
FalkeEins
_VISITCOMMUNITY
England - South East, United Kingdom
Joined: March 07, 2005
KitMaker: 868 posts
AeroScale: 690 posts
Posted: Saturday, May 30, 2009 - 01:14 PM UTC

. Hi Panos,
..
..I was looking at a couple of perfect side-on shots in 'Aces & Wingmen' - short of drilling & pinning I can't see an easy fix - I certainly haven't bothered on my Revell builds..
Emeritus
_VISITCOMMUNITY
Uusimaa, Finland
Joined: March 30, 2004
KitMaker: 2,845 posts
AeroScale: 1,564 posts
Posted: Saturday, May 30, 2009 - 11:17 PM UTC
Your model turned out really good!
That's some nice work with the foil.


Quoted Text


Quoted Text

my only comment would be the colour of the interior framing of the canopy


You are absolutely right, but i was over it (from foiling n final result) and lazy to mask the interior of the canopy!


Instead of masking the inside, you could also mask the exterior, spray the interior color first, then the exterior one. This way you get the appareance of an interior frame, although in larger scales and with opened canopies the more laborious method of masking both sides of the canopy would yield a more realistic result.

 _GOTOTOP