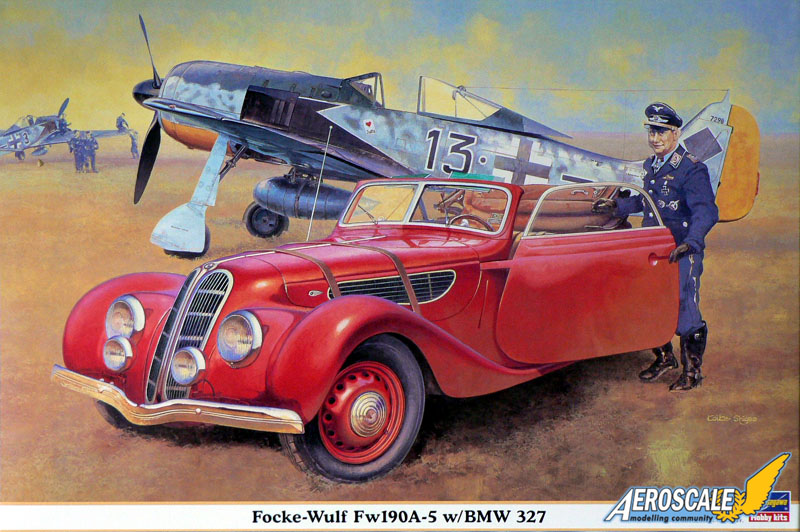
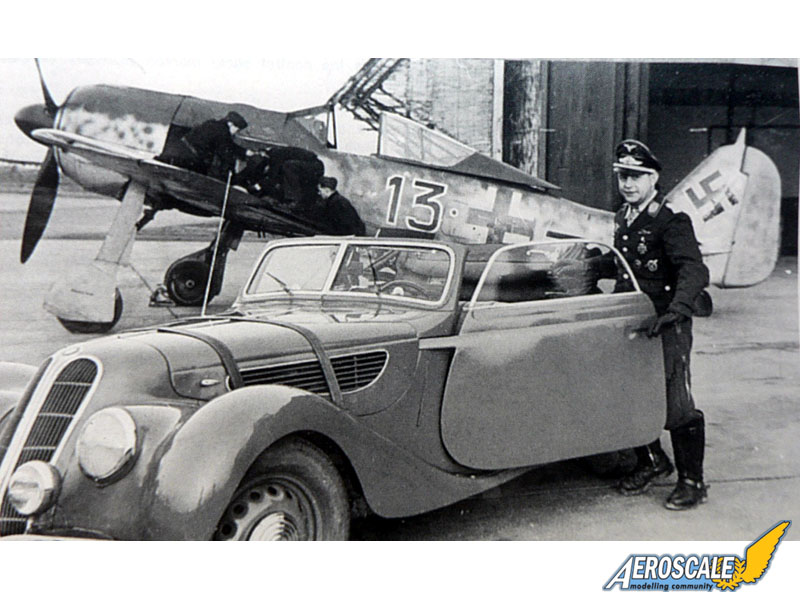
_GOTOBOTTOM
World War II
Discuss WWII and the era directly before and after the war from 1935-1949.
Hosted by Rowan Baylis
REVIEW
Fw 190 A-5 w/BMW 327
TedMamere
_VISITCOMMUNITY
Moselle, France
Joined: May 15, 2005
KitMaker: 5,653 posts
AeroScale: 4,347 posts
Posted: Tuesday, August 07, 2007 - 09:37 AM UTC


A few months ago (or was it already over a year?) Hasegawa announced the release of a Focke Wulf Fw190 A-5 in 1/48 scale. While this was good news in itself for WW2 Luftwaffe fans, the fact that a BMW 327 car was to be included in the kit made the aircraft diorama crowd even more impatient to see it hit the shelves. Was the waiting worth it? My answer is definitely yes!

Link to Item

If you have comments or questions please post them here.

Thanks!
alpha_tango
_VISITCOMMUNITY
Germany
Joined: September 07, 2005
KitMaker: 5,609 posts
AeroScale: 5,231 posts
Posted: Tuesday, August 07, 2007 - 06:15 PM UTC
Guten Morgen Jean-Luc

so you got your parcel earlier than me ... very nice review!

I will probably throw away the Priller humunculus and use a figure from the ICM sets.

I am not sure what you dislike on the instructions? I always fold them as I need it and thus it does not take more space than instruction "booklets" ... you do not need to see all steps all the time, do you?

have a nice day

Steffen
SGTJKJ
#041
_VISITCOMMUNITY
Kobenhavn, Denmark
Joined: July 20, 2006
KitMaker: 10,069 posts
AeroScale: 3,788 posts
Posted: Tuesday, August 07, 2007 - 10:49 PM UTC
Thanks for a good review, Jean-Luc.

This could definently be a nice kit to add to the collection - especially for a diorama. I agree, we live in golden times for modellers.

Thanks for the review.
alpha_tango
_VISITCOMMUNITY
Germany
Joined: September 07, 2005
KitMaker: 5,609 posts
AeroScale: 5,231 posts
Posted: Tuesday, August 07, 2007 - 11:15 PM UTC
Hi Jesper and J-L

re "Golden times" ... since the hard battle on the military front started (DML vs. AFV/Tristar) I have more the feeling, that this is the last blow up before the bang. Still it is good, because we get many nice kits now, but there is already some mortuary odor ... OTOH I already have enough kits for a life time, so I think I'll die before the hobby does

just my two euro ct

cheers

Steffen
CaptainA
_VISITCOMMUNITY
Indiana, United States
Joined: May 14, 2007
KitMaker: 3,117 posts
AeroScale: 2,270 posts
Posted: Wednesday, August 08, 2007 - 03:07 AM UTC
Love the car. Wouldn't drive anything else.
TedMamere
_VISITCOMMUNITY
Moselle, France
Joined: May 15, 2005
KitMaker: 5,653 posts
AeroScale: 4,347 posts
Posted: Wednesday, August 08, 2007 - 04:16 AM UTC
Hi Steffen!


Quoted Text

re "Golden times" ... since the hard battle on the military front started (DML vs. AFV/Tristar) I have more the feeling, that this is the last blow up before the bang. Still it is good, because we get many nice kits now, but there is already some mortuary odor ... OTOH I already have enough kits for a life time, so I think I'll die before the hobby does


My thoughts exactly! But let's enjoy the decadence of our hobby right now!

Concerning the format of the instructions, the problem is that I often have the model in the right hand, the part to glue in the left hand and the cement tube between my teeth... and then realise the instructions is not opened on the right page! I think I must be the problem
Did you already received your kit Stephen? The figure isn't as bad as you say...


Quoted Text

Love the car. Wouldn't drive anything else.


If I had the choice, I would take the plane!

Jean-Luc
alpha_tango
_VISITCOMMUNITY
Germany
Joined: September 07, 2005
KitMaker: 5,609 posts
AeroScale: 5,231 posts
Posted: Wednesday, August 08, 2007 - 05:10 AM UTC
Hi Jean-Luc

Unfortunately I do not have it yet.

I go on a cross Germany trip tomorrow, as I have a job interview in Düsseldorf on Friday and another one in Karlsruhe on Monday, so I will not get it until Tuesday .. fingers crossed (for both a job and the kit)

BTW I ordered the MIZU tape someone recommended recently and it is great. I also got a Tamiya saw that is really large and works great (74024 thin blade craft saw) ...

best wishes

Steffen
TedMamere
_VISITCOMMUNITY
Moselle, France
Joined: May 15, 2005
KitMaker: 5,653 posts
AeroScale: 4,347 posts
Posted: Wednesday, August 08, 2007 - 07:24 AM UTC

Quoted Text

I go on a cross Germany trip tomorrow, as I have a job interview in Düsseldorf on Friday and another one in Karlsruhe on Monday, so I will not get it until Tuesday .. fingers crossed (for both a job and the kit)


Hi again Steffen!

Wow, Düsseldorf and Karlsruhe! Not exactly two cities which are near Mecklenburg-Vorpommern. I wish you good luck for the job interviews. If you have the choice, go to Karlsruhe! It's nearer from where I live!

Jean-Luc
CaptainA
_VISITCOMMUNITY
Indiana, United States
Joined: May 14, 2007
KitMaker: 3,117 posts
AeroScale: 2,270 posts
Posted: Wednesday, August 08, 2007 - 07:26 AM UTC

Quoted Text


If I had the choice, I would take the plane!

Jean-Luc


Yeah, me too, but I have no place to park it. And I don't know how to fly. I'll take the car.

Odd are no one out there is willing to give either one of them to either one of us.
Merlin
Staff MemberSenior Editor
AEROSCALE
#017
_VISITCOMMUNITY
United Kingdom
Joined: June 11, 2003
KitMaker: 17,582 posts
AeroScale: 12,795 posts
Posted: Wednesday, August 08, 2007 - 07:40 AM UTC
Hi Jean-Luc

Nice review - and I'm really glad your kit beat mine in the post (not surprising as I ordered mine so late!) . After all the problems I had with Hasegawa's 'A-3, I really wasn't looking forward to reviewing this if mine arrive first - so it's great to hear this one's all new - and you've really whetted my appetite for it now.

Good luck with the interviews Steffen. Your mention of Karlruhe takes me back to my schooldays - my school was part of an exchange scheme with one in Neckarsulm. Happy days.

All the best

Rowan
TedMamere
_VISITCOMMUNITY
Moselle, France
Joined: May 15, 2005
KitMaker: 5,653 posts
AeroScale: 4,347 posts
Posted: Wednesday, August 08, 2007 - 07:40 AM UTC

Quoted Text

Odd are no one out there is willing to give either one of them to either one of us.


Hi Carl!

True! This is why we must build them as 1:48 scale models...

Jean-Luc
TedMamere
_VISITCOMMUNITY
Moselle, France
Joined: May 15, 2005
KitMaker: 5,653 posts
AeroScale: 4,347 posts
Posted: Wednesday, August 08, 2007 - 07:47 AM UTC
Hi Rowan!

Welcome back! I hope you had great holidays!


Quoted Text

I'm really glad your kit beat mine in the post


So the French post is faster than the German and British one! I'm looking forward to your "U.S. Army light vehicle" review though...

Jean-Luc
alpha_tango
_VISITCOMMUNITY
Germany
Joined: September 07, 2005
KitMaker: 5,609 posts
AeroScale: 5,231 posts
Posted: Wednesday, August 08, 2007 - 07:50 AM UTC
Hi Rowan and Jean-Luc

many thanks for your kind wishes .. I hope they help...

best wishes

Steffen
Merlin
Staff MemberSenior Editor
AEROSCALE
#017
_VISITCOMMUNITY
United Kingdom
Joined: June 11, 2003
KitMaker: 17,582 posts
AeroScale: 12,795 posts
Posted: Wednesday, August 08, 2007 - 07:55 AM UTC

Quoted Text

So the French post is faster than the German and British one! I'm looking forward to your "U.S. Army light vehicle" review though...

Jean-Luc


Cheers Jean-Luc

Yes - I'm back in The Smoke. It's only fair that HLJ sent your kit before mine - I think you pre-ordered didn't you? Mine was a last-minute decision when I spotted the "U.S. Army light vehicle" (which is apparently on the way...).

All the best

Rowan
alpha_tango
_VISITCOMMUNITY
Germany
Joined: September 07, 2005
KitMaker: 5,609 posts
AeroScale: 5,231 posts
Posted: Thursday, August 16, 2007 - 04:11 AM UTC
Hi Gang

Just got it from the postman .. Geman costums had fun with it, but luckily i've had nothing to pay

Any progress J-L?

cheers

Steffen
TedMamere
_VISITCOMMUNITY
Moselle, France
Joined: May 15, 2005
KitMaker: 5,653 posts
AeroScale: 4,347 posts
Posted: Thursday, August 16, 2007 - 12:34 PM UTC

Quoted Text

Any progress J-L?


Hi Steffen!

Funny you ask that! Guess what ended on my workbench today?
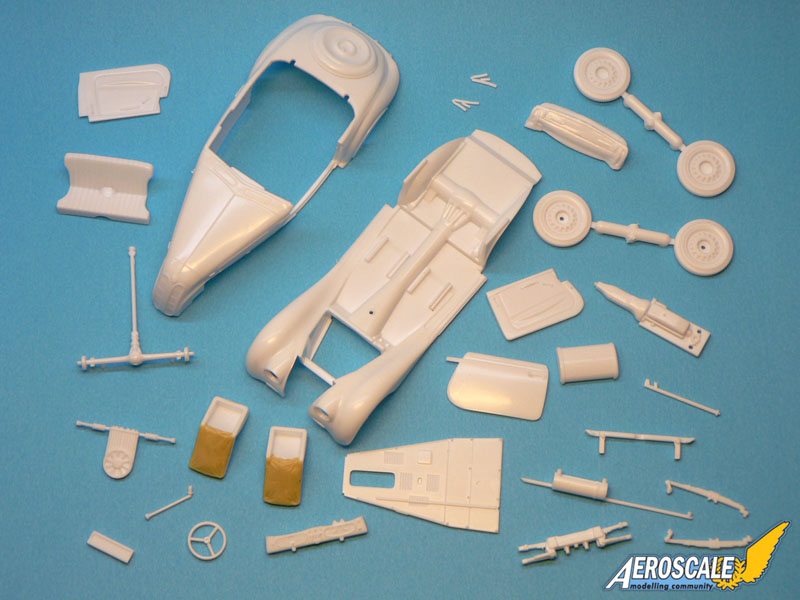
I got distracted by another project in the past days (see here) and now I need a quick "fun build"

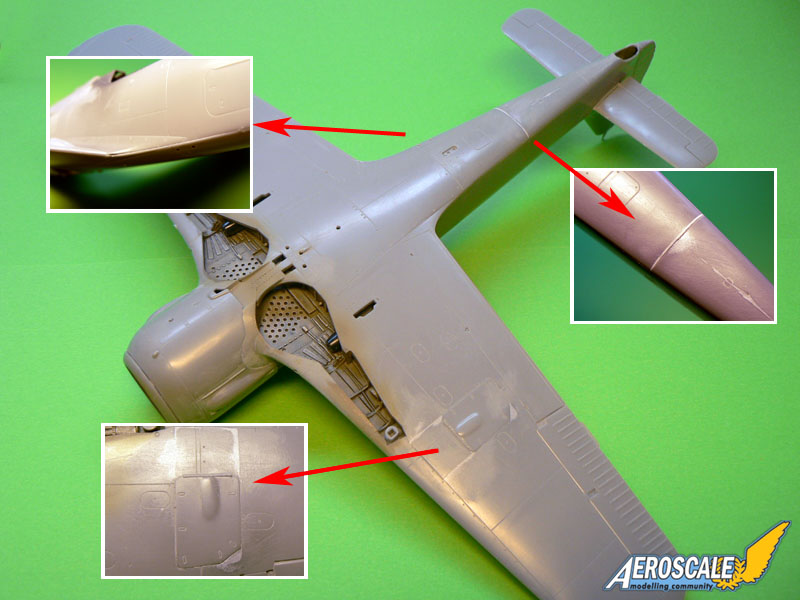
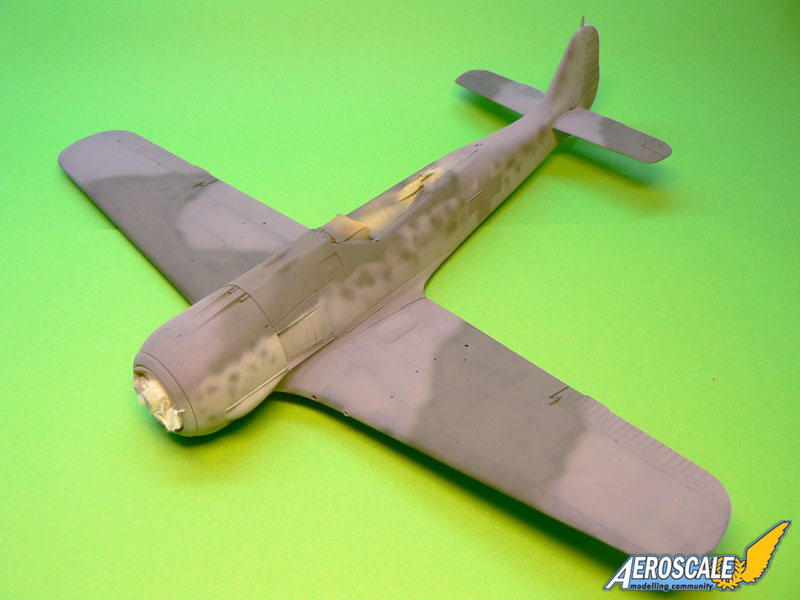
I started the Fw 190 A-5 by doing some sub-assemblies and cleaning the parts for painting...


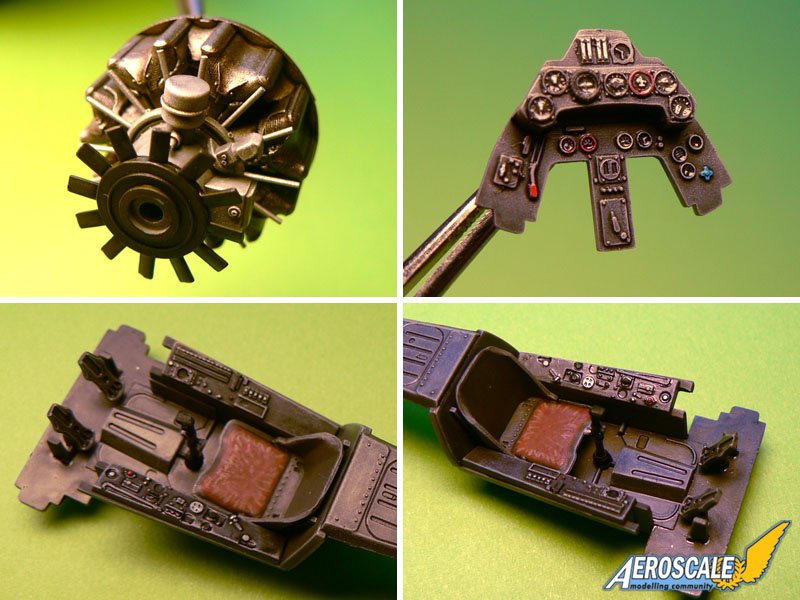
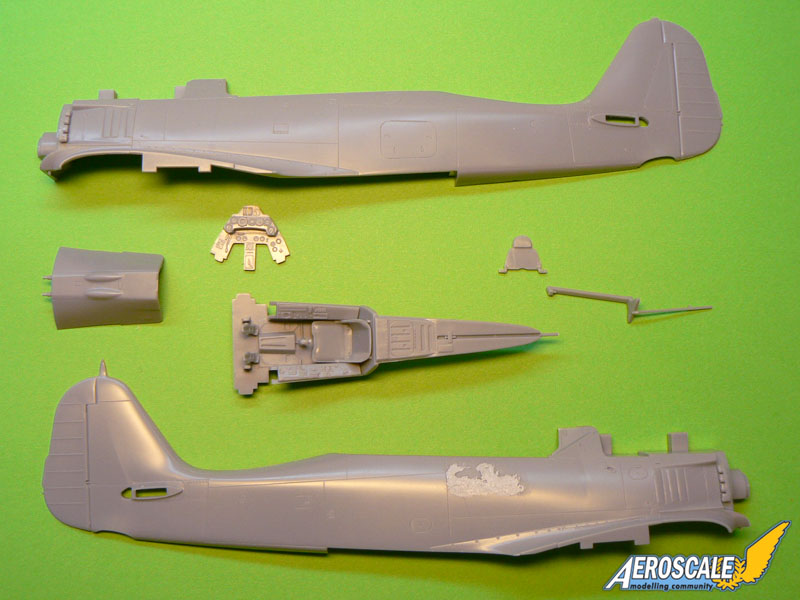
Fuselage halves and cockpit: I glued the exhausts and filled two access panels on the starboard side as per instructions (these are for the A-8 version). A smaller one will have to be relocated and rescribed later. The interior sub-assembly is composed of the cockpit tub, two side consoles, two rudder pedals, one control column, one seat, the instrument panel, the head armor plate and the canopy slide frame. Not seen on the picture are the canopy actuator wheel (glued inside the right fuselage half) and the Revi gunsight.
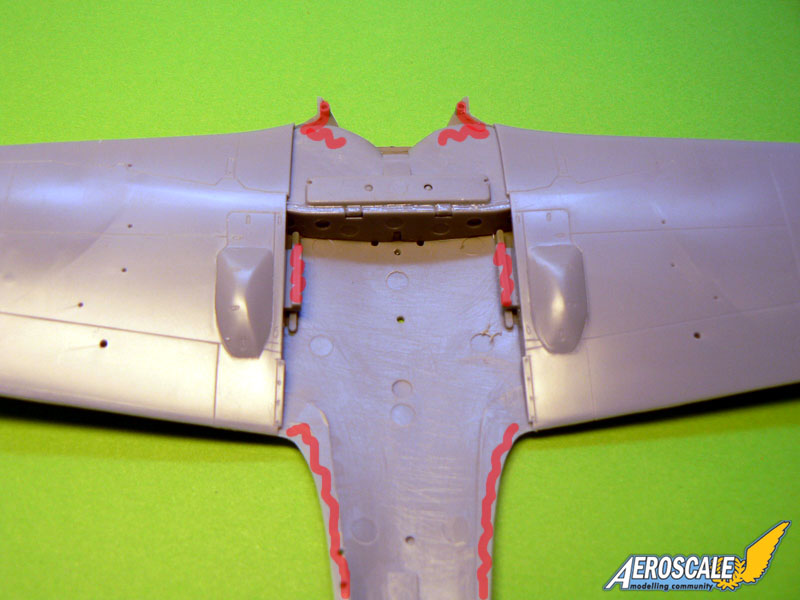
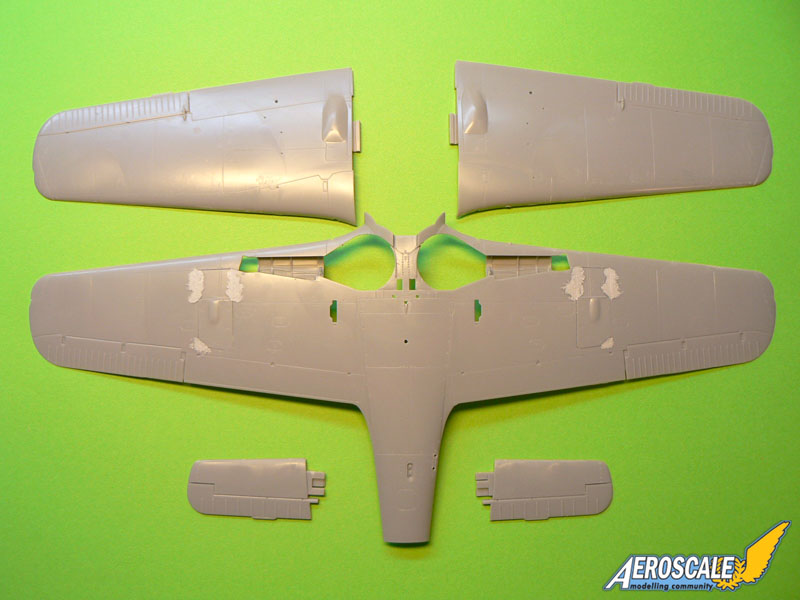

Wings: I cleaned the parts and added the underwing bulges. Filler was needed because the inserts don't always follow the aircraft's panel lines. I noticed while reading the instructions that I've probably made a mistake in my review. I thought that the optional underwing bulges present in the kit were for the A-6 version. In fact it seems this is not the case and maybe someone (Steffen?) can help me to find what's right and what's wrong.
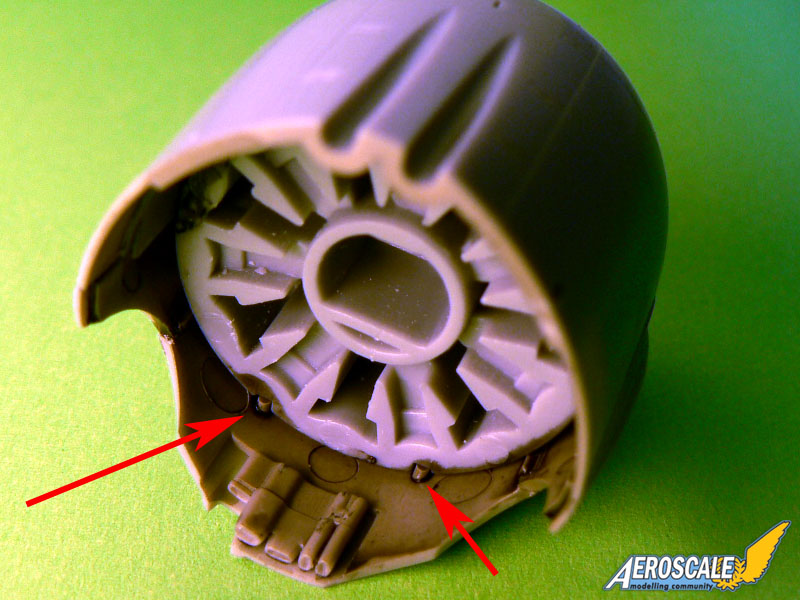
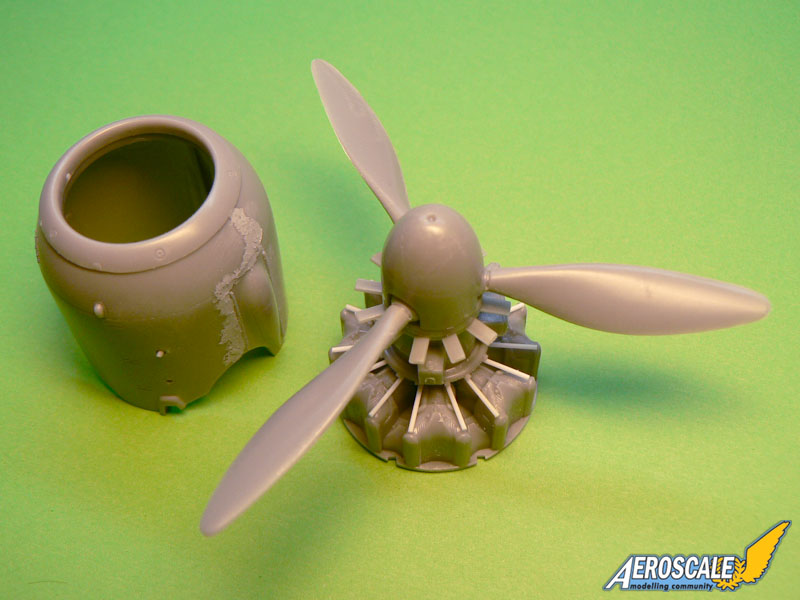

Engine and cowling: 
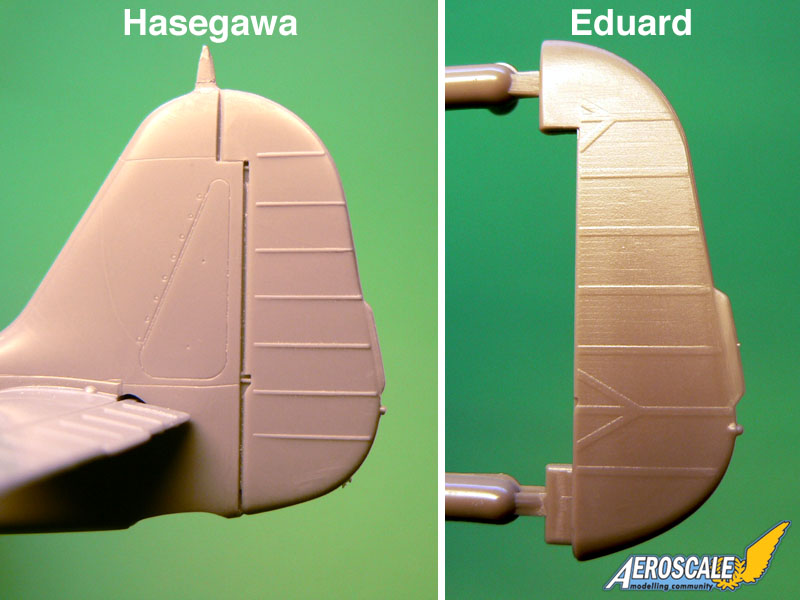
the engine in the Hasegawa kit is not as detailed as Eduard's version. But in this case the level of detail is appropriate since the engine bay is not supposed to be displayed open. In the picture, what appears white on the engine are replacement rods. While separating the original part from the sprue, I broke 3 rods from the 14 and 3 more broke when I tried to fixe the first ones... Since the plastic of the kit is very brittle I decided to replace all of them with evergreen rods. The cowling is made of 5 parts and here too filler was needed because the parts don't always meet at "natural" panel lines.
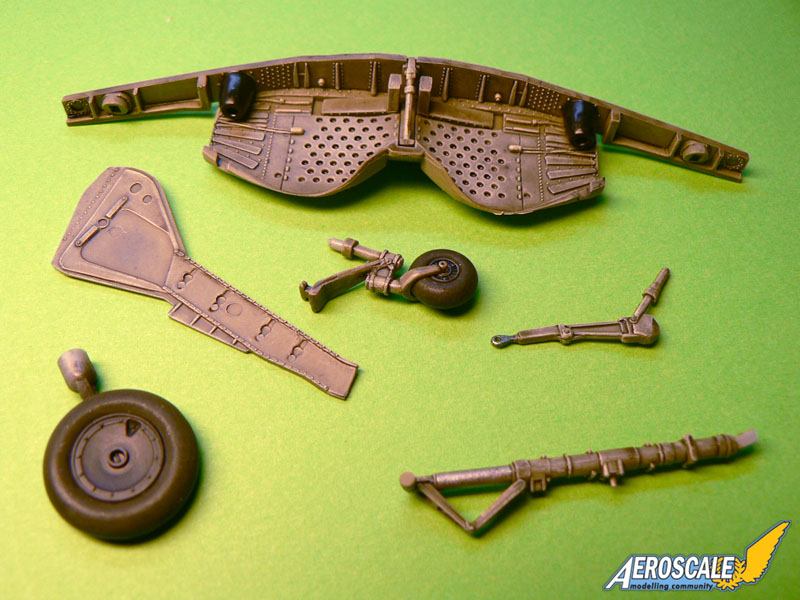
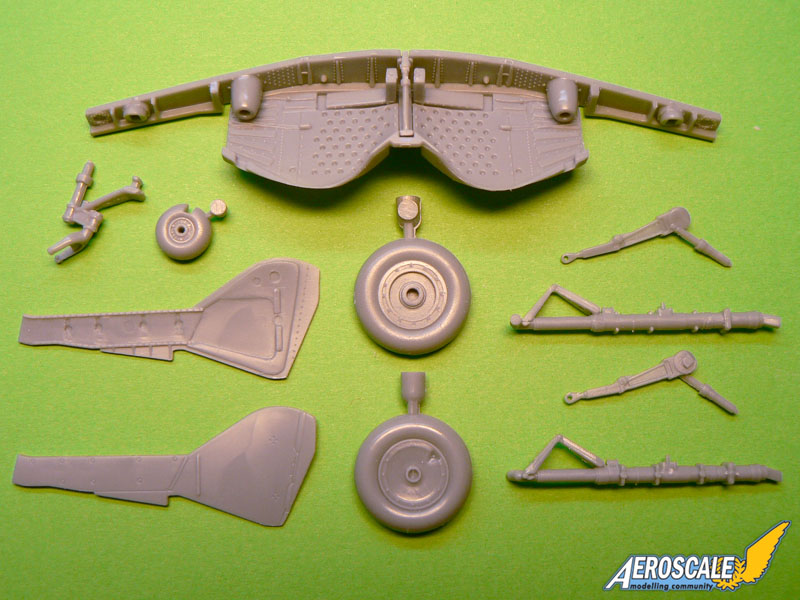

Landing gear: the gear bay insert is composed of four parts and is very convincing. The landing gear is nicely detailed with realistic looking actuators.


External parts: an additional fuel tank is provided with the attachment rack. Two gun barrels, an access ladder, an antenna and a pitot tube will have to be added at the end of the build given the fragile nature of these parts.

Obvioulsy Hasegawa designed the Fw 190 A-5 kit so that it is easy to build. There are not many parts but the level of detail is good. I will soon paint the parts in their appropriate colors and then glue the fuselage halves together and fit the wings to see if everything is as straigthforward as it seems...

Jean-Luc
alpha_tango
_VISITCOMMUNITY
Germany
Joined: September 07, 2005
KitMaker: 5,609 posts
AeroScale: 5,231 posts
Posted: Thursday, August 16, 2007 - 06:44 PM UTC
Hi Jean-Luc

I did not have a close look yet, as I still have my nephew here and he still wants to have all of my attention ... (my IPMS boss is already mad at me because of the few updates recently)

Some things I see from your build report and a first own look at the sealed sprues.:

1. Wing gun covers: I hope you have checked your refs. Typical for the A-5 is the bulbous cover for the ammunition drum for the MG FF (see the Eduard Bf 110 thread ... you cannot just attach smaller covers). I cannot comment on the other (that you installed) maybe it is an early field solution for MG 151 installation correct for this very variant (Priller)--- but then I see no ejector chute. .... have to dig in my references to make a final statement

2. I am not happy, that Hasegawa went the same way as Dragon did. I prefer the eduard style for providing special fuselages for every variant. But I still have to check if there is much wrong (under fuselage access panel is smaller than on the A-8, connection for Anlasserkraftstoff and of course the hatches you already filled )

3. The upper cowling has some strange slots? ... the lower cowling has an additional pipe that I was not aware of (which can be perfectly correct)

4. The two part tail wheel is a nice touch

5. I like the car and hope Hauler does some grilles as for the Citroën

6. you are right on the figure .. it is much better than I guesstimated from earlier pictures

thats all for now

best wishes

Steffen


Merlin
Staff MemberSenior Editor
AEROSCALE
#017
_VISITCOMMUNITY
United Kingdom
Joined: June 11, 2003
KitMaker: 17,582 posts
AeroScale: 12,795 posts
Posted: Thursday, August 16, 2007 - 07:13 PM UTC
Hi Steffen

I'm glad you've changed your opinion of the figure - looking at it for real, I was trying to work out why you hated so.

As Jean-Luc says, as well as filling the A-8 panels, you need to add a new one. (I don't like Hasegawa's solution of supplying a decal for this.)

The fabric-covered control surfaces seem slightly odd. Hasegawa show rip tapes (although far too heavily), but they don't match the number (stabilizers) or pattern (ailerons and rudder) of the internal structure according to my refs.

According to the HT Model Special, Hasegawa have included the wrong style mainwheels for a standard 'A-5. They may be correct for Priller's a/c - I don't know.

The thing I noticed with the BMW is that the chrome plating is very thick and has some blemishes. The parts might look much more to scale stripped and painted with a chrome metalizer.

All the best

Rowan
TedMamere
_VISITCOMMUNITY
Moselle, France
Joined: May 15, 2005
KitMaker: 5,653 posts
AeroScale: 4,347 posts
Posted: Friday, August 17, 2007 - 09:36 AM UTC
Hi Steffen and Rowan!


Quoted Text

1. Wing gun covers: I hope you have checked your refs. Typical for the A-5 is the bulbous cover for the ammunition drum for the MG FF (see the Eduard Bf 110 thread ... you cannot just attach smaller covers). I cannot comment on the other (that you installed) maybe it is an early field solution for MG 151 installation correct for this very variant (Priller)--- but then I see no ejector chute. .... have to dig in my references to make a final statement


Yes I've checked my refs and I thought the bulbous covers were for the A-5 variant and the others (the ones I used) for the A-6. It's only when I noticed that in the kit's instructions it is said to use the latter that I realized I made a mistake in the review. Like you I suppose these are probably a variant (early?). In page 31 of the Squadron "in action" book about the Fw 190, there is a photo of an A-5 with the same smaller covers. In the famous picture with the BMW, it is not possible to see what kind of bulges are present on Priller's plane so I decided to follow Hasegawa's instructions.


Quoted Text

According to the HT Model Special, Hasegawa have included the wrong style mainwheels for a standard 'A-5. They may be correct for Priller's a/c - I don't know.


On the picture I mentionned above, Priller's aircraft is fitted with the solide hubs wheels so Hasegawa is correct in this case. Both style were used on the A-5 so the best is to check on a photo if possible. Replacement wheels are not present in this kit but there are some in Eduard's!

I made some progress today, not much but at least some...


The engine and the cockpit have been painted as per the kit's instructions. The engine, as I said previously, is basic but will be mostly hidden by the propeller hub and the cooling fan. The instrument panel looks very nice and the cockpit detail is good. I will add Eduard seatbelts later.


I have also finished the landing gear bay. Some drybrushing and a good wash was my receipt to get this result.

Tomorrow I will close the fuselage halves and glue the wings.

Jean-Luc
Merlin
Staff MemberSenior Editor
AEROSCALE
#017
_VISITCOMMUNITY
United Kingdom
Joined: June 11, 2003
KitMaker: 17,582 posts
AeroScale: 12,795 posts
Posted: Friday, August 17, 2007 - 09:19 PM UTC

Quoted Text

On the picture I mentionned above, Priller's aircraft is fitted with the solide hubs wheels so Hasegawa is correct in this case.


Hi Jean-Luc

You're absolutely right - the photo's so famous, I completely forgot to check it before posting!

One thing Hasegawa maybe missed from that same photo of Priller's a/c is that, to me, the rudder looks like it was overpainted with a mottle to tone-down the yellow. Hasegawa show darker orange patches on the boxtop picture as though the yellow's rather roughly applied over the existing scheme, but the streaks and blotches in the photo look darker than any camouflage on the fin. How do you interpret it?

All the best

Rowan
TedMamere
_VISITCOMMUNITY
Moselle, France
Joined: May 15, 2005
KitMaker: 5,653 posts
AeroScale: 4,347 posts
Posted: Monday, August 20, 2007 - 02:48 AM UTC

Quoted Text

One thing Hasegawa maybe missed from that same photo of Priller's a/c is that, to me, the rudder looks like it was overpainted with a mottle to tone-down the yellow. Hasegawa show darker orange patches on the boxtop picture as though the yellow's rather roughly applied over the existing scheme, but the streaks and blotches in the photo look darker than any camouflage on the fin. How do you interpret it?


Hi Rowan!

Below is the famous picture of Priller and his two BMW powered machines. You are probably right about the rudder. It seems it was overpainted with RLM02. One other thing I've noted is that the markings appear to have a shinier finish than the camouflage. This was often the case because the paint used for this purpose was different. So it is not always necessary to dull coat the entire model to have an even finish. Markings can be much more glossy than the camouflage on some WW2 aircraft.


Here are some more progress picture...


The engine is very easy to fit into the cowling but you must take care not to push it too far forward otherwise the cooling fan will stand proud at the front of the plane. I adjusted the engine on my model so that the locators are barely visible.


To achieve an almost perfect "wing to fuselage" fit, you don't have to add too much glue. I only applied some on the areas marked in red. I didn't applied any cement on the wing roots to avoid glue smears. On the photo you can also notice the locators on the upper wings parts. They were very effective in improving the fit!


Here's a picture of the model in it's current status. The fuselage, the wings, the engine "power-egg" and the horizontal stabilizers have been assembled together. The fit is very good and only a minimal amount of filler is needed, mostly in areas where inserts have been used. Some plasticard was needed on the rear fuselage bottom because there was a noticable gap.

To add fuel to the debat about the overal surface detail, I've compared the Hasegawa and Eduard kits...


The fabric representation is very similar in both cases if somewhat overdone in the Hasegawa kit. It can be toned down with some sanding though. Eduard do have the habit to provide fuselage halves that match a specific version in their kits while the Japanese manufacturer prefers to use a more modular concept. This means in the latter case that you will have to fill and rescribe some panel lines. However (for the A-5 kit at last) it seems that some filling and rescribing will also be necessary on the Eduard Fw 190 kit if you want a 100% accurate result.


This is a picture which shows the "additional pipe" Steffen mentionned in an earlier post. I've added a picture from a Squadron walkaround book. It seems that the pipe is really there...

Next time I hope to be able to post some pictures of the camouflage painting... and maybe some of the BMW car.

Jean-Luc
CaptainA
_VISITCOMMUNITY
Indiana, United States
Joined: May 14, 2007
KitMaker: 3,117 posts
AeroScale: 2,270 posts
Posted: Monday, August 20, 2007 - 09:17 AM UTC
So what camo scheme are you going to use on the car? The 190 is going to be bright red isn't it?
TedMamere
_VISITCOMMUNITY
Moselle, France
Joined: May 15, 2005
KitMaker: 5,653 posts
AeroScale: 4,347 posts
Posted: Tuesday, August 21, 2007 - 09:35 AM UTC

Quoted Text

So what camo scheme are you going to use on the car? The 190 is going to be bright red isn't it?


Hi Carl!

Are you color blind?

Sorry the Fw 190 isn't going to be red...


I applied the RLM 74/75/76 camouflage as per instructions. It seems that the fuselage cross was lighter than usual on Priller's aircraft so I painted it as Hasegawa suggested (RLM 75). The white will be applied as a decal later. I will paint the yellow theatre markings as well as the "eagle wings" on both side of the fuselage tomorrow...


I started the BMW today. I didn't do much, mostly cleaning the parts. I will paint the pieces in their respective colors and assemble them later. The yellow stuff on the back of the seats is Tamiya Epoxy Putty. I used it to simulate fabric, otherwise there would have been empty space there.

Jean-Luc
betheyn
Staff MemberSenior Editor
AEROSCALE
#019
_VISITCOMMUNITY
England - South East, United Kingdom
Joined: October 14, 2004
KitMaker: 4,560 posts
AeroScale: 2,225 posts
Posted: Tuesday, August 21, 2007 - 09:54 AM UTC
Great work as usual Jean-Luc.
What is the purpose of the "additional pipe" ?
Andy
CaptainA
_VISITCOMMUNITY
Indiana, United States
Joined: May 14, 2007
KitMaker: 3,117 posts
AeroScale: 2,270 posts
Posted: Tuesday, August 21, 2007 - 12:08 PM UTC

Quoted Text

Are you color blind?


No, actually I'm a ___________ . (you decide)
 _GOTOTOP