Introduction
Every once in a while you get an opportunity to enjoy the marvels of a true master makers. I stumbled upon the Small Stuff by sheer accident, while I was trying to source out useful reference for one of my projects from a Russian modeling site. Mumbling through the discrepancies of the google translate, I spotted a hyperlink that was pointing to an intriguing build at another site. I was immediately caught up by the Russian word "невероятный" (unbelievable), which I could read and understand in my native language as well. I double-clicked the link, and the rest is...
A Piece of Soviet History
The I-14 (ANT-31), a Soviet single-seat fighter was developed at Tupolev's design bureau by Pavel Sukhoi's team. It was the first all-metal monoplane fighter with retractable landing gear in the world. The first prototype powered by Bristol Mercury IVS-2 radial engine took off on May 27 in 1933. The second prototype, called ANT-31bis (I-14bis) was considerably redesigned, including a more powerful Wright Cyclone R-1820 F-2 engine, a smooth wing skinning instead of corrugated on ANT-31, different, outward-retracting landing gear and an open cockpit. ANT-31bis was armed with two synchronized PV-1 machine guns and two Kurchevsky APK-11 recoil-less cannons in the wing. The aircraft successfully passed the state acceptance trials in 1934, and serial production was started at the new No 125 factory in Irkutsk. Production I-14 had an increased wheel track, R-1820 F-3 engine and was armed with machine guns only. State acceptance trials of the first production aircraft held in 1936 uncovered a serious problem - difficult spin recovery. The military refused to accept I-14, and the design bureau had to introduce several modifications, including a new tailplane with an increased area, which finally allowed to solve the spin problem. However, by that time I-14's rival, a much cheaper and easier to produce Polikarpov I-16 was already in mass production. It was decided to terminate the I-14 production and scrap the unfinished aircraft at No 125 factory. Of 55 aircraft ordered only 18 were completed and entered service. (Courtesy of the Small Stuff website)
the kit
Being the first full resin kit of an attractive and lesser known subject, the Small Stuff's Sukhoi I-14 (aka ANT-31) has already attracted hundreds of comments at Russian and international modelling sites, and stood up against the scrutiny of serious reviewers. The opinion is unanimous: we're dealing with an exquisite model which sets a completely new benchmark in small scale resin kits. The cynics may actually condone the fact, but only after pointing out that the goal was much easier to achieve due to scarcity of original data and reference pertaining to the prototype. They want us to believe that the magical bits of resin that we hold in our hands are actually the work of a simple mortal, but it definitely isn't. It's a bird, it's a plane, it's a Superman!
preparing the master
Eugeny Knupfer is the mastermind behind the Small Stuff logo. The full story explaining how the master for this model is created can be found
here. In short, Eugeny's initial ambition was to dress up and add some detail to the original Prop&Jet vacuform kit, but it snowballed out of control into a complete refurbishment of the original, both in terms of the breakdown of parts and devising a full range of details that brought this kit to a complete different level. For this reason only, it wouldn't be fair to call Eugeny a "master caster"; instead, he is definitely one of the most skilled modelers with a remarkable display of detailing and general modeling skills. He didn't simply bettered an old kit, but also corrected some of its dimensional faults and achieved a level of detail that is simply unprecedented in this scale.
If you think that I am lauding too much, I must say that I am not easily impressed. I am Libra in zodiac, and it is the only zodiac symbol that's neither animal nor human - but surely that doesn't make me any less human! I must admit, though, that I've developed some kind of affection for the work of the "Russian modeling school", which is renowned for its love of details and impeccable craftsmanship, epitomized ore recently in the works of master modelers like Sergey Kosachev (Vector) or Ruslan Bilyk (Rest Models). I hope this affection doesn't blur my judgment, but the only way to dispense with it is to delve into a full-build review of the kit and see whether it can withstand the challenge. So, let's us first peek into the kits contents...
the kit
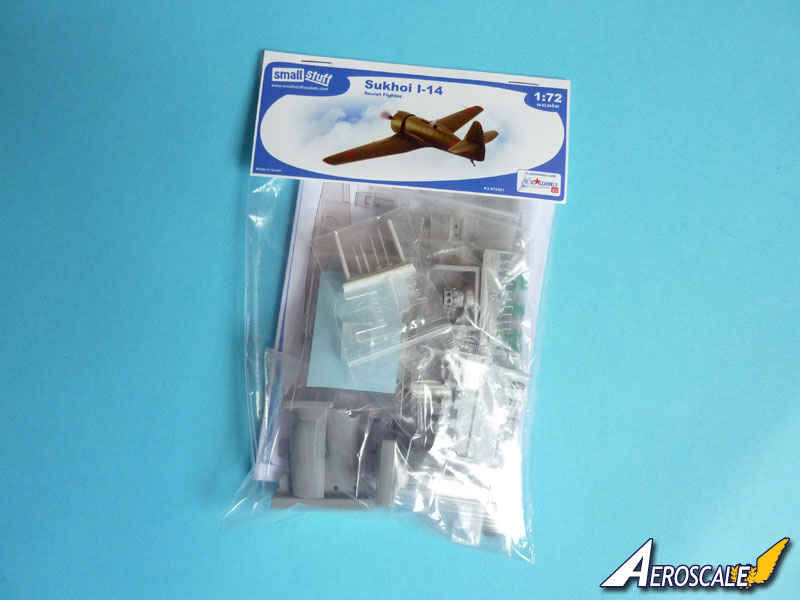
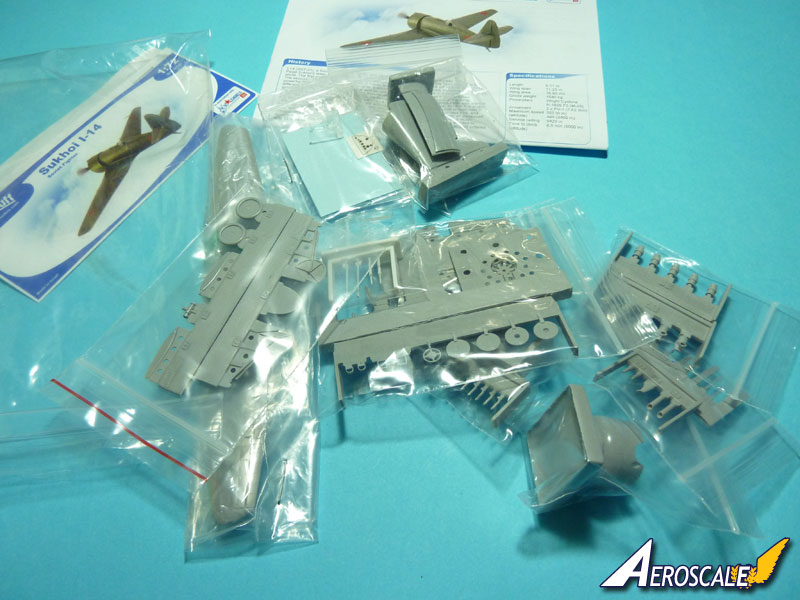
Presentation and packaging. The kit arrives tightly packed in a medium sized zip-lock bag. If I counted correctly, the kit comprises of:
- 87 light gray resin parts;
- 4 metal reinforced white resin parts;
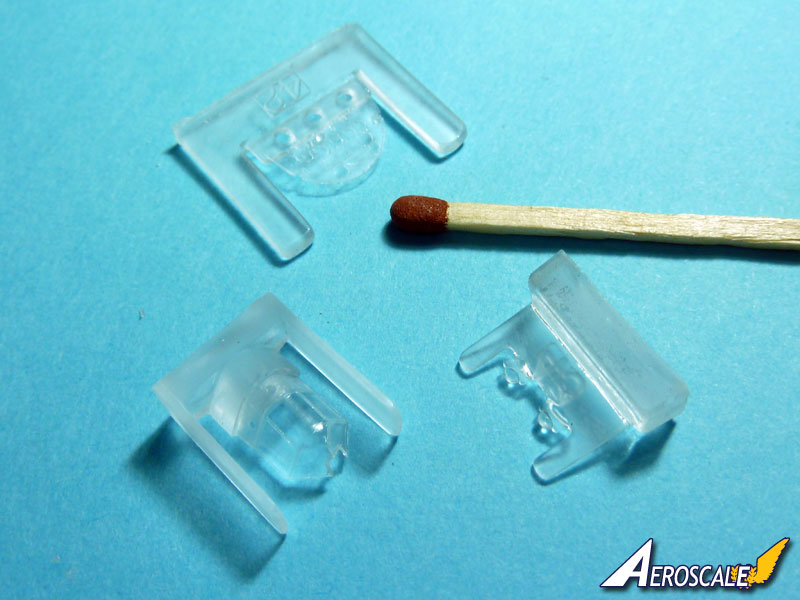
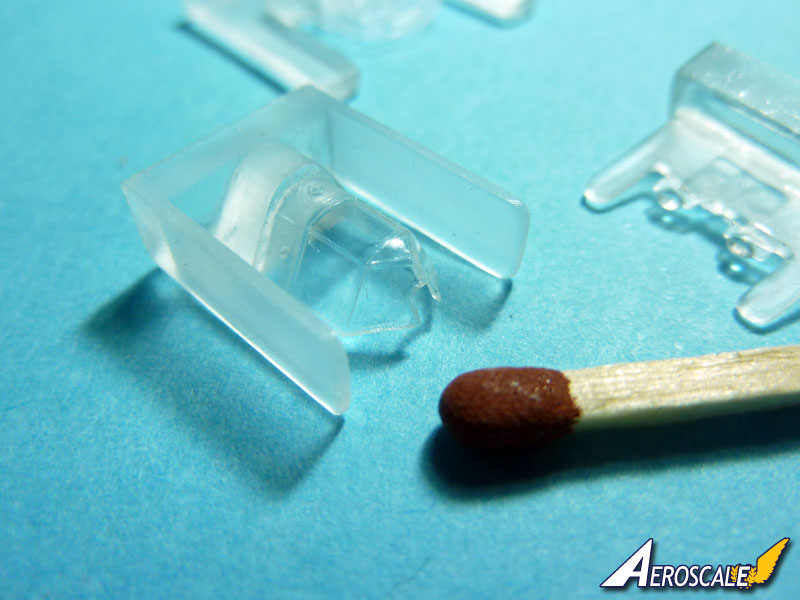
- 4 clear resin parts;
- one decal sheet and printed instrument panel;
- kit instructions.
To my surprise, the kit had no boxing or packaging apart from the zip-lock bag. For the moment the bag reminded me of the Sport Billy cartoon of my childhood. Billy had the magic size-changing gym bag - the Omni-Sack - which produced all sorts of tools as he needed them. Just like the Omni-Sack, Small Stuffs package comes with a total of twelve smaller zip-lock bags with assortments of resin bits packed individually or in smaller subgroups for additional safety or simply to prevent them from becoming loose and lost.
Though the contents are safely stored within the bag, addition of the box in my opinion might not only improve the overall great presentation, but also add to the impression that the precious contents are stored properly and securely. However, this is only a reflection of a modeling traditionalist, since the package is sufficient enough and probably does the job better than I am able to presume.
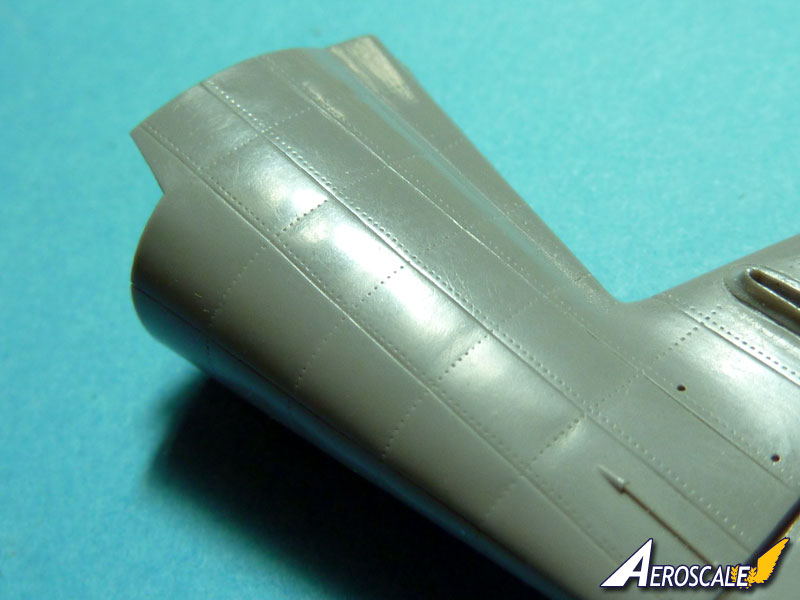
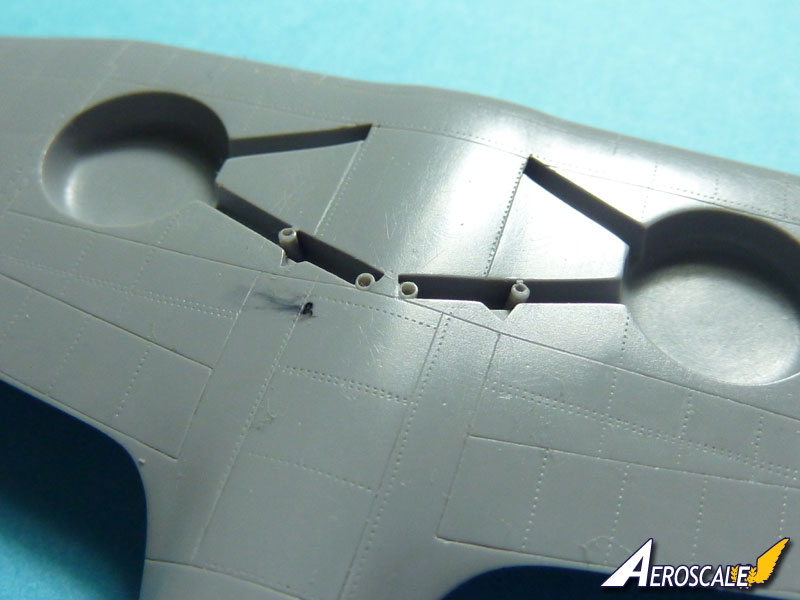
General casting and quality remarks. My first step was to inspect general casting quality. One must bear in mind that this is a full resin kit, and the argument from experience urges caution. However, playing the devils advocate is not an easy task with the Small Stuff! The casting is thoroughly impeccable, no flash or casting faults, absolutely free of any surface blemish and bubble-free. The overall arrangement of casts and flawless pourings (with fancy addition of company's logo and molded in parts numbers) is actually reminiscent of some of the best casts I've ever seen and usually expect from the biggest players in the town, like Aires, CMK or Quickboost.
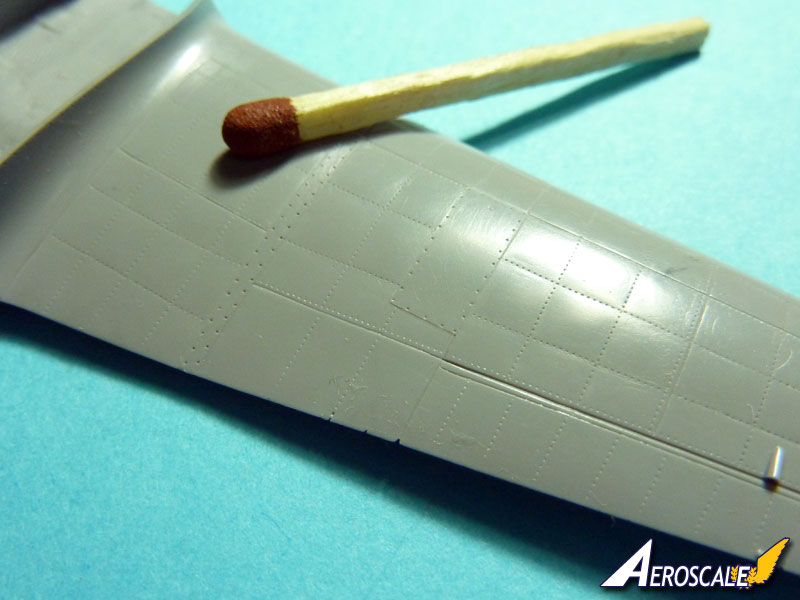
The satin surface finish is simply beautiful, and the surface details with finely engraved panel lines and delicately executed yet visible riveting - simply establishes a new standard in this scale. Eugenys ingenious simulation of metal fatigue on the main kits surfaces illustrates the fact that the master model was built out of sheer modeling passion and is a work of love. However, bigger resin parts will require care while removing them from the casting blocks, and leading edges of some parts will require removal of tiny amounts of pouring leftovers. If you own one, I strongly advise that you use only the finest assortments of
Flex-i-File grit tapes, but just take proper care of the surrounding surface details and use masks to protect it.
sub-assemblies
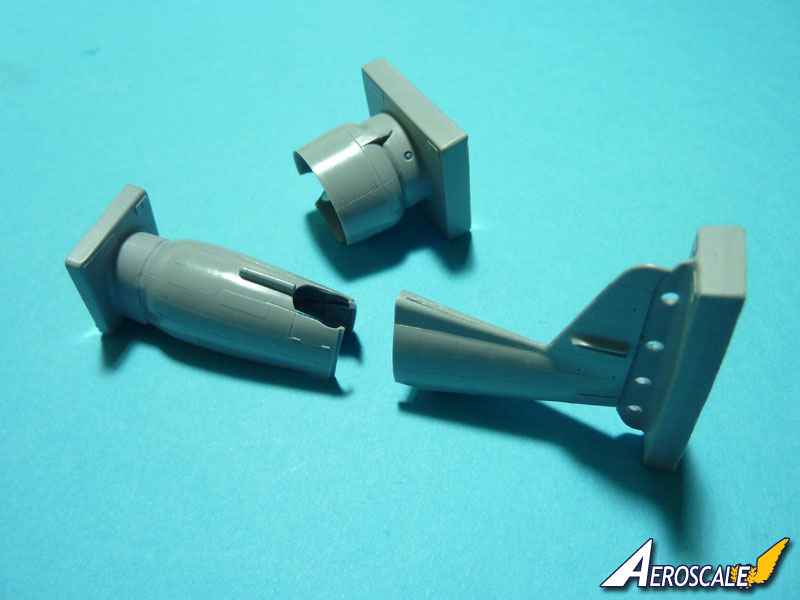
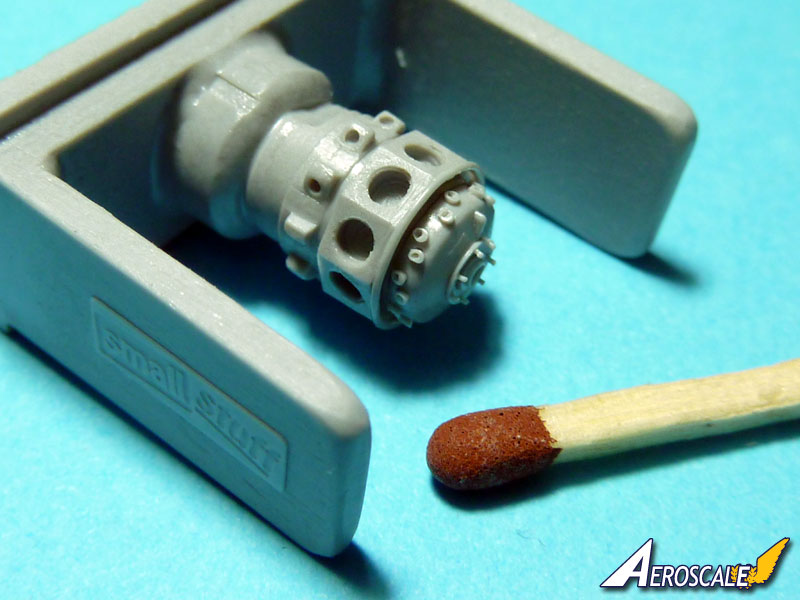
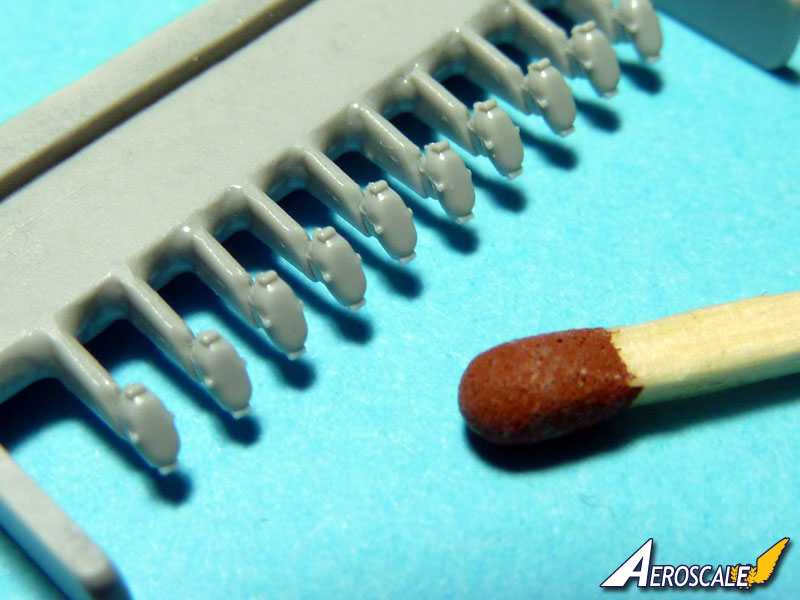
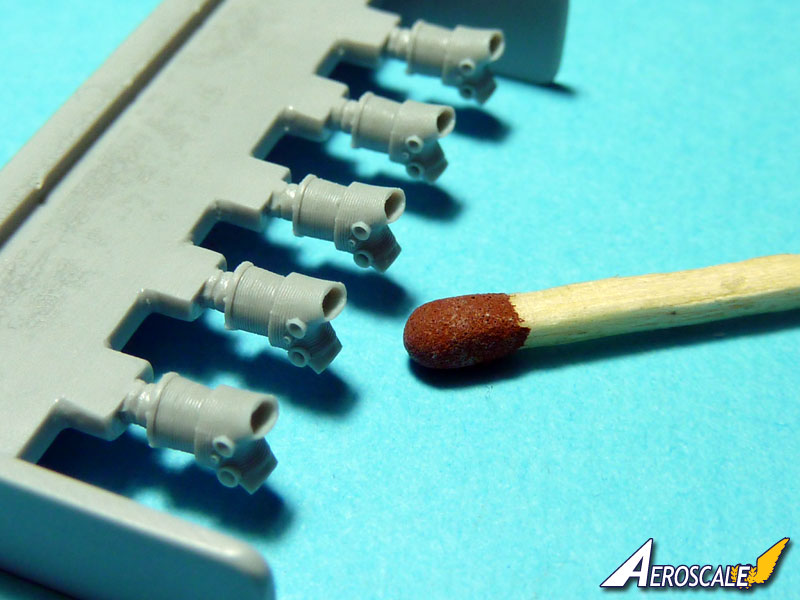
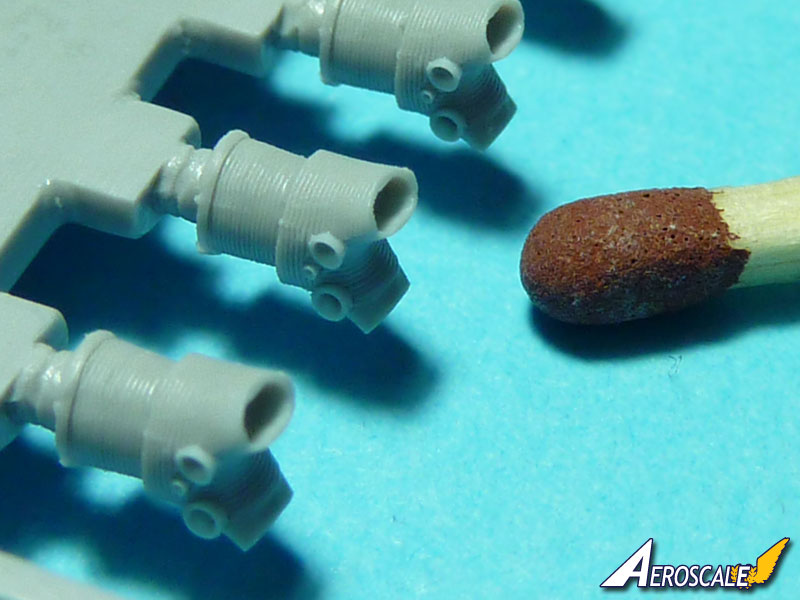
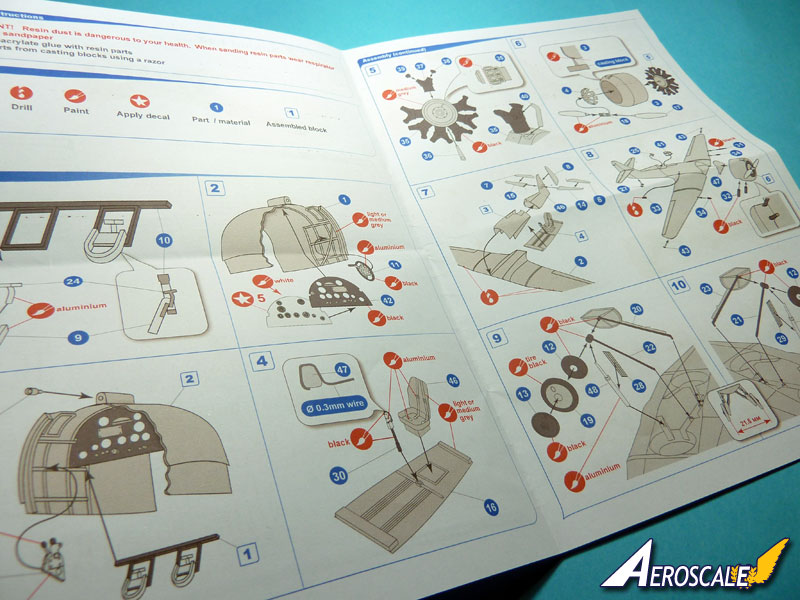
The engine. The engine is a truly kit in itself. The fact that engine consists of almost half of the total resin pieces present in the package is the fact worth of notice. I can imagine this kit to be attractive only to a patient and skilled modeler, yet it is worthy of praise and deserves every minute needed for its assembly, even if you are a complete newbie. As you can see from the photos, the engine is a true witness to craftsmanship and modelling finesse. You may decide to dress it up with additional details, but I am quite positive that it will stand out just as it is. However, the kit instruction (sequence 5 & 6) are a bit vague on the exact fit of the engine against the engine cowling, and it appears that the front part of engine should be removed for proper fit. I will thoroughly test it during the build, so pay close attention to the outcome. The propeller is a three-piece assembly, and I cannot hide my displeasure with the fact. Be sure to align the blades correctly by creating a kind of propeller jig in order to match the angles properly.
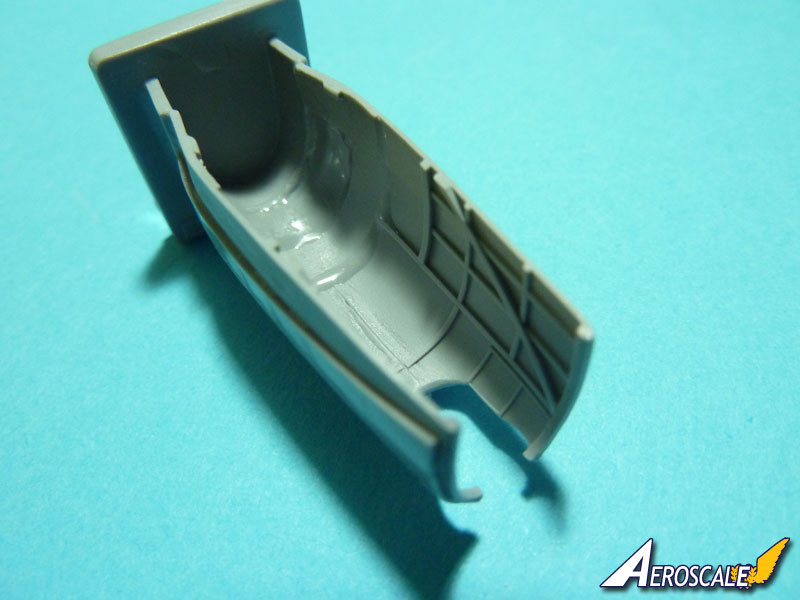
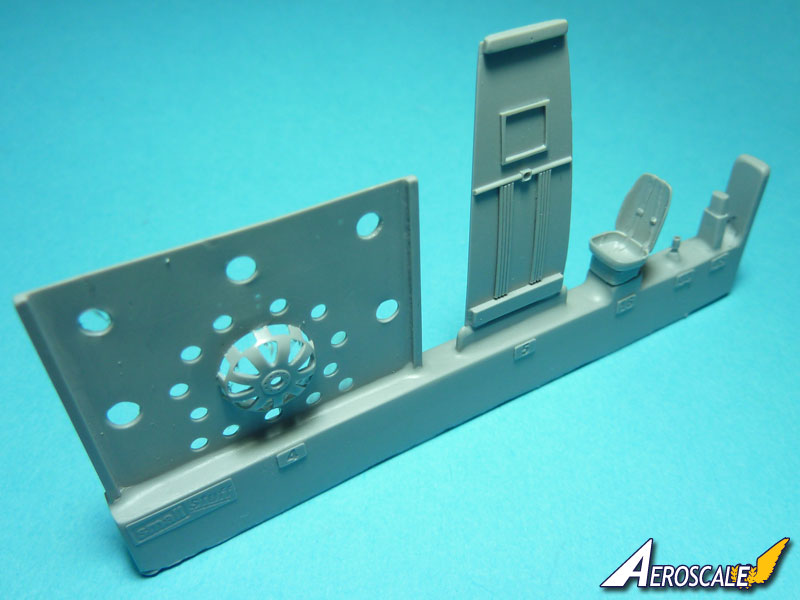
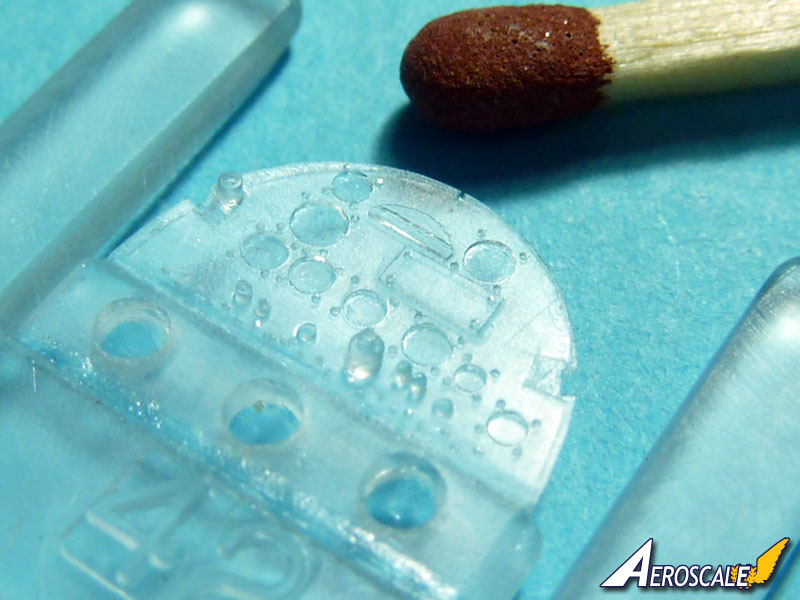
The cockpit. Amount of detail in the cockpit is inversely proportional to the overall visibility through the tiny cockpit opening. The rudder controls are simply small and consist of several tiny parts, and additional care is required not to lose the tiniest of parts. The impression of rather busy cockpit for this scale is achieved not only by internally molded framework and structural details of the consoles, but also by addition of several beautifully detailed parts like the throttle quadrant, trim wheel, one-piece seat with integrated seat-belts, and the cockpit floor with the control stick. However, the assembly sequence #4 is a bit indistinct and unclear. It points out that the missing control columns handle is to be made from a piece of 0.3mm diameter wire, which should be formed against the part #47, which is either wrong, or I simply couldn't understand it properly. The instrument panel is made from clear resin, which is tiny but very sharp in detail, and will be only enhanced by the printed instrument backing. The decal sheet contains the instrument panel decal, but I deem the decal thoroughly uninteresting and simply unusable due to somewhat poor print quality.
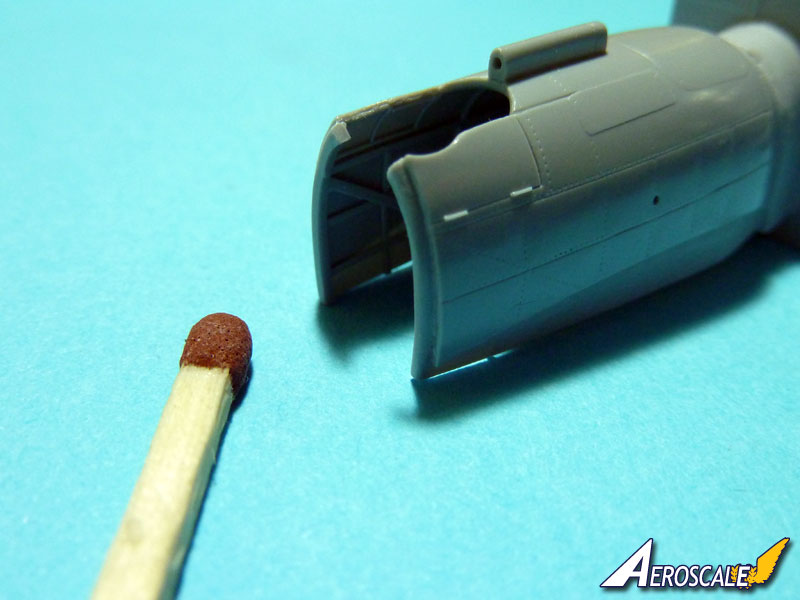
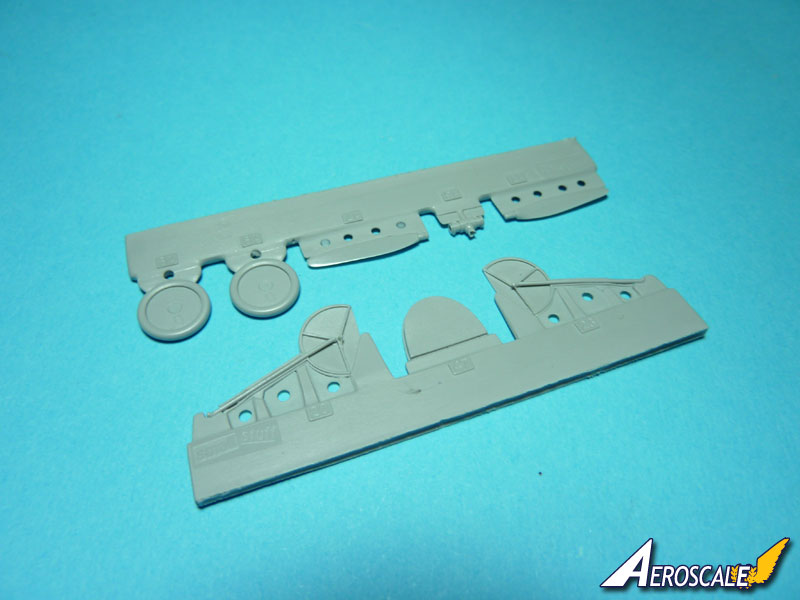
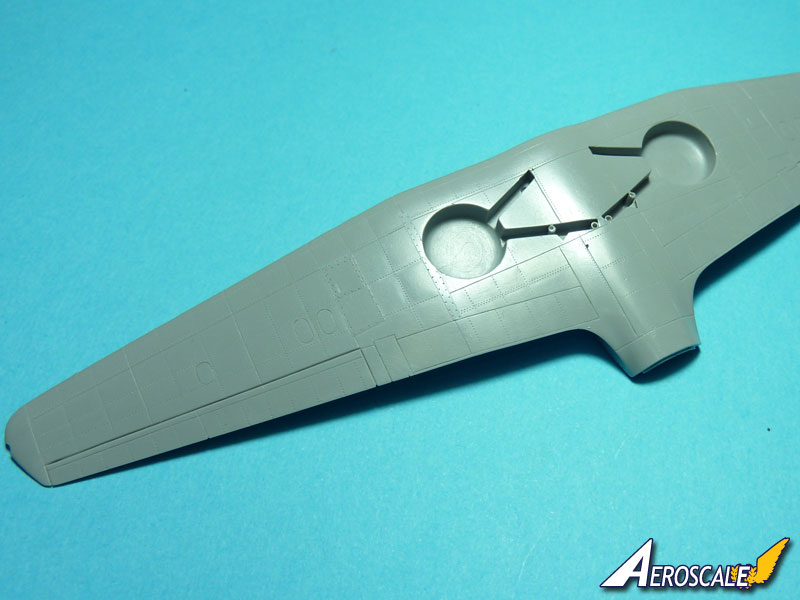
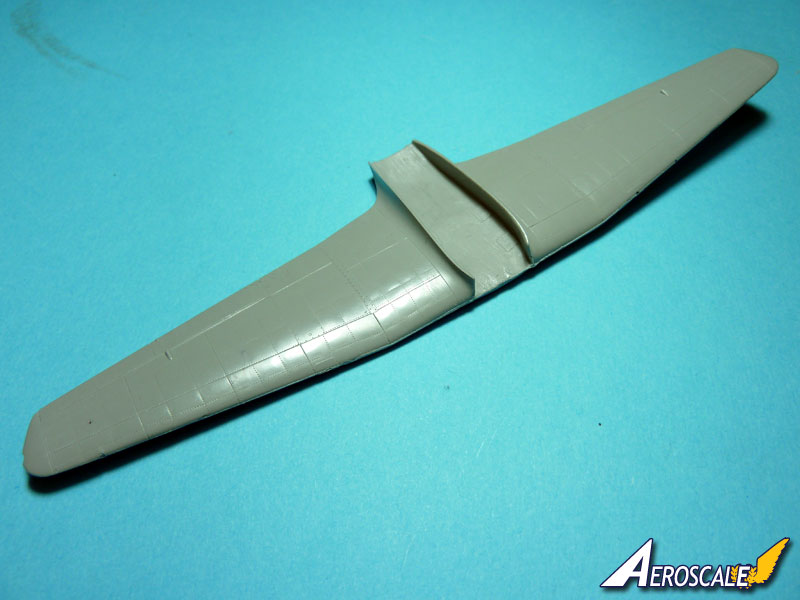
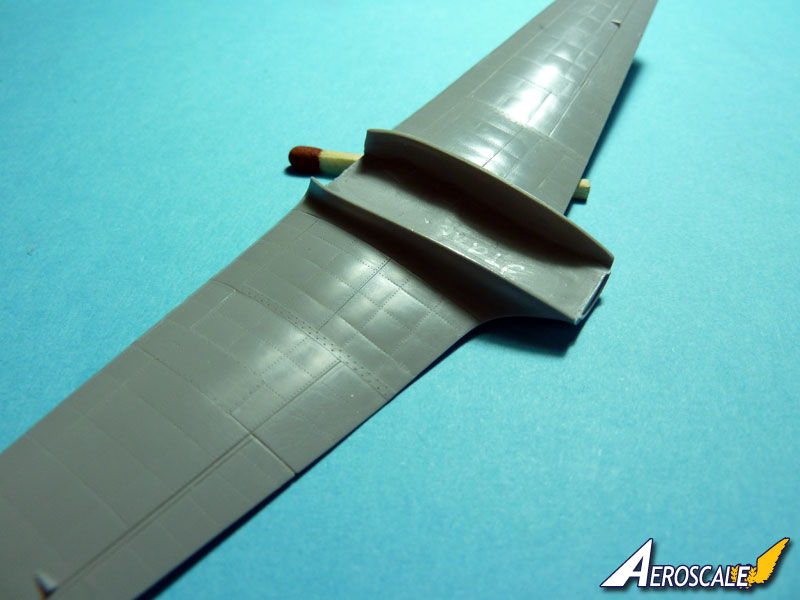
The fuselage and the wings. The fuselage is a two-piece assembly disjointed at just the most logical place right behind the seat. If you are prone to experiment and able to exercise due caution, the arrangement of parts actually enables you to cut open the cockpit doors, thus increasing the overall visibility of the cockpit detail. At least this is what I contemplate doing, because it would in my opinion greatly improve the overall impression of the assembled kit. The main wing is a single piece, and it is dressed up with beautiful surface details and finely engraved lines and rivets. The leading edge calls out for subtle removal of the excess resin leftovers. The fit against the fuselage is thoroughly great and trouble-free, but this can be only verified during the assembly. The stabilizer, and corrugated rudder and elevators are simply beautifully cast out, and can be posed in desired configuration, which is a nice touch and will add some life to the finished model.
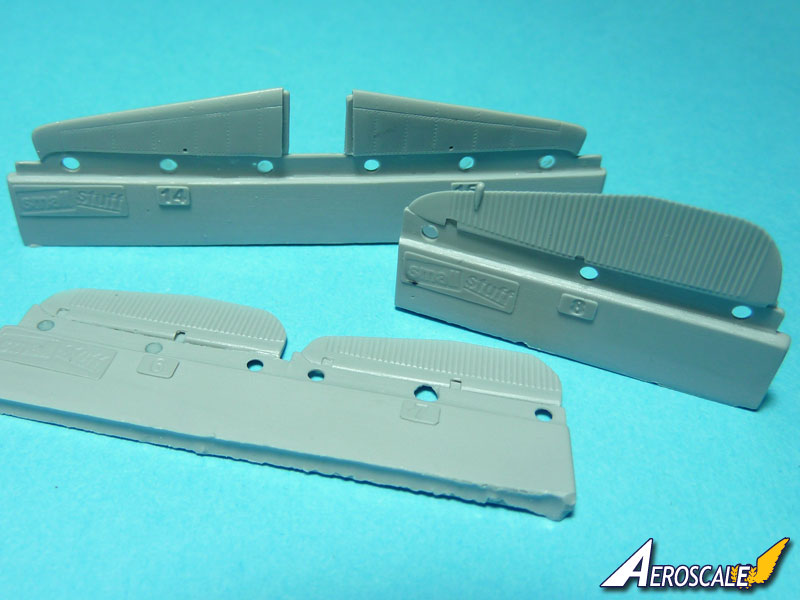
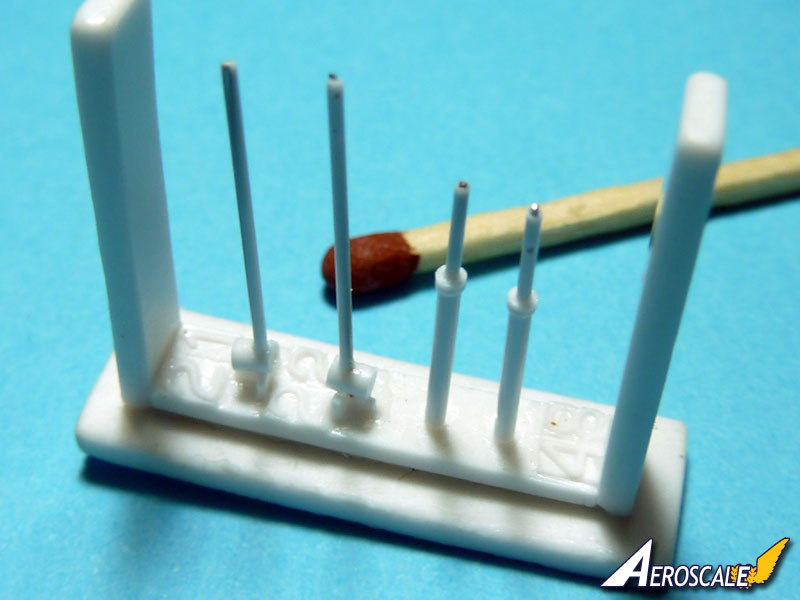
The Undercarriage. The undercarriage legs are made out of steel reinforced resin parts, which are cast without a glitch, and will surely withstand the weight of the finished models. The undercarriage covers, which form the third part of the undercarriage tripod, will surely add structural strength to the undercarriage. The breakdown of wheels and wheel hubs as individual parts is also very thoughtful, since it will make painting much more enjoyable and hassle free. The proper distance between the main undercarriage legs is clearly indicated in the instructions, and I assume you wont experience problems aligning it.
The decals and instructions
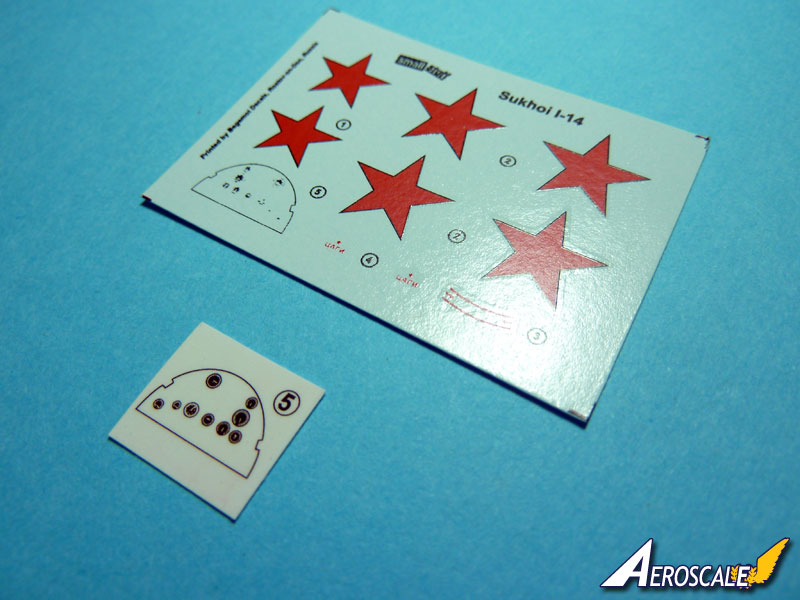
The small decal sheet is printed by Begemot, and are of acceptable quality. I am a bit concerned about the overall transparency of the red (which needs to be tested out), but the overall intensity of colors seems appropriate. There are small inconsistency in register, but this is not very noticeable and won't affect the overall impression. Apart from the standard six-position red stars, you get three basic stencils and that's pretty much everything.
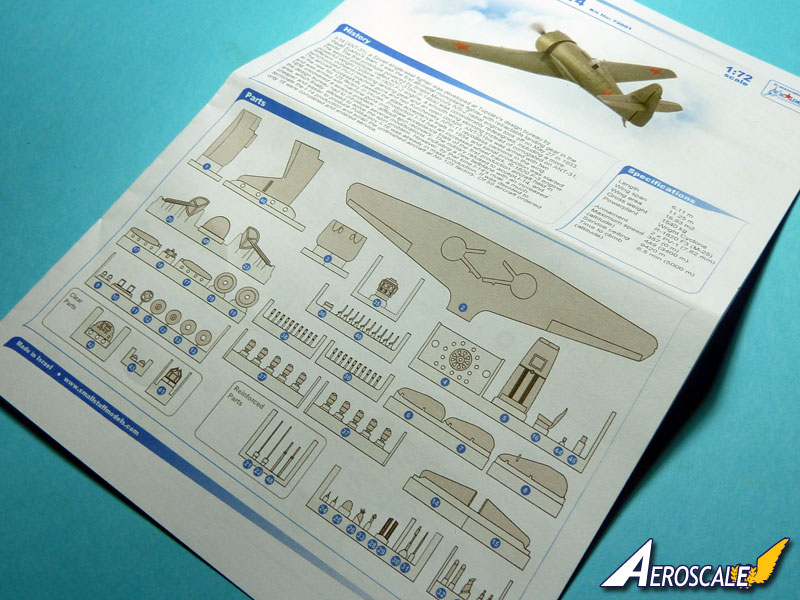
Instructions are a multicolor A4 sheet fold, and provide historical information pertaining to the model. It is nicely arranged, and very clear in terms of assembly sequence, but there are minor factual discrepancies which could be made more clear in places. However, the instruction provides only basic and generic painting guide, which is also understandable, since the exact colors used on the I-14 remain unknown. Though I am pretty sure about the top green, I still haven't made up my mind concerning my personal preference for the undersides, but I am very close to using light blue instead of light gray. I am also open to consider valid arguments in favor of either.
conclusion
I guess you could say that I already made up my mind and formulated my concluding remarks about this kit. It would be an understatement if I said that the kit didn't impress me. Perfectionist attitudes set in motion a vicious cycle. First, perfectionists set unreachable goals. Second, they fail to meet these goals because the goals were impossible to begin with. Failure to reach them was thus inevitable. Third, the constant pressure to achieve perfection and the inevitable chronic failure reduce productivity and effectiveness. Fourth, this cycle leads perfectionists to be self-critical and self-blaming which results in lower self-esteem. It may also lead to anxiety and depression. At this point I am left without argument; whatever and if I had anything in store to criticize this kit, it simply vaporized under the impression of modeling diligence and love invested in the production of this kit. It is simply not for the rookie, but I wholeheartedly recommend this kit for any passionate collector and modeler alike, because it is simply beautiful and will surely stand out in your collection as a true gem or rare modeling amber condensed in resin.
If you are interested in a full build review of the kit, you can visit my build log
here.
Edit: I am adding few sentences from my recent correspondence with Eugeny, because it actually corrects some of my own factual mistakes and omissions that I made in this review:
"A few minor things that I would like to point out. First, ANT stands for Andrei Nikolayevich Tupolev, not Antonov (Antonov aircraft have an "An" designation), a very common mistake. Second, the small piece of paper with instruments printed on it is a decal, printed on an inkjet printer, which replaces the Begemot one. It's supposed to be transferred to the back of the transparent instrument panel". This reminds me that modeling is a joint venture and a constant learning experience! Thanks, Eugeny!
Please remember, when contacting retailers or manufacturers, to mention that you saw their products highlighted here - on
AEROSCALE.


Comments