Founded in 1910 the Socie'te pour les Apparreils Deperdussin and bought by Louis Bleriot in 1914 and renamed Socie=te pour Aviation et ses De'rive's. In 1915 Spad began to design a series of fighter aircraft that would use the Hispano-Suiza engine. The Spad XIII was a development of the Spad VII. The Spad VII was flown by the famous pilot Capt. Georges Guynemer, who was not particularly pleased with the type, especially when compared to the aircraft flown by his German adversaries. He took his concerns directly to the manufacturer. With that, the groundwork for the development of the Spad XII and XIII were laid. The Spad XII was armed with a 37mm cannon and twin Vickers, It saw limited production and used by the very experienced pilots. The Spad XIII saw much more widespread use. Thanks to the use of a more powerful Hispano-Suiza HS 8Be engine rated at 220hp, and later the HS 8BEe (235hp), the main drawback of the previous model in the form of inadequate armament could be addressed, and the SPAD XIII received two Vickers machine guns with 400rpg. The head-designer of the type, Louis Bechereau also enlarged the airframe slightly, and strengthened it.
The first prototype of the Spad XIII was flown by Second Lieutenant Rene Dorme on April 4th, 1917. Due to a heavier weight, the new type didnt achieve the maneuverability of its predecessor, but it did display a better rate of climb, and a faster speed
of 215 km/h. It also seem to be able to take tremendous punishment and hold together. The performance of the new type was such that contracts were immediately awarded for large production numbers. Ultimately produced by the parent company manufacturers (SPAD) and eight others, (A.C.M., Bernard, Bleriot, Borel, Kellner, Levasseur, Nieuport, and SAFCA).
The new type began reaching units during the summer of 1917. Originally, the aircraft had rounded wingtips, but these soon reverted back to the squared off tips of the Spad VII. This kit is representative of the initial production series. It was eventually flown by the American, Belgian, British, Czech, Italian, Japan and Siamese Air Services from 1918-1928.
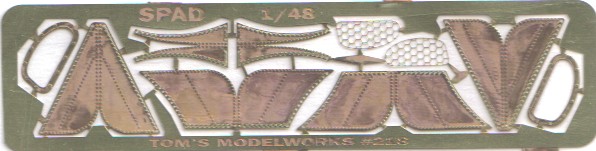
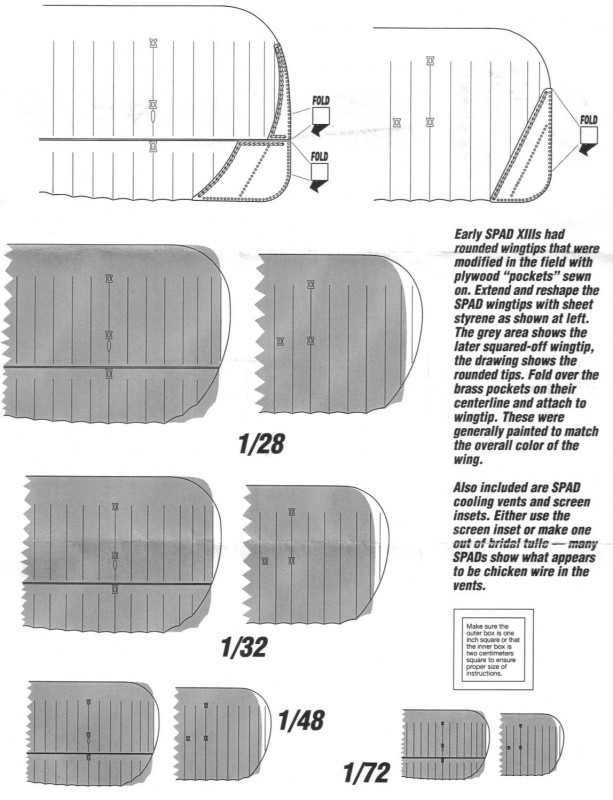
Ply-pockets
The ply-pocket extensions will be seen on more on French early (round tipped) wings of their Spad XIII aircraft. The British were loath to use them but did try. By 28 February 1918 all 200hp Spad XIII in the French 6th Army area had these installed. The XIII had been in service since Sept. 1917. Factory blunted tips began showing up around the 1st March of 1918.
As far as the Americans were concerned the ply pockets were only seen on some machines. For instance the Spad XIII 7689 "Smith IV" is seen in the NASM in Washington DC (recently restored). Its lower wings had the ply-pockets but not the top wing. Again the ply-pockets only were installed on round tipped Spad XIII wings. This was to add more area to the wings. Later production airframes (manufactured after February 1918) had the blunt tips incorporating the larger area during construction on the factory floor.
So if you are doing a Spad XIII manufactured before the beginning of 1918 it should probably have round tips. From about January to March 1918 these ply-pockets would have been installed on various wings. Please understand these are only general time frames.
Kit History:
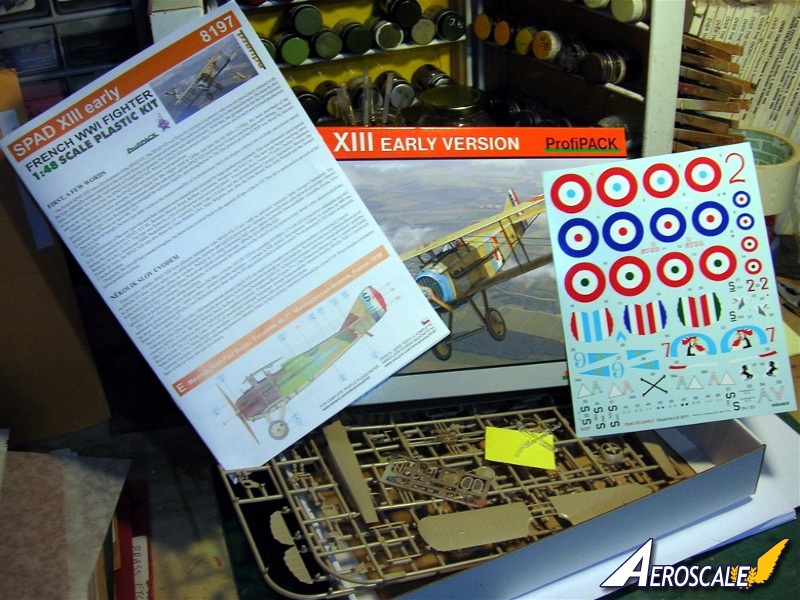
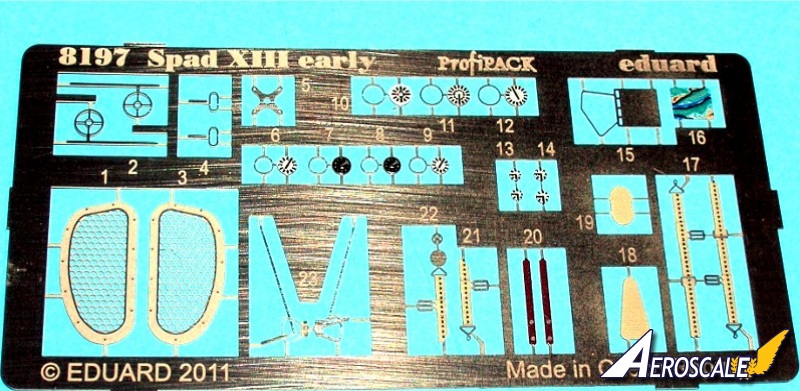
There were other 1/48 scale kits of the Spad XIII many of these were comprised of Balsa wood as a medium. Both Hawk and Aurora had overly large details with heavy raised and scribed stringers and ribs with raised engraving for decal locations. These were the hallmarks of kits from this era. Previously the finest example of the 1/48 Spad XIII is the DML / Dragon and Eduards late production #8196 kit issues. Here I will discuss Eduard's second issue kit #8197 Spad XIII "early version", its general build up and details often misrepresented due previously to a lack of information. PP = plastic part, PE = photoetch. Begin with pre-drilling all rigging pilot and strut locator holes.
Toms Modelworks ply-pockets for the early round tipped Spad XIII types. Due to the kindness of Burl Burlingham (the IPMS Grandmaster of photoetch) and the late Tom Harrison (Tom's Modelworks is still open for business) all those of us interested in scale accuracy & PE details have been blessed with their newest brass fret. Specifically they are in 1/72, 1/48, 1/32 & 1/28 scale Spad XIII ply-pocket wing tip add-ons.
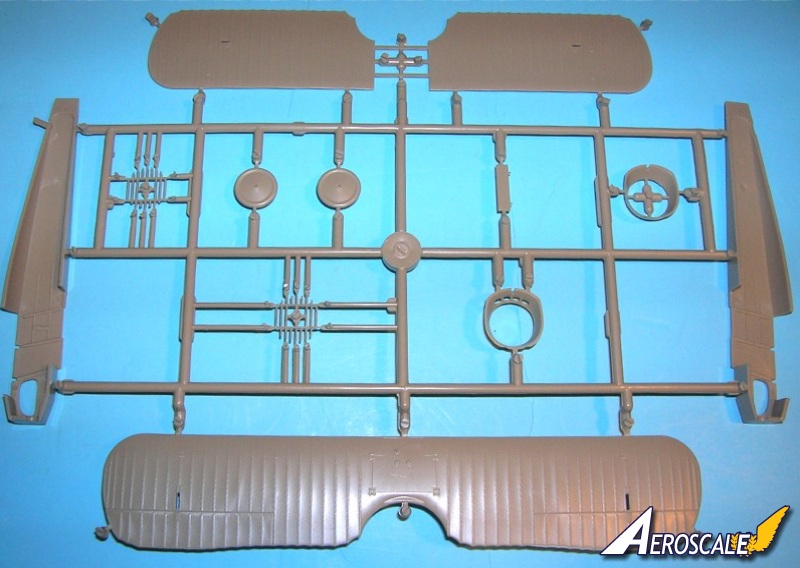
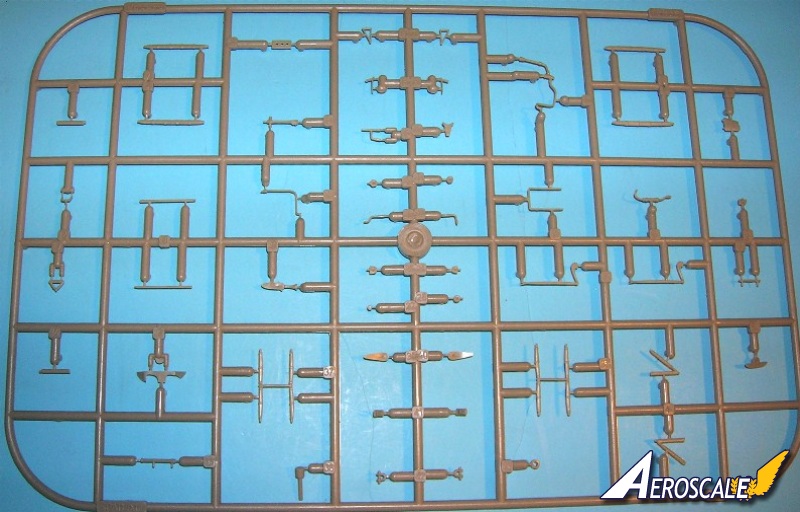
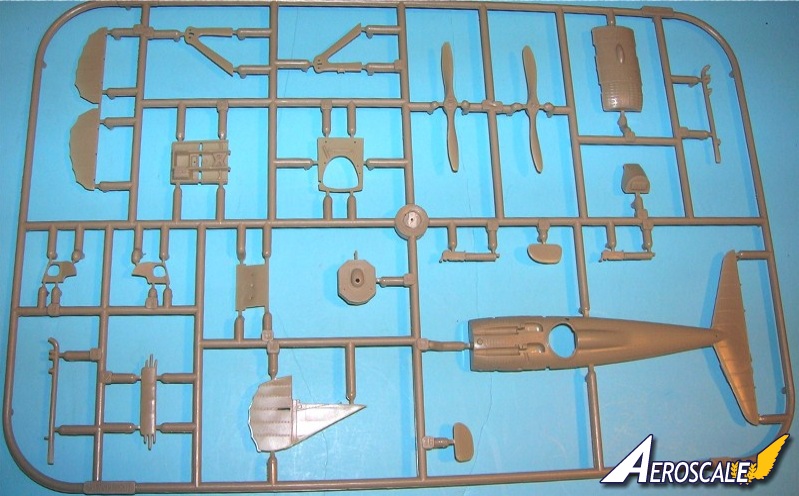
Kit contents:
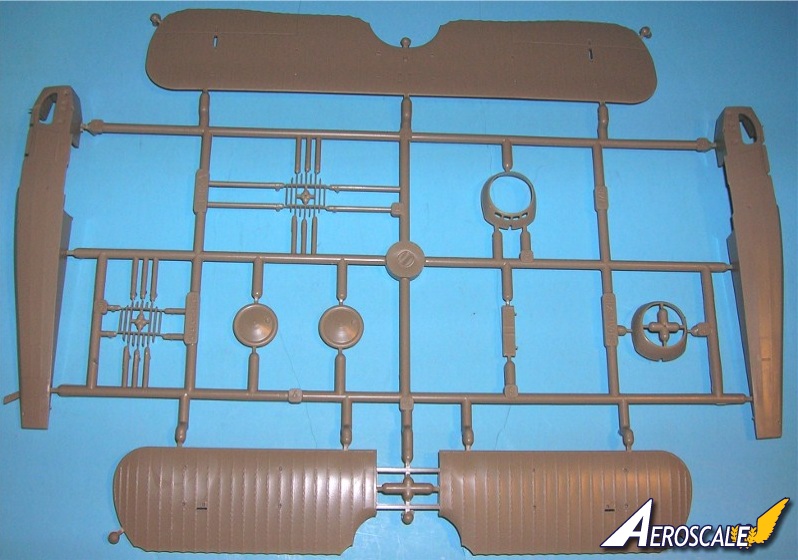
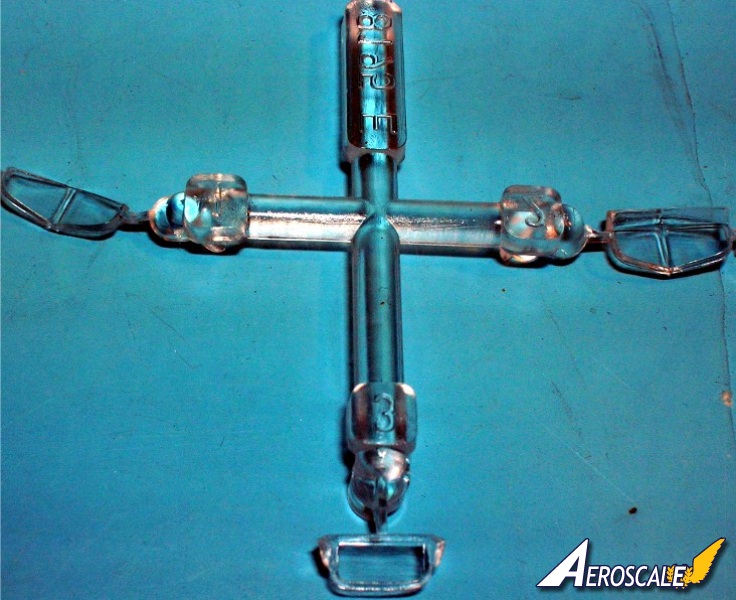
87 plastic parts
27 Color Photo-etched details
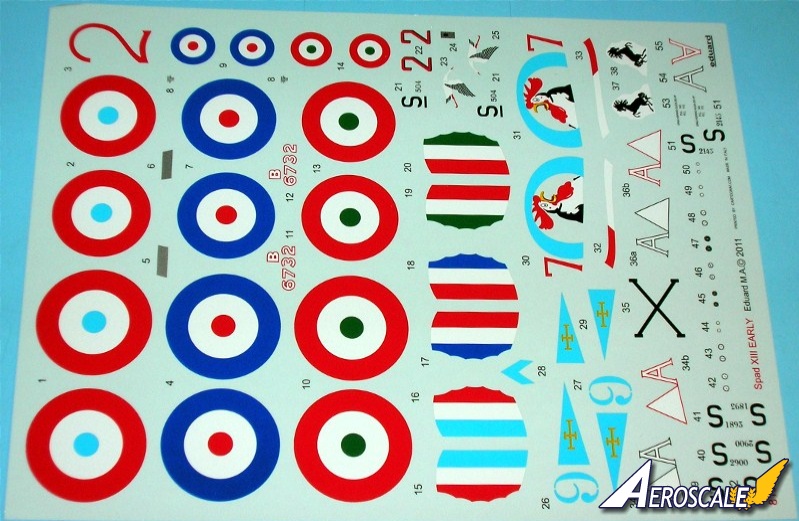
5 attractive markings
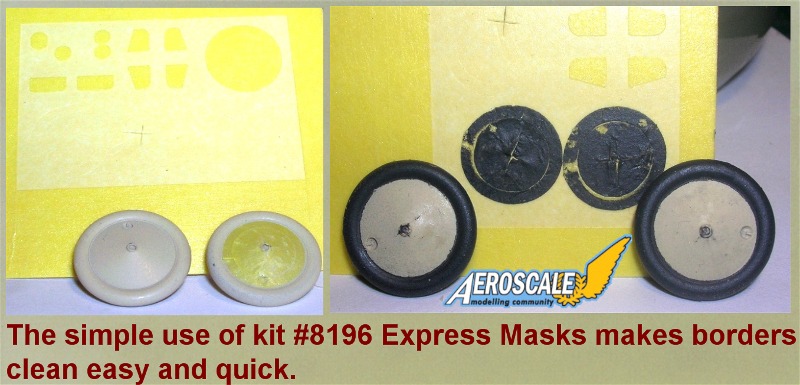
Express masks
12 page instructions
The Build
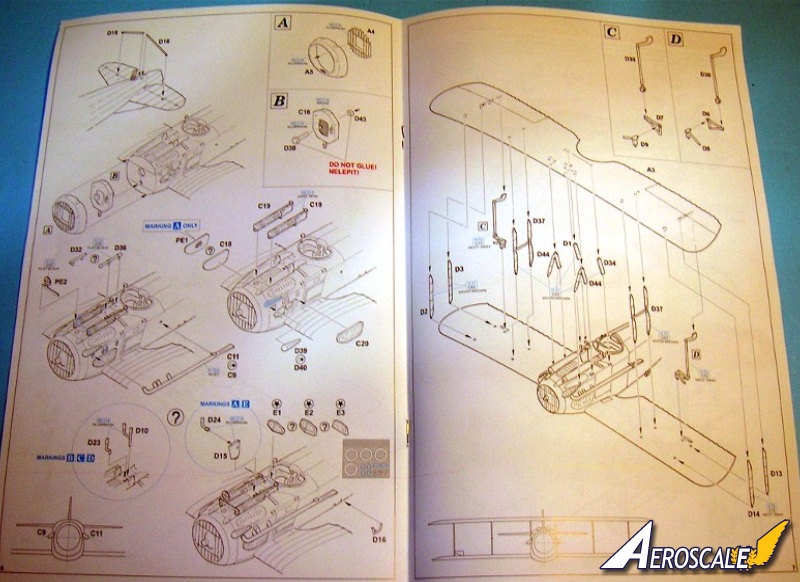
Page 1. Introduction & history in English and Czech.
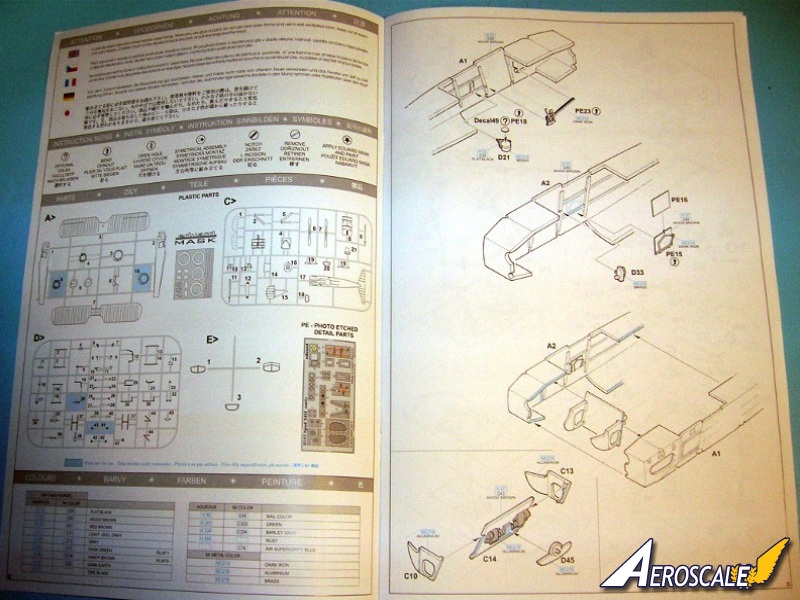
Page 2. Parts map, instruction symbols, paint colour codes and warnings
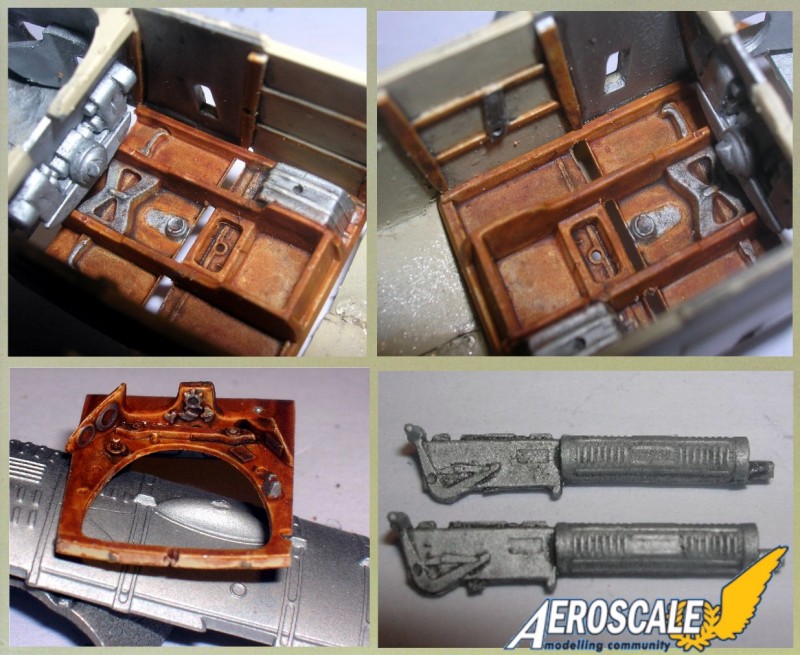
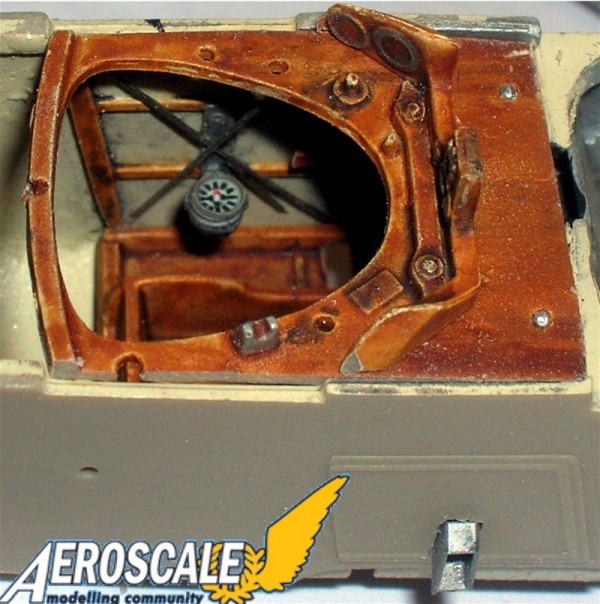
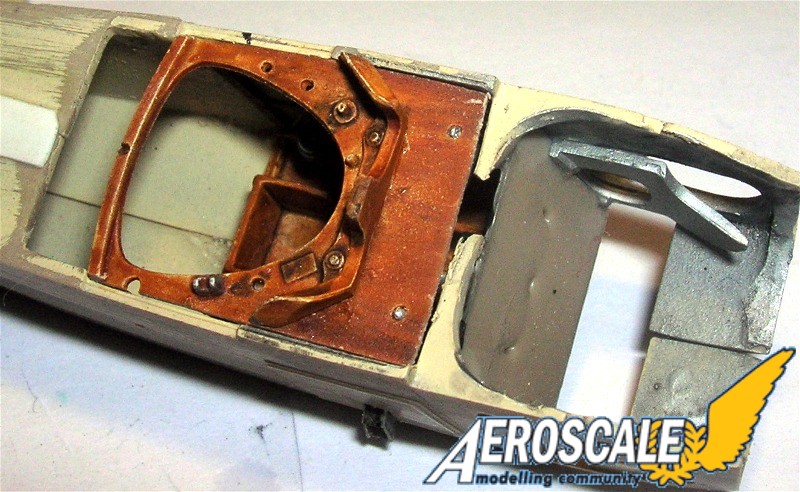
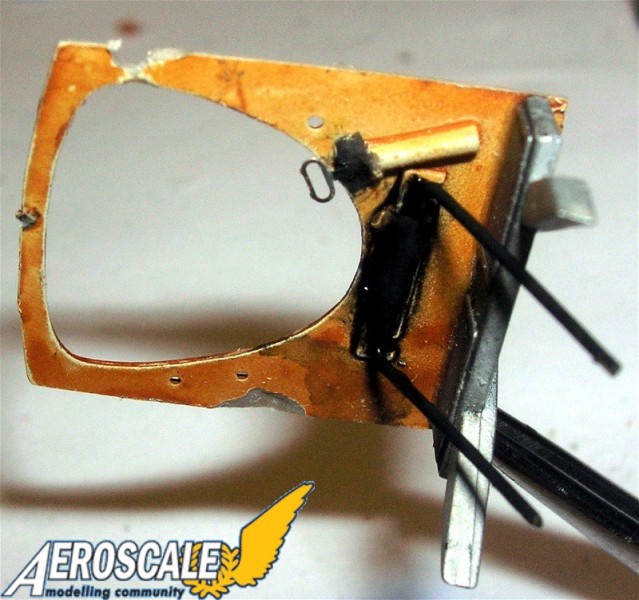
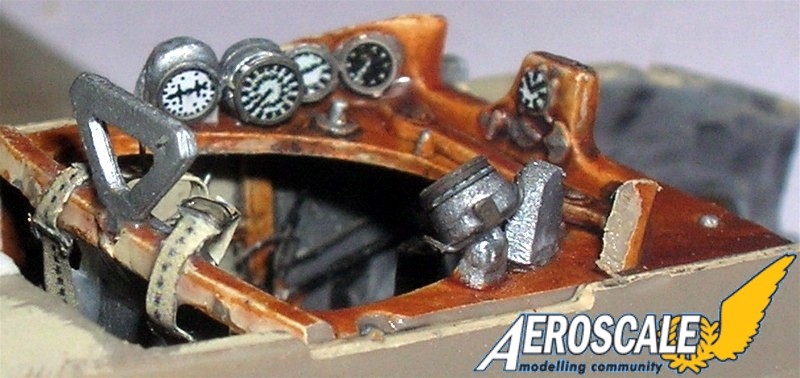
Page 3. If you are attempting to build a complete and open engine compartment, before you close up the fuselage halves (A 1 & 2) carve out the un-needed forward top deck area of the panels and the area of vertical support for the kit radiator. For the fuselage interior walls (PP A 1 & 2) you can paint the interior in linen and wood colours and add the internal bracing wires (crisscrossing the bays) from fine wire. Add the compass (PP D 21). Next, paint the handle for the carburetor adjustment levers (PE 23 ) to look like stained wood or leave it bright metal , as both types were used. The expended ammunition links chutes (PP D 41 X2) are not to be used in this early production machine. Next the Starter Magneto (PP D 33) and spring loaded map board (PE 15) should have a wood backing not metal. The PE map is less than convincing and a paper one should be substituted. Add a scrap piece of sheet plastic to represent a fabric screen / wall for the rear cockpit.
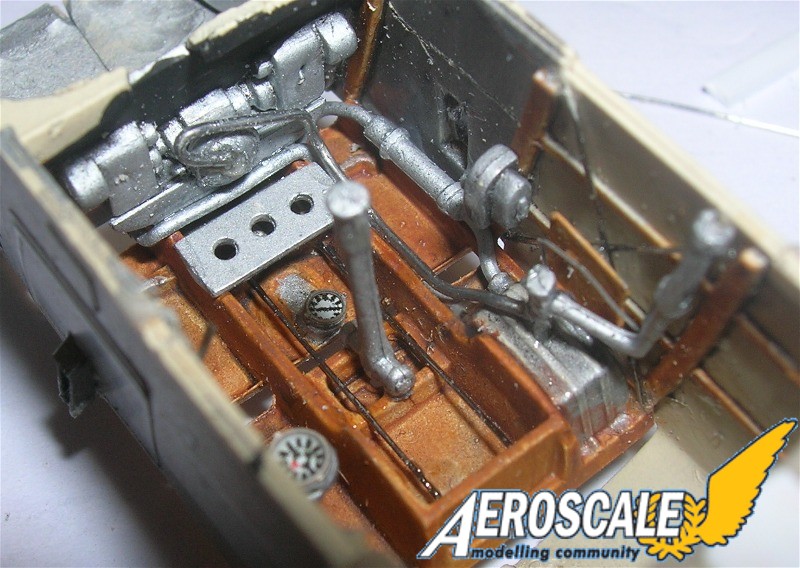
The forward lower firewall Section (PP C 14) has a partial facade of the rear portion of the Hispano Suiza motor and is completed by a second addition (PP D 45). The forward portion of the engine bearers (PP C 10 & 13) assemble together but lack the outer Awing stiffeners that would be seen of this area is left open. The Eduard kit is very much like the DML / Dragon kit in this respect. At this point you can install an engine compartment with some scratch-building and a resin 200hp Hispano-Suiza from Engine & Things (kit # 48147.) http://www.planet.eon.net/~engthg/CATALOG 2011.pdf
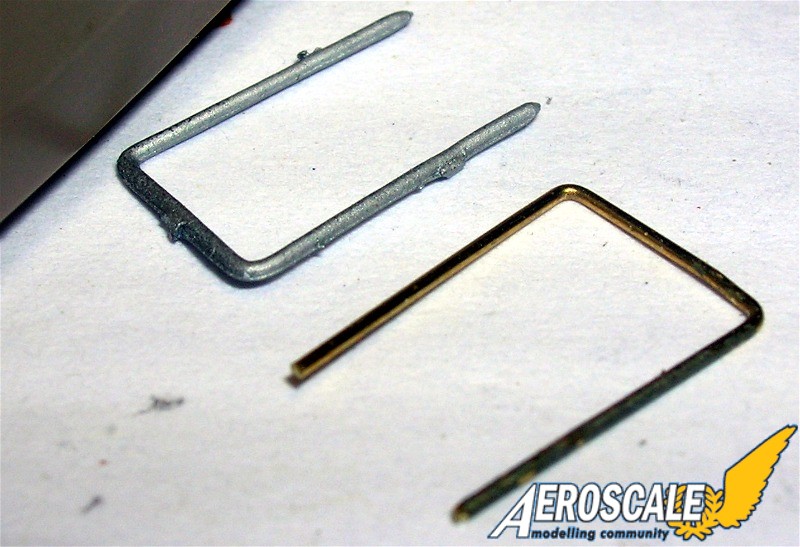
The forward sections of the engine bearers (C 10 & 13) are extensions of the seat support. Check your references for wiring and plumbing. I add plumbing from brass and copper wire /rod and small gauge solder.
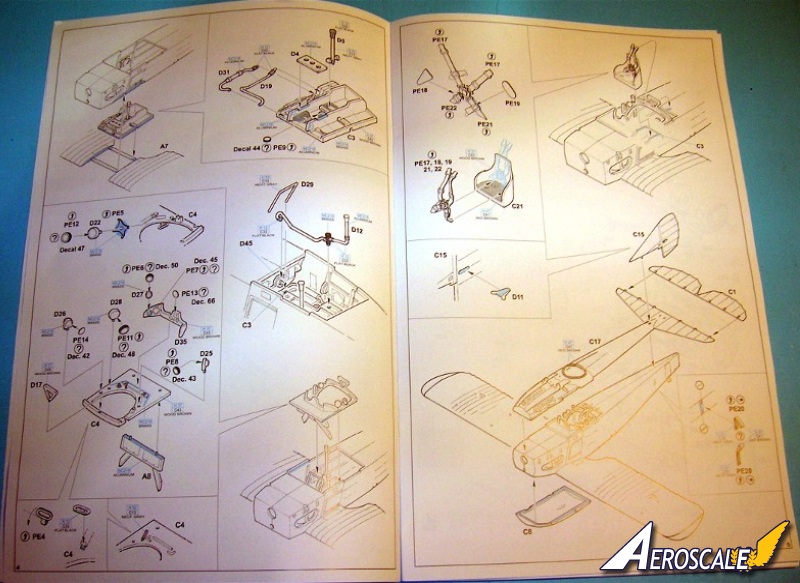
Page 4. Here you unite the completed floor assembly and lower wing (PP A 7) to the closed fuselage halves (B 1 & 3). The cockpit floor (C 3) should be varnished wood with raised metal details. The top of the main fuel tank is centrally located within the forward third area of C 3 with the fuel gauge provided as a decal or as photoetch (PE 9) at its apex. This was either a bubble float in the fuel cap or a stick gauge, both working a gear mechanism on marked levels. A fuel line can be made of solder/flux should lead from the pilot=s left side of the main fuel tank to the port side and forward into the firewall. The seat supports are actually the rear of the engine supports. The rudder bar assembly is molded to the flooring. Not my favorite aspect of this kit. These should be painted along with the oil tank (also molded to the floor) to look like bare metal. The control column (D 5) and oil tank fillet pipe / vent (D 12) are bare metal as well. There should be two pipes leading forward from the oil tank (D 19 & 31) to the rear engine to the oil sump. See your references on these details.
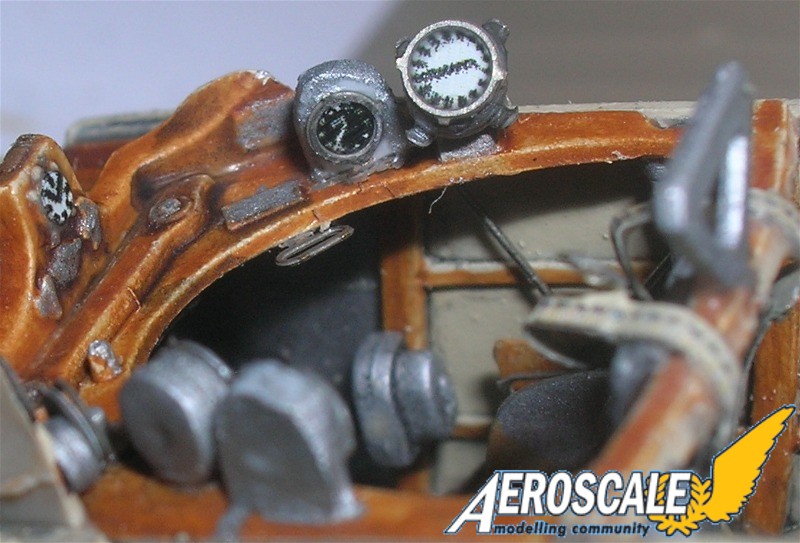
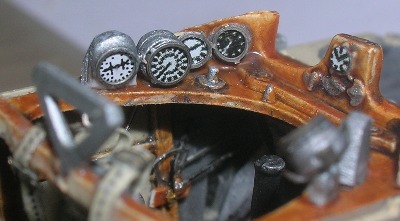
The instrument panel (PP D 35) contains (from left to right) oil & water temperature gauges (PP 26 & 28, PE 11 & 14) decal gauge faces are also provided. Centrally located are the switches for the motor air pump, main & auxiliary fuel tanks, and the manual air pump. Add a metal aircraft manufacture=s plate to the right side/ wing of D 35. The support shelf (PP C 4) needs to be slightly beveled at its three outer contact edges to fit into the rear portion of for its eventual contact with C 17. Then insert the oil pressure gauge (PE 13 ) centrally located and to the right, tachometer (PP D 25 & PE 8 ) and the altimeter (PP D 22 & PE 5, 12 ) per the kit instructions. The two pull rings (PE 4 X 2) attached to the underside of the instrument shelf (PP C 4) are cocking handles for the twin Vickers machine guns to be added later. Though they give you two rings they only provide for one installation. One other part is the shelf support rods (PP D 29). I would replace these with painted metal items of a smaller gauge. The ammunition box and empty link chutes (PP B 8) are fitted at this point too.
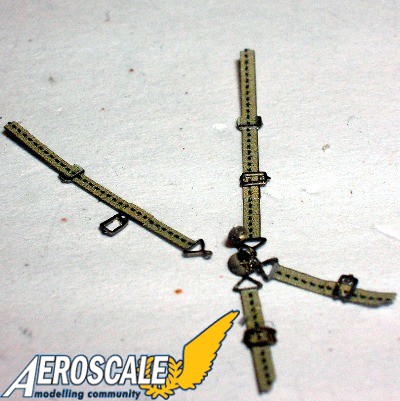
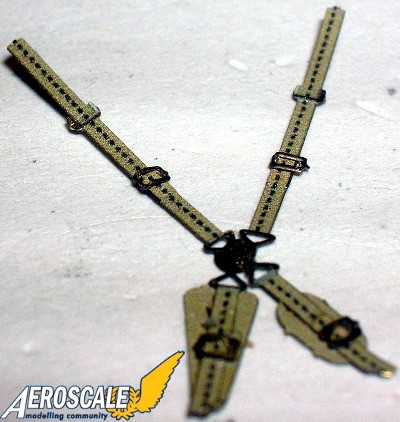
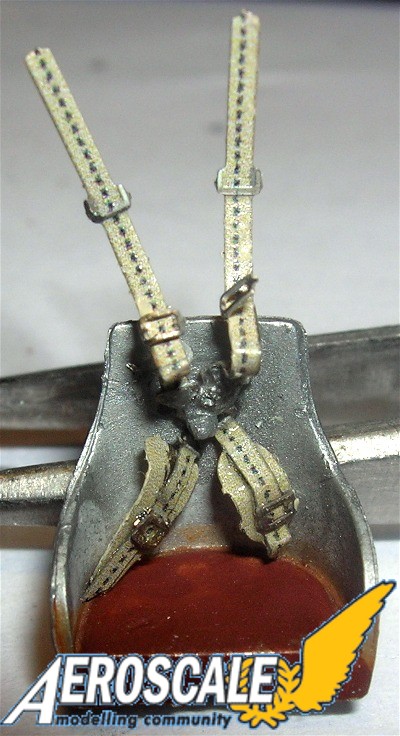
Page 5. If you use the kit lap belt parts (PE 17, 18, 19, 21 & 22) should be annealed then glued in place. This represents the type with the quick release mechanism that was standard on French manufactured aircraft. The seat (PP C 21 ) is an mid to late production type and should be painted as if upholstered (stuffed with material and covered) in leather. Next you add the actuation control horns (D 11) to the slot in the rudder / stabilizer (PP C 15). The upper fuselage facade (PP C 17) elevators (PP C 1) fun and rudder combination (P C 15) and undersurface chin pan (PP C 8) are brought together. The fuselage pick-up straps (PE 20 X 2) are added at this time.
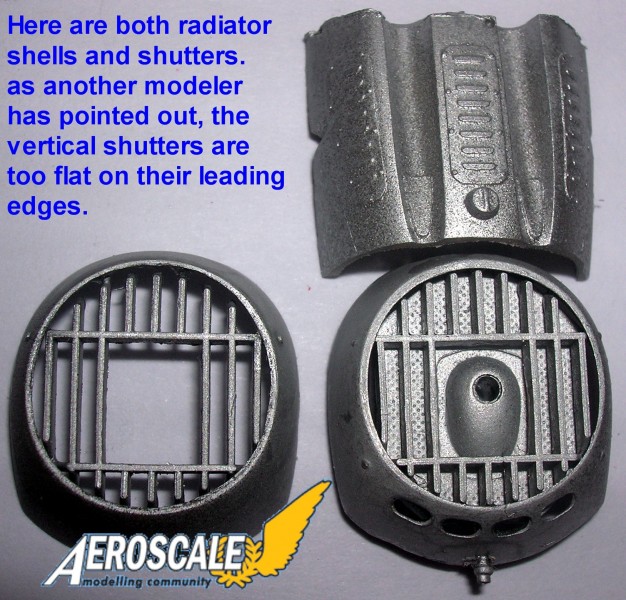
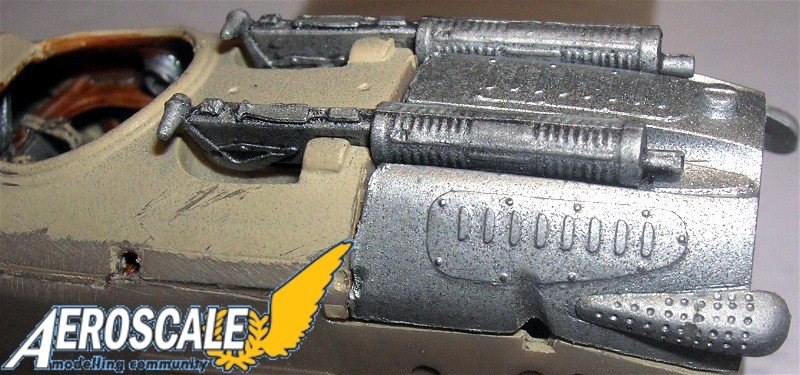
Page 6. First add the stabilizer struts (PP D 18 X 2) for the horizontal tail surface assembly. Now insure that the whole tail assembly is directionally plumb with the fuselage in every respect. Then the radiator / engine crankcase and propeller shaft assembly (PP C 16, 38 & 43). The radiator shroud comes as two models (PP A 5 or 10). The (PP A 5) is recommended as being applicable. The same recommendations follow for the radiator shutters (PP A 4 or 9). Use (PP A 4). The radiator of the Spad XIII was bolted directly to the gear housing of the Hispano-Suiza 200hp. Imagine the vibrations and harmonics that this soldered brass unit was subjected to! No wonder Spad XIII type aircraft were in the hangar an average of more than 30% of the time. Two telescopic sites (PP D 32 or 36 ) are provided. Two ring sites (PE 2 X 2) are provided but you will only need one. The twin Vickers machine guns (PP C 19 X 2) drop into their slots accordingly well. The Spad XIII types built for the Americans seem to have partial shielding covering most of the lower sides of the gun receivers/breeches. See your references. These weapons were a natural metal colour and then give them a wash of flat black and allow to dry completely. You can add the engine head fairings (PP C 39 & 40) here. If you are building this with an exposed engine, wait to add the exhaust pipes (PP C 9 7 11). Otherwise go ahead and add them now. The engine side mounted access panels come in two types, plastic (PP C 18 & 20) or in photoetch (PE 1 & 3).
Now you can begin to install the detailed Hispano-Suiza resin engine mentioned in page 3. In some cases you would insert pins into pre-drilled holes in the resin engine heads and the eight connection ports of the exhaust pipes (C 9 & 11.) Some filling may be needed to allow for the distance of the exhaust port connections and the seated engine. Remember to dry fit and measure carefully before permanently attaching either item. In my case the exhausts will be separate from the engine. If you install this assembly begin completing the wiring and plumbing. The fuel & water plumbing and or fairing (PP D 10, 15, 23 7 24) needs to be altered in adding tubing to the engine and radiator. The modified forward area of the upper cowling (PP C 17) should reflect a cut out for these >pipes.= Check your references. Three types of windscreens (PP E 1-3) are provided. But, add them as a last step in the build after an over-all dull / flat coating of the finished build.
Page 7. The socket holes in the wings >all= need to be enlarged slightly. Test fit your kit struts first. Carefully align and attach the cabane struts (PP D 1, 34 & 44 X 2) to the upper deck (PP C 17). The fuel tank pressure intake ( PP D 20 ) was on late production airframes and therefore not applicable. At this point everything else is mounted to the top wing ( PP A 3 ). The aileron actuation control horns, rods and bell crank assembly (PP D 6, 7, 8, 9 & 30 X 2 ) is done twice, one for each side of the aircraft. The interplane struts (PP D 2, 3, 13, 14 & 37 X 2) need to be added carefully to keep the top wing plumb and square. Then bring these components together with the fuselage using a >Lego= block jig and let the assembly dry thoroughly. The referenced jig keeps everything lined up correctly. Fabric wrap reinforcement strips seen on the interplane struts can be done by using strips of decal film painted an off white colour.
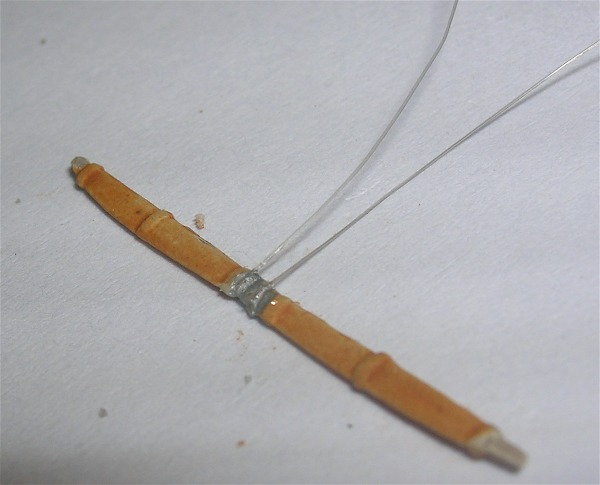
Page 8. Finally the landing gear I clipped the plastic axle ends off of the axle/spreader bar (PP C 12) and added brass pins of the appropriate diameter in to predrilled holes. Paint and assemble the under carriage struts (PP C 2 & 5) and the modified axle spreader bar (PP C 12) to the fuselage underside, again insuring that it is plumb and square. The creative rigging of this unit can be functional in keeping the assembly together (even if dropped: AThe Voice of Experience.@
Lastly the propeller (PP C 6 & 7) is considered. The kit item are an Eclair Co. profile and the Gremont Co. profile and while there were others, check your references for the aircraft that you have chosen.
Kit Colour Schemes:
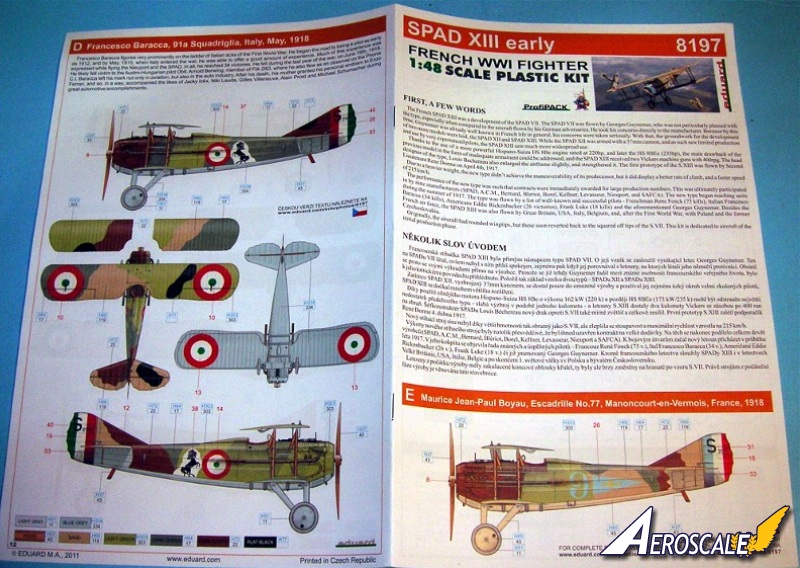
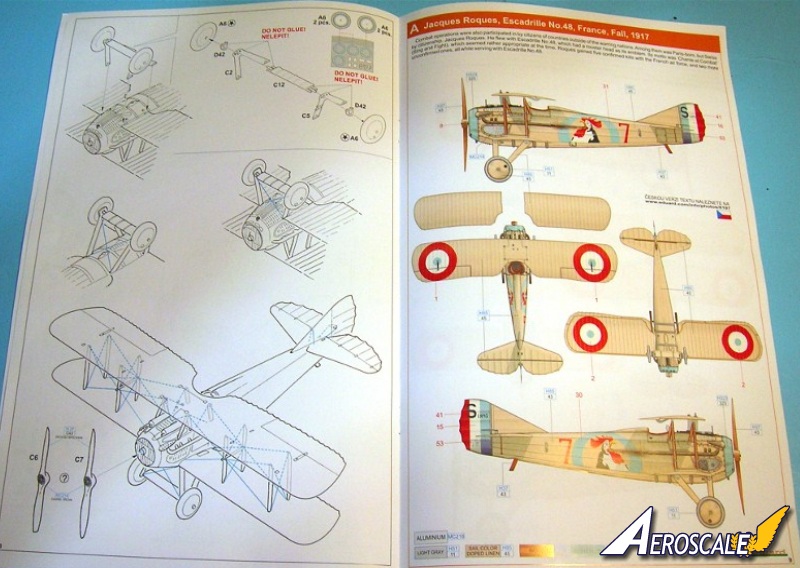
A. Lt. Jacques Roques, Escadrille Spa.48, France, Fall, 1917. Non-French citizens also served and participated in combat operations. Among them was Paris-born, but held Swiss citizenship, Jacques Roques. He flew with Escadrille No.48, which had a rooster head as its emblem. Its motto was Chante et Combat (Sing and Fight). Roques gained five confirmed victories and two more unconfirmed.
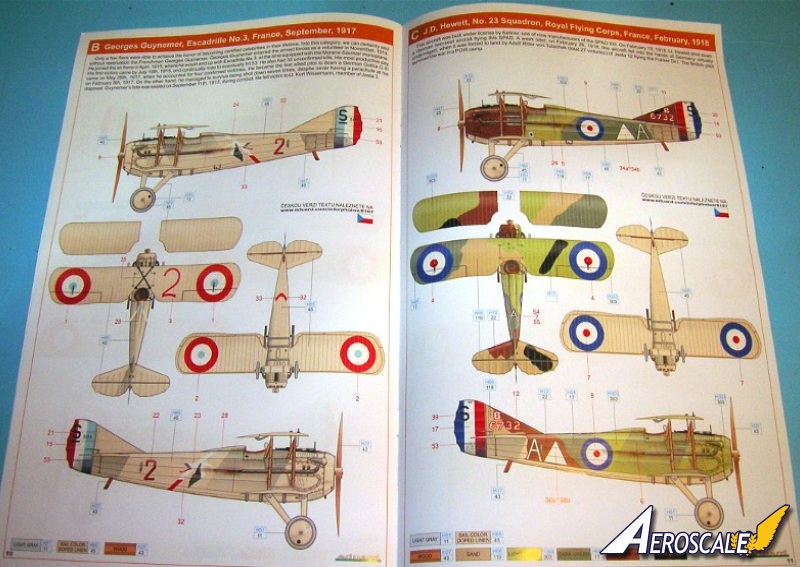
B. Captaine Georges Guynemer, Escadrille No.3, France, September, 1917. Only the top fighter pilots were able to achieve the honor of becoming certified celebrities in their lifetime. Such was Captaine Georges Guynemer. Georges Guynemer entered the armed forces as a volunteer in November, 1914. He joined the air service in April, 1915, where he would end up with Escadrille No.3, at the time equipped with the Morane-Saulnier monoplane. His first victory came by July 15th, 1915, and rose eventually to 53. He also had 35 unconfirmed kills. His most productive day came on May 25th, 1917, when he accounted for four confirmed victories. He became the first allied pilot to down a German Gotha G.III on February 8th, 1917. He also managed to survive being shot down seven times, despite never having a parachute at his disposal. Guynemers fate was sealed on September 11th, 1917, during combat. He fell in combat to Lt. Kurt Wissemann, member of Jasta 3.
C. Lt. J. D. Hewett, No. 23 Squadron, Royal Flying Corps, France, February, 1918. This aircraft was built under license by Kellner, one of nine manufacturers of the Spad XIII. On February 19, 1918, Lt. Hewett shot down a German two-seat aircraft flying this Spad. A week later, on February 26, 1918, this aircraft fell into the hands of Germany virtually undamaged, when it was forced to land by Hauptmann Adolf Ritter von Tutschek (total 27 victories) of Jasta 12 flying Fokker Dr.I 404/17. The British pilot survived the war in a POW camp.
D. Major Francesco Baracca, 91a Squadriglia, Italy, May, 1918. He began the road to being a pilot as early as 1912, and by May, 1915, when Italy entered the war, he had a good amount of experience. Much of this was evident while flying the Nieuport and the Spad types. In all, he reached 34 victories. He fell on June 19th, 1918 to the Austro-Hungarian pilot Oblt. Arnold Berwing, member of Flik 28D, where he also flew as an observer on the Phonix C.I. Baracca left his mark in aviation and in the auto industry. After his death, his mother granted his personal emblem to Enzo Ferrari, and has accompanied the likes of Jacky Ickx, Niki Lauda, Gilles Villeneuve, Alain Prost and Michael Schumacher during great automotive accomplishments.
E. Lt. Maurice Jean-Paul Boyau, Escadrille No.77, Manoncourt-en-Vermois, France, 1918. He was a famous rugby player (XV rugby), 6 times in the national French team and he was one time French champion. During the war he served in the infantry and as a driver joined air service in 1915. He obtained a Pilot's Brevet on 28 November 1915, he served as an instructor at Buc before being posted to N77 in September 1916.he had 35 official air victories (21 balloons and 14 aircraft). He continued to play rugby during the war in the army team and lost two times in front of the New-Zealand army team. He fell in combat on 16 September 1918. The city of Dax (south west of France), where he played rugby before the war gave his name to the local stadium.
At the front:
The following is an excerpt from recent correspondence with Mr. Alan Toelle. He is probably the finest authority on the French 5 colour camouflage extant. He knows the Spad XIII from rudder to prop boss. Mr. Toelle=s lifetime studies into various licensed built Spad XIII types and the layout of their cockpits are a >must-read= to the builder/ researcher/ devotee.
"...Mr. Carrick=s drawings of the Spad XIII (the basis for the DML Spad XIII, STL) are in my opinion very accurate - as accurate as they can be at that scale. He did a very conscientious job and knew a lot about the subject..."
"...I provided him with quite a bit of information and we talked over some issues. The wing tips, however should not show the airfoil when viewed from the end as the spars turned down near the ends and the tip bow was flat in the plane of the leading and trailing edge - as a dinner plate laid upside down..."
"...As for the subject [Hangar Queens] Spad XIII types were all Hangar Queens, relatively speaking. They were reported out of service more than 30% of the time on average. Motor replacement was very common but they had all kinds of other maintenance problems aside from damage due to operations. A good example is Joe Eastman=s Spad XIII S.15006 (Squadron Aircraft) #19 of the 94th Aero Squadron. The following are extracts from Eastman=s diary: . ."
"July 24, (1918): My Spad after five changes of oil pumps, was again given me to make a practice flight this morning in preparation for the regular patrol at 15:00 this afternoon. I no more than cleared it off the field when something - a connecting rod - broke - smoke blew into the pit, the entire plane shook with vibration, and I was barely able to regain the field again without accident. This was my lot after nearly a week in fussing with the tub (aircraft). Rankin at luncheon told me to take (Squadron Aircraft)#10, which he said was in good condition. Later I learned it was the machine that (Lts.) Coolidge and Sherry has unsuccessfully attempted to use. I went out to it and found it still in the process of repair. I waited until time for the patrol and learned in that time further of its disquieting departure from a machine in good condition. The motor is an unheard - of make; (?) The throttles are offset and require a new technique in manipulation; its gas thumb lever needed a pair of pliers to move; and neither guns nor sights had ever been tested. Although my habitual appearance is one of cow-like docility and temperamental imperviousness, I left the ground in a state of mind that jumps out of a chair when a door is closed above a whisper. After two minutes in the air, I began to gather the evidence of my switchboard (Instrument Panel.) Both the air and oil pressures were less than half the normal figure - and the important little temperature hand was doing a comedy skit in the region of 105 degrees or 25 degrees hotter than is conducive to successful flying. A few minute spent hopefully in pursuit of the patrol failed to influence the gauges for the better. I piqued (a sharp roll with wings at near vertical) for the field and instead of the temperature cooling it continued to augment in its own cheery fashion. The motor stopped firing over Coulommiers, struggled to life, coughed, missed and revolved feebly by turns letting me down nearer and nearer to an unpromising landscape - which by the grace of GOD, I was enabled to clear...Plane #10 received a new motor."
"On 28 July (Eastman again tested his own plane #19): My plane is still in the hospital this morning. I would have taken it to the range, but on testing the motor could throttle no more than 900 RPM - so I look forward to trying the guns and a flight this afternoon."
"29 July: Motor troubles still beset my can (aircraft.) In the vain hope that it might have changed its mind, I took it for a tour of the field, but was drenched by overheated water as before. The mechanics, with whose business I=m daily growing more acquainted, are changing the radiator. These planes are certainly causing a lot of trouble as compared to the 28's (Nieuport types) which were at least simple to keep on the line."
"10 August: My motor still knocks and vibrates which I hope can be remedied. Spark plugs, I hope."
"13 August: My plane developed trouble on patrol...the motor was knocking and the oil no longer passed through the glass (gauge.) At that instant there was the gentle rap of a broken connecting rod on its way through the casting and I could go no further."
"7 September: It seems that no day is complete without some remark on motors. At supper it was said that the Hispano 220 is valued at $5,000.00. And after today I=m ready to send my sixth, I believe it is, back to the shops, each having an average life of say seven hours flying!...In order to give me an opportunity to test out my fancied troubles, Thorne sent me above on the field patrol last evening, although knocking like mischief, she carried one up to 4,000 meters...Thanks to these interminable annoyances. I=ve several times come to the point where I could hardly trust myself to declare faulty on the ground what I=ve been positive of in the air. Today as the Captain seemed dubious of my report - I had (Lt.) Jeffers try my bus (aircraft) out; but he was glad to regain the field after making a half turn in it. Steam was shooting off the top a foot high."
And so it went. In a period (discussed) of 75 days, plane # 19 (S.15006) had three motor replacements and was reported as unserviceable on 38 days, which is 50.7% of the time! In addition, it had two forced landings at which point it was condemned.. Alan Toelle
Please note that all statements in italics are added by the writer of the kit review for the reader=s benefit.
Reference:
Aeroplane Monthly, IPC Magazines Ltd. Vol. 19, #8, Aug. 1991.
Italian Aces of WWI by Guttman, Osprey Pub. 200?.
"To Capture the Rainbow..." by S. Lawson, Cross & Cockade Int. Vol. 29, #1, 1998.
"...Before the Colors Fade" by D. Eubanks, Cross & Cockade USA Vol.19, #1, 1978.
Lafayette Foundation Archives, Denver Colorado USA.
"Project Butterfly" by Hardesty, Hastings, and Toelle, Cross & Cockade USA Vol. 9, and 13, 1972.-
(Most excellent articles on the French 5 color camouflage patterns.)
Report on Spad XIII S.4377 by A. Toelle, unpublished to date 2006.
Report on Spad XIII S.6625 by A. Toelle, unpublished to date 2006.
Report on Spad XIII S.7689 by A. Toelle, unpublished to date 2006.
Report on Spad XIII S.8340 by A. Toelle, unpublished to date 2006.
Report on Spad XIII S.15295 by A. Toelle, unpublished to date 2006.
Report on Spad XIII S.16594 by A. Toelle, unpublished to date 2006.
SPAD XIII C.1 by C.F.Andrews, Profile #17, 1965.
SPAD XIII C.1 by J.M.Bruce , Windsock Datafile #32, Albatros Pub. 1992.
"The Charge of the Yellow Ram (the 138th Aero Sqdn)" by S. Lawson, Cross & Cockade Int. Vol.25, #4, 1994.
Windsock, Albatros Pub. Vol. 6, #4, July/Aug. 1990.
Windsock, Albatros Pub. Vol. 6, #5, Sept/Oct. 1990.
Windsock, Albatros Pub. Vol. 8, #1, Jan./Feb. 1992.
Windsock, Albatros Pub. Vol. 9, #4, July/Aug. 1993.
Please remember, when contacting retailers or manufacturers, to mention that you saw their products highlighted here - on AEROSCALE
Highs: Excellent details, unconventional fuselage assembly alernate radiator pieces.Lows: One piece molding of the flooring and its fixtures is a real short coming. Verdict: This a good kit and filled the void that has been empty for so many years since the DML kit disappeared from LHS shelves. The modeler needs good colour information. But the kit is a high quality attempt.
About Stephen T. Lawson (JackFlash) FROM: COLORADO, UNITED STATES
I was building Off topic jet age kits at the age of 7. I remember building my first WWI kit way back in 1964-5 at the age of 8-9. Hundreds of 1/72 scale Revell and Airfix kits later my eyes started to change and I wanted to do more detail. With the advent of DML / Dragon and Eduard I sold off my ...


Comments