During August 1944 the Gotha Aircraft Company took over the job of series production of the Horten brothers' Ho IX all-wing fighter, which would be known as the Horten Ho 229. On receiving the design data, Gotha engineers found some areas for improvement. The Ho 229 had limited space for installing new equipment or adding more crew members. More importantly, since the engines were to be enclosed in the wing, different engines could not be fitted without extensive aerodynamic testing, which was not possible time-wise considering the worsening war situation for Germany.
The Gotha designers proposed an alternate all-wing design to the RLM in January 1945 which used many of the construction techniques as in the Horten aircraft but had the advantage of being able to be modified with new equipment and engines without changing the flying characteristics greatly. The basic construction was to be a welded steel tube frame covered by plywood and "Formholz", a moulded and formed wood sheathing.
The Gotha Go P.60A was a flying wing that was powered by two turbojet engines near the rear of the wing centre section, one above the wing and one below. The advantage was this arrangement allowed any jet engine to be fitted, plus maintenance would be easier due to accessibility with the engines in the exposed nacelles.
In the designed Go P.60A, two BMW 003A-1 with 800 kp (1763 lbs) of thrust were to be used at first. Three fuel tanks were enclosed within the wings, one 1200 litre (317 gallon) tank in each outer wing panel and one 1200 litre (317 gallon) tank behind the cockpit. The pressurised and armoured cockpit, located in the extreme nose, held two men who were in a prone (lying down) position. The prone position had the advantage of allowing the crew to withstand G-forces better, and was researched in the Berlin B9 test aircraft. This system was also used in the DFS 228 high altitude reconnaissance aircraft and the Henschel Hs 132 jet powered dive bomber. The main landing gear legs retracted to the front and rotated 90 degrees to lay flat. The nose gear was offset to the port side and retracted to the rear.
To cure stall during landing, the wing leading edge was fitted with hydraulically activated split flaps. There were also a pair of conventional split flaps mounted at the rear which were installed with a 15 degree forward sweep and also could be used as air brakes. The other three types of control were:
*Elevators/Elevons - located in the inner trailing edge of the wing and were provided with auxiliary trim tabs
*Ailerons - located in the outer trailing edge of the wing and had internally balanced control flaps
*Drag Rudders - located in the wing tips at a 18 degree angle (to the aircraft centreline), they were designed to be used during high speed manoeuvres
Armament was to be four MK 108 30mm machine cannon (150 rounds inner cannon, 175 rounds outer cannon) for the Höhenjäger (High Altitude Fighter) version, two MK 103 30mm machine cannon (175 rounds per gun) for the Zerstörer (Heavy Fighter) version and two MK 108 30mm machine cannon and two RB 50/18 cameras for the Aufklärer (Reconnaissance) version.
The Höhenjäger (High Altitude Fighter) version could also to be fitted with a Walter HWK 509B rocket engine to increase the ceiling and climb rate, and was thus designated the Gotha Go P.60A/R .
One of the main criticisms of the Go P.60A was the difficulty for the crew to escape while in flight. One solution was to mount both jet engines below the wing, and this proposed version was to be known as the Go P.60A-2 . Unfortunately, this configuration reduced the roll rate in combat and was eliminated. Although further versions were to have some sort of ejection device for the crew, the war's end prevented the completion of the Gotha Go P.60A.
Historical Background by Dan Johnson of Luft 46 website.
THE KIT
Car kit manufacturer Marsh Models have now entered the aircraft area of modelling.
This is Aerotech's second debut release
One good thing is that the price, originally estimated at over £35 has been set lower at around £30 . This is comparable to other resin kits in the high average price bracket. But a treat awaits.
Type: Resin
The kit's contents are:
Resin Parts: 17
Etched Parts: 50
White Metal Parts: 12
Clear Parts: 2
Decals: Multi choice of aircraft
This is a very comprehensive kit with virtually every conceivable detail extra included in the price. All parts are grouped coming in individual resealable plastic bags.
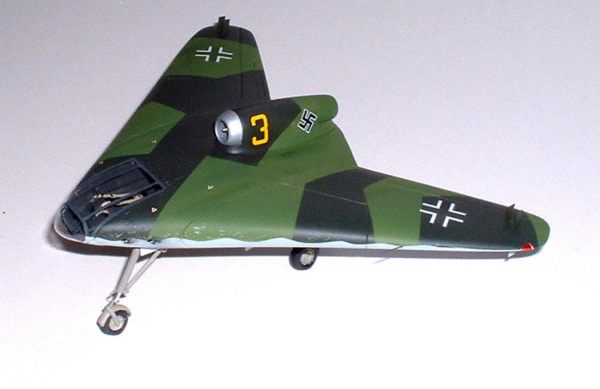
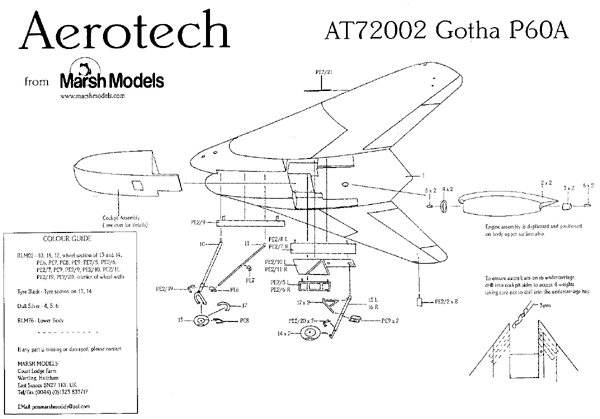
MAIN PARTS
All are superbly cast with minimal flash, so clean up will be easy. The main fuselage/wing assembly comes as one big piece with excellent detailing and panel lines. The only gripe being on my sample the aft wing tips are chipped (Red circle). This will need either a re-profiling of the wing edges in these areas or to try and add material to bring them back to the original shape.
On the instructions, it indicates where drilling needs to be carried out to accommodate the provided metal weights. It remains to be seen whether this will be sufficient to prevent tail sitting. However this is a very well engineered kit and it probably will be enough. If it is not, further drilling out of the main part may be necessary.
(Red arrows for instructed drilling areas. Blue arrows indicate possible areas should further drilling out be needed)
SMALL PARTS
As with the larger parts, the small ones are excellent. Being exceptionally clean and thin with no cutting from casting blocks or removal from resin flakes. Minimal clean up required.
All parts need a wash in soapy water and rinse to get rid of any casting release agents.
WHITE METAL PARTS
Following the Fw Ta183 these are amongst the best I have seen. Very clean castings that require minimal filing and clean-up. These parts include undercarriage legs, jet nozzles and ballast weights.
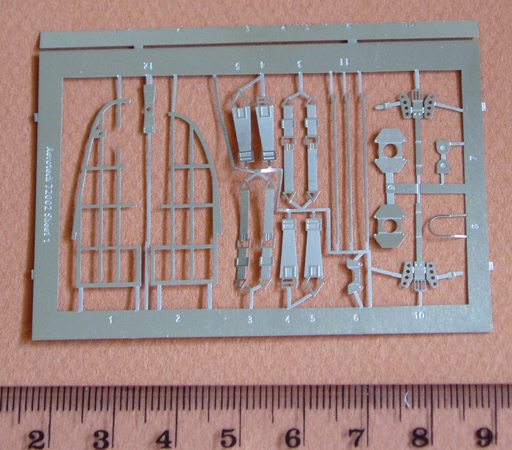
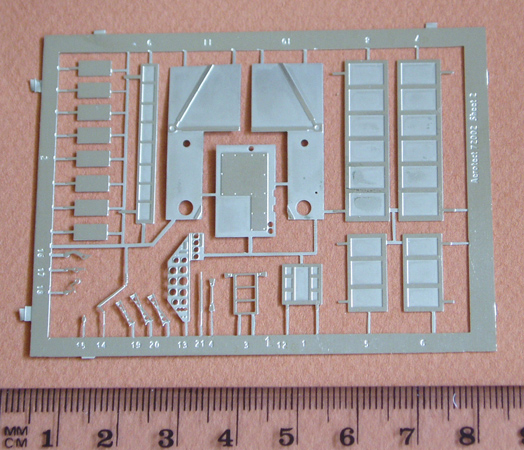
ETCHED PARTS
2 comprehensive frets are supplied and again these are superb. They cover everything you could imagine from cockpit detail panels, seat belts to the inner framing for inside cockpit sides.
CLEAR PARTS
Two vacuformed canopies are provided for each kit. The parts are clear with good frame marking, but would benefit a dip in Future/Klear.
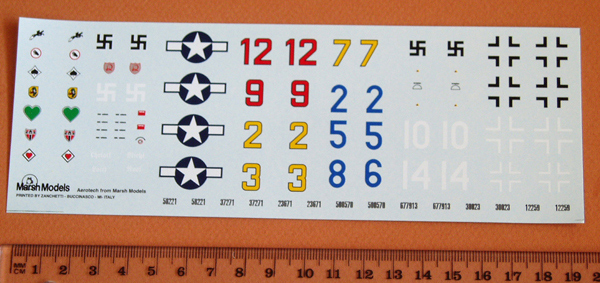
DECALS & INSTRUCTIONS
The very extensive decal sheet is common with Aerotech's Fw Ta183, but with such a big selection of code numbers and emblems, in addition to all the insignia and swastikas. Some stencils are also supplied. There is even US markings for a captured aircraft version.
One thing of interest is the decals are designed for use directly on to matt paint.
One thing of interest is the canopy frame is supplied as a self-adhesive sticker. A good idea. It comes in black but there is sufficient material to test paint acceptance, should the modeller wish to colour it in the camo shades.
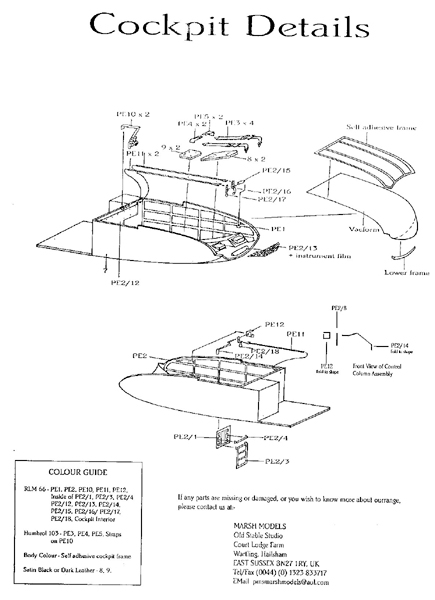
There are two instruction sheets provided, one with the assembly instructions which are OK. The other is very good using photographs for the colour guide and etched metal guides.
CONCLUSION.
Another cracker of a kit. Aerotech have done their homework and have produced an amazingly well engineered kit setting a very high standard. There is virtually nothing left out. An extremely well detailed model should result. And, although the price is expensive, it is very good value when you consider the huge amount of multi-media parts included..
It scores 9+ because of the wing and are there any tens? This comes mighty close.
I am sure this will be both an exciting and straight forward build.
I think it is a kit more for the experienced because of there being so many mixed media parts and options. But, having said that, a newcomer to this kind of kit should not find it too difficult as long it is not rushed and patience and care are exercised throughout the build, although I would recommend trying a simpler kit first to gain experience.
SUMMARY
Percentage Rating
90%
Scale:
1:72
Mfg. ID:
002
Suggested Retail:
£29.95
PUBLISHED:
Nov 04, 2004
NETWORK-WIDE AVERAGE RATINGS
THIS REVIEWER:
72.42%
MAKER/PUBLISHER:
90.00%
About Peter Allen (flitzer) FROM: ENGLAND - NORTH WEST, UNITED KINGDOM
Greetings to all.
My real name is Peter Allen and I have recently returned to UK from working in Riyadh, Saudi Arabia, as a creative director in an advertising agency.
My home town is Wigan in the north of England.
Im married to Emily, a Polish lass who tolerates my modelling well.
Ive wor...