The first test flight of the new aircraft was in May 1916. The results were simply spectacular, especially as regards its maneuverability and rate of climb. The Sopwith Tripe-Hound (as the fighter had been nicknamed) was immediately sent to undergo military trials in France, and later the second pre-production machine was sent to the front. The tests continued until the end of 1916, and as a result the RNAS as well as the RFC were interested in the type, however the RFC later rejected therotary powered triplanes in favor of the newly delivered examples of the Hispano - Suiza V8 powered Spad S.VII. In April 1917, forever remembered as "Bloody April", six RNAS squadrons received Sopwith Triplanes. The first serious clash with the latest German fighter of that period, the Albatros D.III, led to astonishment amongst the German military: the new English triplane surpassed their own development in all respects, even speed. During one sortie two triplanes suddenly encountered a large German Albatros formation and knocked down at least three of them in a few minutes while the surviving enemy machines left the area immediately. Thus was born the legend of "the unsurpassed English design with three wings" which greatly influenced the Germans and encouraged Anthony Fokker to design his famous Fokker Dreidecker. . . The final straw in the fate of the Triplane was the Sopwith Camel, whose arrival immediately pushed almost all previous rotary powered British fighter aircraft into the background. Only combat use of an aircraft type could prove whether some conceptual development might have a future. The appearance of the triplanes led to a multiplane "fever" - designers began to conceive of machines with four and even five wings. Later, with the appearance of more powerful engines and the introduction of new materials in aircraft construction, all of these experiments became anachronistic, but at least two multiplanes, the Sopwith Triplane and the Fokker Dreidecker, can confidently be called truly successful and classic designs of their era. (Edited & Abridged from Roden website)
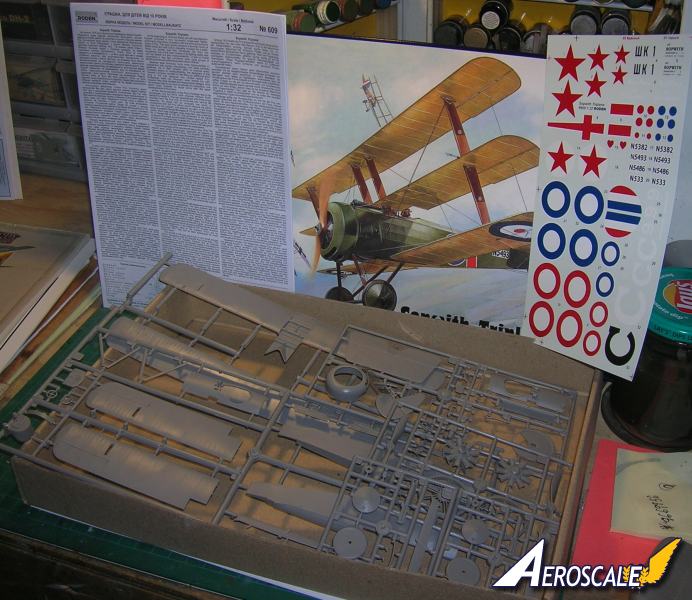
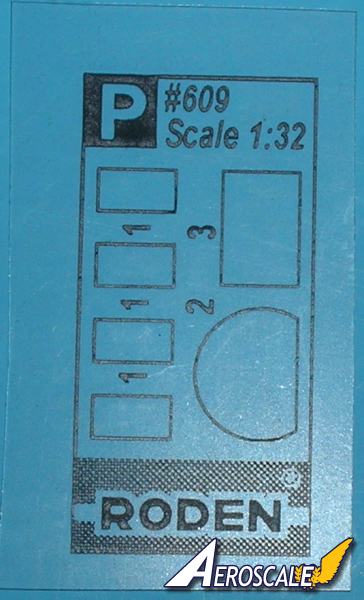
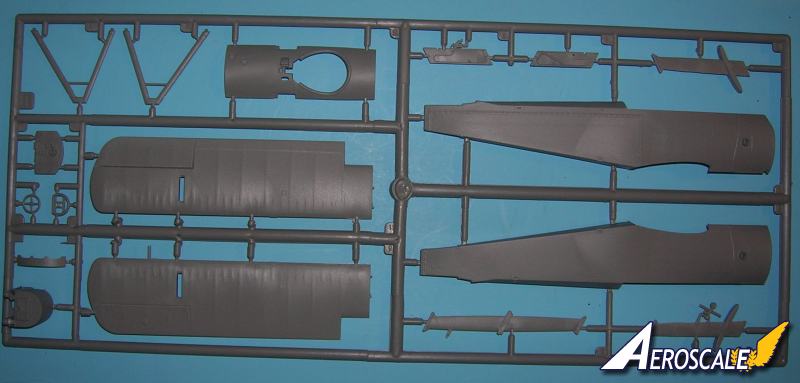
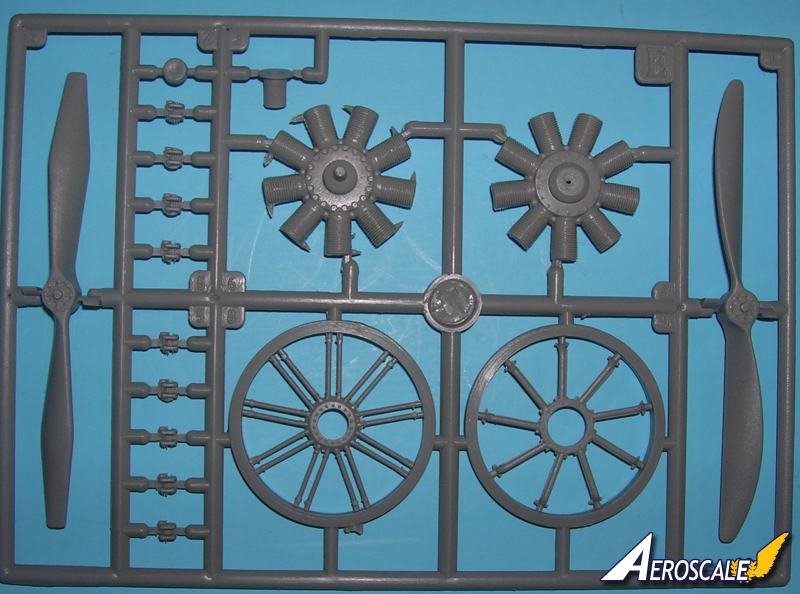
Kit Contents
As a model, it has been a favorite subject for decades. In this case I will discuss the Roden 1:32 Sopwith Triplane kit #609. Begin by washing and mildly scrubbing all parts in warm soapy water and rinse in clean and dry. Then pre-drill all struts and rigging locator holes. Also choose the attitude that your control surfaces will be set at. Separate the controls (ailerons and elevators) from their locations and reposition. Dont forget to consider the sit of the control column and rudder bar in complementary positions to the ailerons.
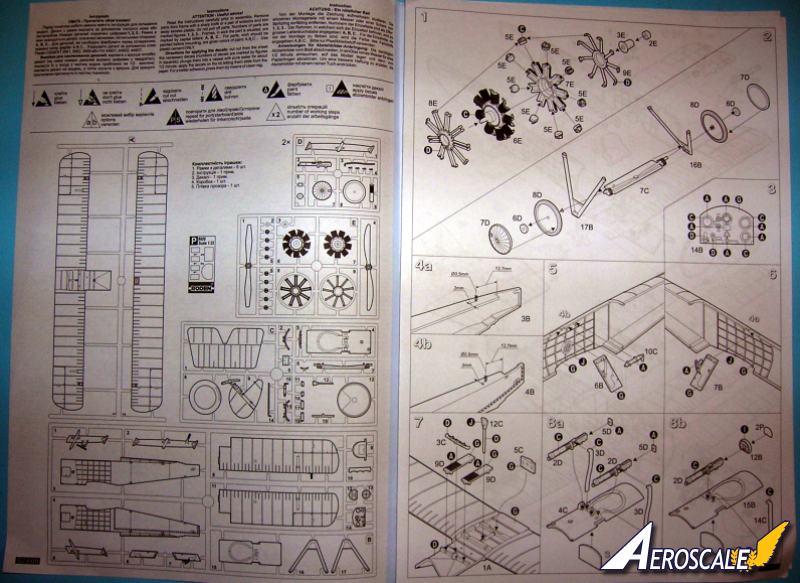
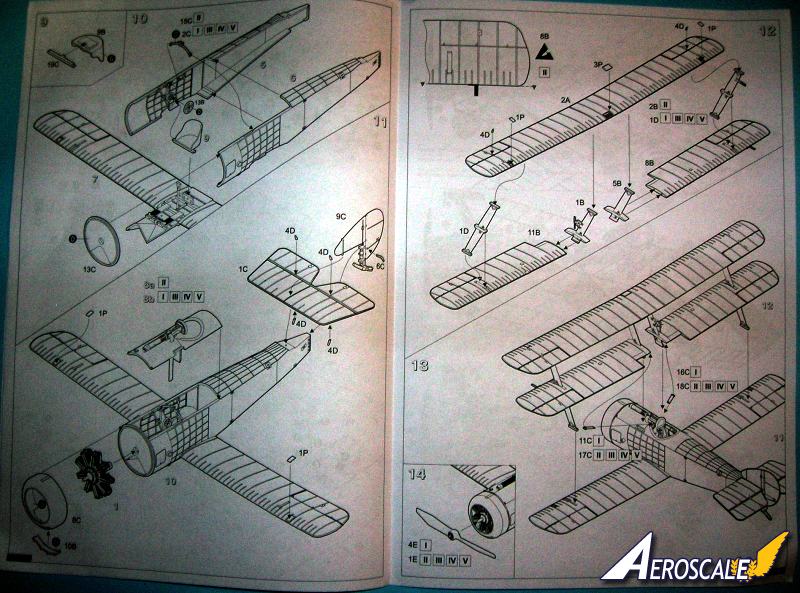
Step 1.) I begin by assembling the Clerget motor crankcase (6&7 E) on a section of brass metal rod. The cylinder heads (5 E X 9) insert into the ends of the united cylinders. Note the direction of the rocker arms face forward. Now carefully add the push rods ( 6 E) parallel to one another on the crankcase (6&7 E) up to the cylinder heads. Normally, I would add some Grandt Line Nuts for the crankcase, check your references. After finishing the motor assembly push the brass mounting shaft through the hole in the fuselage firewall. Glue the shaft in place using a scratchbuilt retainer ring. Now add the exhaust gutter (PP 23.) The large area horizontal tail surface (PP 32) was the early standard and fitted to all Triplanes upto the end of May 1917. I deleted the tail skid (PP 29) in favor of a scratchbuilt brass item.
Step 2.) Many production Sopwith fighters of the time including the Triplane employed the use of split axles. I also put brass pins in the ends of the Undercarriage Vees (16 & 17 B )to be pushed into pre-drilled holes in the fuselage for better stability. When completed add them to the fuselage one side at a time. Then add the spreader axle ( 7 C ). The wheels (6,7,8 D X 2 ) are added. They should have a slight Toe-in at the top of the tires. Note - There is solid axle on N5486 as late as 1994. In this modern display it is fitted with very small wheels. The kit item needs some work.
Step 3 ). The instrument panel and colour applications.
Step 4a & b ). Here you will need to cut a 5/16 of an inch block of plastic out the fuselage sides at the stern post. Check your references. This will then need several small pieces of brass rod to support the rudder and act as the mechanism for adjusting the horizontal tail surfaces. Now at "18 feet 10 inches applies to the two prototypes, N.500 and N.504 with the 110hp Clerget. N.500 went to France for operational evals during July 1916. N.504 initially had the 110 engine but had the 130 version retrofitted in September 1916 and had the rear fuselage strengthened in October. The length for production airframes was increased (?) to 19 feet 6 inches.
In the Harleyford publication "Sopwith - the man and his aircraft by the late Bruce Robertson & drawings by Peter G Cooksley". Covered are lengths & dimensions of every Sopwith aircraft from 1912 to 1919."
My measurements bear out that Roden got the fuslage sides within 2.85 scale inches the GA drawings. See the discussion thread.
Now if thats the case 19 feet 6 inches at 1:32 = 7.31 inches.
Step 5.) Pilot's right side ( 4 B ) and lower cabane strut. The fuel tank air pressure hand pump (10 C ) should have and air hose leading forward to the engine compartment.
Step 6.) Pilot's left side ( 3 B ) and lower cabane strut ( 7 B ).
Step 7.) Each component of the cockpit assembly that is to simulate wood I will paint a base coat of acrylic buff or linen colour. When thoroughly dry I will apply a clear flat coat. When that is dry, I will begin streaking a brown enamel wash over the area with an older brush. Several coats may be needed. All hardware items of metal can be painted aluminum with black knobs and handles or medium grey entirely.
Step 8a & b.) Discusses the single or twin Vickers machine gun assembly ( 2, 3 & 5 D X 2 ) ( 12,14 & 15 B or 4 C ). I am told that during its stay in White City that the factory installed Vickers Gun on N5486 was removed before being shipped to Russia. It should be noted that in white and red Russian hands it is doubtful that N5486 ever had a Vickers re-installed. Save the clear film as a last add item.
Step 9.)The seat harness straps need to be scratchbuilt. The harness straps may then be painted either flat leather or canvas type colors. Before you add the harness assembly you may want to paint the seat to look like a steel (termed bullet proof) version as this was usually what the parent company called for in their specification plans. There was NO more armour plate on the twin gun machine than there was on the single gun machine - if you can call "bullet proof steel", which was specified for the seat and the fuel tank, as armour plating.
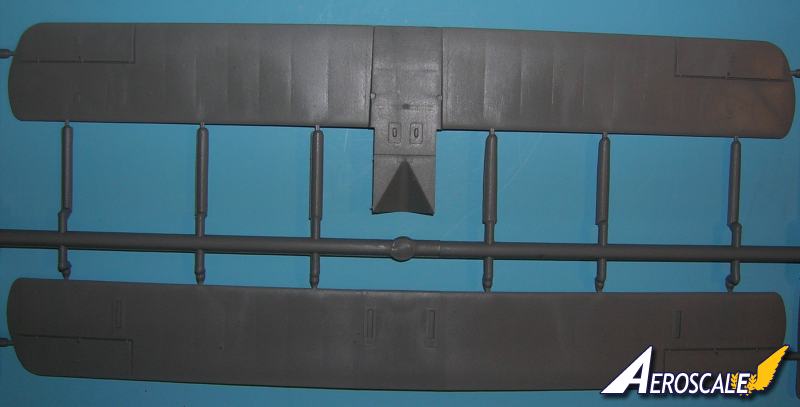
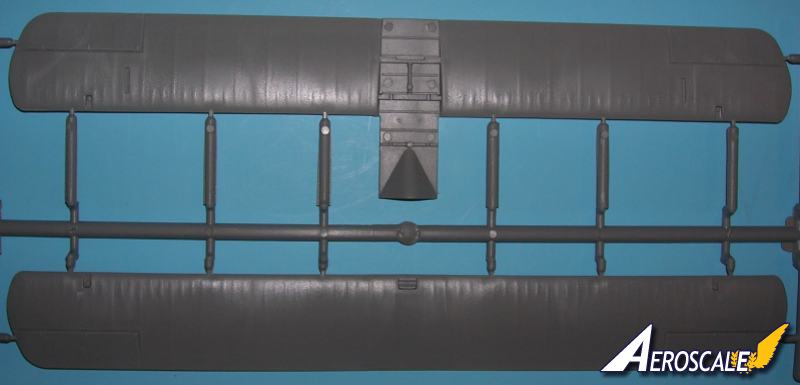
Step 10.) Go ahead now and unite the fuselage halves (3 & 4 B ). Do yourself a favor and begin the addition of the lower wing ( 1 A ) and then fit the cabane struts ( 1 & 5 B ) and let them dry. Then add the middle wings ( 8 & 11 B ) lining up the interplane struts ( 1 D & 2 B ) with the cabane struts. This goes much smoother if you use a jig made of childrens Lego blocks. A little planning here keeps everything square. Add the top wing ( 2 A ) and then let dry thoroughly. Next the Rigging for the wings only. Then begin finishing the tail surfaces then rig them.
Step 11.) Unite the cowling parts ( 8 C & 10 B ) and at least thin down the lower edge that is not in contact with the fuselage assembly and the front cooling holes for a better scale effect. The horizontal tail unit is one that was standardized during May 1917.
Step 12 - 13.) Add the control horns (4 D X 8 ). Let these dry then add their rigging. The generator/ fuel pump on the cabane strut(1 B) is attached to the starboard (pilots right) cabane struts trailing edge. Then run a simulated wire down to the struts inside edge as thought it were attached to the generator. This should enter the fuselage at the cabane struts base. Note the braces (11,16,17 &18 C ) should be added in the next step. These go from the underside of the Vickers gun breech to the end cap of the middle wing. Add a wire to the interplane strut ( 2 B )where you add a scratchbuilt the pitot tube. The wire should travel along the leading edge of the middle wing.
Step 14.) Notes the propeller (1 or 4 E ) application. It should be a solid rich red brown colour. More often than not this was a shellac often seen on Sopwith Propellers as well. These wont show any wood grain. Some props were stained then clear varnished. Check your references.
Step 15.) All rigging reinforcement patches and cables should be complete at this time. I prefer clear decal film to duplicate the reinforcement patches.
Painting:
Normally from the Sopwith factory all upper surface fabric areas were certainly PC12 in a Class A type of application. This has a red- brown (iron oxide) caste that could vary due to the method of application, exposure to the elements and elements or make up of a particular batch to drab earth with an olive tinge. Under-surfaces of the airframe were proofed with clear shrinking dope then clear varnished. I went with a more PC10 type color as it was an export version. If the color were PC12 to my thinking there doesnt appear to be much iron oxide in this application. This is just my opinion.
Profiles
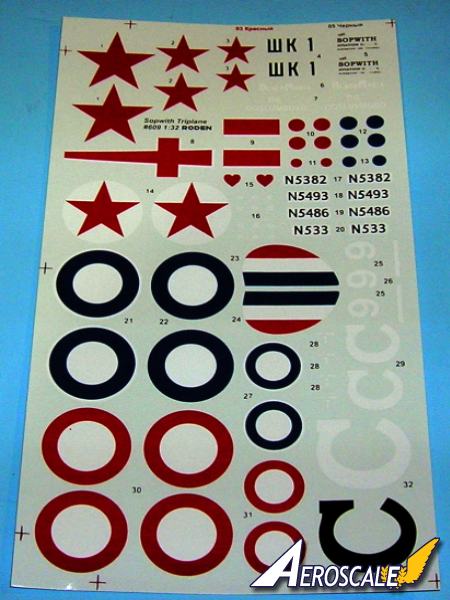
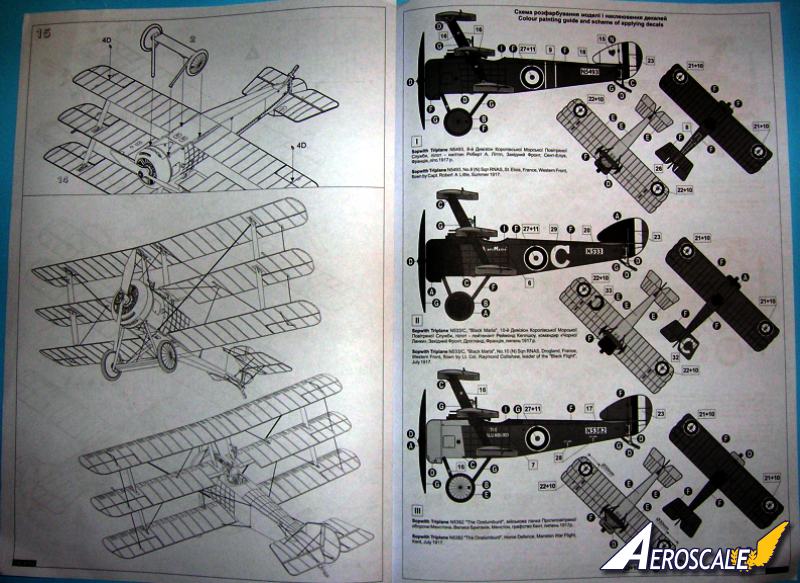
1. Sopwith Triplane N5493, No.8 (N) Sqn RNAS, St. Elois, France, Western Front, flown by Capt. Robert A Little, May - July 1917. Nicknamed Blymp. Though the markings seem incomplete for this machine.
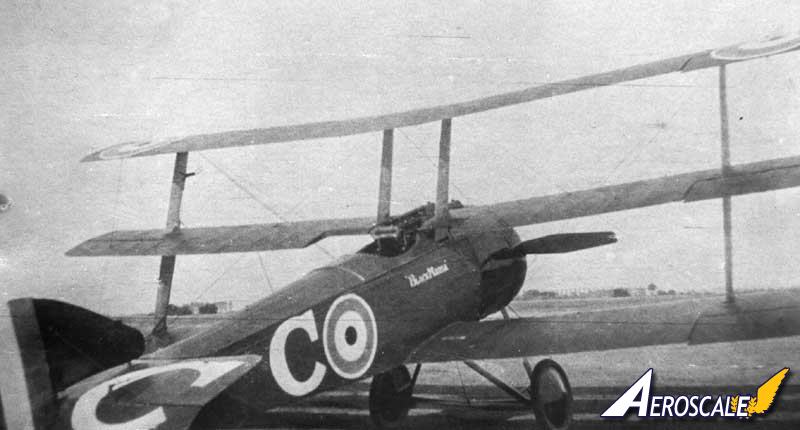
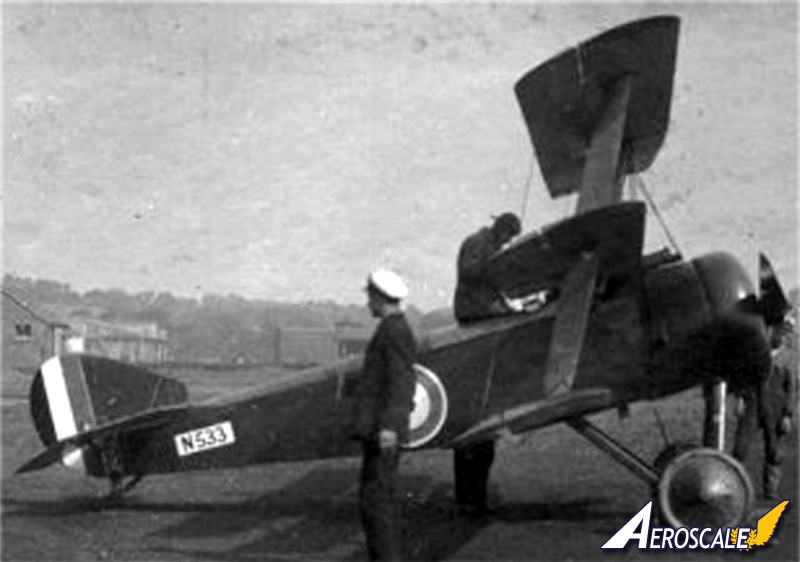
2. Sopwith Triplane N533/C, "Black Maria", No.10 (N) Sqn RNAS, Drogland, France, Western Front, flown by Lt. Col. Raymond Collishaw, leader of the "Black Flight", July 1917. Only four of the six Clayton Shuttleworth 2 gun machines saw combat, 2 airframes (N533 & N536) with Naval 10, 1 machine (N534) with Naval 1, and 1 (N535) with the Manston War School. Flt./Lt. Collishaw flew it (N533) for several weeks suffering gun problems in every flight, then he made two claims on one patrol. It was then flown by F/S/Lt. Alexander who hated it, and it quickly ended up as the commanders hack. The other machine (N536) was flown by Nick Carter who also hated it, and it was passed downwards, and fairly soon ended up getting shot down (on 14.8.17 F/S/Lt. Lloyd was brought down by Uffz. Steudel of Jasta 3.)
3. Sopwith Triplane N5382 "The Ooslumburd", Home Defence, Manston War Flight, Kent, July 1917.
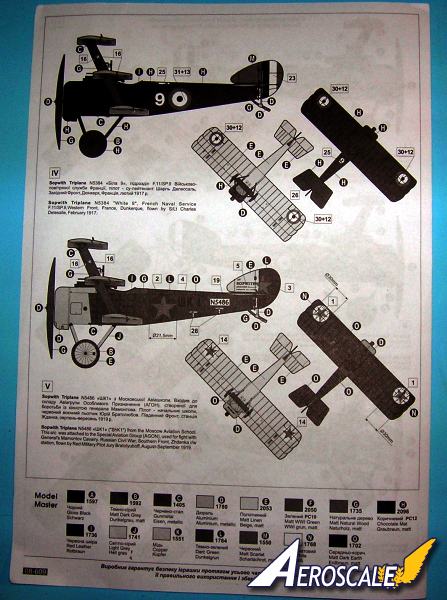
4. Sopwith Triplane N5384 "White 9", French Naval Service F.11/SP.9,Western Front, France, Dunkerque, flown by S/Lt Charles Delesalle, February 1917. Seventeen aircraft were delivered to the French Aviation Maritime. Essentially these were lend lease machines.
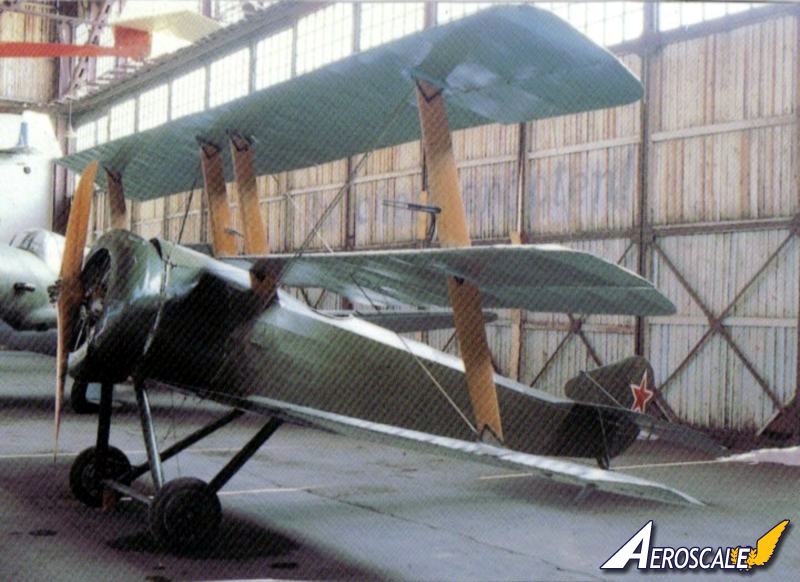
5. Sopwith Triplane N5486 ShK1 from the Moscow Aviation School. This a/c was attached to the Special Aviation Group (AGON), used for flight in cooperation with General's Mamontov Cavalry. Russian Civil War, Southern Front, Zhdanka r/w station, flown by Red Military Pilot Jury Bratolyuboff, August-September 1919.
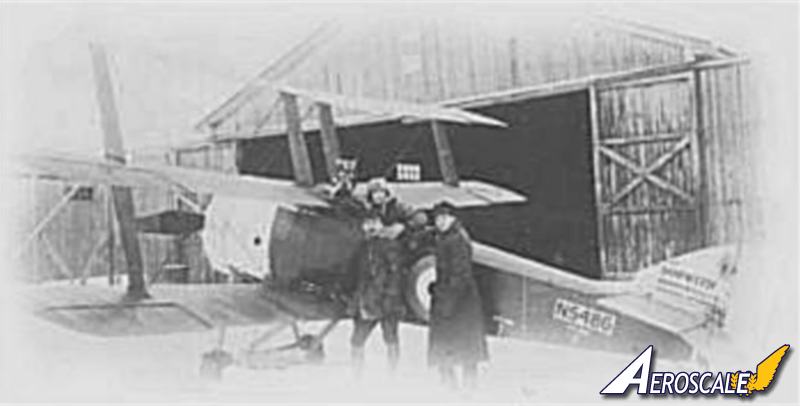
...On May 4th 1917 Sopwith Triplane N5486 left the Royal Naval Air Service depot at White City for shipment to Arkhangelsk. Presented to the Imperial Russian Government, it was (unarmed and) intended for evaluation. Despite the excellent climb rate and maneuverability, no orders for more...were placed. Sopwith Triplane N5486 came to the Red Army after the revolution in October 1917. In the hands of Russias aviators the unconventional Sopwith Triplane was to take its place in the early history of Russian aviation. Her operational career in subsequent years provided in patchwork reports and a few lines from an biography is unique reading to say the least. Though it is more probable that she served as a trainer and forward observations. She was still intact and on display at the Air Force Museum at Monino outside Moscow in 1994. It is one of only two original Sopwith Triplanes in existence. The other is of course N5912.
Sopwith Triplane N5486 has actually gone through 5 specific profiles.
The first profile shows N5486 in Imperial (white) Russian service after it was fitted with skis, probably around October - November 1917. There is one photo of this profile taken with snow on the ground in front of a wooden hangar. It may have had the legend "SK I" in red behind the fuselage cockade but someone is standing in front of this area. The Vickers machine gun was not installed at this time.(See: Profile Publication #73 p.10 & the Datafile 22 p.19.) Actually at White City up to its arrival in Russia after early May 1917 and into September 1917 the profile would probably have wheels. The wheel covers were almost certainly white. Because of the poor quality of some existing photos the full engine cowling has been interpreted not to be aluminum but white. This is doubtful. With the photograph call this an actual scheme.
The second profile shows N5486 in red Russian hands. The serial number box was retained and can clearly be seen, the only alteration being the direct application of red stars over the blue, white and red British cockades on the fuselage sides. It is conjecture that there was a white sphere was painted on the rudder with the red star in its center as this was normal practice. It is likely that the nose cowlings are bare aluminum here. The fin was still clear varnished linen and carried the Sopwith Logo. It is also assumed that there were stars on the upper and lower wing surfaces. You can apply them directly on the British cockades or on the white spheres. Call this profile provisional.
The third kit profile lets you put down white spheres and add the red stars to them. I suppose you could even add these over the British roundels, then add the Red Stars. This is not supported by any evidence I know of so it is hypothetical at best.
There is fourth profile possibility due to a photograph that shows all portions of the British national markings and upper fabric surfaces overpainted with what looks like a dark solid color. This includes the rudder as well. Plain red stars are apparent. ...On a Bolshevik airfield we see the Tripehound sitting in the background behind one of the few Vickers F.B.19 Mk I fighters. It had the legend "SK I" behind the fuselage star. Both planes lack machine guns, which, combined with the plain red stars on both (the last traces of the British cockade seem to have been overpainted), suggests that the photo was taken after the 1914-18 War. The serial number is still within a white rectangle, the wheels seem to have clear doped or dirty white covers and the cowling is either light gray or (more likely) castor oil tinged bare metal. In the book Aircraft of the Russian Civil War', the author seems to imply that the Russian Sopvich Triplane was used or at least went to, an operational unit. Apparently the Tripehound was attached to the Bolshevik 'Special Purpose Air Group' (AGON) on the southern front in 1919. This would be an actual scheme.
A fifth profile would show N5486 as it was displayed up to 1994. All upper and side surfaces are Russian dark green. All lower surfaces are lt. blue. The ex-Soviet red stars outlined in white are seen on the wings and rudder only. The upper deck behind the cowling is modified and has a triangular metal panel that is partially raised like a an air scoop. It is still unarmed. As mentioned earlier the aircraft is displayed with a solid axle and very small wheels of about 16 inch diameter. Struts and (nonstandard) propeller appear to be stained & clear varnished. (See: The Only British Triplane... by E. Sheldon, Aviation History, March 1995.) Again an actual scheme.
References:
Aircraft of the Russian Civil War, author V. Kondratyev
And Now the Onions by G. Mottram, Cross & Cockade Int. Vol.12, #3, Hangar Notes. 1981.
British Fighter Units 1917-18 by A. Revell, Osprey Pub. Ltd. 1978.
Report on...USSR Symposium by C. Bobrow , WWI Aero #124, Pp.85-87. May 1989.
Royal Navy Aircraft Serials 1911-1919 by R. Sturtivant & G. Page , Air Britain, 1992.
Sopwith Triplane, WWI Aero #91.
Sopwith Triplane Aces of World War I by Frank McGuire. Osprey pub.#63 2004.
The Fighting Triplanes by E. Hadingham, Macmillian Co. 1968.
The Last Train Over the Rostov Bridge by Aten, 1961?
The Only British Triplane... by E. Sheldon, Aviation History, March 1995.
The Sopwith Fighters by J.M. Bruce, Vintage Warbirds #3, Arms & Armour Press, 1986.
The Sopwith Triplanes by J.M.Bruce, Profile Pub. #73, 1966.
The Sopwith Triplane by R. Rimell, Datafile #22, Albatros Pub.1990.
The Sopwith Triplane Eduard issues- 'Stairway to Combat', Model Aircraft Monthly, June 2002.
Triplane Losses by R. Collishaw, Cross & Cockade USA Vol 8, #2, Summer 1967.
Triplane Losses by F. Bailey & S. Taylor, Over the Front V.10, #4, Pp. 312-334, Winter, 1995.
Triplane Losses Addenda Over the Front Vol 11, #2, P.186.Summer, 1996.
Triplane Photos- Cross & Cockade Int. Vol 5, #1, P.40, Spring 1974.
When contacting manufacturers and publishers please mention you saw this review at AEROSCALE
Highs: Crisp fine details in the plastic parts. Lows: There are no instrument gauge faces. Some minor sinkmarks on the underside of the lower wing. Kit fuselage needs extending 6mm according to one written reference.Verdict: Excellent plastic kit.It fills the void between the Camel and the Pup nicely.
Our Thanks to Roden! This item was provided by them for the purpose of having it reviewed on this KitMaker Network site. If you would like your kit, book, or product reviewed, please contact us.
About Stephen T. Lawson (JackFlash) FROM: COLORADO, UNITED STATES
I was building Off topic jet age kits at the age of 7. I remember building my first WWI kit way back in 1964-5 at the age of 8-9. Hundreds of 1/72 scale Revell and Airfix kits later my eyes started to change and I wanted to do more detail. With the advent of DML / Dragon and Eduard I sold off my ...
Yes. Top marks for observation. Why all the mystery and obfuscation? It surely cant be that distasteful to you to quote something I've written, can it? I understand, given that the short fuselage issue was missed in your review, you might have been a little embarrassed by that but hey, even you make mistakes sometimes. I will say that after your recent treatment of James Fahey, Im very surprised that you suggest asking him for assistance - but your conscience is your own affair.
The good thing in all this is that there is an easy means of correcting the issue (though Im surprised that you didnt mention that a while ago, as you seem to have known about it) but even better is the prospect of a kit from Wingnut Wings of the Sopwith Triplane in the future, which I have little doubt will be accurate in shape and detail. No date yet, but hopefully soon!
LINK
This is for anyone interested. An "in the box or first look" kit review by nature does not include comparisons between real and scale dimensions. That usually is seen in the forum "build logs" (blogs) or an Aeroscale "build review".
The "in the box or first look" kit review does deal with history, kit contents, (sometimes) instruction step explanations & clarifications, decal details and I include references. Only recently have I added images of temporarily joined (taped together) major components to show fit concerns. By the way a few posts back I did add the links to the membership's online builds here. I usually do that in these review discussion threads too.
But to repeat the kit has to be put together for overall length dimension comparisons so you usually won't see any in an "in the box" or "first look" review.
Now having said that, there is a place where the membership can voice its opinion about review content.
Click here.
I find the concept of a review (of whatever type) which doesn't include the reviewer's appraisal of the accuracy of the kit's parts, to be somewhat strange. Equally, the contention that shapes cannot be compared with the real thing before the model is constructed I also find slightly counter-intuitive; If good and reputable drawings are to hand, then it is much easier to make comparison of such things as wing span and chord, fuselage length etc. before construction starts. It has been the established way of doing things for such luminaries as Ray Rimell of Windsock for the past twenty-thirty years or more.
The accuracy of drawings is, of course, often open to question but if the reviewer cites their sources, then at least the prospective modeller can make up their own mind. Overall measurements on their own often don't suffice - witness the 1/48th Hasegawa Spitfire Mk.IX; as far as I know the overall length was not so much questioned as the distribution of various measurement points within the overall figure. In the specific case of the Sopwith Triplane, the overall length was not as important as the shortness concentrated in just the rear fuselage.
Whilst accuracy may not be at the top of everyone's agenda when considering a kit purchase, for many it is paramount and to ignore the issue in a review does seem slightly perverse - particularly if much of the rest of the review consists of a blow by blow account of how to construct the model when no construction has taken place; that would surely be more appropriate in a build review.
I had a look at Rowan Bayliss' thread in the link above and much of what people want, it seems, are links to other kit-related products - resin, etch, books and decals, in the main. So with that in mind here's a link to a review for Pheon Models decals for the Roden Sopwith Triplane by James Fahey on Hyperscale:
LINK
He also did a review for the same decal selection in 72nd and 48th scale here on Aeroscale:
LINK
For the future, I hope that James will once again post reviews of our products and others here, as with the recent excellent comparison of available 1/32nd scale "lozenge" decals from DB, Pheon and Wingnut Wings:
LINK
I am also pleased to say that reviews of Pheon products will soon be appearing on Aeroscale again, via Rowan Bayliss and others. Hopefully they will be linked to reviews of the kits for which they are intended and to other related products for the same kit.
After all, that is a part the service that Kitmaker and Aeroscale sets out to provide: a one-stop shop for modellers to read independent and helpful reviews of modelling products of all subjects and eras, as well as the valuable forum resources and a platform for manufacturers to make their products and future plans available for modellers' scrutiny.
The contributors on this site cannot be expected to have accurate plans available to assess the accuracy of every product they review. Viewers of this site do not pay anything, and contributors do not receive anything for their time (except the kit/item if it was provided for review). The kitmaker network welcomes multiple reviews of the same item, so I am sure if you wanted to share any comments on the accuracy of a kit it would be welcomed.
I have submitted full reviews (not just in-box), and I have not compared the kits to plans for these either.
It may be out of place but I feel theres more to this than first appears, past misunderstandings seem to colour some peoples views, which I feel rather sad about as EVERYONE here contributts, we may not all be right all the time.
But getting back to the issue addressed here of course the reviewer can only work with what they have available but I do agree with Rowan, if theres known issues then they should be highlighted.
If I had realised what unpleasant finds I got with this kit I would have steered clear, nothing unsurmountable bu non the less, bad moulding and finish of parts etc never mind dimensional issues would have been good to know about in advance.
Sorry if this appears negative but I dont wish Aeroscale to implode like another well known site has recently.
Keith
Folks,
O.K. I've only just returned from a 10 day break in contact however, after sleeping on my initial reaction of "not my place to pitch in on this one!" I beleive I need to support Keith's comment. I too am a member (admittedly not a great participant) of several other sites and can read between the lines on "implosions".
The reason, as I have often stated openly to all here, that I truly enjoy this site far more then the others is the spirit of support, respect, and genuine friendship I see here every time I log on. All or some of those qualities are often trampled on or just absent on the other venues.I would be significantly saddened should we ever sink into that mudhole!
Having said that there will always be differences in opinion or conclusions drawn from the "record" and we can learn much from them. The issue is how we deal with them. IMHO healthy opposition is good as long as the three forementioned qualities are maintained in the process.
Thank you to every member of this truly unique little community for consistently making my day much better and teaching me so much about a hobby I enjoy tremendously; let's be real careful of losing that quality.
Cheers (and respectfully)
Lance
Hi Guys
Another issue I notice with this kit is that Roden have made a hash of the markings on N5493, Robert Little's mount. I can't see it on the decal sheet pics and it seems they have left out Little's nickname for N5493 , which was of course "Blymp", named after his nickname for his young son. Furthermore the red heart shown on the rudder were markings belonging to the next pilot who flew N5493 (name escapes me). Luckily the Pheon decal set has the correct markings for Little's N5493. I'm surprised this wasn't picked up by this normally knowledgeable reviewer.
Thanks Mr. Eddy,
Even after a year this thread has some life. Good corrections are always a welcome. Please don't be a stranger. Mr Eddy is a well known devotee to the genre. I kind of hope contributes some kit reviews here.
Glad I could be of some little assistance Mr. Lawson (is that a pun? Oops) I think you guys do a great job. Haven't been building much of late due to a few reasons so don't have much to say regarding reviews. I did buy my first Wingnut Wings kits recently and my jaw is still on the ground regarding their quality. Once I revisit my currently rusty modelling skills I'll give them a go. I have the Hansa Brandenburg W.29 and Roland D VI (Both favourite aircraft of mine)
model on!
Neil


Comments