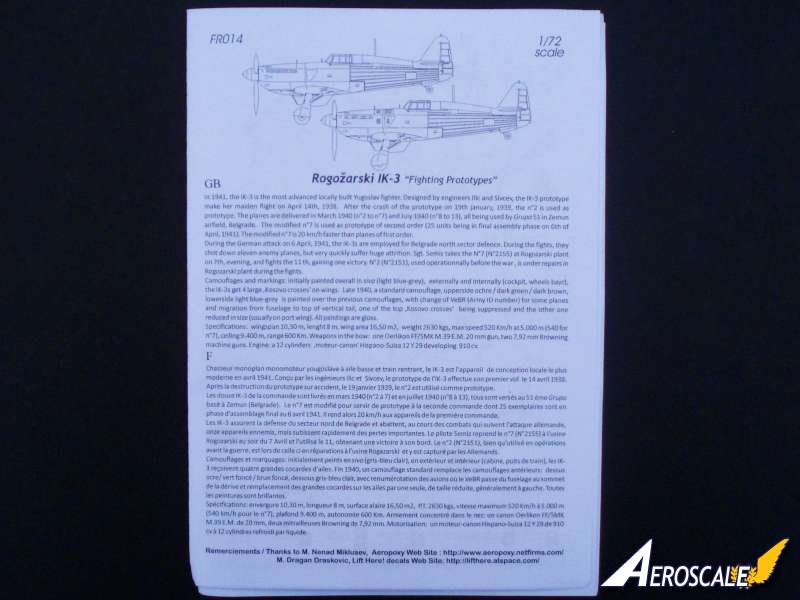
History
In 1936 the Yugoslav government knew that sooner or later they would be confronted by the expansionist ambitions of Italy. The Yugoslav government asked Serbian engineers Ljubomir Ilic, Kosta Sivcec and Zrnic to design a fighter of similar performance to that which existed in Western Europe and the United States. Sivcec had worked in France for Morane -Saulnier and had studied the design of their modern fighters , including working on the MS-406. Ilic had experience working at Fairey in the UK and had worked on the Fulmar. When they returned to Yugoslavia in late 1937 they believed that they had acquired enough experience and were confident of building a fighter at least equal to that of British and French aircraft. The design was for a single seat, low- wing monoplane. It was to be powered by a Hispano-Suiza inline 12Y, locally manufactured under license by Avia . The aircraft was to have a retractable undercarriage and a sliding canopy. Primary armament was the 20mm Oerlikon cannon firing through the propeller hub. The IK-3 was also to be armed with two Browning 7.92mm machine guns, mounted in the upper nose. The IK - 3 was built in wood, canvas and metal. The IK-3 prototype made her maiden flight on the 14th April, 1938, but crashed later that year killing the pilot, Captain Milan Pokorni. Test flights were then carried out using aircraft no 2. The performance was promising and the Yugoslav Government ordered 12 aircraft, all of which flew with Gruppo 51 based at Zemun, Belgrade. A further 25 modified IK-3's were ordered and airframe no 7 was used as the prototype for the modifications. Camouflage and markings for the early aircraft was light blue-grey, which was applied inside the cockpit and wheel wells. Four large Kosovo crosses were applied to the upper and lower wing. In late 1940 a standard camouflage of ochre/dark green/dark brown on the upper surfaces and light blue-grey on the lower surfaces was applied. The tricolour on the rudder was abandoned as were the two large crosses on the wing upper surfaces. Only one much smaller cross was applied on the starboard wing.
The Rogozarski IK- 3 was declared operational in January 1940 and was deployed along the borders between Italy and Yugoslavia and Austria -Yugoslavia. The small number of IK-3 intercepted and engaged aircraft from Germany and Italy that were probing the Yugoslav border. In April 1941, when the Third Reich decided to go on the offensive against Yugoslavia , it was up to the twelve IK -3 to provide aerial defence. Only two aircraft were lost on the Yugoslav side , while the IK -3 shot down eleven German planes : four Ju 87's, four Me 110's, two Ju 88's and a Me 109. When German troops entered Yugoslavia, pilots and ground crew destroyed the remaining fighters.
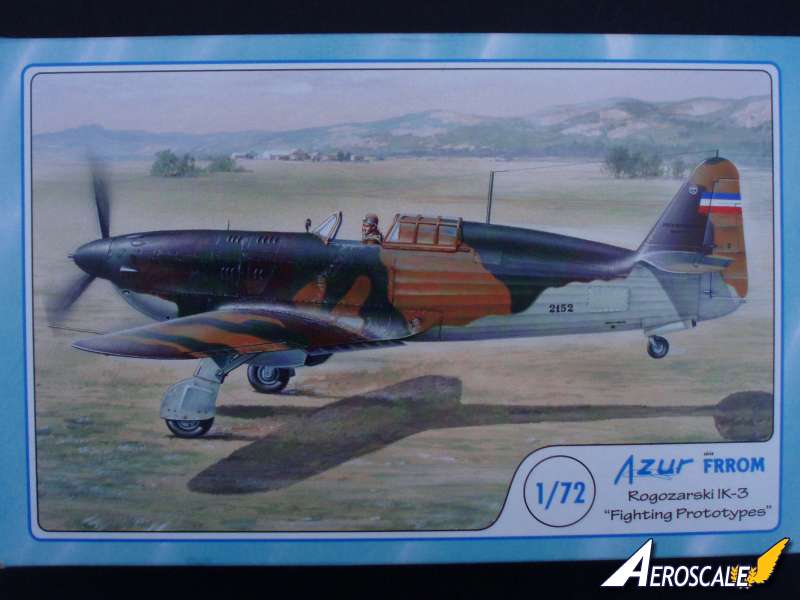
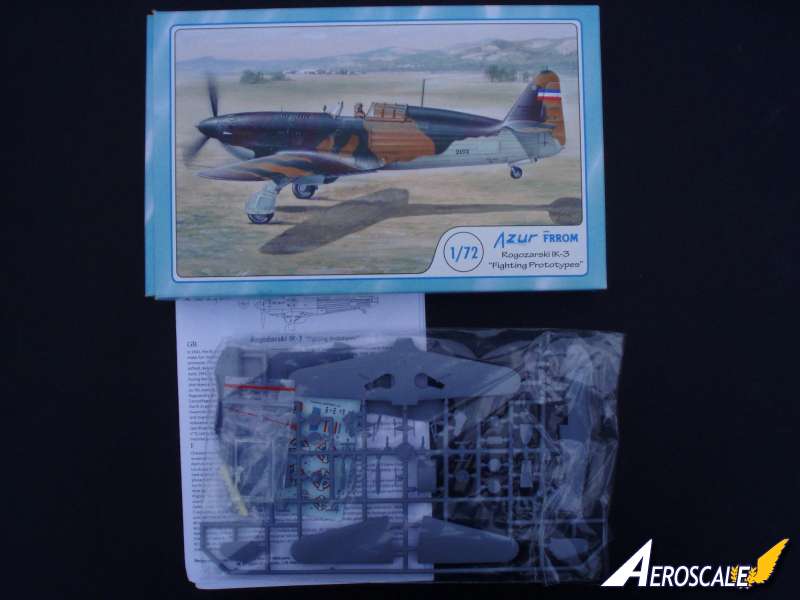
The Box.
Is side opening, I know many of you dislike this style of packaging. But to be fair this one survived a trans-Atlantic trip to the UK and then to France with no signs of damage or compression. There is a little information printed on the box including that the kit was designed in France and the tooling and moulding was done in the Czech Republic. The back of the box has four side views and two upper and lower plan views all in colour of the aircraft depicted, as a painting guide. A nice touch also is the mention of the three magazines that were used for reference:
Avions No's 149 and 150.
Air magazine No 50.
The Kit.
Well what is inside the box?
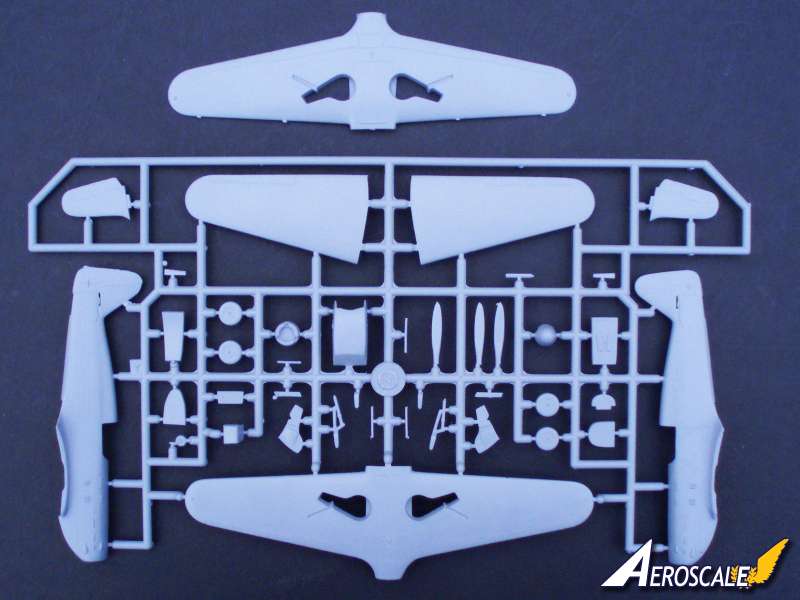
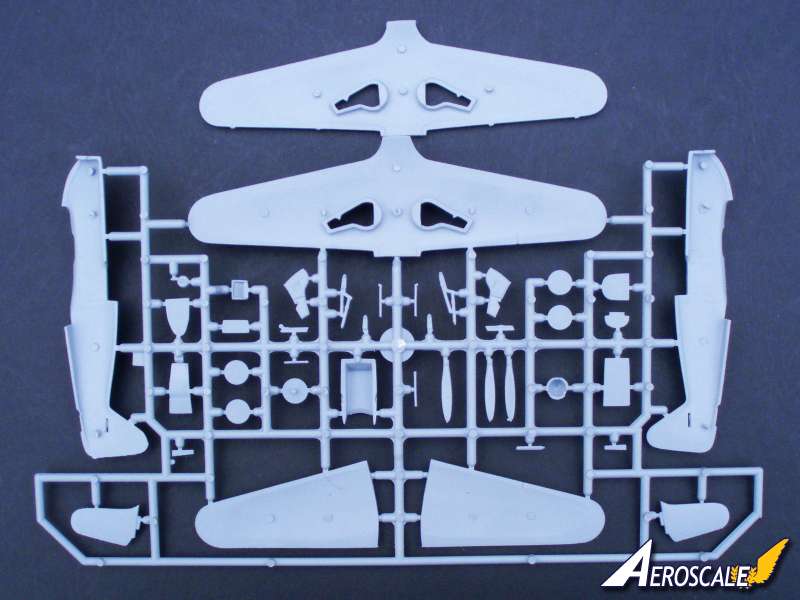
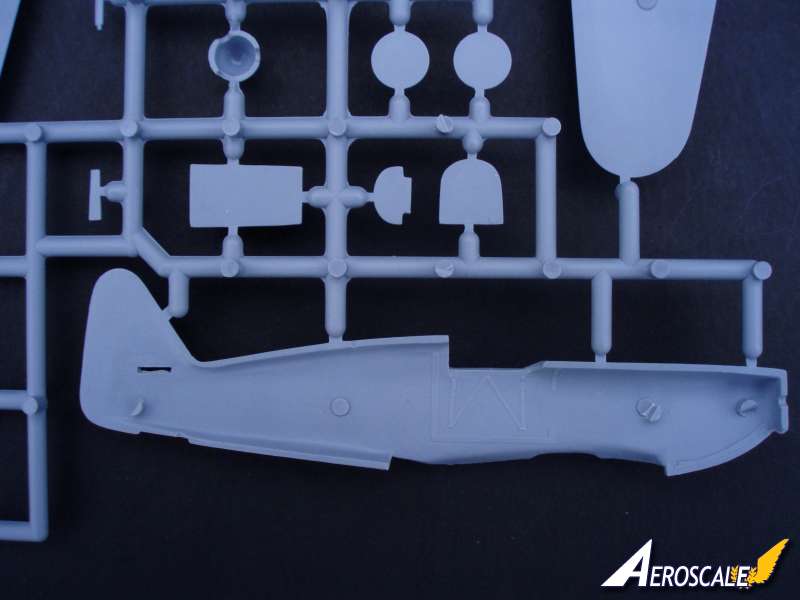
- There are two sprues of injected light grey plastic. Sprue A contains the 31 parts of the 33 injected plastic parts that make up this kit. Sprue B contains an alternative lower wing as used on the second series. The only difference from the original wing is the slightly redesigned centre wing to accommodate the slightly longer flaps and the slightly shorter undercarriage doors. Another difference, which is possibly a mould design error is that the depression in the starboard lower wing for the pitot tube is missing. I thought it might have been that the second series of aircraft were not fitted with a pitot tube in the wing, but the painting instructions beg to differ. The parts are attached to the sprues by thin plastic which should make separating the parts simple with a lessened risk of damaging the parts.
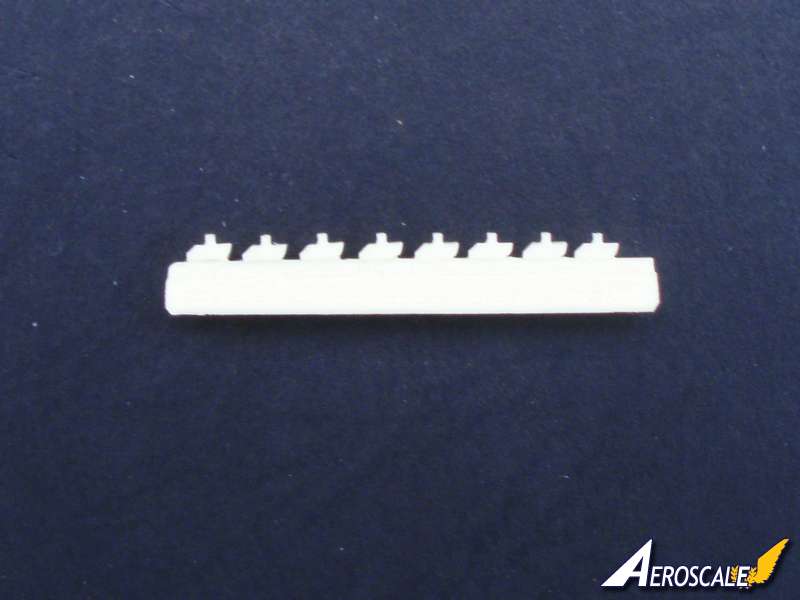
- Resin exhaust pipes in a small resealable bag.
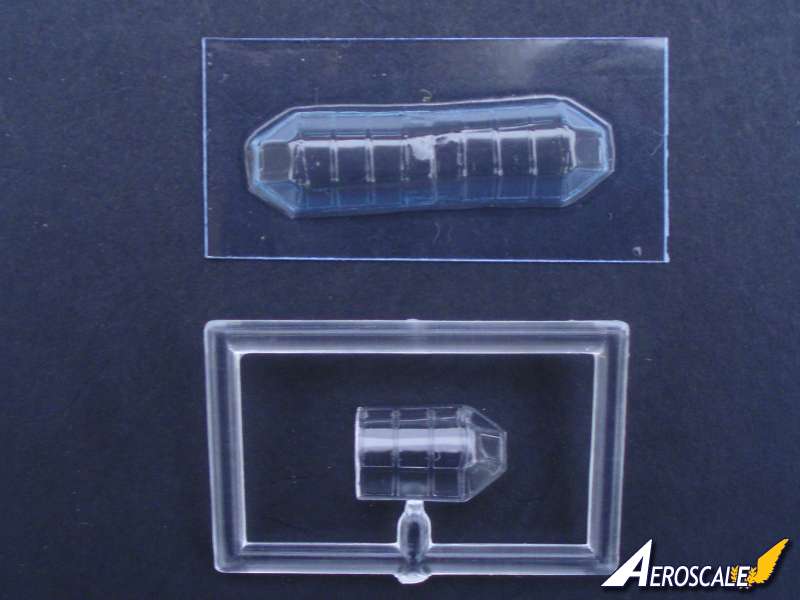
- Three, yes three canopies. You have the choice of using the nicely moulded injected canopy or the two vac formed canopies. The quality of them all is superb.
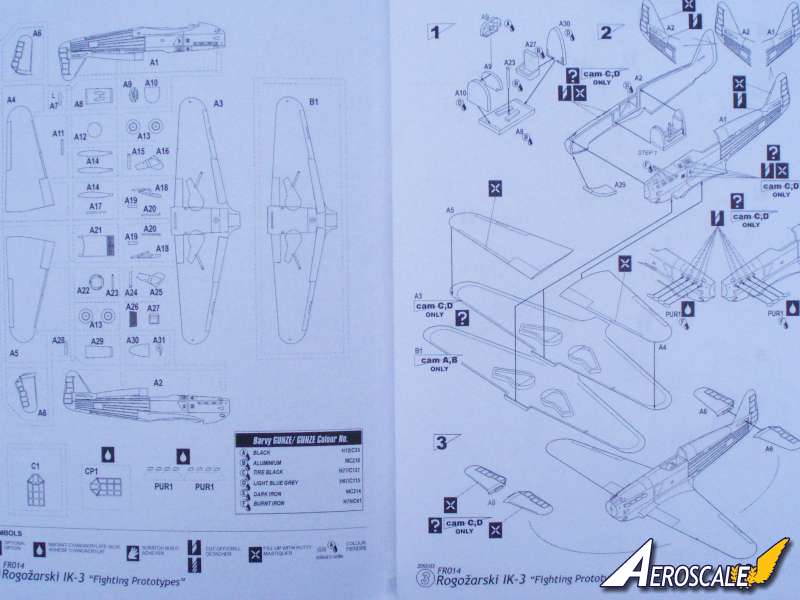
- Ten page black and white instruction sheet. Instructions come in the form of exploded diagrams with symbols and instructions in English.
- Small decal sheet including national insignia in three sizes, two types of fin and rudder flashes, serial numbers, some stencils including three for the propeller blades.
First impressions, what a tiny aircraft this was.
Starting.
It is very important that you decide which aircraft you want to depict as there are quite a few differences between the two series. For the latter series you need to:
- Remove the 8 grills just aft of the exhausts.
- Remove the exhaust pipes and replace with the resin ones.
- Remove the two slight bumps just fore of the tail planes.
- Remove the panel lines on the leading edge of the tail and tail planes
.
- As mentioned previously the lower wing surface is slightly different so you need to use the lower wing on sprue B.
- Shorten the undercarriage doors.
These modifications are pretty straightforward and should present no difficulties. Erasing the panel lines on the tail and tail planes may not even be necessary as the panel lines are so lightly moulded.
The Cockpit.
Comprises of six parts: floor, front and rear bulkhead, instrument panel, seat and control stick. The excellent instrument panel has low relief details for the instruments that have tiny representation of the screws that hold the instruments to the panel. The bucket of the seat needs some thinning down and there are no representation of seat straps. The floor has two foot boards, but no rudder pedals. There is some framework moulded onto the inside of the fuselage.
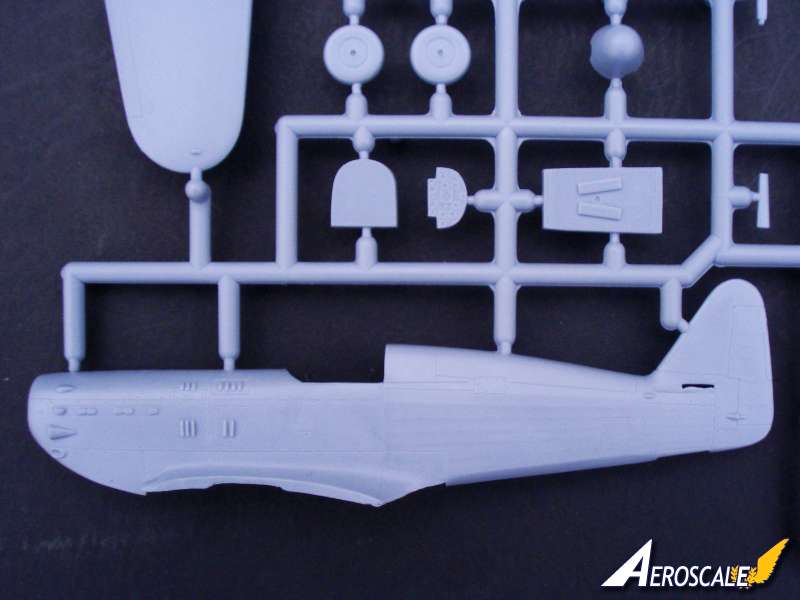
The Fuselage.
Incredibly fine panel lines and the representation of the fabric fuselage aft of the cockpit and rudder is beautifully restrained. The rivets are again very well done. There are a three intakes just below the exhausts that would benefit from drilling out. The exhaust for the first series of aircraft are moulded onto the fuselage. As with most limited run injected moulded kits there are no locating holes. The lower part of the nose comes as a separate part. There is a tiny amount of thin flash present on the rudder and the slots for the horizontal tail planes. The radiator under the fuselage, between the wings, is separate consisting of two parts: the fairing, including the closed rear vents and the separate radiator front with very fine grill detail. From photographs that I have seen of the aircraft, it would seem that the representation of the contours of the upper part of the fuselage between the cockpit and the leading edge of the tail , don't look quite right. I think it should be a little more defined [see photos from the references below]. I am a little wary of photographic evidence like this as it is always difficult to draw conclussions. I cannot see any representation of the two browning machine guns that were mounted in the upper nose. Strangely the gun positions are illustrated in the instruction, so it is possible to drill these out yourself.
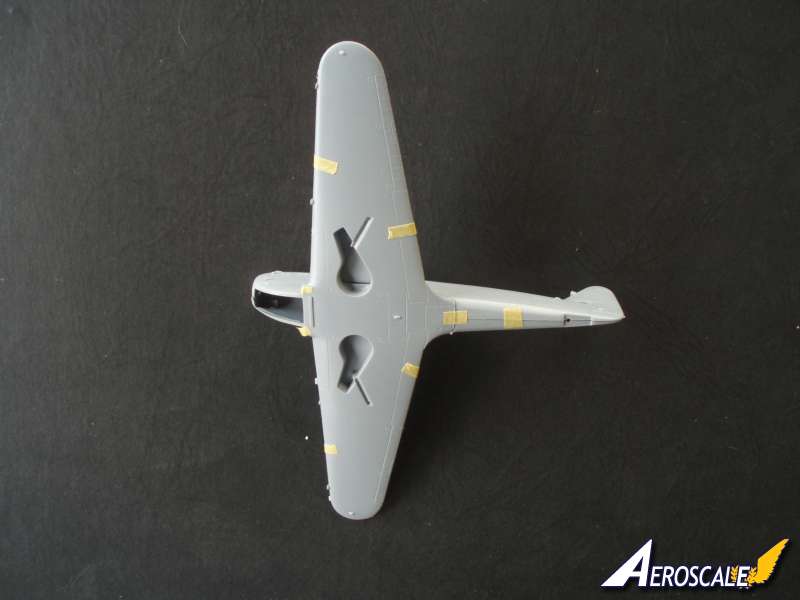
The Wings and Tail Planes.
Wing is made up of two part upper and a one piece lower wing. Again beautifully moulded with fine panel and rivet details. If anything the lines of the ailerons, flaps and elevators are possibly too fine and it might be an idea to emphasis them a bit more by scribing. There is a slight mould mark on the lower wing to aid the location of the radiator. The undercarriage bays have no detail, so consult your references if you want to detail these. The two tail planes are moulded in one piece.
Other Bits.
The three propeller blades are all separate and will need to be carefully constructed. The blades are glued to a back plate, but there is no jig for aligning them. The propeller spinner needs drilling and a tube should be glued in to represent the cannon. No tube is provided although the instructions have the dimensions of the tube you need to use. The spinner looks a little too blunt, but could be reworked simply enough. Undercarriage is also nicely done. The main gear is made up from 16 components. The main wheels come in two halves. The axle unlike many contemporary undercarriages is supported at both ends, and this part comes in two parts. There are a couple of holes that need drilling out for the undercarriage supports. Tail wheel was retractable and is moulded in one piece and looks good. The two doors are tiny.
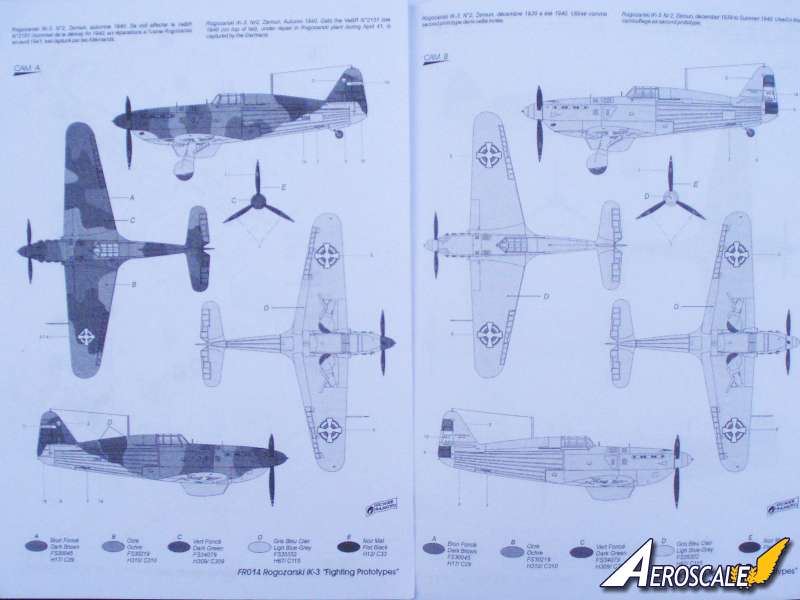
Markings.
Two aircraft are depicted in two different schemes:
Scheme A IK-3 no 2 VeBR 2151, late 1940, captured by Germans. Dark brown / ochre / dark green upper surfaces and light blue grey under surfaces.
Scheme B IK-3 no 2 VeBR 2151, December 1939 to Summer 1940. Used as the second prototype after the crash of the first prototype. Painted overall light blue grey.
Scheme C Ik-3 no 7 VeBR 2155, 7-12 April 1941. Aircraft of Sgt M Semiz, which was used as the prototype for the second series of aircraft. This aircraft was destroyed on the ground by it's crew. Dark brown / ochre / dark green upper surfaces and light blue grey under surfaces.
Scheme D Ik-3 no 7 VeBR 2155 April to summer 1940 based at Zemun airfield, Belgrade. Painted overall light blue grey.
Colour references are for Gunze Sangyo, but Azur have provided FS paint references.
Decals.
A small sheet containing four large Yugoslavian ensignia for the blue grey aircraft and smaller insignia for the camouflage aircraft. There are two different tail flashes and VeBR numbers are provided. The numbers [2157 and 2152] don't seem to agree with the Aircraft numbers in the painting instructions. There are a few stencils to apply including the makers labels for the propeller.Decals look well printed with minimal carrier film. Colour is fairly restrained with good registration. Decals are produced by Aviprint from the Czech Republic.
Conclusions.
This looks like a cracking kit, with some reservations. This kit I believe is based on the aircraft displayed in the Museum of Belgrade. The kit is delicately detailed and a tribute to some very skilled mould making. This would be a great introduction to the world of limited run kits for anyone wanting to move away from the shake and bake kits. I have to admit to knowing very little of this aircraft, particularly the brave actions of the pilots against the Luftwaffe. With a tiny bit of additional work this will be an excellent addition to any WWII fighter line.


Comments