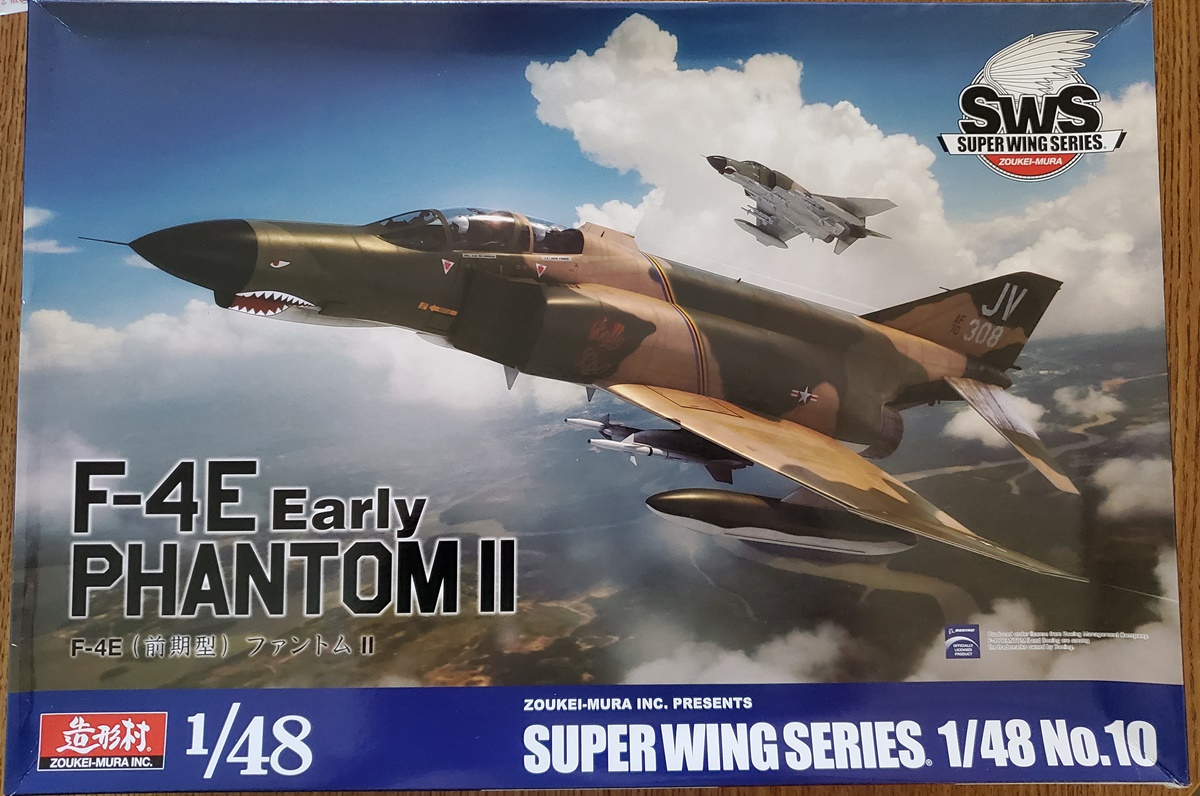
Ah, the F-4 Phantom II. If I were to start on a history for this one, there wouldnt be any room for the actual review. Suffice it to say that to date, more F-4s were built than any other Western jet aircraft after the F-86, and Phantoms are still flying in military service around the world, 60 years after it entered service with the U.S. Navy. If you want to know more, theres plenty out there. You can start with Wikipedia and go as far as you want to.
The F-4 in 1/48 scale
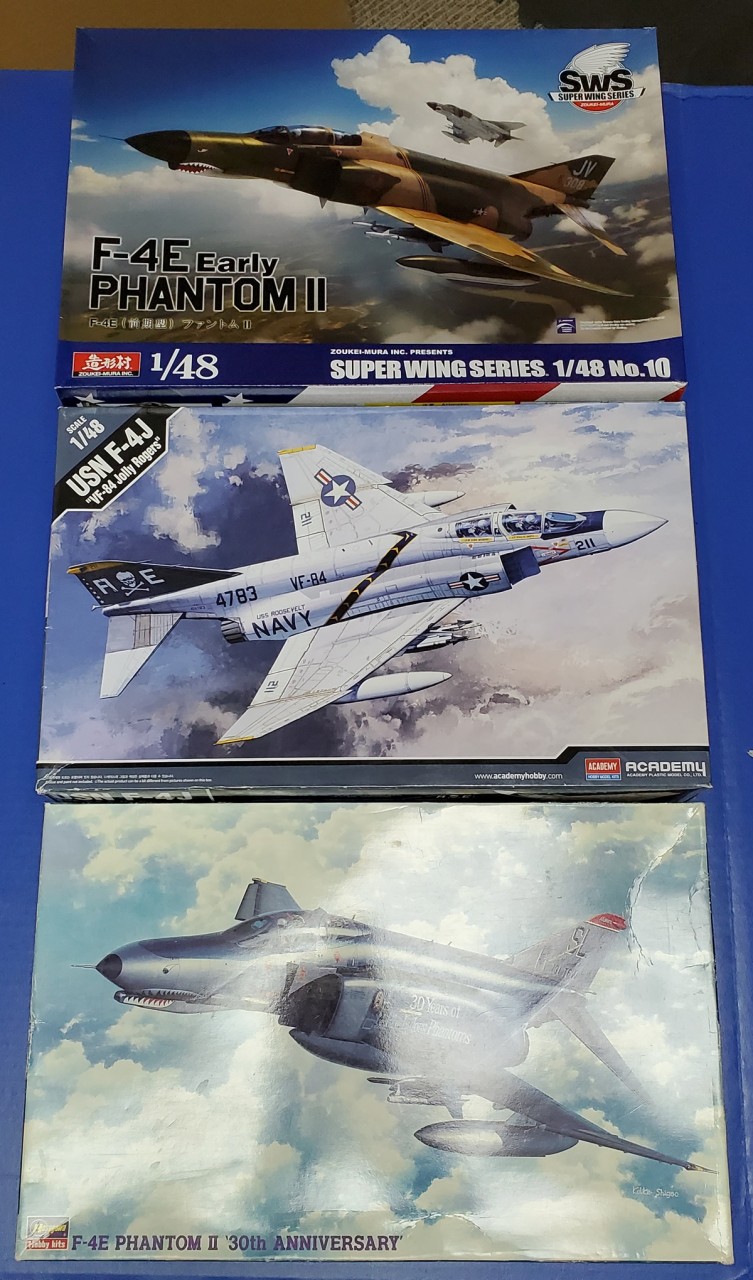
The Phantom has been a favorite of modelers pretty much since the aircraft itself was introduced into service. In 1/48 scale, the aircraft has been released by nearly every mainstream manufacturer since Aurora put one on the market in 1961. Quality has, of course, been all over the map, but there have been some very fine kits. In 1982, Hasegawa entered the market with a Navy F-4J which kicked off their Phantom Family. Over the years, the line has expanded to include pretty much every version of the mighty Phantom. Initially they all had raised panel lines, but over time recessed lines were introduced (though many versions remain raised.) Later releases included some kits with photo-etch and white metal details, etc. Hasegawa F-4s were the kings of the Phantom hill for many years and a number of them are still available. Then in 2012 Academy introduced a new-tooled F-4B with state-of-the-art panel line engraving, open intakes with forced perspective intake trunking, and generally better detail than the Hasegawa kits. Since they, theyve expanded their line to include the F-4C, F-4D, F-4J and F-4N. I reviewed the F-4J and did some comparisons to the Hasegawa kit back in 2015 here on AeroScale. Very nice kits indeed and definitely a step up from the previous industry leaders.
Enter Zoukei-Mura. In 2016 this relative newcomer to the world of plastic scale models released their 1/48 F-4J and it was a beauty! Excellent details, surface scribing and flush rivets (rather cleaner and sharper than Academy IMHO), full length intakes, etc. Since then theyve expanded their line to include the F-4C, D, and S as well as a couple of other boxings of the J. All of them have been excellent kits, if a bit pricy (though not much, if any, more than the Academy kits). One thing that has been pointed to by Phantom experts is some mis-shapes on the aft fuselage around the engines, an issue which all of these Z-M short nose F-4s seem to share.
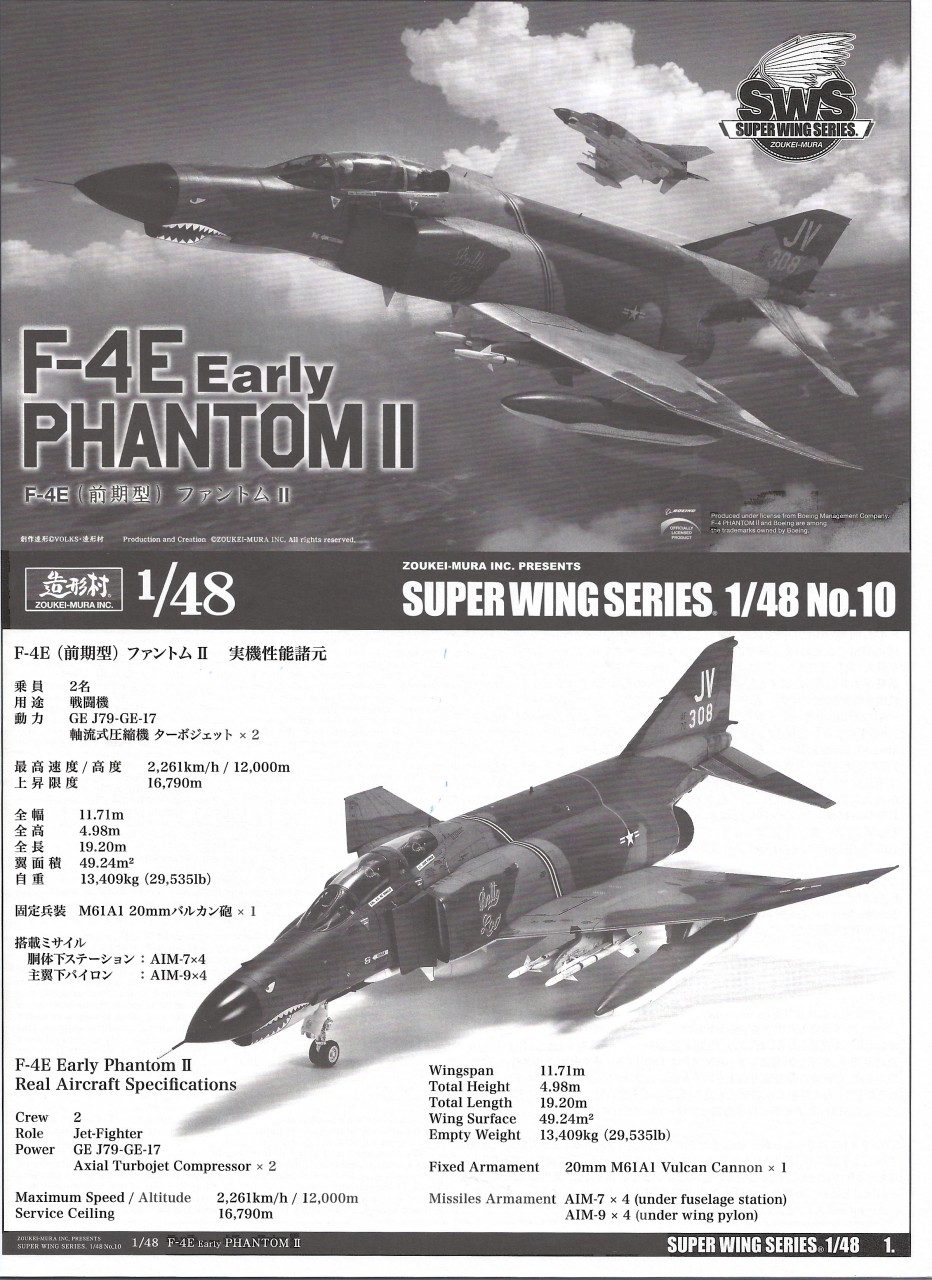
One version that has not seen a new tool since Hasegawa, however, was the most produced variant of them all, the long nose F-4E. This was the first Phantom with a designed-in gun and was the main version for the U.S. Air Force as well as a large number of foreign users. Hasegawas wasnt bad, it had first rate engraved panel lines and good detail when it was released in 1983, but the intakes were plugged and not much has been added since it was first brought out. Zoukei-Mura has now stepped up the plate with the first of an announced series of kits based on the E. This first release is an early E, with the original gun muzzle cover (though as well see, the later one is in this kit as well), and un-slatted wings with no TISEO. Z-M has said they will be doing a late E as well as the EJ, F, and G down the road. But the early E is here now, so lets have a look at it!
Zoukei Muras F-4E early
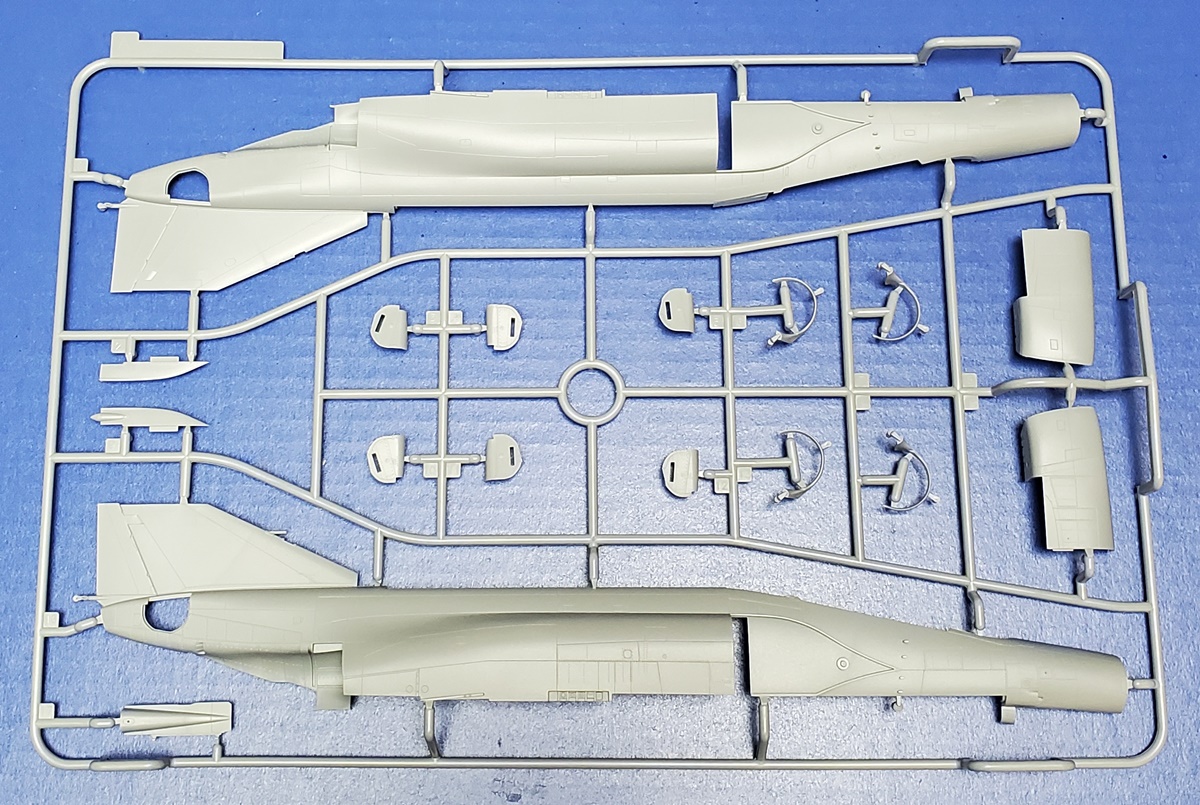
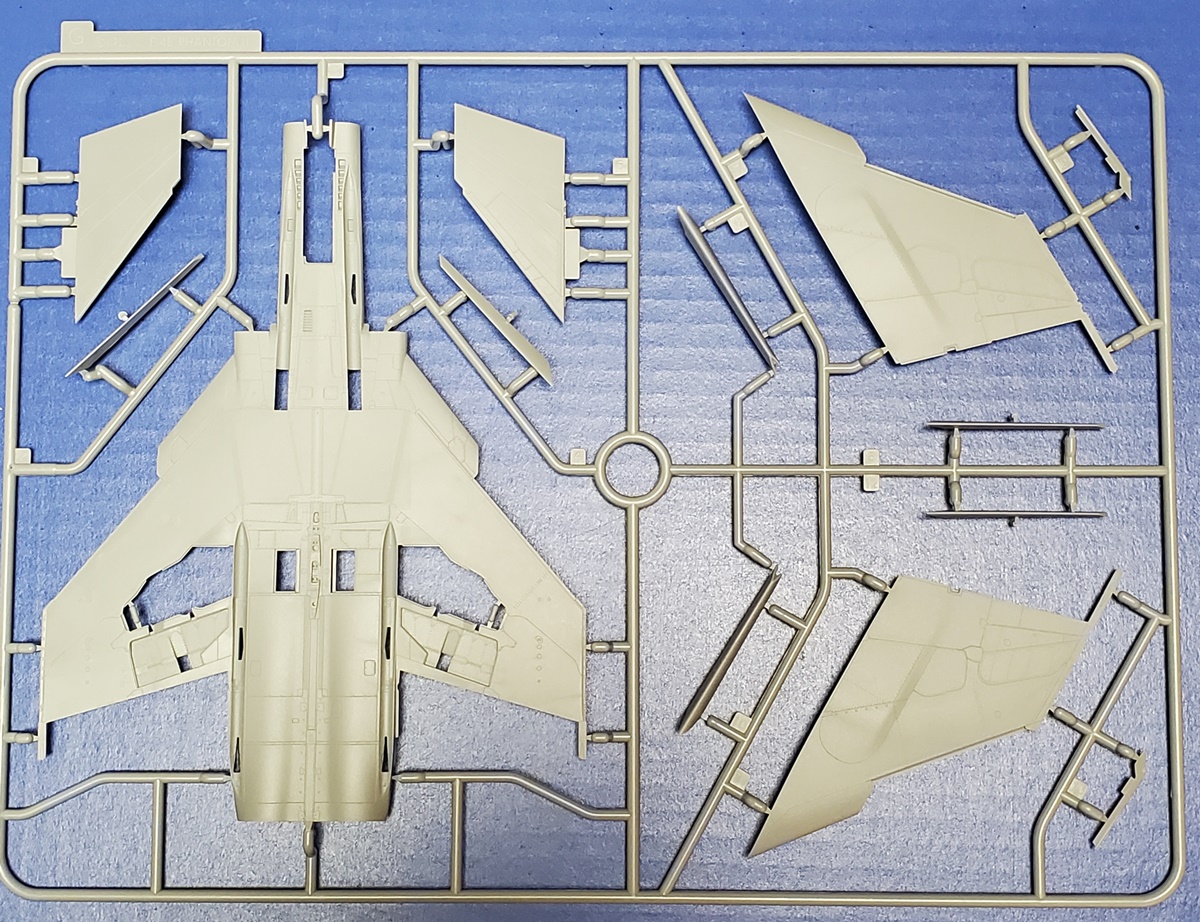
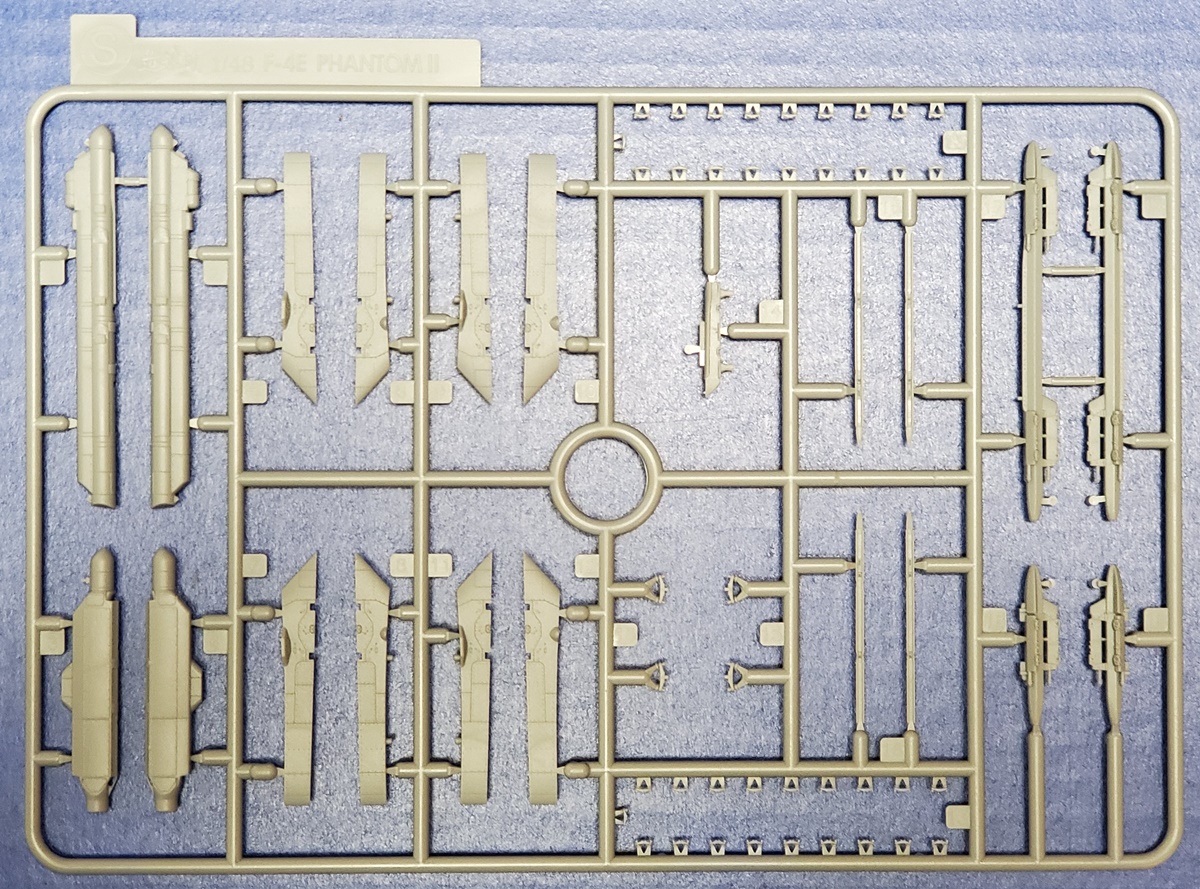
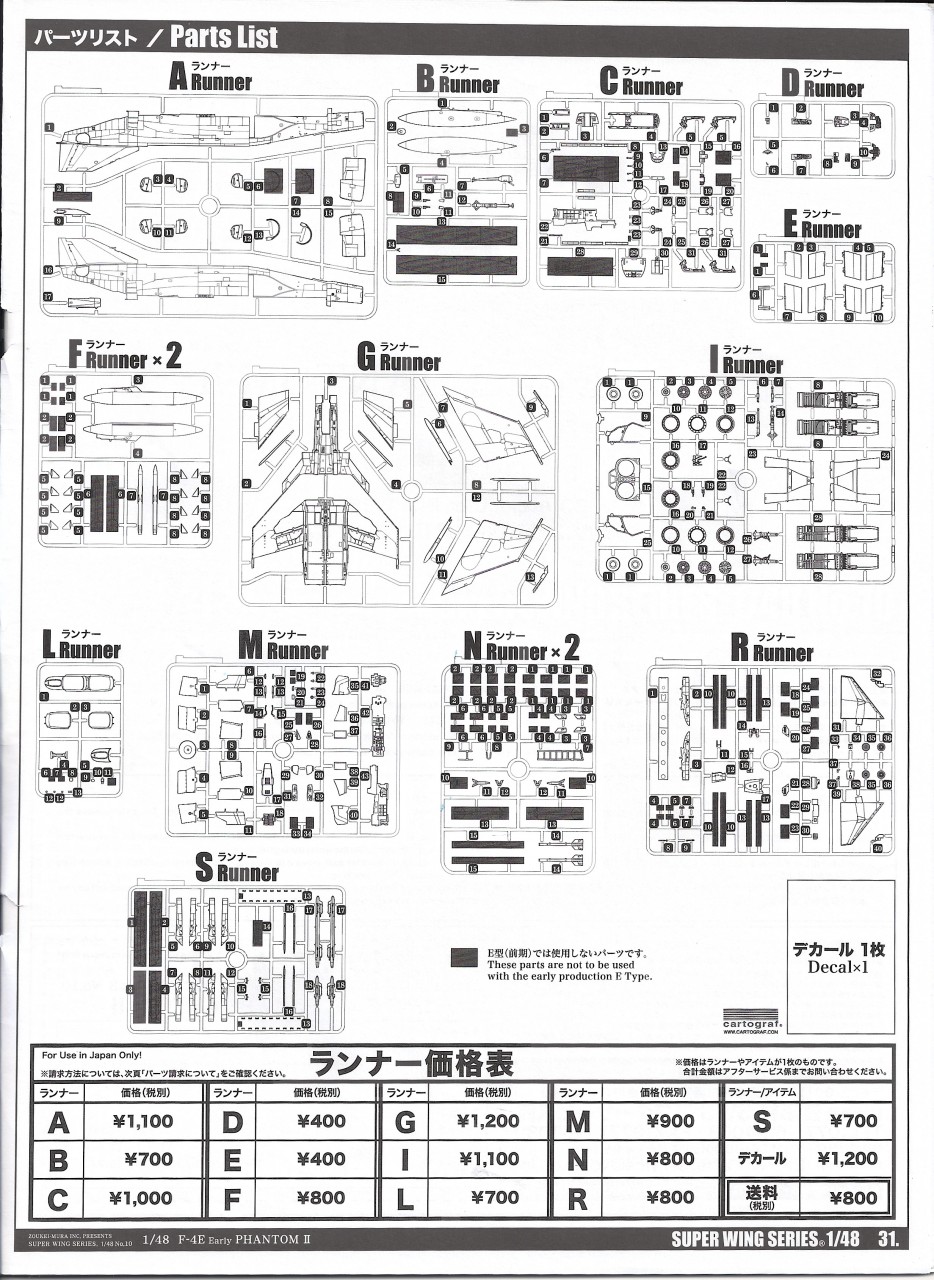
Sprue A
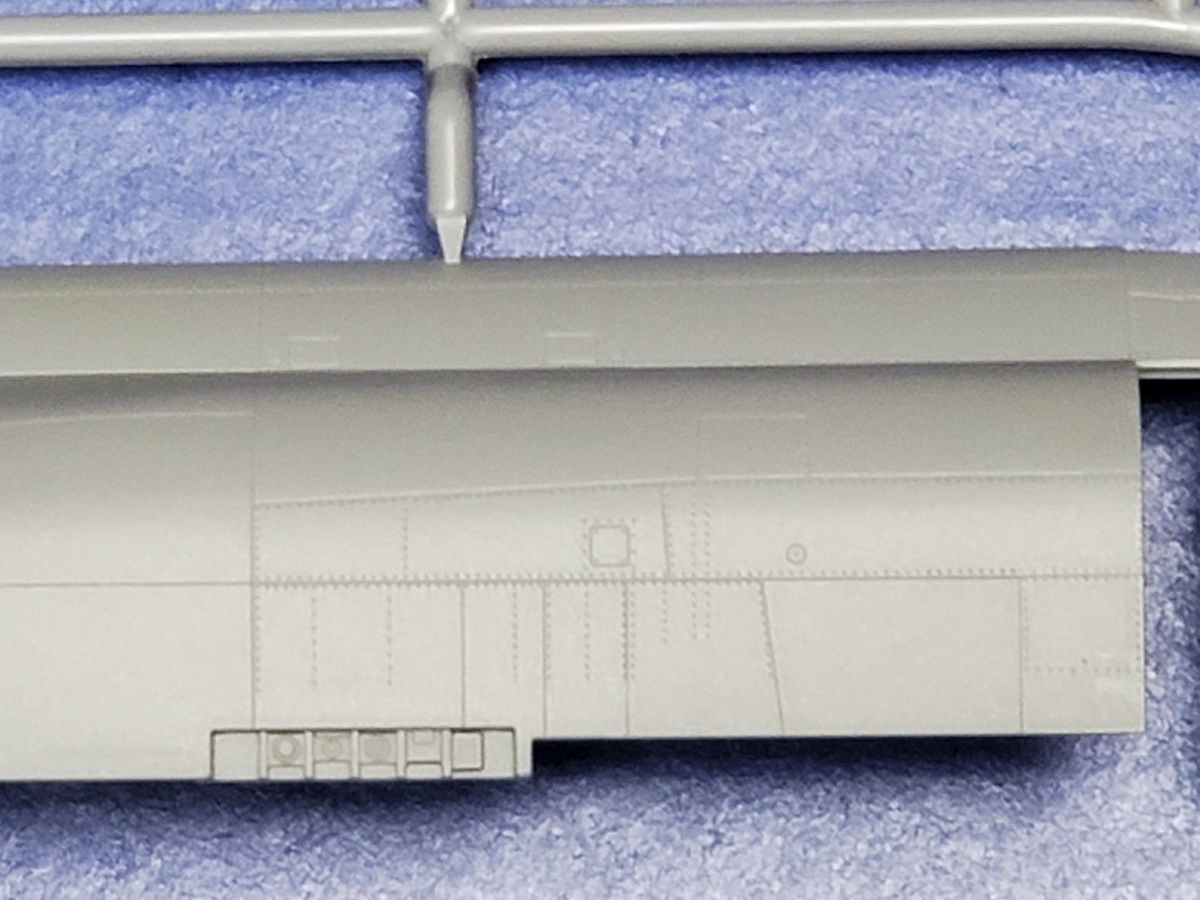
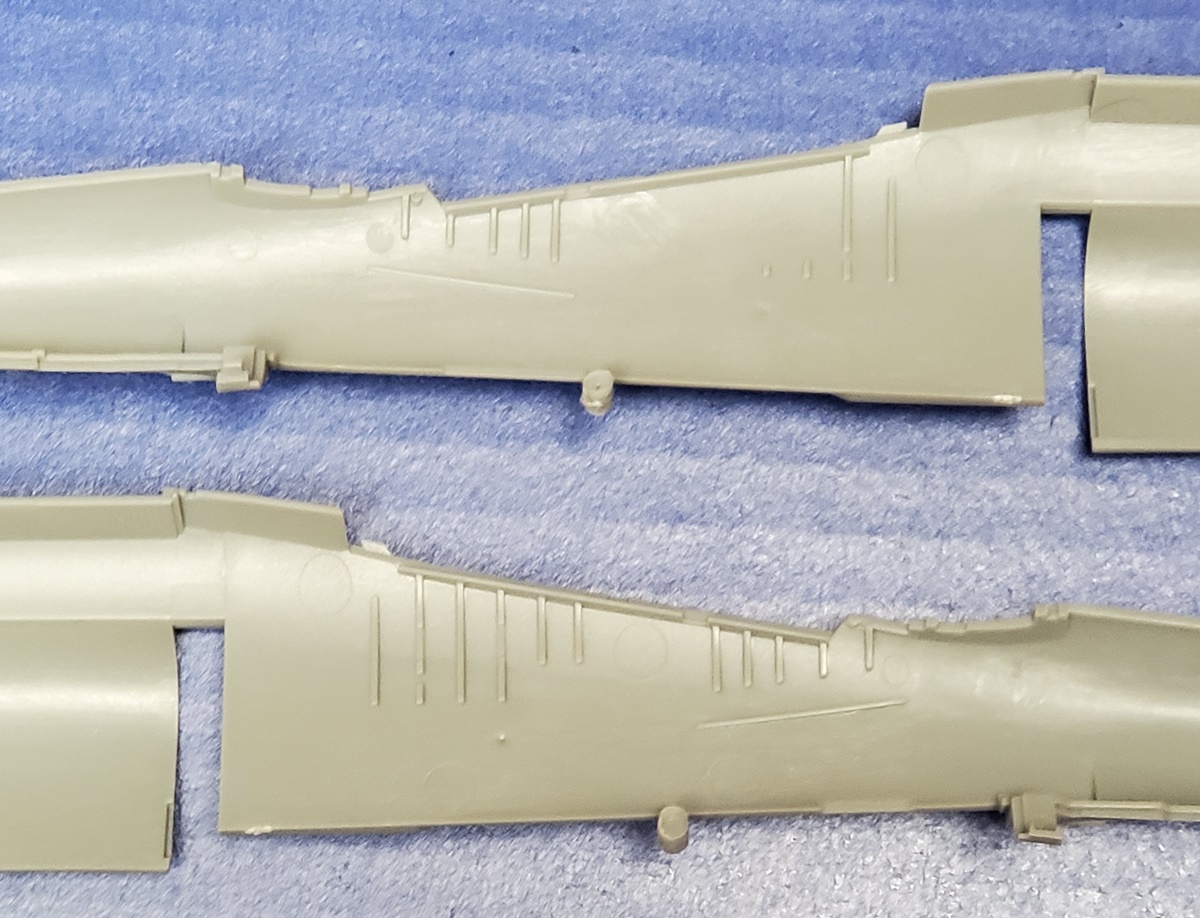
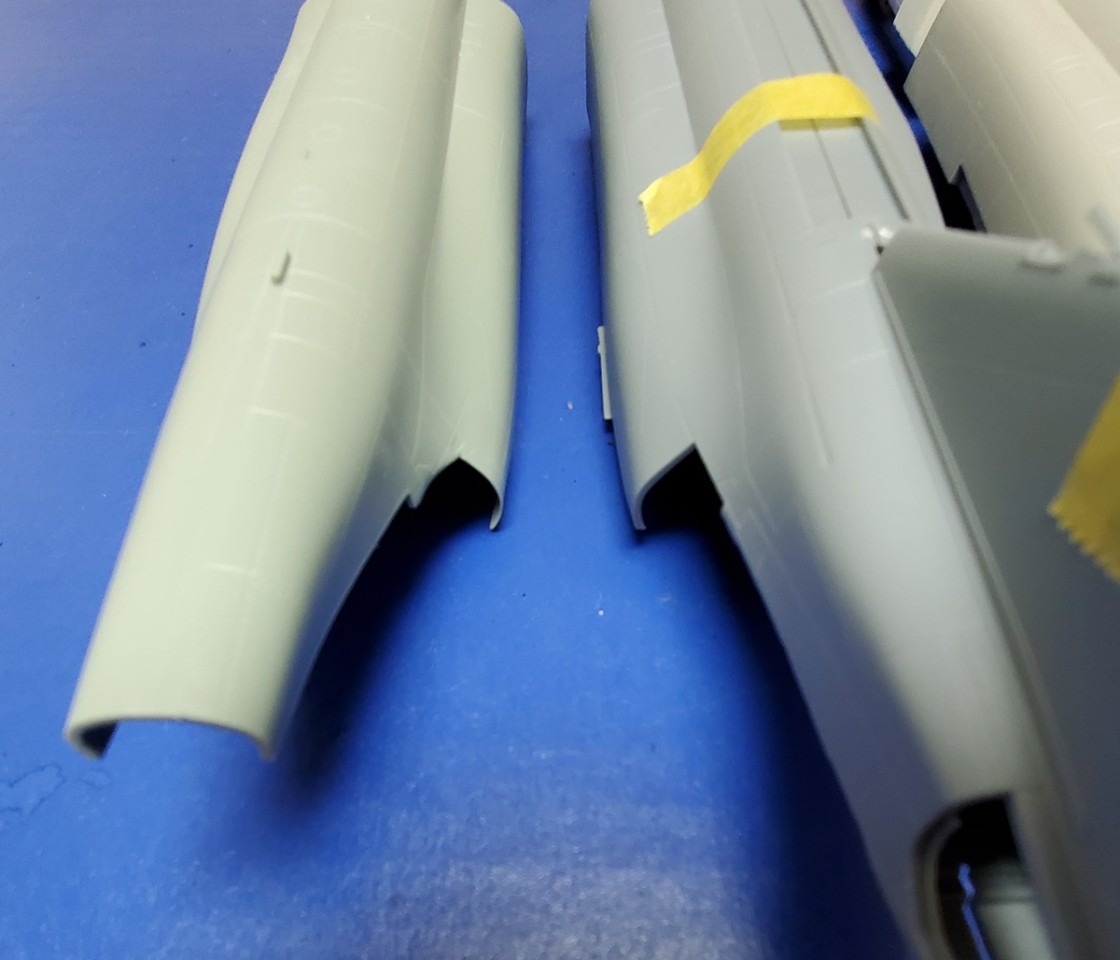
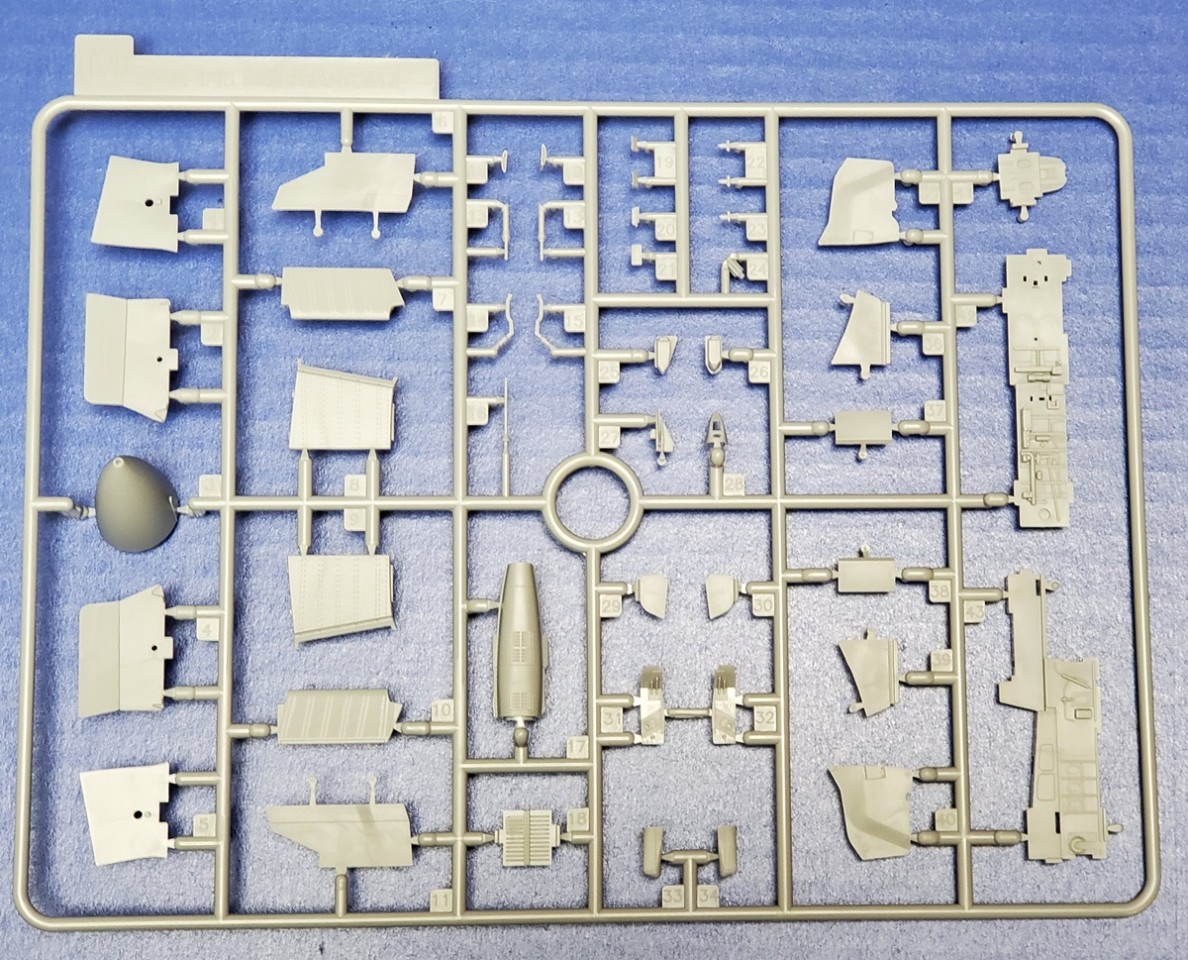
Sprue A is the main fuselage sprue. It has the fuselage halves, left and right, as well as intake and tail parts. Looking at the fuselage parts, you may notice a big chunk missing along the spine. This is because Z-M has engineered this area with a long insert along the spine. This not only allows them to provide different parts for the Navy and Air Force versions (since each uses different kinds of in-flight refueling systems) but also ensures no seam across the top of the fuselage where there are a lot of scribed in details. Also on this sprue are two styles of vertical fin top, one with an RHAW antenna and one without. Handy for those who plan to make an aircraft without that feature.
Surface detail is composed of fine scribed lines and recessed rivets where appropriate and is very well done indeed. Some framing is molded into the cockpit sides so they arent bare above the detail that will be added when we get there. There is also a small part of the main wheel well sidewall molded as part of the fuselage.
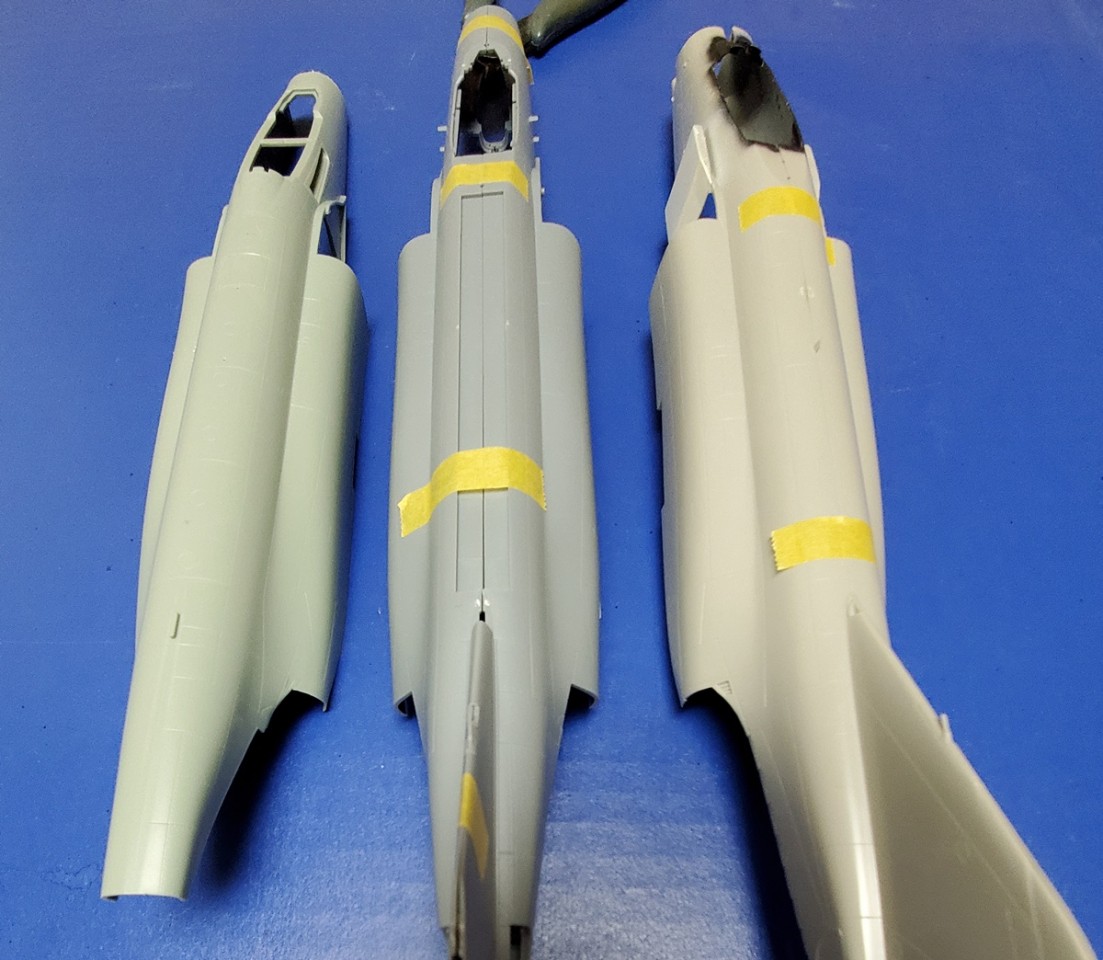
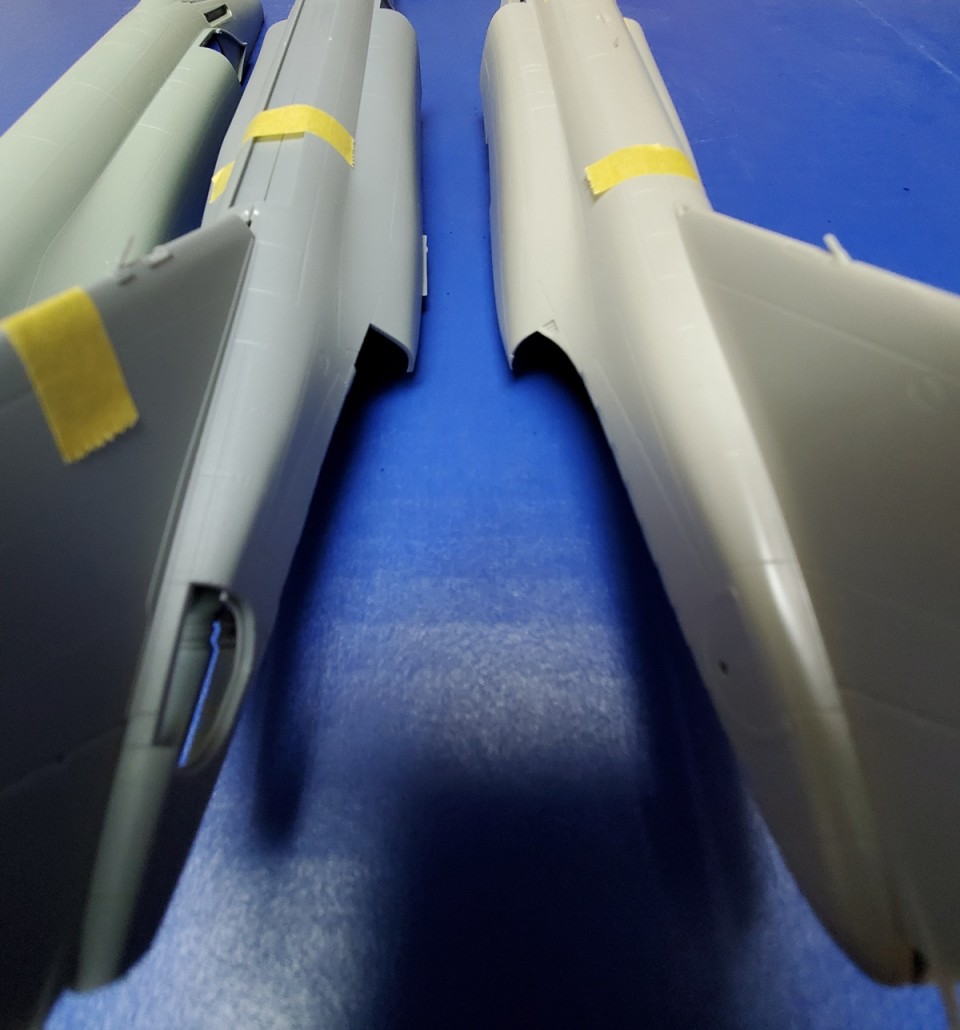
Here is where we see the shape issue that has bothered others on the net about the Zoukei-Mura Phantoms. I dont have any of the earlier Zoukei-Mura Phantoms, but Ive included pictures comparing this rear area with the Hasegawa E and Academy J. This is hard to capture, but as I look at them, they all look pretty much the same to me. The word on the street was that, since Zoukei-Mura needed a new fuselage for the E, theyd take the chance to fix the problem. Looks to me like they have.
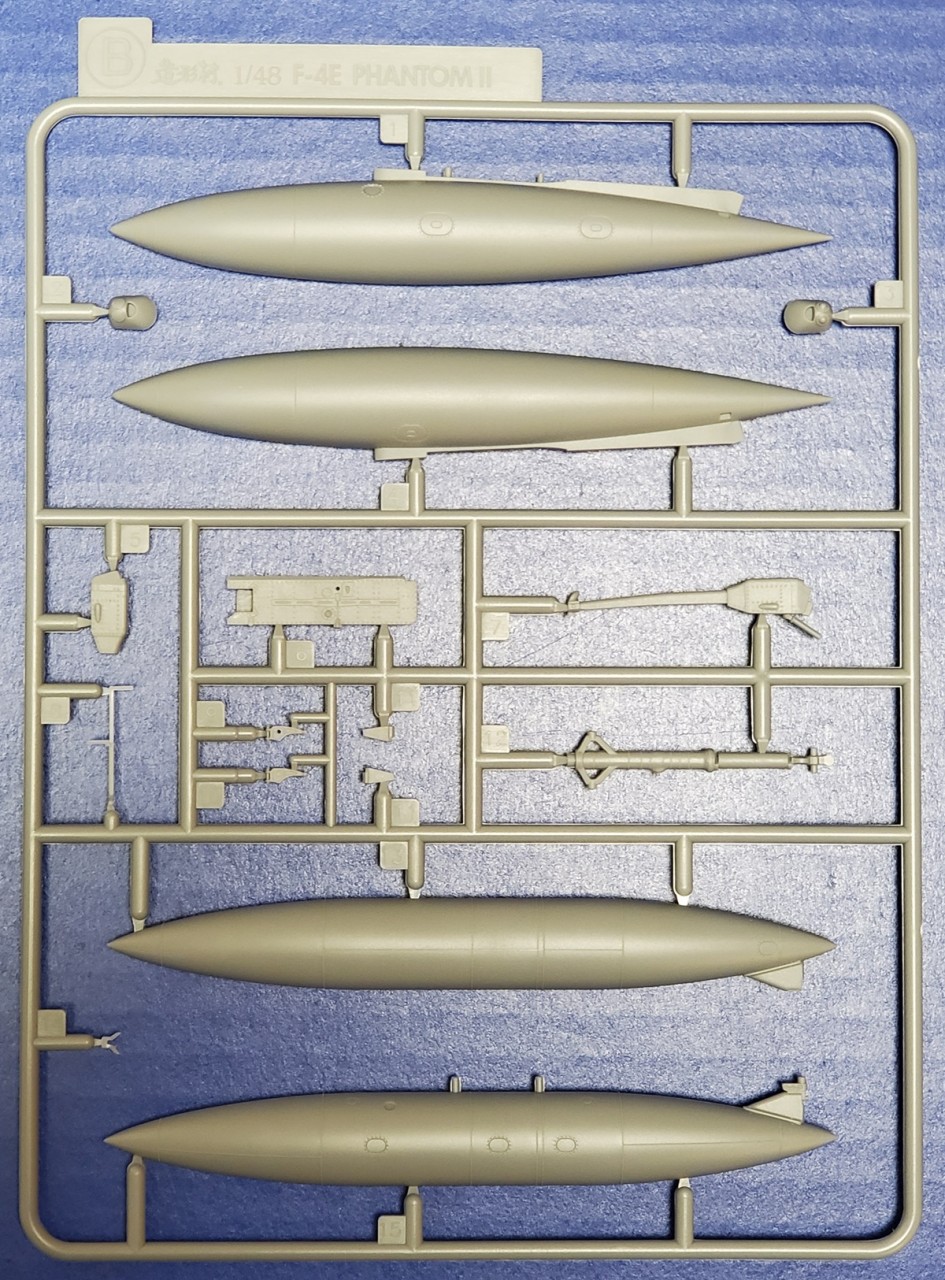
Sprue B
This is a fairly small sprue that contains the centerline fuel tank halves, arrestor hook parts, part of a gear door, and an optional, extended nose gear strut. I dont know that Ive ever seen a land-based Phantom with an extended nose gear, something that was frequently used on carrier take offs to get more upward thrust and lift under the wings, but that doesnt mean it never happened. Kudos to Z-M for giving us the option. For those who are looking, theres another center line tank here that in the instructions is marked not for use. I do believe that is the F-15 style tank that was used by later Air Force Phantoms, an indication of things to come.
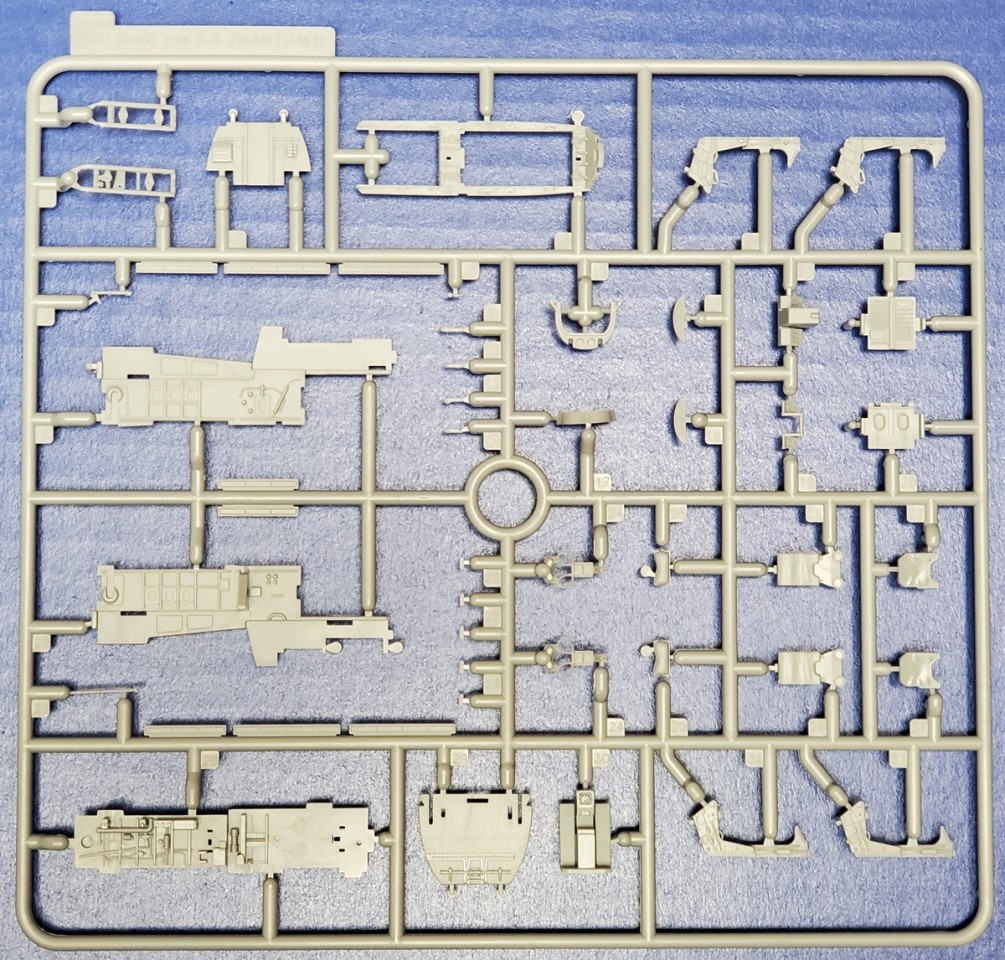
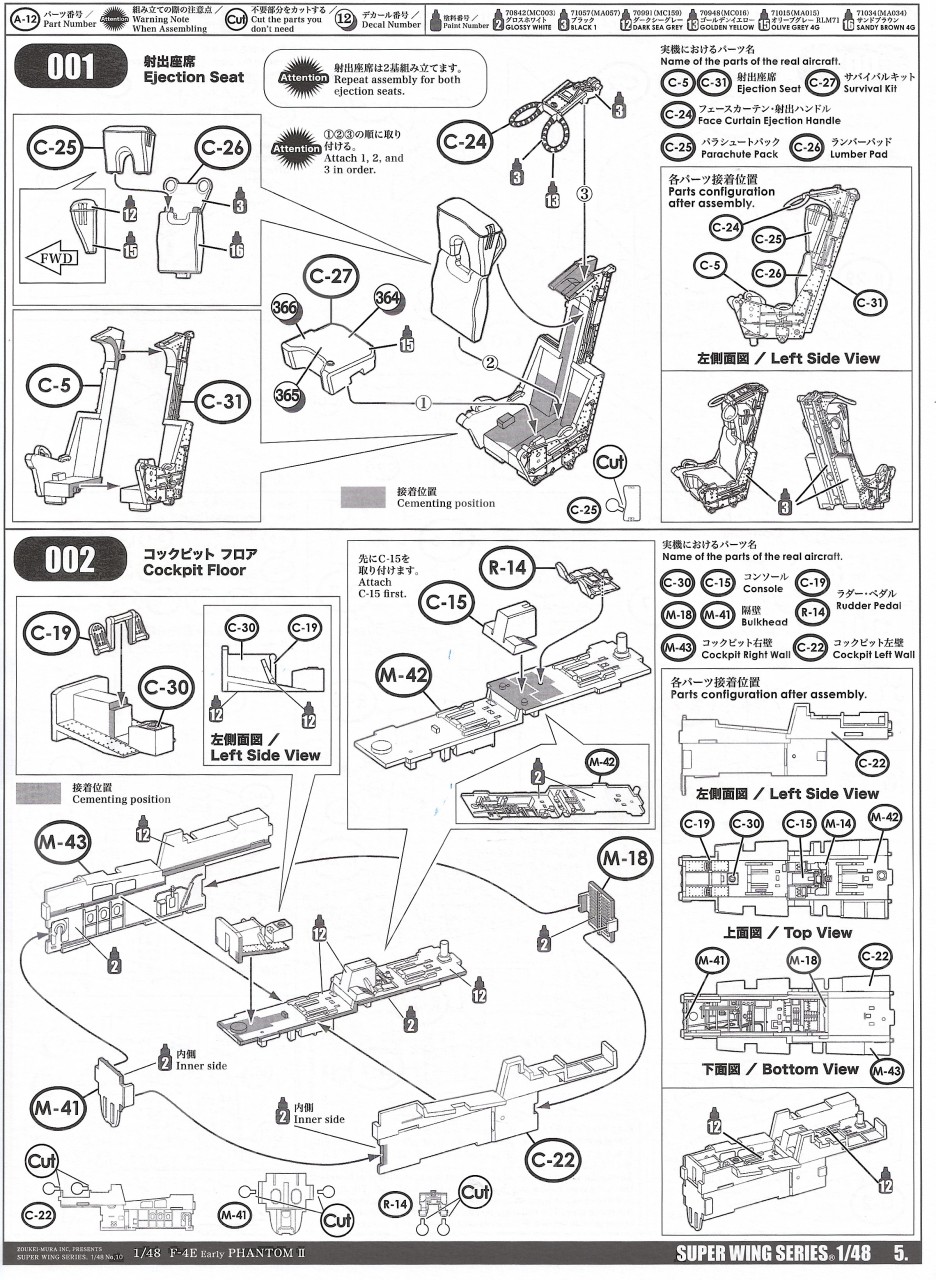
Sprue C
Here we have a number of cockpit parts, including sidewalls and floor/nose gear roof, and the seats. One of the sidewall parts and the floor/roof are marked not for use. A look at Zoukei-Muras instructions for the J that I found online show that they were used there, as were the blacked out front and rear nose well walls. Looks like someone was paying attention. Also included here is an innovative part, the cockpit sill. This goes on when you build the cockpit and should help you align it when its trapped between the fuselage halves. This probably needs to be done very carefully to make sure everything lines up later, and Zoukei-Mura indicates that you dry fit carefully when this goes on. Im sure Ill figure out some way to screw it up. Sigh.
The seats are made up of seven parts each and are actually quite nice except for the common failing, no belts or harnesses. The kit does not include any photo-etch or even decal options for these so once again its up to us to source alternatives if thats important to us. Speaking for myself, seat belts are a bit of an OCD issue for me, my models just have to have them. Once upon a time I built a Hasegawa F-16 without belts and its been sitting on my shelf for 15 years or more giving me the evil eye. I just cant do it. So, for this build, I grabbed a pair of Wolfpack MB Mk.7s. Nice looking seats that should fit fine. However, heres a tip for those who go that route. The kit seats, of course, are hollow on the bottom and they fit into some ridges and bumps on the cockpit floor (part M-42). Those have to go if youre using a resin seat. Happily, as the part is flat, theyre pretty easy to get rid of. But do it now, because theyll be a right pain to delete once the cockpit is built up. Ill try to remember to mention this when I get to sprue M as well.
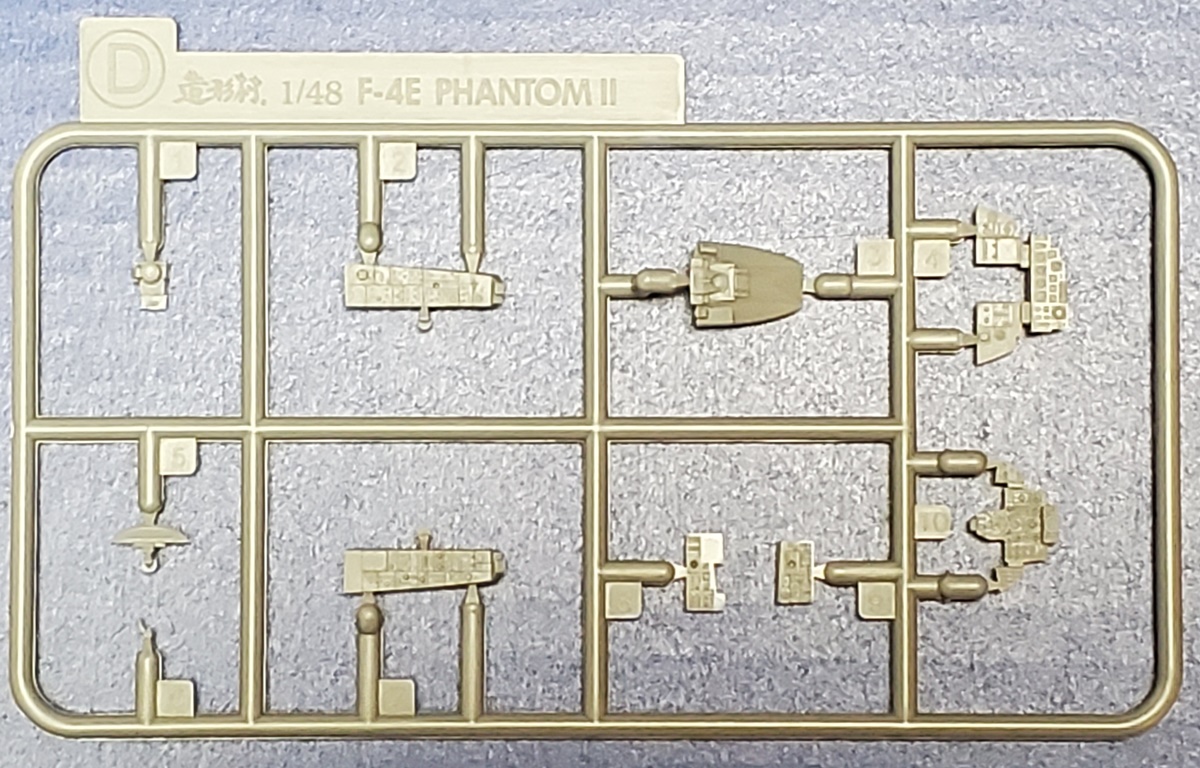
Sprue D
A small one with type specific instrument and side console panels. Very nice detail here that should come up well with some appropriate dry brushing. If thats not your thing, decals are provided. Ive read some comments that arent particularly complementary of those decals, but they look pretty nice to me and Ill probably use them (given my less than stellar panel painting skills). Again, the option is there to go either way, which is nice.
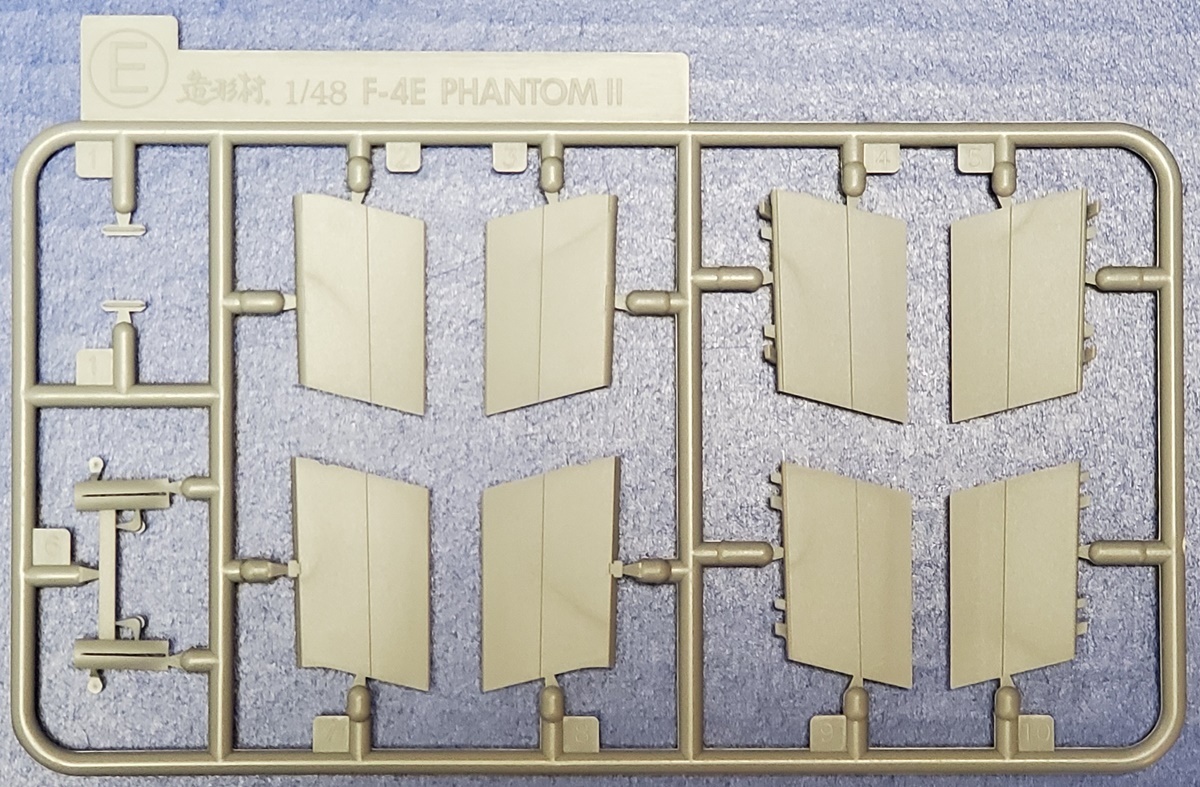
Sprue E
Another small sprue with parts for the trailing edge flaps, which can be fitted up or down, and ailerons, which can be fixed in different positions as well as illustrated in the instructions (including the range of appropriate angles.) Theres also a piece here used to block off the forward Sparrow missile bays if you dont plan to mount the missiles. I do, but nice of them to provide the option.
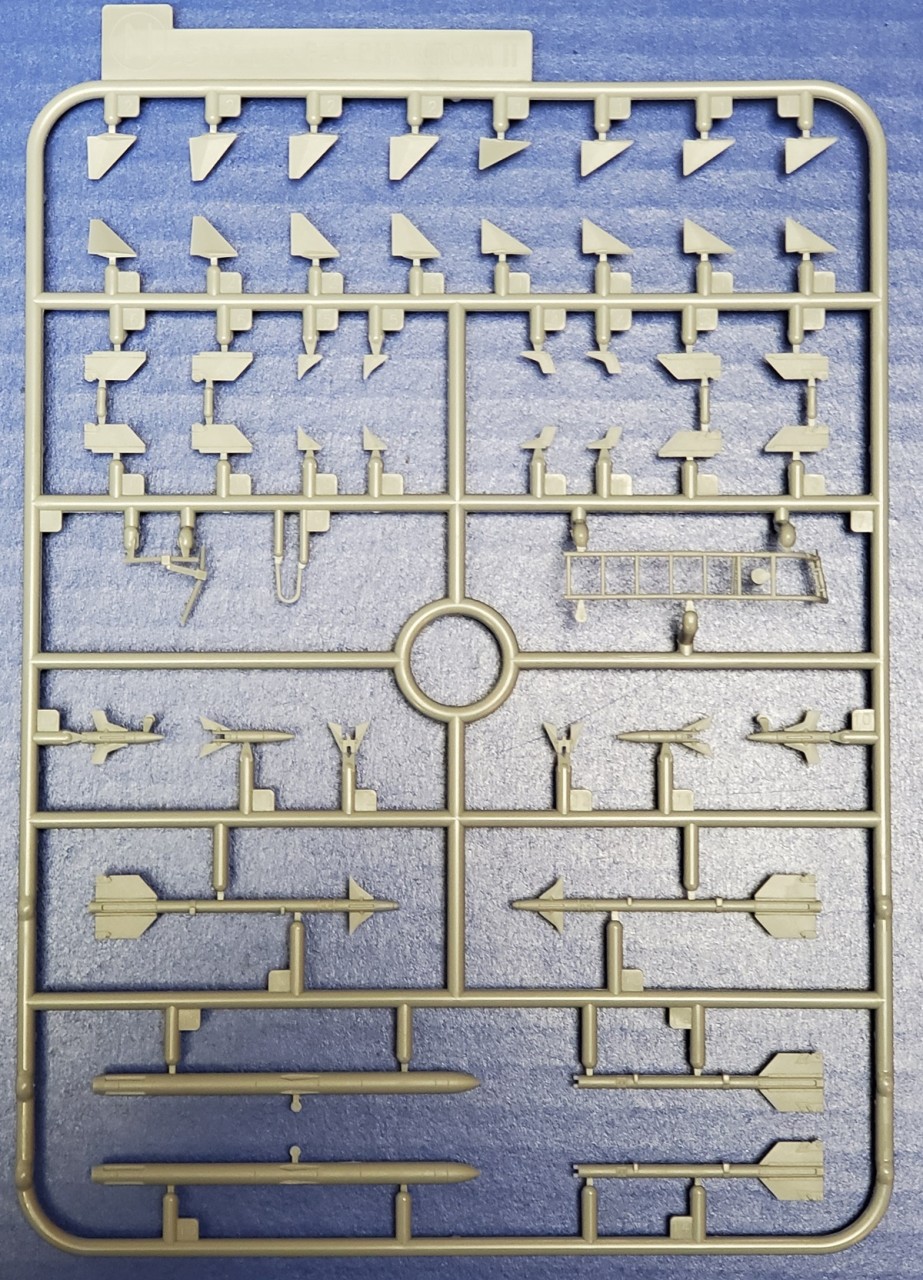
Sprue F
There are two of Sprue F and they contain wing tanks and parts for the AIM-7 Sparrows and AIM-9 Sidewinders. This is a common sprue for pretty much all of Z-Ms Phantoms so far and, as such, has parts for different versions of these missiles. A lot of this sprue is not for use on the E kit, and sprue M will have the necessary parts for the versions used here. The decal placement sheet states that the ones to use here are the AIM-7E and AIM-9E-2, which look correct based on what Ive been able to look up. But earlier versions are still in the kit if appropriate for the model youre building.
Heres a good place to bring up another of the big knocks this kit and earlier Z-M F-4s have come in for, the lack of weapons. If youre loading for air-to-air, youre in good shape as you get 4 each of the Sidewinders and Sparrows. But if you want air-to-ground, youre going to have to look elsewhere. This is unfortunate, and I wish some options had been included, especially as sprue S has some very nice TERs and MERs; but frankly the F-4 carried such a wide range of ordinance over its career I can see where Z-M was afraid to go down that rabbit hole. They could have added a whole new kits worth of parts to cover them all. I tend to stick to air-to-air myself, so Im not too bothered. But Im letting you know what you get (and what you dont).
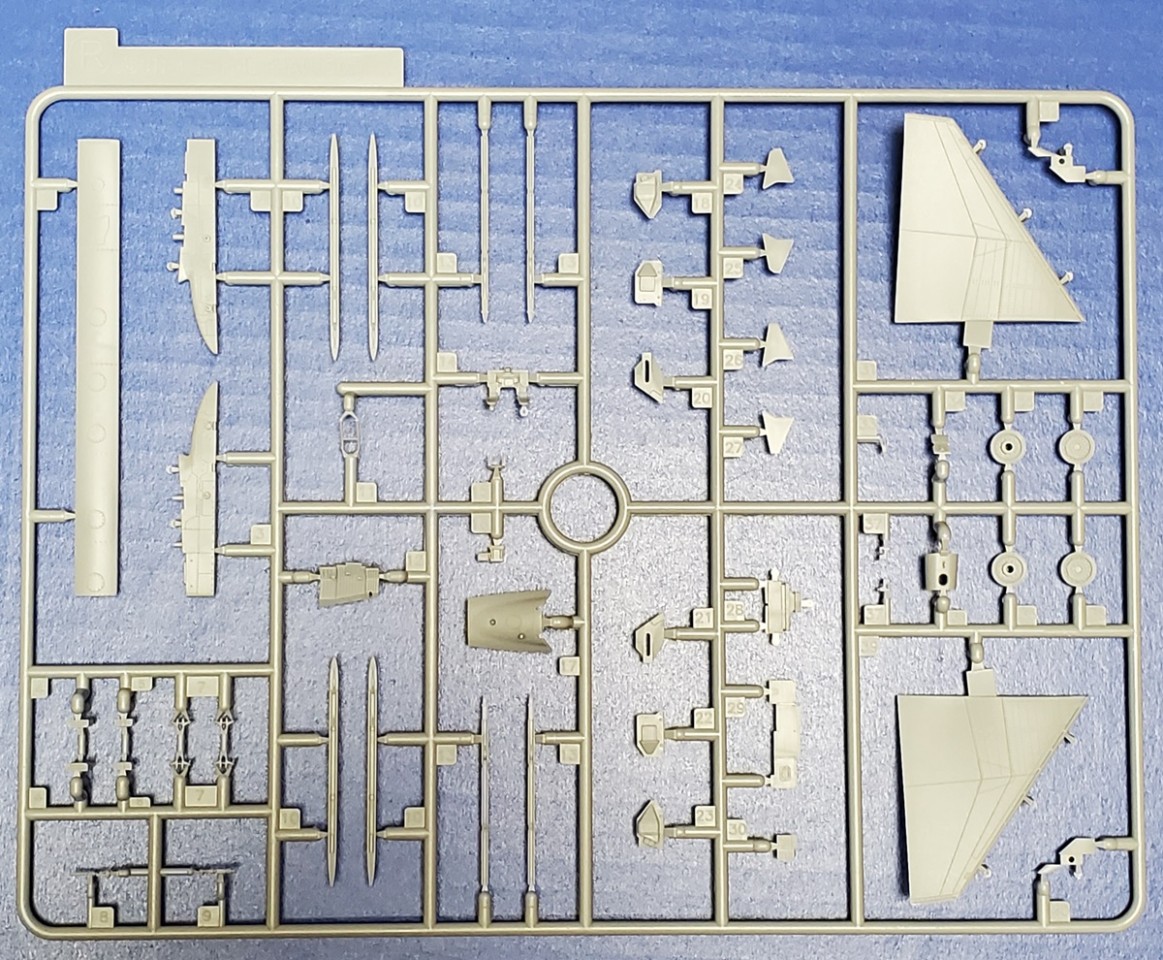
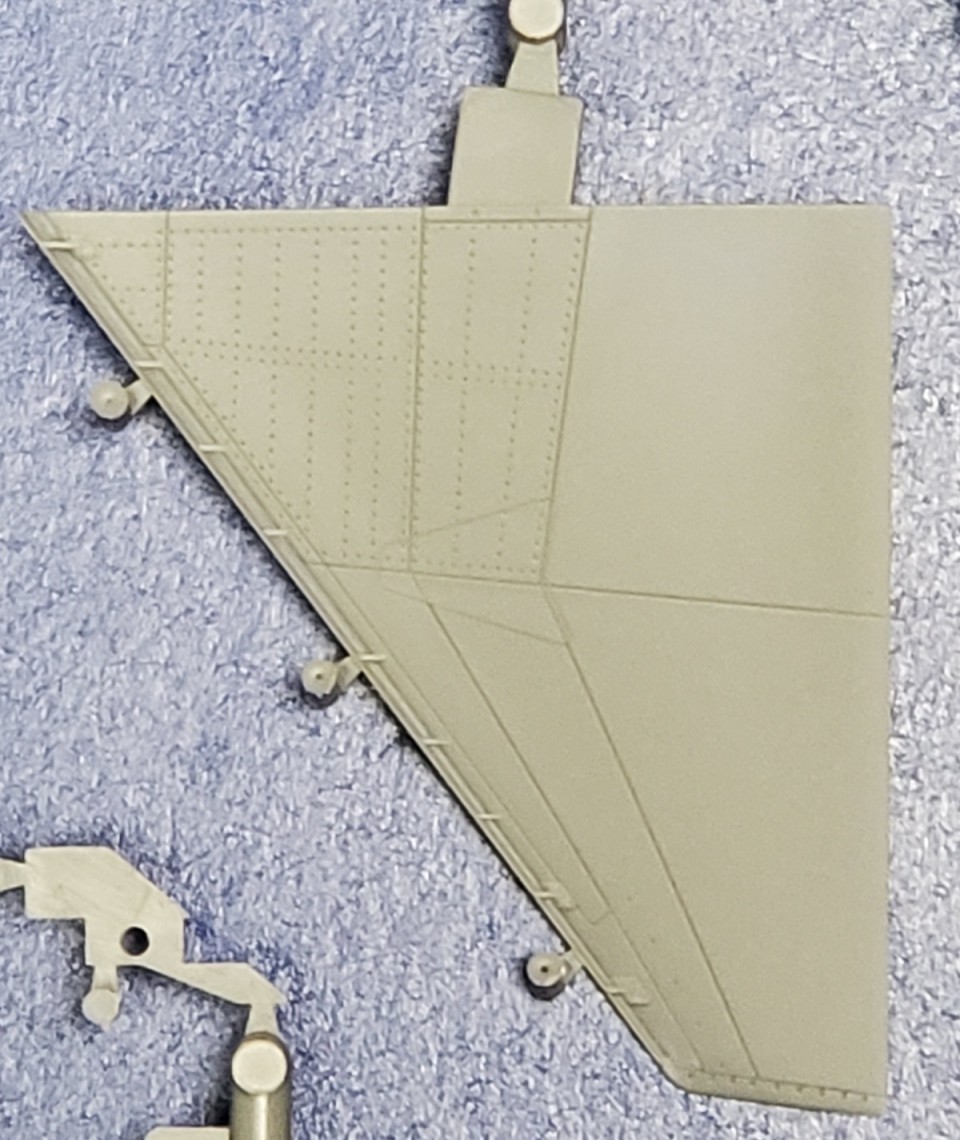
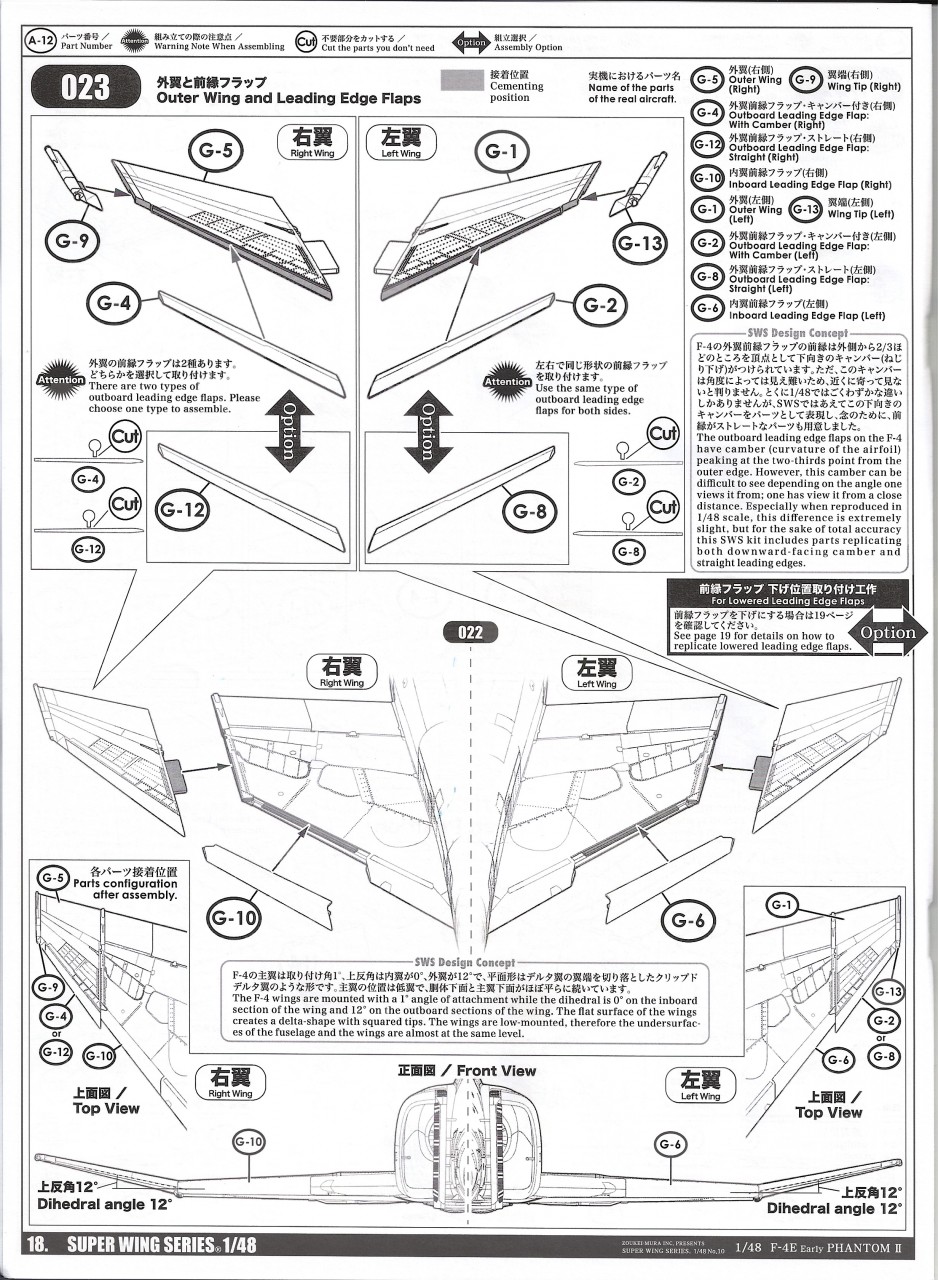
Sprue G
Here are the wings. Needless to say (though I guess Im saying it), they are the correct bulged type for later Phantoms. These are the un-slatted wings of the early E, but the leading-edge flaps are included as separate parts and can be posed up or down which is fully explained in step 23 of the instructions. The appropriate wingtips for the early E are included and the main gear well detail is molded on the bottom of the upper wings. Its a bit sparse, but not unrepresentative of the real thing. Again, beautiful and appropriate surface detail on these prominent exterior parts. I have a tad bit of concern for how shallow the main gear attachment points are, but at least you can add them after the major construction is done, instead of before like the Academy kits.
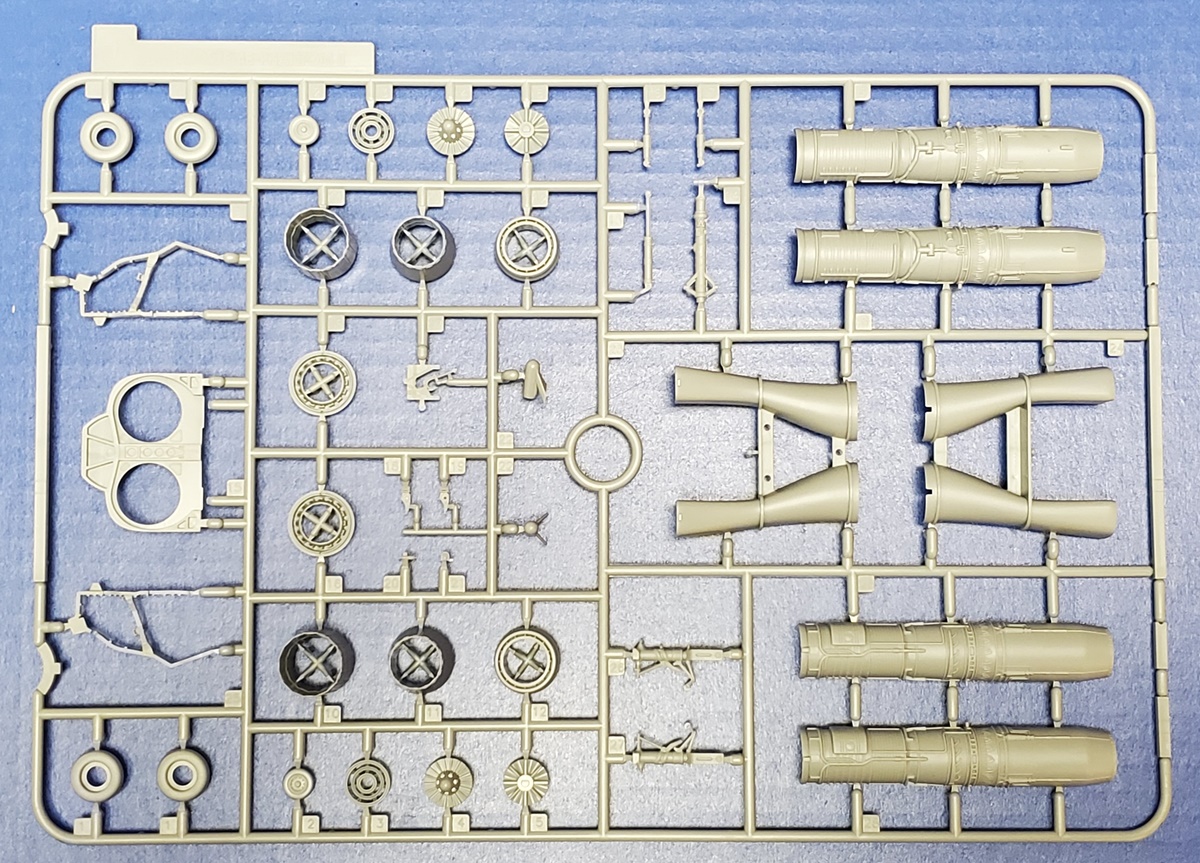
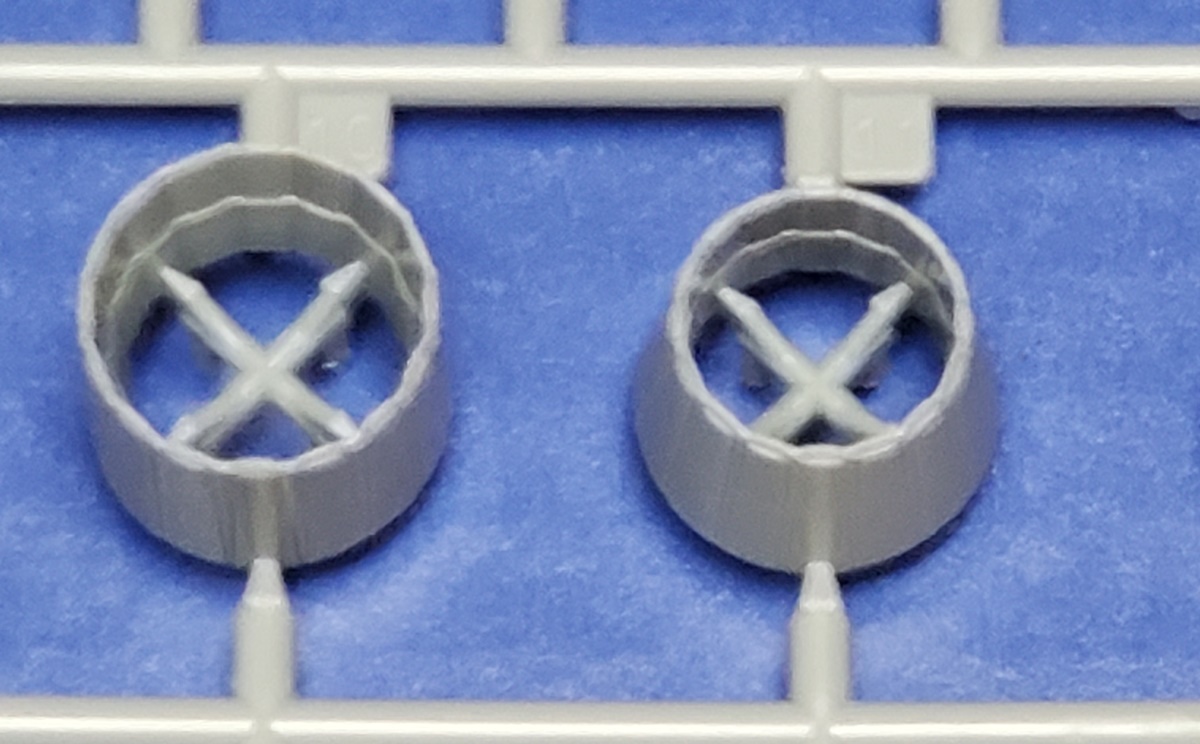
Sprue I
Here we find the parts for the J79 engines, intake trunks, afterburner cans, and landing gear parts. Detail on all the parts are well up to snuff, including one-part moldings that cover most of the main gear well side walls. The nose wheels are one part each but the main wheels have separate wheels and tires to help with painting.
The engines are complete, though if you wanted to display them as mounted you will need to do surgery to the airframe. If you want to display them outside the airplane, there is a simple dolly. Either way, youd want to add plumbing, wiring, and so forth. Keep in mind that there are two blow-in doors on the bottom of the fuselage that are almost always open on the ground (and are depicted as open in this kit, though they are separate parts). Whats inside these doors is the bottom of the engines. So, if you leave an engine out, youre going to have a hole here. I think the details on engines are perfectly acceptable if all you see of them is through these doors. If I recall correctly these are just holes on the Academy kit, so Zoukei-Mura scores here.
The burner cans come as opened or closed, which is nice. Detail is a little simplified as compared to resin replacements out there, and they are a bit clunky, but theyre better than Hasegawa or Academy gave us. They are the correct, larger burners for the F-4E.
Sprue L
Here we find the clear parts for this kit. These are very nice and clear with no seam lines to polish out. As with Z-Ms earlier F-4 kits, you get a one piece fully closed canopy or a 4-part windscreen/canopy set so they can be posed open. There are also parts for various lights and a part for the rather simplified HUD that shows up on sprue R.
Sprue M
This is an F-4E specific sprue, with a number of parts particular to this version of the Phantom, including the one piece radom, gun muzzle, 1 piece short and 2 piece long gun covers, and new pieces for the cockpit and nose gear bay to replace the unused parts from sprue C. Part M42 is the appropriate cockpit floor/nose gear well roof. It has the same bumps and ridges for fitting the kit supplied seats as the not-for-use part on the C sprue. Dont forget to remove these now, before you put the cockpit together, if youre using resin seats. While this kit only uses the short gun muzzle cover, parts M33 and 34 (marked not for use on the parts map) are the long muzzle cover, which was frequently retrofitted to earlier aircraft even before slats were added due to the tendency of the short cover to whistle and cause flame-outs when fired. This gives the builder a lot more flexibility to build pretty much any pre-slatted F-4E.
Also on this sprue are various bulged main gear doors, dive brakes, intake ramps, antennae, the pitot tube, and so forth. Im sure well see this one in the later E kits as well.
Sprue N
Here are the rest of the parts for the Sparrows and Sidewinders. There are two of these sprues, much of which is marked not for use on the parts map since they are for different versions than called for in this kit. But once again, if the particular model youre making would have been armed with other variants (as mine probably will be), theyre probably here. Also on this sprue is the boarding ladder, so you get two of them in case you want a spare.
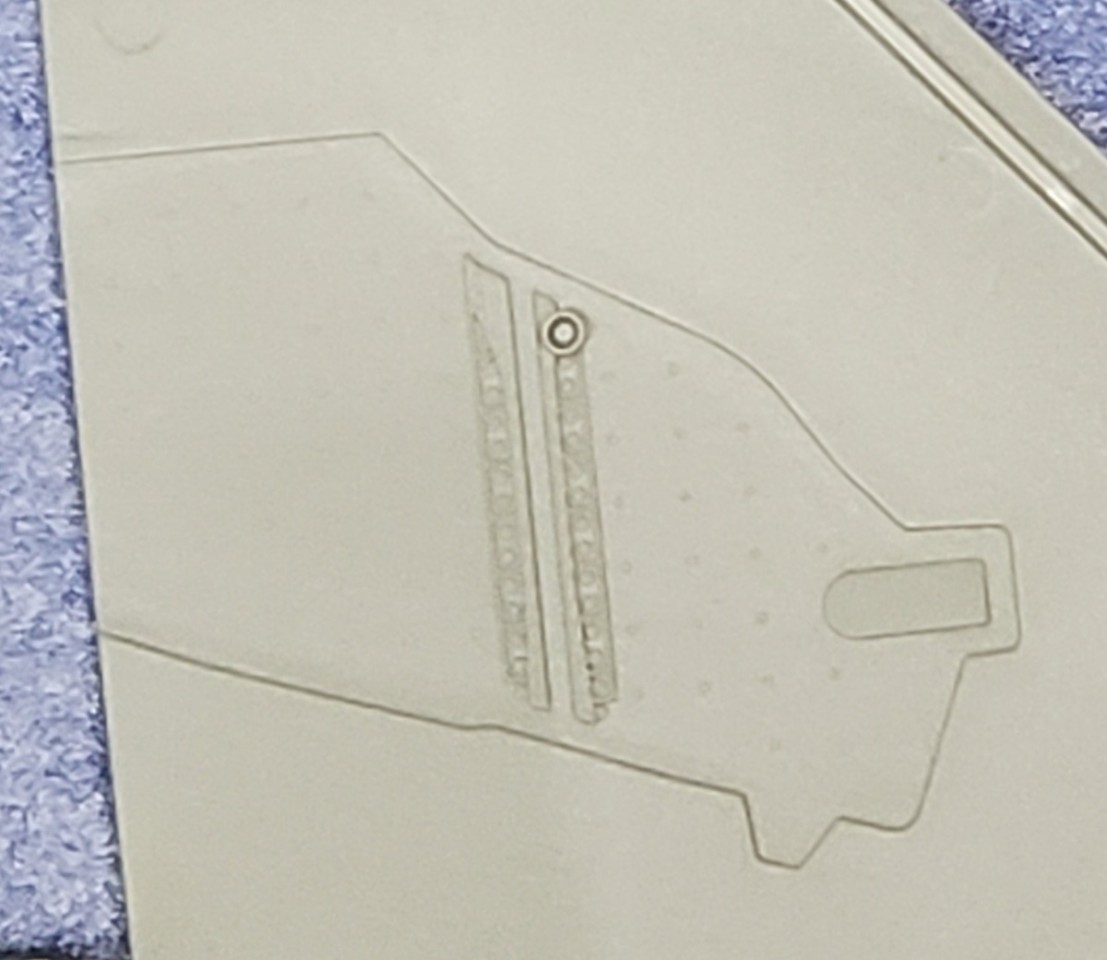
Sprue R
This contains parts for later version F-4s, including the slotted stabs, some pylons and missile rails, and various bits and pieces including the main gear wheel halves and that spine insert I mentioned earlier. Interestingly, also on this sprue are some chaff and flair dispensers that were grafted on to weapons pylons on later Phantoms. Theyre marked not for use here, but in case the aircraft youre modeling lasted long enough to use them, you have them. If not, they look very good and will be nice to have in the spares box. Ive included a picture of the underside of the slotted stabilator so you can see what that looks like. Very well done, in my opinion.
Sprue S
This one is interesting in that it has pylons, missile rails, and TERs and MERs (two each) with separate sway braces. So, you can show your Phantom ready for loading or, if you source ordinance outside the kit, bomb it up.
Also included here, and marked not for use, are a couple of ECM pods. Now this is definitely out of my comfort zone (I can never keep these things straight) but I believe one is an ALQ-131 and the other is some variant of an AN/ALQ-184. Feel free to correct me if Im wrong on these. In any event, theyre here if you need them.
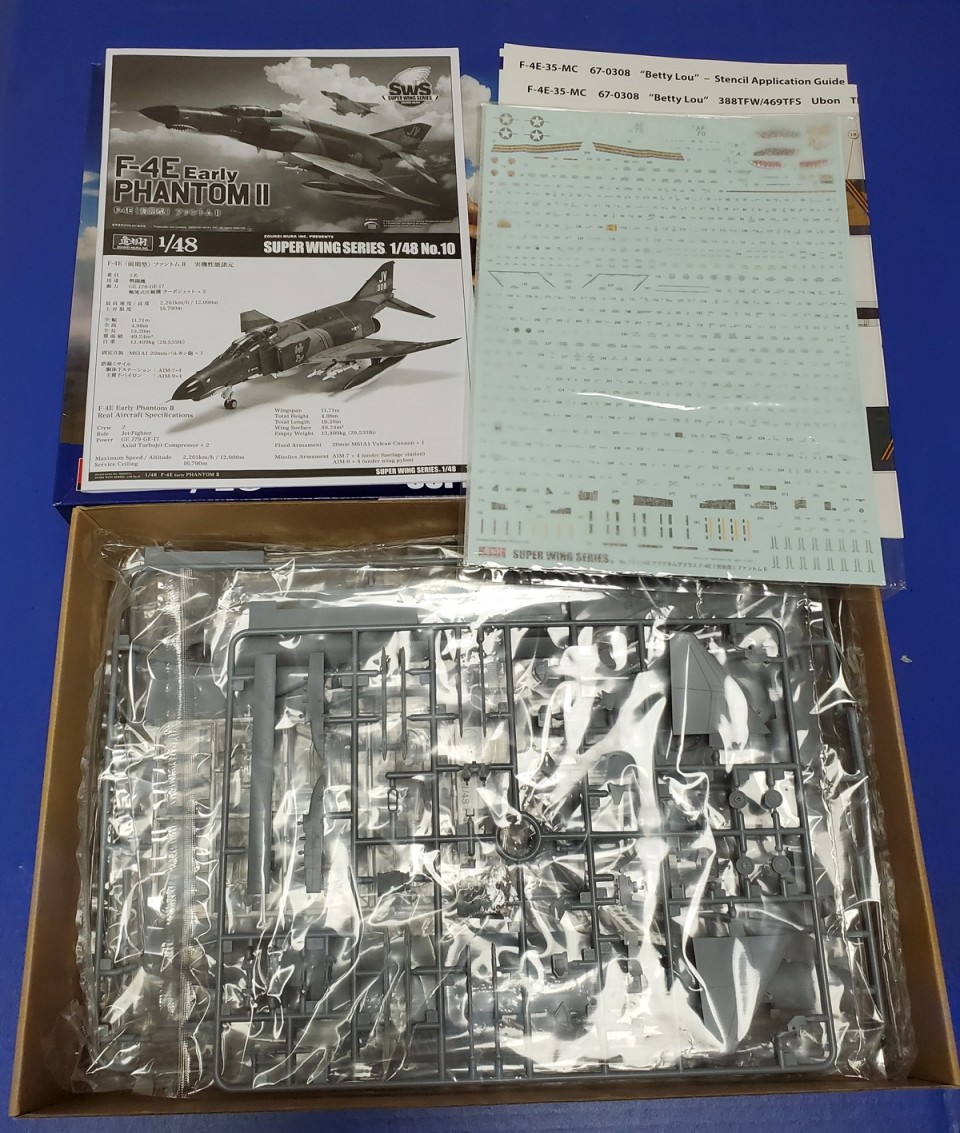
Decals
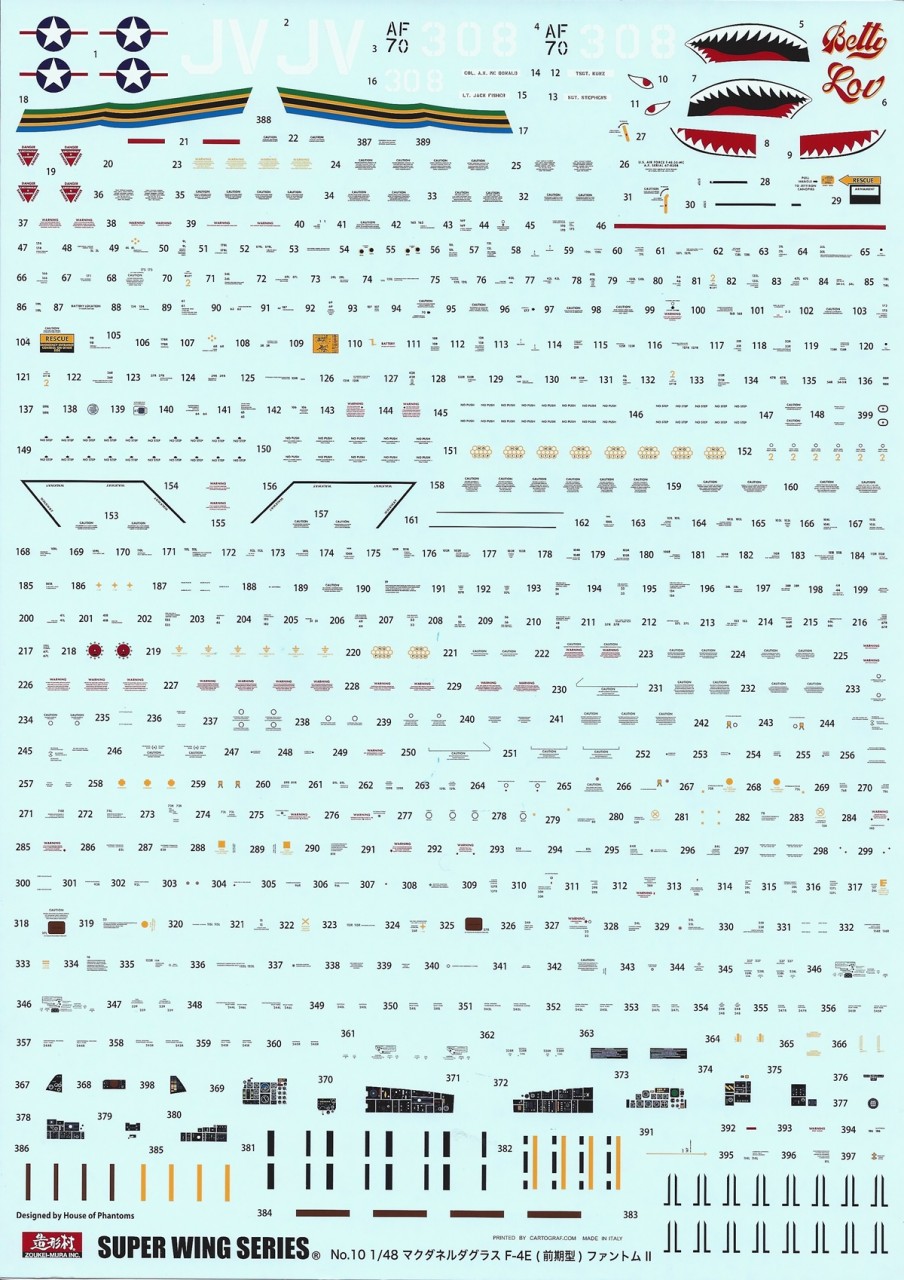
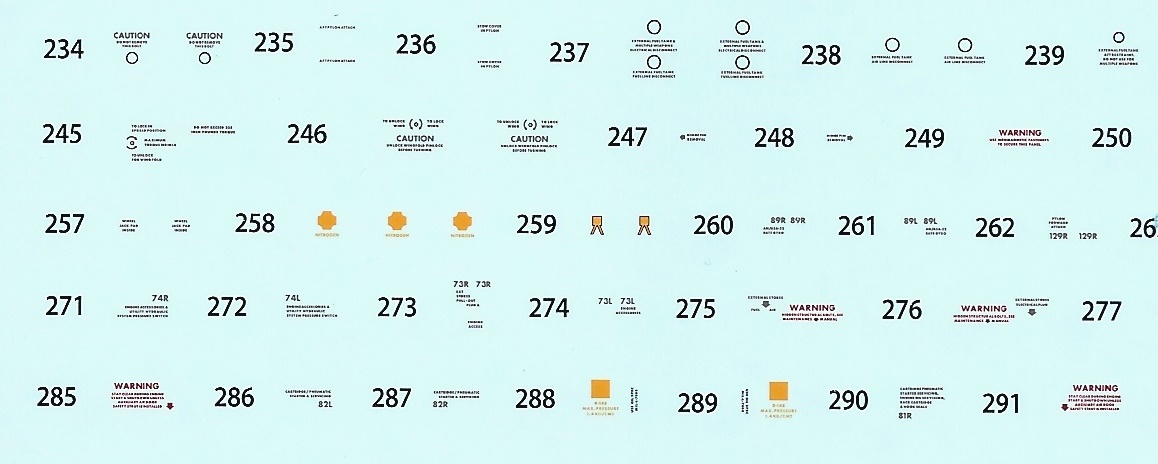
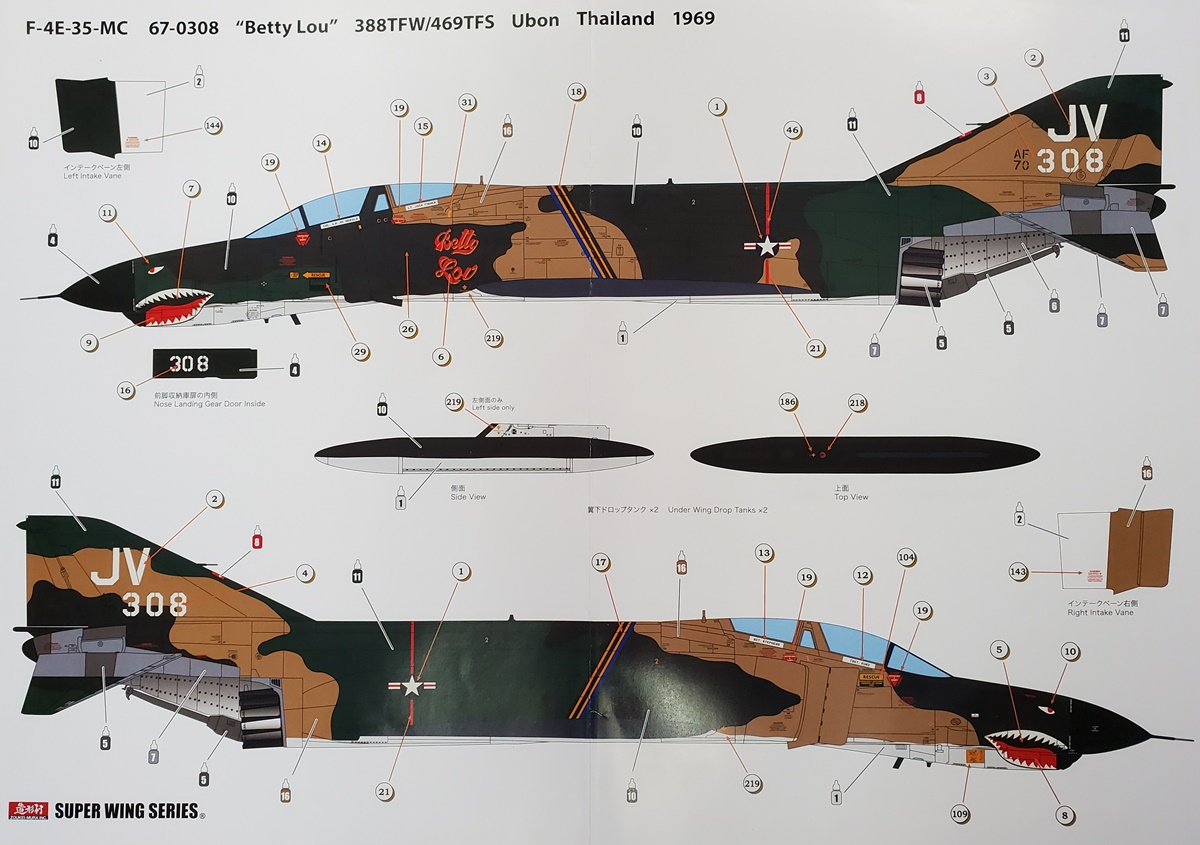
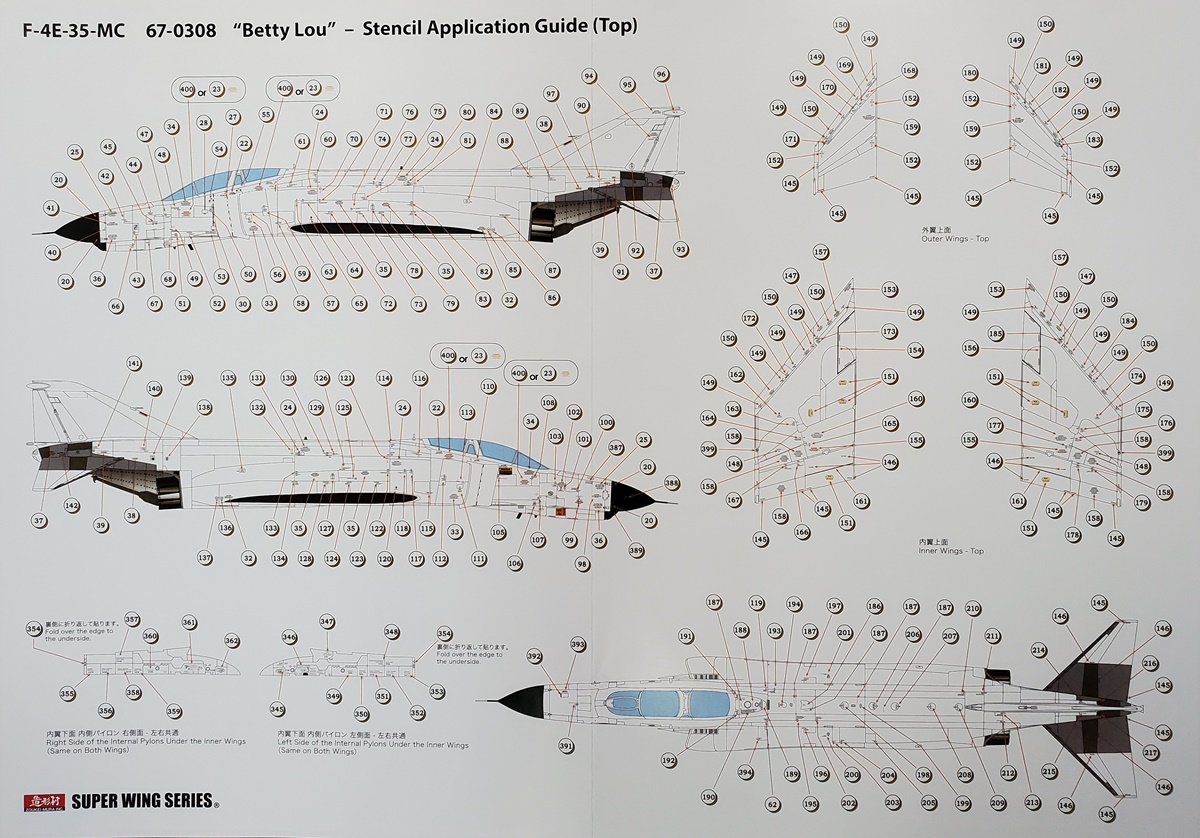
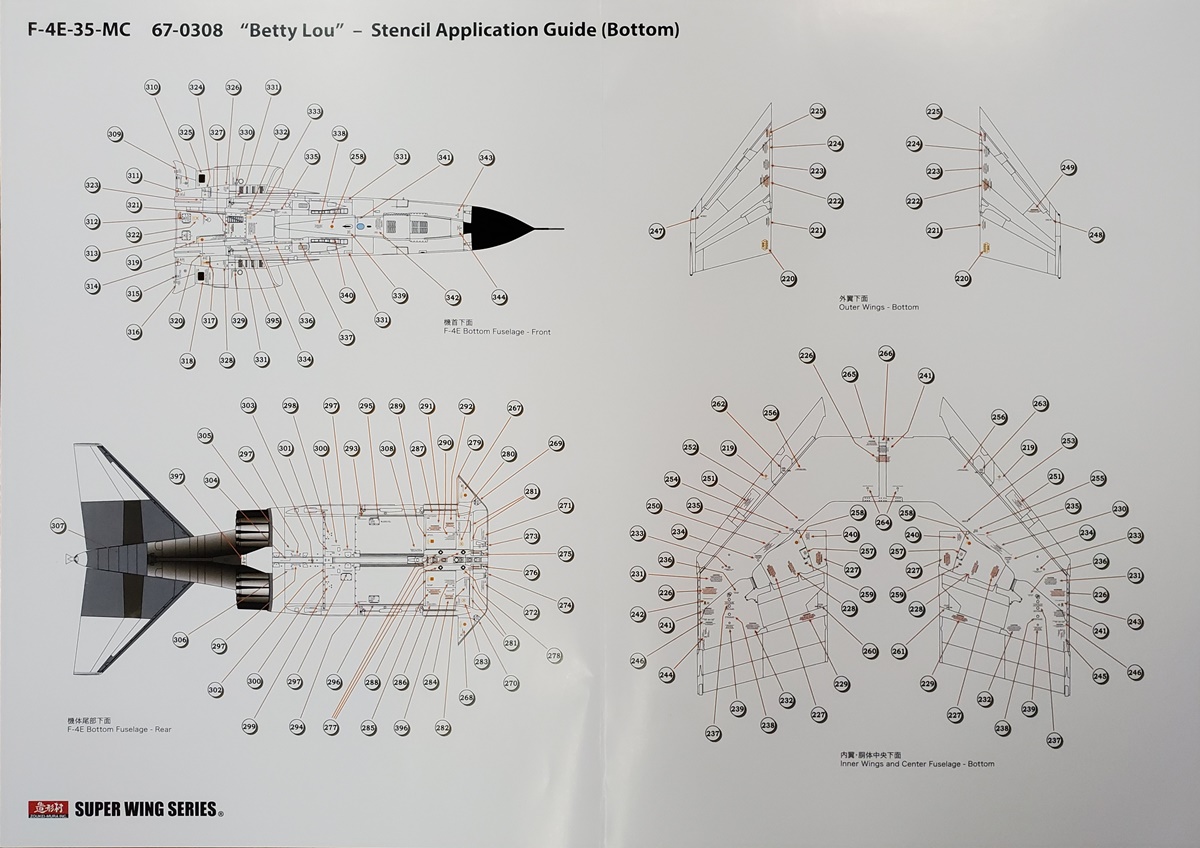
The decal sheet is fairly good sized (about 30 x 21 cm) and looks to be good quality. The decals for the one markings option in the kit (Betty Lou of the 469th TFS/388 TFW based out of Ubon, Thailand in 1969, I believe flown by the Wing Commander, Col. Allen McDonald, based on the fuselage stripes) take up a pretty small portion of the sheet, the vast majority being covered with airframe stencils. Ive included a closeup of some of those and, as you can see, they are readable under magnification and appear to be in actual English. These arent all going to go on in one session, so be prepared for that. Zoukei-Mura does give us two large sets of painting and placement instructions, including a two-page (front and back) sheet just for the stencils. Also on the decal sheet are markings for the Sparrows and Sidewinders and were shown where to apply these on the main painting diagram. Ive also included a close up of the instrument panel and side console decals. Im thinking Im going to use the instrument decals for sure, havent made up my mind about the side consoles.
Instruction Manual
The instruction manual is just a bit smaller than the decal sheet and is 32 page and 43 steps long. Included is a short history of the Phantom (that makes me glad I just got new glasses) and is specific to the F-4E, not a generic Phantom history. It includes a little horn-blowing by Zoukei-Mura ( based on our extensive research to reproduce every detail with accuracy. There is nothing like the joy of collecting SWS kits of this masterpiece of a fighter ), but why not, they seem to have put a lot of effort into these kits. Page 3 is a nice technical description of the F-4E, calling out some of the differences from the earlier versions of the airplane. At the bottom of the page is a drawing pointing out the different options regarding the placement of some of the parts, with referrals to which page youll find this on. This is nice, though interestingly they label it Try out different positions! Hi ho!
The instructions themselves are in black and white but the drawings are quite clear and show parts placement nicely, frequently shading where glue will be applied and even showing you where to cut off mold overflow pins. Zoukei-Mura likes to throw in technical descriptions of the actual airplane, explaining what youre putting together, like Monogram instructions of old. That can make things a bit busy, but I like knowing the whats and whys of what Im doing. And most of the construction steps show only a few items being assembled, which keeps things easier to follow. On the other hand, they do have tips about things like test fitting where things could be tricky (such as fitting the cockpit sill to the cockpit.) And there arent weird, cryptic symbols to decipher. When they show options, it says option, when you need to cut, it says cut. Very nice!
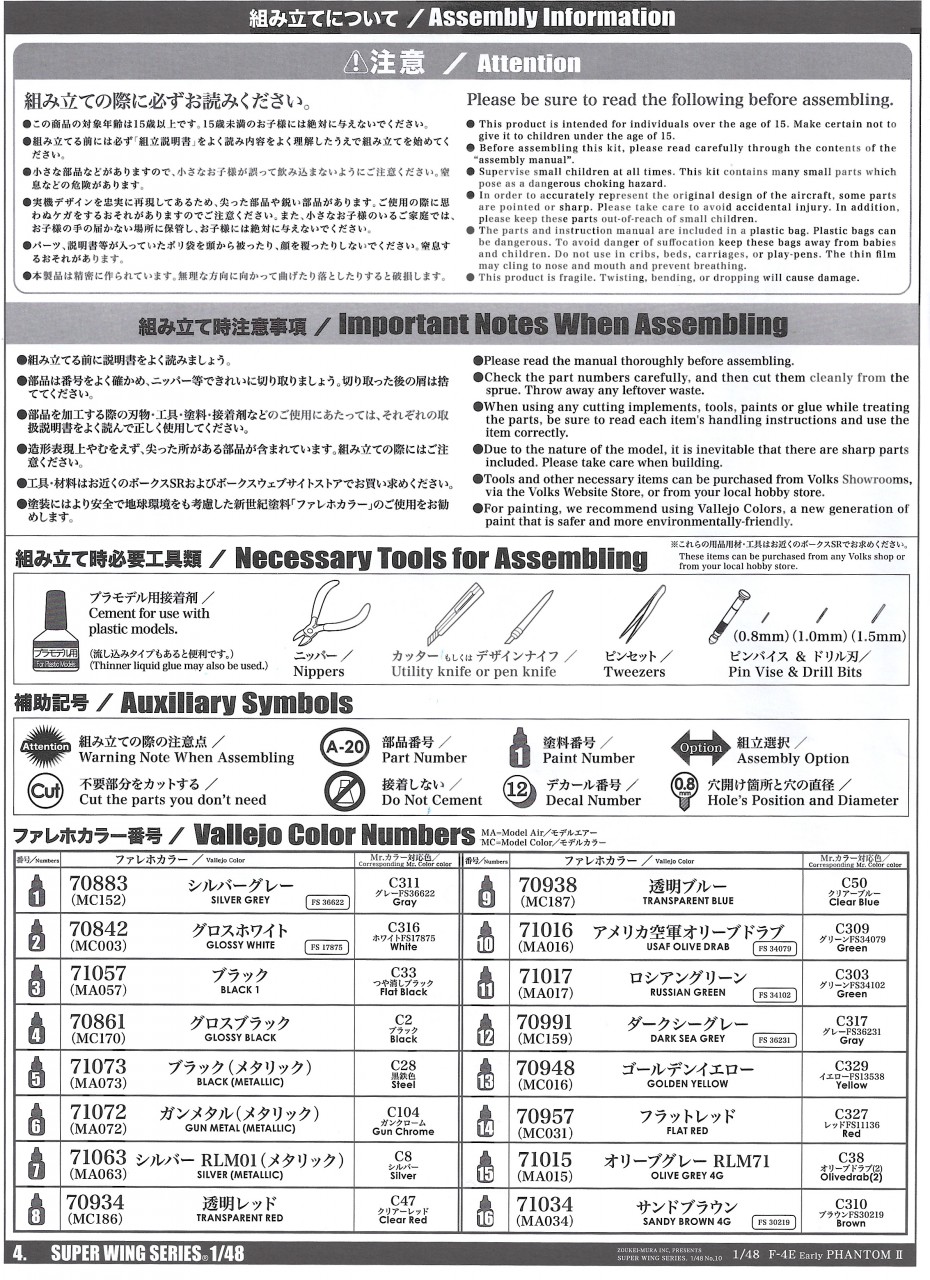
Paint call-outs during the build are shown by a small paint bottle with a number, but whenever these appear on a page theyre accompanied by a small panel in the upper right corner explaining what those colors are. Again, a very nice touch to keep you from having to constantly refer back to the paint chart. That chart appears on page 4 and the main paint company listed is Vallejo, though corresponding numbers for Mr. Color are also shown, as well as some FS numbers for the major camo colors.
Conclusion
Well, is this it? Is this the all-singing-all-dancing 1/48 F-4E weve all wanted? Yes and no. No photoetch means no seat belts/harnesses (or decals for them either either) and things like the HUD framework are a bit simplified. Not as much plumbing in the gear wells as on the real thing. Burner cans are a bit thick and also simplified. So theres room for improvement and after-market. But those kinds of AMS issues aside, this is really an excellent kit of the E model Phantom, and I think Im pretty safe in saying the best on the market. While I havent actually built it yet, Zoukei-Mura kits have a reputation rather like Wingnut Wings (RIP), keep those join lines clean and test fit everything, and theyll go together like a jigsaw puzzle. This one is jumping to the top of the to-do pile. Ive got my IDF/AF resources and decals ready. This is gonna be fun!
Please remember, when contacting retailers or manufacturers, to mention that you saw their products highlighted here - on AEROSCALE.
SUMMARY
Highs: Fine surface detail, lots of excellent detail all-around, full intakes, engines, and burners, both gun muzzle covers, different versions of the Sidewinders and Sparrows, full stencils, good instrument panel decals, appropriate parts for the F-4ELows: No air to ground ordinance, only one decal option, no seat belts/harnesses, burner cans a bit clunkyVerdict: At last a new tool, state of the art F-4E! Rather pricy, but what new kits aren't these days? Should provide hours of fun to build.
About Michael Satin (MichaelSatin) FROM: COLORADO, UNITED STATES
I started modeling before I was 10 and have been going ever since. Oddly, I don't seem to be getting any better. Hmm... I do mostly WWI and WWII aircraft and early jets but I also emphasize Israeli subjects. I've been known to branch out into armor and ships as well as an occasional spacecraft o...
Hi Michael
Thanks in return for such a comprehensive review! This was what I needed to read when the F-4EJ Kai landed in my lap! How did it get stranded in Kitmaker "never-never land"? Hmmm... let's not go there.
The important thing is that it's available now to anyone tackling this kit. I'll do a bit of "retro-forward jiggery-pokery" to link my earlier Japanese "Phantom Forever 2020" retirement review to your detailed look at the standard kit.
All the best
Rowan
Thanks, Phil. It's sort of on the slow track right now while I try to finish my 1/32 Hurricane, but then it should be full speed ahead! I'm posting the build in the Phantom 60 Campaign on the new forums.
Michael


Comments