_GOTOBOTTOM
World War II: Japan
Aircraft of Japan in WWII.
Hosted by Rowan Baylis
Nakajima B6N2 (Jill) 1/48th build
Mist086
_VISITCOMMUNITY
Iowa, United States
Joined: August 22, 2006
KitMaker: 31 posts
AeroScale: 0 posts
Posted: Monday, August 28, 2006 - 08:15 PM UTC
Hello all!

THis is my first build since i've gotten back into the hobby. It's an Nakajima B6N2 Carrier Attack Bomber Tenzen (Jill) Type 12 1/48th scale by Hasagawa. This is the first plane of the many of the IJN line i'm gonna do.


If there are any pitfalls i should know about, please let me know.

1 Question if i may. On the instrument panel, do most of you just drybrush the dials, or do you use a wash?

Thanks and i'll update with progress pics
Holdfast
Staff MemberPresident
IPMS-UK KITMAKER BRANCH
#056
_VISITCOMMUNITY
England - South West, United Kingdom
Joined: September 30, 2002
KitMaker: 8,581 posts
AeroScale: 4,913 posts
Posted: Tuesday, August 29, 2006 - 12:53 AM UTC
Hi Jim,
I have the B5N2 (Kate) which is similar. The instrument panel on mine is nicely done and I would normaly paint and dry brush it. However, in my kit the instrument decals look pretty good, as they are coloured, rather than just black and white. You also have a choice of clear or black background. I would be very tempted to use the "clear" decal, but if you do this you would need to get the decals to "snuggle" down really well.
I couldn't tell you if there are any pitfalls but my kit looks like it's an excellent model and I wouldn't envisage any, real, problems. If you do encounter any just hope back in here and ask away
Mal
Mist086
_VISITCOMMUNITY
Iowa, United States
Joined: August 22, 2006
KitMaker: 31 posts
AeroScale: 0 posts
Posted: Tuesday, August 29, 2006 - 01:53 AM UTC
Mucho thanks. I have ordered MicroSet and MicroSol. Hopefully those will help "snuggle" the decal on inst panel. I'll give it a go. If it doesn't work, on to the 3 bristle brush i go
Steelheader
_VISITCOMMUNITY
Michigan, United States
Joined: June 07, 2005
KitMaker: 46 posts
AeroScale: 29 posts
Posted: Tuesday, August 29, 2006 - 03:37 AM UTC
Jim, I am about an hour from finishing my Hasegawa Jill. Here are a few areas of challenge that I had experienced during the build. Some, if not all were self-inflicted.

1. I elected to build the model with the wings down. I used small pieces of plastic stock cemented inside the wing joint to create tabs and to improve the fit between the inboard and outboard parts of the wings. Dry fit, dry fit and dry fit again before you commit the cement. I am never happy with how the wings fit in the down position on kits offering that alternative.

2. The canopy greenhouse can be cut with a fine razor saw if you want to open it up, just cut it before you mask and paint it (guess who decided at the last moment to open the greenhouse??). There is plenty of detail inside the cockpit, so show it off.

3. Don't lose the clear tail navigation light like I did.

4. I assembled the engine cowlings after painting them and fixed the assembly in place after the model itself was painted. For me, at least, there was some fiddling required before I was happy with the fit of the cowling to the fuselage front.

5. I masked and airbrushed the Hinomarus on the wings and fuselage, but used the decals for the aircraft numbers on the tail. I laid down about three coats of Future for a glossy finish, and applied the decals with MicroSet and MicroSol. No silvering.

6. The three small windows on each side of the lower fuselage were not used, but rather I used Micro Krystal Kleer applied with a round toothpick after the model was painted. This worked just fine. I did not want to attempt masking the kit's clear parts in these locations.

7. The ventral gun position may be installed in an open or closed position. Here again I decide for the closed option. You may need to rescribe the seam line if you go this route.

8. I painting the wheels and landing gear separately, and fitted the wheels in place before final assembly of the gear. Once the model was substantially complete I installed the gear, aligned the wheels so the flat spots were on the bottom and applied liquid cement on the axels with a Touch-n-Flow applicator and they were fixed in place.

Overall this is a fine kit, but plan your efforts and dry fit repeatedly until you are really satisfied, then use the solvent.

Good luck and enjoy the experience.
Brigandine
_VISITCOMMUNITY
Dunedin, New Zealand
Joined: July 12, 2006
KitMaker: 553 posts
AeroScale: 86 posts
Posted: Tuesday, August 29, 2006 - 04:56 AM UTC
Hi Jim,
You've chosen an interesting kit with which to re-enter the fray!

As Michael mentioned the wings are a sod to assemble if you want them extended. I ended up epoxying short lengths of brass tubing through boths sets of outer ribs to fix my outer wing panels firmly in place.

Take your time over the flap assemblies, especially if you want to show them extended and lowered.

About the worst feature of the model is that Hasegawa generic torpedo (it also - er- graces their Aichi B7A ). At the least the tailfins need to be thinned down, especially the trailing edges, and S1, the rudder, could be remade from thinner plasticard. I also wrapped a couple of suspension cables around the middle of the torpedo and up into the centre section adjacent to the centre crutch S5. Your box art is a good guide to these details.

Enjoy the model, it's a good choice.

Jeff W.
Mist086
_VISITCOMMUNITY
Iowa, United States
Joined: August 22, 2006
KitMaker: 31 posts
AeroScale: 0 posts
Posted: Tuesday, August 29, 2006 - 08:38 PM UTC
Thanks for the tips. What color in the inside of the cockpit supposed to be. I cannot find any pics on line and the books i have are all outer paint schemes. HELP!!!!!!
Steelheader
_VISITCOMMUNITY
Michigan, United States
Joined: June 07, 2005
KitMaker: 46 posts
AeroScale: 29 posts
Posted: Tuesday, August 29, 2006 - 11:06 PM UTC
Interior color question and maybe a can of worms (?).

The Hasegawa instructions note the interior color to be "yellow green", and include the paint formulation (70% yellow, 15% green and 15% brown). This is noted as "A" in the instruction's steps 1, 2 and 3. I have found this a bit confusing in the past, as Hasegawa normally lists the paint color somewheres near the back of the instructions. So the old addage is true: "when all else fails, read the instructions" (something I must continually remind myself to do).

I have been using Tamiya acrylics exclusively lately, and mixed the Jill's interior color using their flats, in the ratios shown on the Hasegawa instructions. I normally prime the interiors a deep green first as a "base" color. I then apply the final color (Yellow green) at a 1:1 ratio of paint to thinner and I have been using 91% isopropyl alcohol with the Tamiya paints. I apply the yellow green at about a 45 degree angle from vertical onto the cockpit interior parts, which are taped, unassembled, to foam board. By spraying at an angle some of the deep green in retained in corners, nooks and crannies. Also, the yellow green is applied in a less-than-uniform manner, so the parts do not looks too perfect.

After the acrylics have dried for 24 hours (minimum!!) I apply a brown oil wash over everything which seems to tone down the paint, and also collects in the various corners. A light dry-brushing with a flat white, light grey or silver will top off the weather effect.

Another weather "trick" that I learned about is a silver pencil. Use that to show scuff marks and the floor boards, but apply the pointed end to a flat finish and you can achieve some realistic scuffs. This works great on the exterior surface. You can buy the silver pencil at Hobby Lobby, Michaels or any other craft store. Seal everything later with a semi-gloss or flat finish and the interior is done.

Hopefully this method is not too worm-infested, but that is my personaly interpretation of what a 1/48th scale Japanese aircraft interior might look like.

Jim, hope this helps. Also, Jeff Webb addressed many issues that I had overlooked in my initial posting, but did experience during the build. I neglected the cable detail that Jeff noted, though.
Mist086
_VISITCOMMUNITY
Iowa, United States
Joined: August 22, 2006
KitMaker: 31 posts
AeroScale: 0 posts
Posted: Tuesday, August 29, 2006 - 11:24 PM UTC
Thanks. That helps alot. God i love this place
Holdfast
Staff MemberPresident
IPMS-UK KITMAKER BRANCH
#056
_VISITCOMMUNITY
England - South West, United Kingdom
Joined: September 30, 2002
KitMaker: 8,581 posts
AeroScale: 4,913 posts
Posted: Tuesday, August 29, 2006 - 11:41 PM UTC
Great stuff guys, although my Kate dosen't have folding wings the other info is very useful for me also.

Jim, you may be interested in this, my online builds, which include the Aichi D3A1(Val)

Mal
Brigandine
_VISITCOMMUNITY
Dunedin, New Zealand
Joined: July 12, 2006
KitMaker: 553 posts
AeroScale: 86 posts
Posted: Wednesday, August 30, 2006 - 06:10 AM UTC
I was fortunate enough to stock up on the original Aeromaster Acrylics, including a colour called 'Nakajima cockpit gray/green' - a muddy, non descript, medium yellow/green/grey!

Citadel color, Citadel have a colour called 'Camo Green' (scroll down- it's between 'rotting flesh' and 'scaly green'...) which looks a reasonable approximation, with a little more yellow it should do.

Another thing worth adding to a parked Jill are some fairly long access ladders, which could be pulled down from the wingroots, on both sides - the model has a couple of small rectangular panel-lines moulded into the wingroots just forward of the first small window. They can just be seen in the first photo, second B6N.


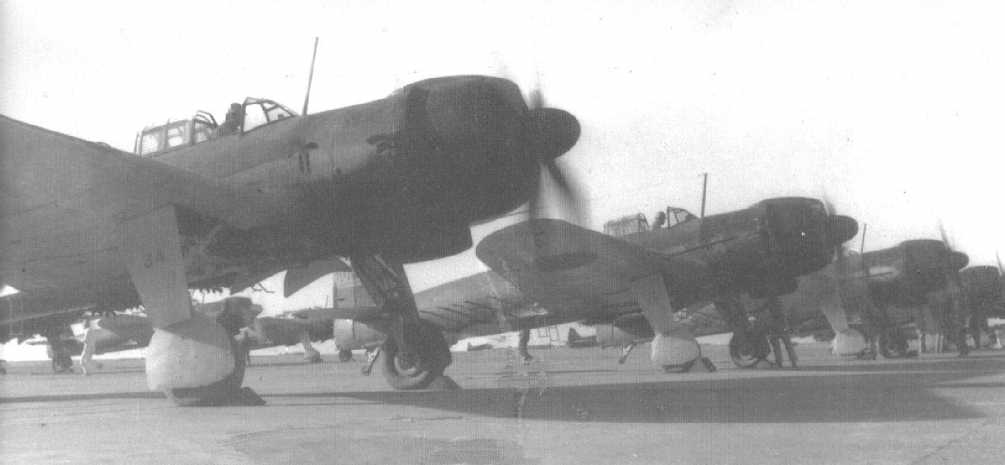
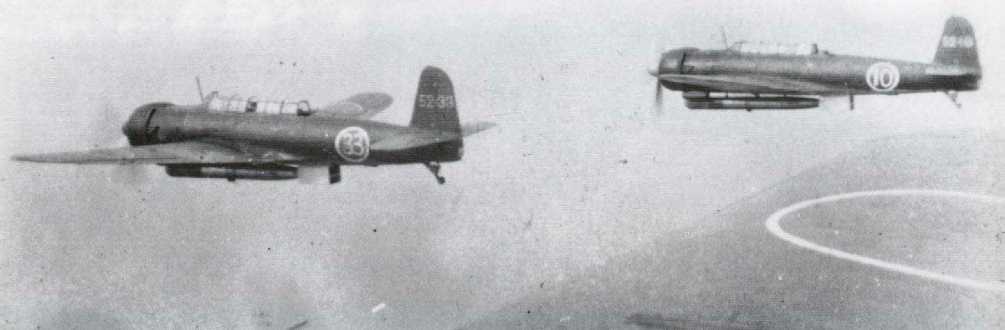
Dang! The torpedoes have a large, box section breakaway tail...the suspension cables can again be seen faintly on the second B6N. The torpedo is suspended around its balance point, well forward
of the middle crutch - note the sleeve around the torpedo. The first photo shows some additional details under the fuselage. White 10 has a natural metal or painted aluminium spinner. 33 looks to have a dark spinner...
(Just found these here.)

Looks like my 'Jill' will have to go to the hanger for a refit; epecially the torpedo!

Jeff W.
Mist086
_VISITCOMMUNITY
Iowa, United States
Joined: August 22, 2006
KitMaker: 31 posts
AeroScale: 0 posts
Posted: Wednesday, August 30, 2006 - 06:46 PM UTC

Quoted Text


I apply the yellow green at about a 45 degree angle from vertical onto the cockpit interior parts, which are taped, unassembled, to foam board. By spraying at an angle some of the deep green in retained in corners, nooks and crannies. Also, the yellow green is applied in a less-than-uniform manner, so the parts do not looks too perfect.


45 degrees from the top or bottom. Or do you spin the parts around and hit again?
Steelheader
_VISITCOMMUNITY
Michigan, United States
Joined: June 07, 2005
KitMaker: 46 posts
AeroScale: 29 posts
Posted: Thursday, August 31, 2006 - 03:44 AM UTC
Jim, I apply the final paint from top to bottom only. There is usually sufficient paint carryover that most of the deep green primer get some of the yellow-green, but the "shadow" effect below horizontal raised detail and corners is retained. Even at 1/48th scale most people peeking into the cockpit will not detect the differences in the paint, but should sense the shadow effect. I feel this technique add depth to the interiors. Again, this is just a personal quirk.

Thanks again to Jeff Webb who goes on to prove that you just can't find all the references on your own.

I am about to start work on the Tamiya G4M2 Betty. Nothing spectacular planned for this model, but am looking forward to the build. Hopefully we will have a new, updated, super computer the end of this year and I can post pictures and be a little more helpful when I can. Thanks for the postings and the additional reference sources.

Best to all.
Brigandine
_VISITCOMMUNITY
Dunedin, New Zealand
Joined: July 12, 2006
KitMaker: 553 posts
AeroScale: 86 posts
Posted: Thursday, August 31, 2006 - 06:43 AM UTC
It'll be good to see another 1:48 Betty, as long as it doesn't end up like this...


This was a 4 Kokutai G4M1 that took part in an attack on the Guadalcanal invasion fleet on August 8 1942. The DD is the USS Ellet, off TULAGI.

Jeff W.
Mist086
_VISITCOMMUNITY
Iowa, United States
Joined: August 22, 2006
KitMaker: 31 posts
AeroScale: 0 posts
Posted: Thursday, October 05, 2006 - 06:35 PM UTC
Ok. This is new for me so bear with me. I need to get a better camera, so don't laugh at the pics.

Here is an update on my first kit i have done in over 15 years. I am taking it slow that's why my progress isn't very far. I am using Tamyia paint and i love them. Critiques are welcome as always


Now that my final paint is done, i have to paint the wheel wells and the interior wings. It says it's a blue/green metallic. But the ones i have and/or seen are to bright. How do I calm them down. Also can i future it now and paint over it?
Mist086
_VISITCOMMUNITY
Iowa, United States
Joined: August 22, 2006
KitMaker: 31 posts
AeroScale: 0 posts
Posted: Sunday, October 08, 2006 - 09:47 PM UTC
Anyone??? Hello?
Steelheader
_VISITCOMMUNITY
Michigan, United States
Joined: June 07, 2005
KitMaker: 46 posts
AeroScale: 29 posts
Posted: Wednesday, October 11, 2006 - 04:50 AM UTC
Jim, looks like you are making very good progress on your Jill. Now, for your question regarding the interior colors for the wheel wells.

I normal airbrush a base coat of Model Master non-buffing aluminum as a base. Then I will mix Tamiya clear blue and clear green at about a 1:1 ratio and thin that with 91% isopropyl alcohol. That blend is airbrushed onto the parts. Once that has dried about 24 hours I will apply an oil wash (burnt umber and sienna thinned with odorless thinner at a paint-to-thinner ratio of about 1:10). The wash is applied to the corners and it flows pretty much from corner to corner. A light dry-brushing with Silver Rub-n-Buff will high-light the raised portions.

I would suggest that perhaps you practice this blend on scrap plastic until you get the blue-green tint that you are after. I completed a Tamiya Gekko earlier this year and it took three tries before I was happy with the blend. The Tamiya acrylic paint can be removed with Windex and an old toothbrush.

Also, it appears that your wheel wells have been painted with the underside color. If that is the case when you air-brush the aluminum the surface may not appear to be smooth as bare mnetal, but may have a slight "texture". I normally apply the aluminum onto bare plastic, then apply the blue-green tint. Once dry the wheel wells are completely masked, I then paint the undersides. I do this only because I find it easier to mask the wheel wells.

Different strokes for different folks. Good luck and keep us posted on your progress.
29Foxtrot
_VISITCOMMUNITY
Victoria, Australia
Joined: September 19, 2003
KitMaker: 708 posts
AeroScale: 674 posts
Posted: Wednesday, October 11, 2006 - 06:05 AM UTC
Having built the same kit a couple of years ago, I used the Xtra Color IJNAF range of enamels, with exception of the primer brown and the cowling blue/black which is from the older AeroMaster 'Warbird' range, the pic shown here is what mine was before the weathering was added.


The blue/black cowling colour is now in the Mr Color range of Laquers
Hope this helps.
Brigandine
_VISITCOMMUNITY
Dunedin, New Zealand
Joined: July 12, 2006
KitMaker: 553 posts
AeroScale: 86 posts
Posted: Wednesday, October 11, 2006 - 06:00 PM UTC
Not bad for a 15 year break!

Some things to watch out for: The forward cowling halves D3 & D4, on my B6N at least, had a noticable concavity on the top, just behind the tail of the airscoop - I ended up filling it with 'Mr Surfacer 500' , then carefully rescribed the panel line.

Those outer wings!..should you decide to show them extended...

Hasegawa still show the starboard wing navigation light F11 as being 'Clear Blue' - wrong, they were still green on Japanese aircraft.

Look forward to seeing how your B6N looks.
 _GOTOTOP