Air Campaigns
Want to start or join a group build? This is where to start.
Fighters Under The Midnight Sun
Emeritus
_VISITCOMMUNITY
Uusimaa, Finland
Joined: March 30, 2004
KitMaker: 2,845 posts
AeroScale: 1,564 posts
Posted: Monday, October 30, 2006 - 10:42 PM UTC
Finished painting the camo:


I initially painted the RLM 74 mottles all the way to the engine cowling, but realized they extend only some way past the cockpit. I proceeded to cover the 74 on the cowling with 76, then re-spraying with 75. The effect wasn't the same as with the rest of the fuselage, with 75 going over 76 and primer. I then decided to apply very sutble mottling of 74 when I finished the edge of the fuselage 74. That looked good enough.
Next it's time for gloss coat and decals.

Emeritus
_VISITCOMMUNITY
Uusimaa, Finland
Joined: March 30, 2004
KitMaker: 2,845 posts
AeroScale: 1,564 posts
Posted: Saturday, November 04, 2006 - 03:50 PM UTC
Removed the masks and started applying the decals.


After putting on the swastikas, I noticed that the white was quite translucent, so I decided to use techmod decals instead. Strangely, they take ages to release from the sheet. Techmods' take like 20 seconds, these around 5 minutes! Perhaps they're old or something?

And what's with Asian manufacturers making decals so thick? Fortunately they seem to be starting to include thinner ones, but on older kits this is quite a nuisance.
Btw, does any manufacturer make BF-109 stencil decals? I'm asking just in case these kit-supplied ones fail completely.
Emeritus
_VISITCOMMUNITY
Uusimaa, Finland
Joined: March 30, 2004
KitMaker: 2,845 posts
AeroScale: 1,564 posts
Posted: Tuesday, November 07, 2006 - 10:08 PM UTC

I applied the rest of the national markings and registry numbers from the generic techmod sheet. Now I need to get some decent stencils before I can continue with the build.

In the meantime, I started building MPM's 1:72 Fokker D.XXI (3rd series).

The cockpit is assembled except for the control stick, which I'll attach after painting. I made the seatbelts from left-over PE, since none was included in the kit.


The propeller hub is the only resin part in the kit, to which the prop blades attach. Detail is nice, but getting the same angle to all the blades will be tricky. Perhaps I should make a jig with a styrene wegde to help alignment?
There were some faint sink marks on the back of the blades, which I puttied and sanded. The only other sink mark I could find was in the cockpit forward wall.


Be careful with electric tools! This happens if you're not...
The cockpit assembly is much too wide and won't fit inside the fuselage halves. I decided to sand & grind both the fuselage halves and the cockpit parts. I of course managed to grind through the fuselage wall... Fortunately I didn't do damage to the fabric ribbing detail, so the breach was easy to blank off with thin styrene sheet and fill the hole with CA & kicker and finish off with putty and sand paper.
Emeritus
_VISITCOMMUNITY
Uusimaa, Finland
Joined: March 30, 2004
KitMaker: 2,845 posts
AeroScale: 1,564 posts
Posted: Saturday, November 11, 2006 - 06:39 PM UTC

I finally got proper pics taken of my 1:72 Brewster. Check them out at the gallery.
JPTRR
Staff MemberManaging Editor
RAILROAD MODELING
#051
_VISITCOMMUNITY
Tennessee, United States
Joined: December 21, 2002
KitMaker: 7,772 posts
AeroScale: 3,175 posts
Posted: Saturday, November 11, 2006 - 07:50 PM UTC
Eetu,

That is a beauty!

Slowly, mine is getting ready for paint.

Great job, thank you!

FRed
Emeritus
_VISITCOMMUNITY
Uusimaa, Finland
Joined: March 30, 2004
KitMaker: 2,845 posts
AeroScale: 1,564 posts
Posted: Monday, November 13, 2006 - 09:45 PM UTC
I took some (hopefully) better pics of my Mörkö-Morane and added them to the FUMS gallery.

When visiting a LHS, I couldn't resist buying Roden's 1:72 LaGG-3. While I was searching for references (instructions only have a left side view in the painting guide, no gunsight, for example), I came across this great site with very nice articles on both LG-1 and LG-3, review of the kit, with information about the different versions that can be built etc. Very handy indeed if you're building a Finnish LaGG.
Click!
Emeritus
_VISITCOMMUNITY
Uusimaa, Finland
Joined: March 30, 2004
KitMaker: 2,845 posts
AeroScale: 1,564 posts
Posted: Sunday, November 19, 2006 - 01:21 AM UTC
Now I finally got an InScale decal sheet were I could swipe a set of stencils. I don't know if these Finnish language stencils are 100% accurate for this plane (or the G2 variant, the decal sheet was originally for G6's), but after the delays, and being told that the camouflage scheme given for the wings in Hasegawa's instructions is inaccurate, I don't care. I want to get this bird finished!
After Techmod's nearly flawlessly performing decals, these were a little shock. They tended to silver on surfaces that were just fine for Techmod's stuff. A few applications of micro sol got them snuggling down, however (I hope.... )Now there's the right side of the fuselage left to go, then I'm ready for weathering and finishing.


My Fokker D.XXI is coming along nicely too. Soon I'll be ready to start painting. One thing I haven't quite decided yet. Should I carve open the fuselage for the extra window behind the canopy, or just paint the back of the glass part black? The opening for the window wasn't there in the kit, you have to cut the opening and install the provided clear part. Now I have filed a recess to the fuselage and the part fits nicely. But would it look that much better if I carved through?


JPTRR
Staff MemberManaging Editor
RAILROAD MODELING
#051
_VISITCOMMUNITY
Tennessee, United States
Joined: December 21, 2002
KitMaker: 7,772 posts
AeroScale: 3,175 posts
Posted: Tuesday, November 21, 2006 - 09:38 PM UTC
My Classic Airframes B.239 is ready for camo. I took care of all the gaps and flaws uncovered by priming, and hit her with a NMF. Finnish Buffalos were delivered in overall aluminum dope before the war.


You can see the slight step at the bottom of the cowling where the fuselage halves did not match up. That is apparent at the tail wheel opening, too.

JPTRR
Staff MemberManaging Editor
RAILROAD MODELING
#051
_VISITCOMMUNITY
Tennessee, United States
Joined: December 21, 2002
KitMaker: 7,772 posts
AeroScale: 3,175 posts
Posted: Sunday, November 26, 2006 - 09:09 AM UTC
My naked Buffalo is getting some undies on:


Several more can be seen here: See Them Here

They will show you how I used tape and finally my finger nails to chip the freshly sprayed Polly Scale paint. Now realize, this acrylic was only on the plane about 10 minutes yet had adhered so well that the tape mainly removed only flecks! That big whopping area behind the canopy was tape, as was the biggest area under the wing, but otherwise Polly Scale dries fast and hard!
Emeritus
_VISITCOMMUNITY
Uusimaa, Finland
Joined: March 30, 2004
KitMaker: 2,845 posts
AeroScale: 1,564 posts
Posted: Sunday, November 26, 2006 - 07:38 PM UTC
Looking good!
That paint chipping looks nice, but the largest one on the fuselage band is a little on the large side. I think a chip that large would get overpainted pretty quickly.
Btw, have you remembered to fill the starboard (right) underwing landing light? These planes had only one fitted. Filling it should be a breeze, just glue the clear part in place, apply a little putty and sand smooth.

I've made progress with my Fokker too. Now I'm in the painting stage. The underside light grey and yellow areas are painted and the plane's ready for the black/green camo.


The engine has very nice detail, so I only added the wiring.
Emeritus
_VISITCOMMUNITY
Uusimaa, Finland
Joined: March 30, 2004
KitMaker: 2,845 posts
AeroScale: 1,564 posts
Posted: Wednesday, November 29, 2006 - 09:00 PM UTC
I got my Fokker painted and the decals are on:


Comparing the decals in this kit the ones in the Mörkö-Morane, what an improvement in decal quality!
While the ones in the Mörkö kit were one of the most useless excuses for decals I have ever tried, these were one of the best I had laid my hands upon. These things were actually almost too thin!
But while the folks at MPM got the decals material right, they still made the swastika blue too light, so I replaced them with techmod's.
JPTRR
Staff MemberManaging Editor
RAILROAD MODELING
#051
_VISITCOMMUNITY
Tennessee, United States
Joined: December 21, 2002
KitMaker: 7,772 posts
AeroScale: 3,175 posts
Posted: Thursday, November 30, 2006 - 01:13 AM UTC
I think Eetu is having fun with this campaign!
TedMamere
_VISITCOMMUNITY
Moselle, France
Joined: May 15, 2005
KitMaker: 5,653 posts
AeroScale: 4,347 posts
Posted: Thursday, November 30, 2006 - 03:53 AM UTC
Hi Eetu!

Nice looking plane! I didn't knew the Finnish used Gee-Bee racers in WW2! :-)

Jean-Luc
Emeritus
_VISITCOMMUNITY
Uusimaa, Finland
Joined: March 30, 2004
KitMaker: 2,845 posts
AeroScale: 1,564 posts
Posted: Friday, December 01, 2006 - 03:28 AM UTC

Quoted Text

I think Eetu is having fun with this campaign!


You got that right!

Looking at it, I think I should be able to build at least one more 1:72 scale plane, and perhaps one in 1:48 too.


Quoted Text

Hi Eetu!

Nice looking plane! I didn't knew the Finnish used Gee-Bee racers in WW2!

Jean-Luc


It's funny how Finns achieved good results with planes that failed somewhere else. F2A-1 and Fokker D.XXI are prime examples. In the Winter War, Lt. Jorma Sarvasto, flying FR-97 (Fokker D.XXI) managed to shoot down 6 DB-3 bombers in 4 minutes. He had the seventh one his sights, but had ran out of ammo.
TedMamere
_VISITCOMMUNITY
Moselle, France
Joined: May 15, 2005
KitMaker: 5,653 posts
AeroScale: 4,347 posts
Posted: Monday, December 04, 2006 - 02:07 AM UTC
Hi all!

I've finally started my G.50 for the FUMS Campaign!
I hope I'll be able to finish it before December 31st!

So far I only started to work on the cockpit and the engine. I added push rods to the cylinders and had to scratchbuild an instrument panel because I must have lost the photo etched fret of the kit (or maybe it wasn't in the box). As I don't have the time to ask for replacement, I will do without PE. Fortunately, the fret was small and there are not many parts to replace.


I also glued the resin wheel bay insert to the lower wing half and... shock! Horror! The fit is terrible!
I will try to fix this with putty but this will probably take some days. I already smeared a lot of putty inside and now I must wait until it dries so I can add a second layer from the outside.


I think this Flying Machines kit won't be easy to build!

Jean-Luc
JPTRR
Staff MemberManaging Editor
RAILROAD MODELING
#051
_VISITCOMMUNITY
Tennessee, United States
Joined: December 21, 2002
KitMaker: 7,772 posts
AeroScale: 3,175 posts
Posted: Tuesday, December 05, 2006 - 01:04 AM UTC
Jean-Luc, welcome! (Er...Merlin...where are you...?)

Hi guys,

Two things--my "Sky Pearl" is getting ready for the end of the campaign. She's a bit more weathered than I planned because...

Second, my B.239 is also to be featured in my plan to show how I chip paint. What you see here is both regular and sea salt, as well as scratching with finger nail, dowl, tape, etc.


Emeritus
_VISITCOMMUNITY
Uusimaa, Finland
Joined: March 30, 2004
KitMaker: 2,845 posts
AeroScale: 1,564 posts
Posted: Tuesday, December 05, 2006 - 11:28 PM UTC
It's Independence day!

I was hoping get something finished for the day, but it looks like these two will be done in a few more days.


I would have got this one done, but I seemed to have lost the gunsight part somewhere. Not a big chore to scratch-build, but still it's a delay.


My 109's almost done as well. Today I added the exhaust stains using pastels and did some more touching-up. Those stains look pretty good to me, but I'm still not 100% happy with them.
How do you apply them? Wet & dry? With a brush or what?
I think airbrushing them would give better results, but when you mess up, it's FUBAR with pretty slim & none chances of removing the paint, assuming you use acrylics for the stains as well as the rest of the exterior. And btw, future doesn't help much with Xtracrylics' thinner. I tried removing a paint smugde, but the thinner ate right through the smugde, future, and the xtracrylics under it, right to the primer)

Oh, and btw, I noticed that I had forgotten to apply the number 1's to the cowling, not that's fixed too.
TedMamere
_VISITCOMMUNITY
Moselle, France
Joined: May 15, 2005
KitMaker: 5,653 posts
AeroScale: 4,347 posts
Posted: Tuesday, December 05, 2006 - 11:36 PM UTC
Hi Eetu!

Fantastic work! The Fokker looks better with the engine cowling!

Do you still use the brush for painting or are you doing all the paint job with the airbrush now?

Jean-Luc
Emeritus
_VISITCOMMUNITY
Uusimaa, Finland
Joined: March 30, 2004
KitMaker: 2,845 posts
AeroScale: 1,564 posts
Posted: Wednesday, December 06, 2006 - 01:58 AM UTC
Thanks for the compliments!

Now I'm using my AB almost exclusively for major areas, painting smaller details by hand.
It's amazing how much better results you can get. My paint coats are much thinner now and look more in-scale than by hand-brushing.
csch
_VISITCOMMUNITY
Buenos Aires, Argentina
Joined: December 27, 2002
KitMaker: 1,941 posts
AeroScale: 1,040 posts
Posted: Wednesday, December 06, 2006 - 04:52 AM UTC
Hi all:

I´ve been looking in the thread and all I can say is: WOW fellows, really great builds, all of them. Congratulations, very nice jobs.
JPTRR
Staff MemberManaging Editor
RAILROAD MODELING
#051
_VISITCOMMUNITY
Tennessee, United States
Joined: December 21, 2002
KitMaker: 7,772 posts
AeroScale: 3,175 posts
Posted: Wednesday, December 06, 2006 - 09:07 AM UTC
Hi Carlos,

Still time for you to jump in!
Emeritus
_VISITCOMMUNITY
Uusimaa, Finland
Joined: March 30, 2004
KitMaker: 2,845 posts
AeroScale: 1,564 posts
Posted: Friday, December 08, 2006 - 12:18 AM UTC
Here we go again...

I started building a second Hurricane. Same kit as last time, but now I'm adding a small Extratech PE set, posing the canopy open (if it fits on the fuselage spine), and applying black/green/light grey paint scheme.

I've already finished modifiying the wings back to mk.I (filled the two outer mg's on each wing), which the kit really is, despite being sold as a mk.II.
No real surprises there, so I'll spare you from any photos.

But here's the cockpit interior, made entirely from PE, and a pic of the left fuselage half, with the instrument panel glued in. It's the usual PE+acetate film, glued to the kit-supplied part.


Emeritus
_VISITCOMMUNITY
Uusimaa, Finland
Joined: March 30, 2004
KitMaker: 2,845 posts
AeroScale: 1,564 posts
Posted: Sunday, December 10, 2006 - 12:07 AM UTC
Dammit...
It seems like that Hurricane kit has more mk.II in it than mk.I
While I was looking at some pics, I noticed that the kit had several mk.II features. Antenna mast is different, the tail wheel strut too, and worst of all, the spinner is much longer and pointier. But then the nose is clearly a mk.I feature.
That antenna mast and tail wheel strut are easily modified, but that spinner looks daunting. It would have been quite easy to reshape if I hadn't glued in the propeller. Glue in a shaft of metal or something, attach to a power drill, and carefully sand it smaller.
I was thinking about building it as the Russian mk.II offered in the revell's decal sheet, although not 100% suitable being non-Finnish but closely tied with FUMS theme and Lampie's Hurricane-build, as this aircraft was captured and became HC-465 in FAF.
But, then I had already filled the extra gunports and shell ejector openings in the wings. The mg openings are dead-easy (and actually better that way,as they're quite badly done in the first place), but the empty cartridge ejector ports look much harder to pull off. And being filled with CA, filled plugs are harder than the surrounding styrene...

Btw, I managed to find the missing telescopic sight of my Fokker D.XXI! I was making a replacement from copper wire and styrene rod when I dropped it on the floor. While searching for it, I found the original. After painting and glueing the sight in place, the model's finished. Pics coming to the gallery soon.
TedMamere
_VISITCOMMUNITY
Moselle, France
Joined: May 15, 2005
KitMaker: 5,653 posts
AeroScale: 4,347 posts
Posted: Sunday, December 10, 2006 - 12:51 AM UTC
Hi Eetu!

That's too bad about the Hurricane! Sometimes we simply know to much things about those damn airplanes!

I made some progress on the G.50. I finished the wheel bays and it's definitely the biggest problem of the kit I think. If you build that Flying Machines model be prepared for some work in that area...


I also completed the cockpit and glued the wings. I had to place a styrene strip on the wing root to fill a gap (red arrow). The upper part of the fuselage is made of two inserts and will need some filler to achieve a good finish on the panel lines.


I hope that I have the most difficult pars of the build behind me! But with those short run kits you never know!?

Jean-Luc
Emeritus
_VISITCOMMUNITY
Uusimaa, Finland
Joined: March 30, 2004
KitMaker: 2,845 posts
AeroScale: 1,564 posts
Posted: Sunday, December 10, 2006 - 11:41 PM UTC
Your Fiat's looking good so far.
Yup, that's the thing with limited-run kits. Some go together with just a few swipes with sandpaper and a few dabs of putty here and there. Some take so much you're not sure if there's more styrene than putty.

I got a G.50 in my stash as well, but it's the Hasegawa/Secter kit. The shape looks good enough to me, but it's quite a schizophrenic kit regarding panel lines. The good thing is that they're recessed. The bad is that it seems like several people worked on the masters without keeping in contact with each other. The panel lines on the wings and fuselage are very delicate (too delicate, IMO), the upper front fuselage part has one panel line that resembles grand canyon... The lines on the tail surfaces look OK. to me.
Also, pretty much all the acces hatches are missing, meaning even more scribing work in addition to the panel lines on the wings and fuselage. I think I'll build this one a little later, without deadlines on my back. It should make a good-looking model however, as I got the old Eduard PE set, a replacement canopy from the flying machines kit (donated by a kind fellow modeler), a resin engine from Vector (a real must, just take a look at the sorry 1-part, 2-D excuse for a kit-supplied engine), plus a .50-cal mg set to replace the kit mg barrels.

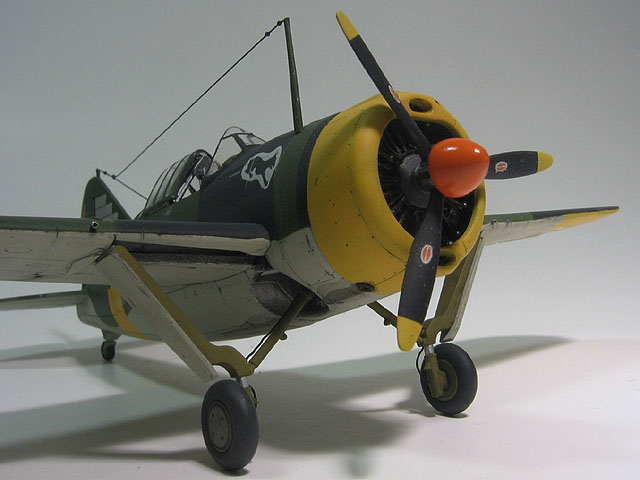
My Bf-109 is almost ready now. The only thing left to do is to paint the wing tip lights. Here's a quick sneak & peek pic:


I decided to put the hurricane on the waiting list for now. I also started tinkering with the Roden LaGG-3 kit I also got in my FUMS stash.
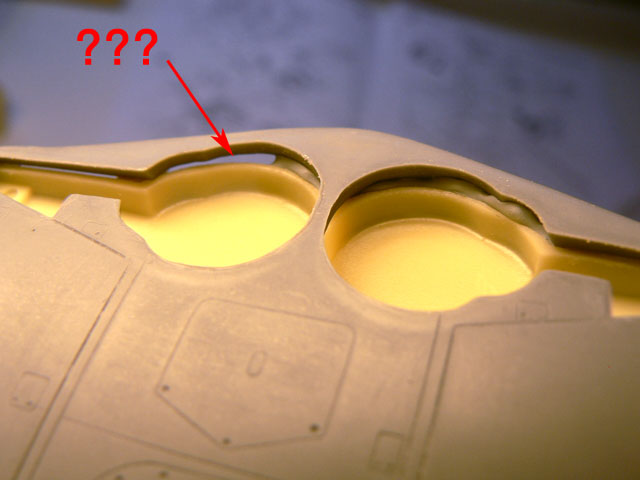
Looks like one of them limited-run kits, at least what comes to parts fit:


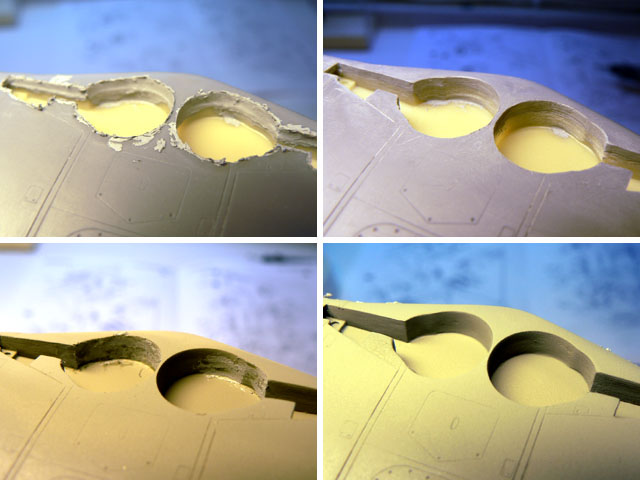
I have done some cleaning-up and tweaking and the fit's getting better. The overall detail seems very nice, though. I've better be carefull filling the gaps to minimize the harm to surrounding detail.
The kit comes with decals for both LG-1 and LG-3,but fail to point out that they had many differences, like radio mast, spinner, armament & upper cowling etc. The kit-supplied decals have to go too, the blue in the swastikas is too dark and the registry numbers are all black, they should be green on the right side, over black. Techmod to the resque, once again! I chose to build LG-3, the main reason being the wings, LG-1 had slots in the wings to counter stalls, a modification made by Finnish engineers. I'm not that confident about cutting 10 identical slots to the wings, so I went the easy way and chose LG-3.