_GOTOBOTTOM
World War II: Japan
Aircraft of Japan in WWII.
Hosted by Rowan Baylis
rising sun is still going on !
penpen
_VISITCOMMUNITY
Hauts-de-Seine, France
Joined: April 11, 2002
KitMaker: 1,757 posts
AeroScale: 0 posts
Posted: Sunday, February 29, 2004 - 11:46 PM UTC
I think it's time for a little update !
The ki43 and ki61 are now both closed.
I need to putty a few gaps on the ki43, then will come the time of cleanup on both kits !
I got books about the ki61 on saturday, so i'll be a bit more confident now about details of the plane.

And you, where have you got to ?


Holdfast
Staff MemberPresident
IPMS-UK KITMAKER BRANCH
#056
_VISITCOMMUNITY
England - South West, United Kingdom
Joined: September 30, 2002
KitMaker: 8,581 posts
AeroScale: 4,913 posts
Posted: Monday, March 01, 2004 - 09:32 AM UTC
:-) Looking good Penpen. My Val is coming on, but I have had to break off to concentrate on my Mossi for the group build on A-UK, I have a month to complete it eek.
Mal
jarhead
_VISITCOMMUNITY
Iowa, United States
Joined: April 20, 2003
KitMaker: 32 posts
AeroScale: 0 posts
Posted: Monday, March 01, 2004 - 09:44 AM UTC
Looking good penpen. Where dis you you get your blue-green color. Is it bottled or a mix. Jarhead
Wad_ware
_VISITCOMMUNITY
Illinois, United States
Joined: September 09, 2002
KitMaker: 537 posts
AeroScale: 437 posts
Posted: Monday, March 01, 2004 - 12:26 PM UTC
Dittos from me Penpen they are looking good.

I am getting further but actually still not too close to done yet. I have wings glued together, the fuselage glued together, landing gear all assembled, anything that can be glued together is. Plus I am done with the photo etch detailing on the engine but still have some assembly to go on the engine compartment as far as the exhaust pipes. I am at a standstill at the moment again for I am waiting on my metallic brown to show up in the mail so I can get those painted.
Basically at this point I have a large 'Box o' Small Parts' awaiting to be turned into 'One Big Part'. :-)
I have decided to airbrush any of the markings on the aircraft that I can. The main insignias and the yellow on the leading edges of the wings will be super easy. Some of the other markings like the red lines on the wings and the two white lines on the cowling should also be real easy to mask off and paint. The numbers on the tail I don't know if I am that brave yet for trying to make stencils for. The other really small markings I probably would be better to stick with the decals. Even using good tecnics sometimes you just can't guarantee that the decals won't silver up on you or do other silly things so I fugure airbrushing any of the markings I can will avoid decal problems.
newtothegame
_VISITCOMMUNITY
Washington, United States
Joined: October 05, 2003
KitMaker: 588 posts
AeroScale: 468 posts
Posted: Monday, March 01, 2004 - 02:17 PM UTC
Wad_ware,

I was thinking of trying to airbrush the insignias too, but am unsure how to do it. Are you going to cut a circle out of a large masking material (I was thinking the new glad wrap stuff???) And how do you cut the circle? Thanks. I want to try to stay away from as many decals as possible, but don't want to screw up the build any more than I already have...


My update:
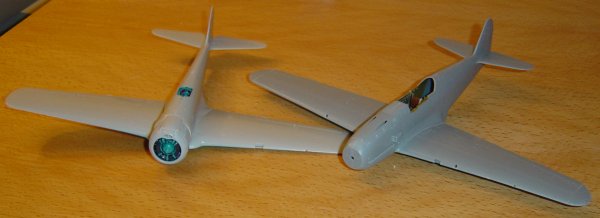
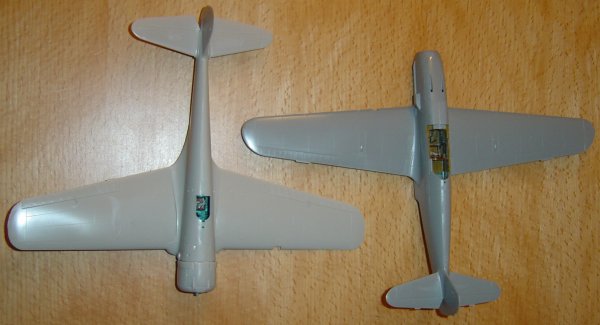
I have the cockpit in. Tried to detail it as much as possible, but had some troubles and noticed that some parts didn't stay on.

The fuselage is together, but I'm not too happy with the point that it meets the wings. Also, the places where I sanded off detail and then tried to rescribe look pretty poor. And after airbrushing on the yellow, I noticed a few small gaps. Unfortunately, my frustration level told me I should just move on.

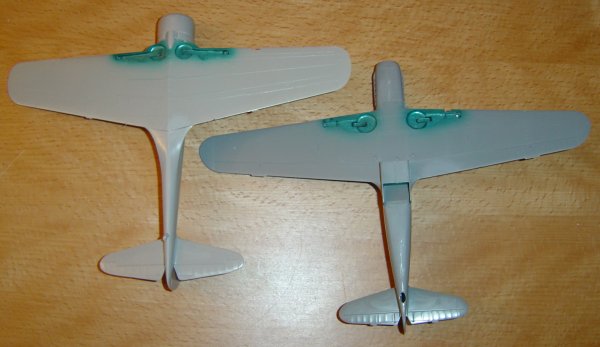
Now I am trying to detail the engine. I think it looks kind of cool, but I don't really understand what the directions are trying to teach me about detailing engines, so I don't know if it looks realistic.

I will try to get some progress pictures up in a day or two. I realize my post sounds very negative, but I am actually enjoying myself and feel that I am continuing to learn a bunch; it's just not as easy as I hoped it would be.

PS. Penpen, I have to agree: your's look like they are coming along nicely. Thanks for keeping this going.
Wad_ware
_VISITCOMMUNITY
Illinois, United States
Joined: September 09, 2002
KitMaker: 537 posts
AeroScale: 437 posts
Posted: Monday, March 01, 2004 - 03:58 PM UTC
I am going to try two different ways of airbrushing the insignias. I will definately practice on junk first before I go for the model

I got a sheet of circle stencils from an art supply store in my area (Dick Blick). The circles range in size from 1" to 2" diameter in 1/8" increments. The only problem is that I want to paint the red 'meatball' on the side of the plane with either a white or black band around it and I don't have a correct size match for all the circles I need to make. Plus the insignias on the wings are a different size also. This sheet is thin and flexible plastic so I am hoping that I will be able to just hold it in place manually while I paint what I can with that stencil sheet. I will just have to tape off the other circles that I am not using for obvious reasons.

To get the other size circles I need I am going to cut circles out of a large sheet of 'frisket' mask. This is a clear sheet of low tack mask. It works like a band-aid. You peel off the protective bottom and then stick your stencil to your project. I borrowed a circle cutter from a friend. It greatly resembles a pencil compass with a point to hold the center and an adjustable blade for cutting instead of a pencil for drawing circles. Any good hobby store or a store like Wal-mart that has a scrapbooking section would probably have some kind of decent circle cutter that would do the job really well.

That is my plans so far anyway and with a lot of practicing we'll see how it works out.
I am still a little ways away from actually painting the insignias so if you get to it before me and try either one of these ideas let me know how it comes out

Good modeling,
Wayne
penpen
_VISITCOMMUNITY
Hauts-de-Seine, France
Joined: April 11, 2002
KitMaker: 1,757 posts
AeroScale: 0 posts
Posted: Monday, March 01, 2004 - 07:31 PM UTC
It's great to hear that you are moving on too !

The blue is the "aotake blue" color from GUNZE.
I added a few details last night. The planes should be ready for a coat of primer within a few days !
I'll stick to the decals for the main part, but I'll have to airbrush a few lines (not provided for the ki61, so I'll have to do them).
Merlin
Staff MemberSenior Editor
AEROSCALE
#017
_VISITCOMMUNITY
United Kingdom
Joined: June 11, 2003
KitMaker: 17,582 posts
AeroScale: 12,795 posts
Posted: Tuesday, March 02, 2004 - 08:47 AM UTC
Hi penpen

They're looking good... and making me feel jealous!

A combination of too much work and hectic home life means I haven't even had a chance to start!... basically all the time I have seems to go into Site stuff... At the moment it looks like every thing I planned to build this Spring is a washout... so I will build my Judy - but it will probably be months after the rest of you have forgotten all about Rising Sun.

All the best

Rowan
Bus
_VISITCOMMUNITY
Sao Paulo, Brazil
Joined: December 11, 2003
KitMaker: 846 posts
AeroScale: 0 posts
Posted: Tuesday, March 02, 2004 - 10:10 AM UTC
I finished my Rufe Fighter!It´s 1/48 from Tamiya ...I´ll soon be posting some pics!
Wad_ware
_VISITCOMMUNITY
Illinois, United States
Joined: September 09, 2002
KitMaker: 537 posts
AeroScale: 437 posts
Posted: Tuesday, March 02, 2004 - 11:34 AM UTC
Sounds like things are pretty hectic for you Merlin
Hope you will be able to do some kit building before too long.
It it's any consolation just don't lose sight of the fact that all the time and effort you put into this site is greatly appreciated by me. I am sure that everybody else will probably echo that sentiment.
Armorama is one of, if not the best, sites on the internet for us military modelers and it is because it is put together and cared for by people like yourself who love this hobby too.

:-) Hope I didn't make you blush :-)
Wayne
penpen
_VISITCOMMUNITY
Hauts-de-Seine, France
Joined: April 11, 2002
KitMaker: 1,757 posts
AeroScale: 0 posts
Posted: Tuesday, March 02, 2004 - 08:52 PM UTC
No problem Merlin !
We all appreciate all the great work you do for the site ! And I hope you enjoy your hectic "real life" too !

I'm certain that you'll enjoy your judy a lot. I took a look inside the boxes of my 2 judy kits (you're envious, I know it) and I found out I had missing parts for one kit ! So I'll have to scratch them looking at the parts fom the other kit !
Merlin
Staff MemberSenior Editor
AEROSCALE
#017
_VISITCOMMUNITY
United Kingdom
Joined: June 11, 2003
KitMaker: 17,582 posts
AeroScale: 12,795 posts
Posted: Wednesday, March 03, 2004 - 09:13 AM UTC
Hi Wad_ware and penpen

Thankyou for the kind sentiments - I really appreciate it! As for blushing... I think I should moan about how hard life is more often! :-)

Seriously, I will have a crack at the Judy... better late than never!

All the best

Rowan
Bus
_VISITCOMMUNITY
Sao Paulo, Brazil
Joined: December 11, 2003
KitMaker: 846 posts
AeroScale: 0 posts
Posted: Wednesday, March 03, 2004 - 01:31 PM UTC
Hey guys!This is the Rufe I was talking about.This is the only photo i could take this far.It´ll be my entry for the A.G.E campaign.
newtothegame
_VISITCOMMUNITY
Washington, United States
Joined: October 05, 2003
KitMaker: 588 posts
AeroScale: 468 posts
Posted: Wednesday, March 03, 2004 - 02:25 PM UTC
Bus,
It is looking great. What green did you use; I used Tamiya JN Green, but like your's better.

Also, what kit is it? Looks so good, I might want to get one to try.
Wad_ware
_VISITCOMMUNITY
Illinois, United States
Joined: September 09, 2002
KitMaker: 537 posts
AeroScale: 437 posts
Posted: Wednesday, March 03, 2004 - 04:21 PM UTC
Bus - the Rufe looks real good. Nice weathering and all.
Can't wait to see more pics :-)

Wayne
penpen
_VISITCOMMUNITY
Hauts-de-Seine, France
Joined: April 11, 2002
KitMaker: 1,757 posts
AeroScale: 0 posts
Posted: Wednesday, March 03, 2004 - 07:37 PM UTC
Bus, your Rufe is looking great !
I hope you'll be able to show us more pics !
newtothegame
_VISITCOMMUNITY
Washington, United States
Joined: October 05, 2003
KitMaker: 588 posts
AeroScale: 468 posts
Posted: Thursday, March 04, 2004 - 03:35 AM UTC
Well here are my progress shots. I put the canopy on with white glue and after painting notice that the fit is terrible. Any advice of filling the huge gaps? Can I use the CA now with the white glue as a protector.

Again this is my first engine detailing attempt. Not at all sure how accurate it looks, but it looks better than it did!?


Thanks for any comments / advice.
Leon
Bus
_VISITCOMMUNITY
Sao Paulo, Brazil
Joined: December 11, 2003
KitMaker: 846 posts
AeroScale: 0 posts
Posted: Thursday, March 04, 2004 - 05:04 AM UTC
Thanks guys!
Newtothegame- I used a Humbroll or Tamiya paint, as I´m not in my house,I can´t give you the number right now(I´ll PM you later)
This is a Tamiya kit, with excelent fit.I just had some problems with the decals.
I´ll post some morre pics soon
Thanks!
BTW- Your´s looking great too!!
Holdfast
Staff MemberPresident
IPMS-UK KITMAKER BRANCH
#056
_VISITCOMMUNITY
England - South West, United Kingdom
Joined: September 30, 2002
KitMaker: 8,581 posts
AeroScale: 4,913 posts
Posted: Thursday, March 04, 2004 - 08:02 AM UTC
:-) Bus nice looking Rufe. Weathering is good, paint chipping looks well done, what did you use? Just a little something you might want to consider, for the future. If you paint the interior colour on your canopy frames, first, it will show through on the inside, then add the exterior colour, when you paint the rest of the aircraft. Even if you don't paint the interior colour a couple of coats are usually necessary, because light shinning through the clear plastic makes the paint on the frames look lighter.
What problems did you have with the decals?

Leon,
Nice Zero, what kit/scale is it? Some good pre-shading you’ve got there, and the engine looks good. Without seeing how bad the canopy fit is it’s difficult to offer advice, but it is possible to fill gaps with white glue. Excess can be wiped off, if you use CA you could cause more problems when trying to remove any excess. Cockpit looks very good :-)
Mal
Bus
_VISITCOMMUNITY
Sao Paulo, Brazil
Joined: December 11, 2003
KitMaker: 846 posts
AeroScale: 0 posts
Posted: Thursday, March 04, 2004 - 10:36 AM UTC
Thanks for the tip Mal!For the paint chiping efect I used Humbroll Silver and for stains, rust, I used oils and pastels.The decals didn´t want to "glue"in the plane, so lots of decal solution was used
Wad_ware
_VISITCOMMUNITY
Illinois, United States
Joined: September 09, 2002
KitMaker: 537 posts
AeroScale: 437 posts
Posted: Thursday, March 04, 2004 - 10:41 AM UTC
Newtothegame - That Zero is looking excellent with the preshading, the cockpit detail, and your engine detailing to me looks great. :-)
Did you use any PE in the cockpit or is it OOTB? Whichever way you did it, it sure looks good.
Sorry I can't offer you any tips or advice on your gap problem. That kind of thing is still past my modeling skills and experience.
I have to break down some time and try the preshading. That always looks so darn good when it is all done.
Can't wait to see the finished Zero.

Wayne
penpen
_VISITCOMMUNITY
Hauts-de-Seine, France
Joined: April 11, 2002
KitMaker: 1,757 posts
AeroScale: 0 posts
Posted: Thursday, March 04, 2004 - 07:24 PM UTC
newtothegame, your zero is looking realy great !
Your preshading is realy good and the details in the cockpit and on the engine realy add to it !
To fill your gap, i'll just give the same advice as Mal : use white glue ! CA could do a lot of damage !
newtothegame
_VISITCOMMUNITY
Washington, United States
Joined: October 05, 2003
KitMaker: 588 posts
AeroScale: 468 posts
Posted: Friday, March 05, 2004 - 08:30 AM UTC

Quoted Text


Leon,
Nice Zero, what kit/scale is it?
Mal


It is Tamiya 1/48 A6M5c.


Quoted Text

Newtothegame - That Zero is looking excellent with the preshading, the cockpit detail, and your engine detailing to me looks great. :-)
Did you use any PE in the cockpit or is it OOTB? Whichever way you did it, it sure looks good.

Wayne


Thanks. I have to admit that I love the preshading technique. I think that it really makes the finish look sharp. Of course my skill is still kind of low and I tend to either over do it, or (like with the top of the zero) cover it up - live and learn.

I did start using a PE set in the cockpit and successfully bent or lost about half of it. I really tried hard on this one though and got a few reference photos and put in some stretched sprue nobs(?). I couldn't figure out how to not use the decals on the left side of the pit (visible in the picture). I read somewhere that you can take some sheet plastic and put holes in it to place over the decal and make a little more 3-dimensional, but I was not very successful with this and gave up.


Quoted Text

newtothegame, your zero is looking realy great !
Your preshading is realy good and the details in the cockpit and on the engine realy add to it !
To fill your gap, i'll just give the same advice as Mal : use white glue ! CA could do a lot of damage !


Thanks. I am going to give the white glue a try tonight.


On a side note: back to painting on the red circles...do you think I will have any luck with just masking it with a wet newspaper with a circle cut out? If so, should I apply future before that point to protect the under layers?

Thanks.
Leon
Wad_ware
_VISITCOMMUNITY
Illinois, United States
Joined: September 09, 2002
KitMaker: 537 posts
AeroScale: 437 posts
Posted: Friday, March 05, 2004 - 11:36 AM UTC
Leon - to me that sounds a little risky using wet newspaper for your mask.
It just seems that it would be too easy to accidentally spray too heavy around the outside of your circle and have the paint bleed through where you dont want it.
Unless you spray lots of VERY light coats at a time until you get the coverage you want on the insignia.
Did you use acylic or enamel paints on your kit? If you use acrylic the wet paper might mess up your paint if left too long. And the future, even if you let it cure for a couple of days, could probably interact with the wet paper and mess you up that way.
The best way to try it out if you can is find a junk piece of old model laying around somewhere or get you a small sheet of plastic. Paint it with the same paint you have on your model and then try your masking idea out on that and see how it comes out. I would sure hate to see you end up with horror stories about your paint job if it doesn't work right for you.

You might try just a thin sheet of cardboard like the back of a spiral bound notebook or the cardboard of your model box. It would be firm enough to keep its shape and flexible enough to hold firm and mold against the model to give it a good solid fit. I wouldn't wet it tho. Just still spray light coats to keep the paint from soaking through the cardboard onto the wrong places.
Also if you don't all ready, get you some latex gloves. They are super cheap at Walgreens. That way you can hold your mask down really close to the edge of your mask to hopefully not get any bleeding under your edges and not worry about all that paint on your fingers. You want to be able to hold your mask down as firmly as possible. You could also try that out on a piece of scrap anything just to see if that could work for you too.

Hope that helps you. Someone else will probably be able to give you their advice too. You can never have too much knowledge

Wayne

Wad_ware
_VISITCOMMUNITY
Illinois, United States
Joined: September 09, 2002
KitMaker: 537 posts
AeroScale: 437 posts
Posted: Monday, March 08, 2004 - 11:22 AM UTC
Leon - have you had a chance to try out any painting your insignias yet?
Just curious on what you choose to do and how it works out for you.

Good modeling,
Wayne
 _GOTOTOP