World War II
Discuss WWII and the era directly before and after the war from 1935-1949.
Hosted by Rowan Baylis
B-29 Superfortress Jumbo King of the Show
Joel_W
Staff MemberAssociate Editor
AUTOMODELER
_VISITCOMMUNITY
New York, United States
Joined: December 04, 2010
KitMaker: 11,666 posts
AeroScale: 7,410 posts
Posted: Tuesday, March 08, 2016 - 01:26 AM UTC

Quoted Text


Quoted Text

Gary,
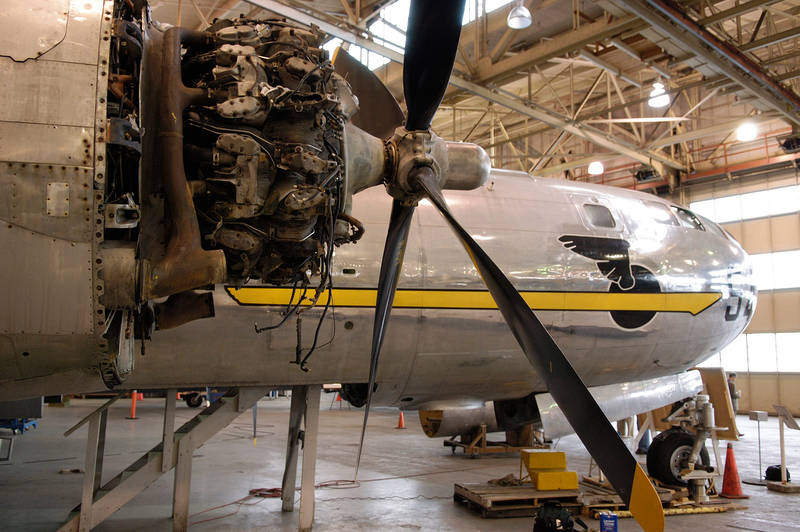
Those big radials really look good with the wiring harness added. Your shaming me into doing the engines on the B-25B.
Joel


Joel,
Heh...I thought by now that doing the harness in your Mitchell was obligatory after showing us pictures of your P-61 engines. You kinda set the bar, buddy.

That being said, the kit engines are in need of some lovin'. And I would bet anyone 20 bucks that the pictures of those Wright Cyclones I can see on the net every day are better than the maker of the model had at his disposal when he was preparing the original moulds.


Best wishes,

Gary


Gary,
The kit actually has a molded plastic wiring harness. I just may try those, but honestly, I've never had much luck with them. They have to fit perfectly or they look as phony as a $3 bill.

I can't tell you how long each of those P-61A engines took, but they were like little mini kits.

Joel
GazzaS
#424
_VISITCOMMUNITY
Queensland, Australia
Joined: April 23, 2015
KitMaker: 4,648 posts
AeroScale: 1,938 posts
Posted: Tuesday, March 08, 2016 - 03:01 AM UTC
Joel,
Those moulded wiring harnesses must be very frail! I can't even look at styrene that is less than 1mm thick and know I will break it. But I hope it works for you.

I can understand a reticence to plunge into detailed engine work. Truthfully, they are little kits in themselves. I try to limit the extra effort to what can be seen afterwards. Had this kit been provided with full-depth engines, I would definitely not have worried much about the back halves. As it was, 36 wires into the harness was plenty for my attention span.

Best wishes,

Gary
GazzaS
#424
_VISITCOMMUNITY
Queensland, Australia
Joined: April 23, 2015
KitMaker: 4,648 posts
AeroScale: 1,938 posts
Posted: Wednesday, March 09, 2016 - 12:21 PM UTC
Hi Everyone!
After a big day of scribing, I tackled an issue that I'd only read about a few days ago:

The kit's Hamilton Standard Props. What I'd read was that the kit props were pretty bad but, (big but!) the aftermarket ones were shaped better but (there's that 'but' again) the blades were too short by 1/4 inch.

Obviously I didn't want to fork out for AM that I would have to modify. So I set out to modify the kit props. Looking for dimensions on the hub led nowhere. The only dimension I could find was the overall prop diameter of 16'7".

So, converting everything into metrics, I ended up with a new hub diameter of 5.6mm for the kit. Next step was filing and sanding it down until I could get my calipers around it. Thank goodness for digital calipers is all I've got to say! In a picture where two mechanics were handling the hub doing maintenance, it looked to me as if the hub was as wide as it was tall. I broke out the saw and sawed off the hub and shortened it to 5.6mm

Here, you can compare my modified propeller sitting next to and unmodified spinner. The modified spinner is on the left:

Please let me know if I stuffed it up or not. I'm not overly familiar with this spinner, though it does look to me as if the collar needs some loving, too.

While looking at images of the spinner I came upon one where the collar was actually rusty(looked like a derelict engine laying in a field somewhere). Therefore, can't be aluminum. Thankfully photos of the bird are plentiful and in color!

Thank you for looking...

Gary
Redhand
#522
_VISITCOMMUNITY
New Jersey, United States
Joined: January 20, 2013
KitMaker: 1,460 posts
AeroScale: 1,443 posts
Posted: Wednesday, March 09, 2016 - 04:11 PM UTC
I confess that modifying the kit prop hubs never occurred to me. I was grateful that there were Ham Standard props in the re-issued kit. The original issues way back when only had Curtiss Electrics.
Joel_W
Staff MemberAssociate Editor
AUTOMODELER
_VISITCOMMUNITY
New York, United States
Joined: December 04, 2010
KitMaker: 11,666 posts
AeroScale: 7,410 posts
Posted: Thursday, March 10, 2016 - 02:59 AM UTC
Gary,

Talk about a impressive modification that has a tremendous influence on the overall look of the prop. The difference is truly night and day.

Joel
Redhand
#522
_VISITCOMMUNITY
New Jersey, United States
Joined: January 20, 2013
KitMaker: 1,460 posts
AeroScale: 1,443 posts
Posted: Thursday, March 10, 2016 - 06:44 AM UTC

Quoted Text

Gary,

Talk about a impressive modification that has a tremendous influence on the overall look of the prop. The difference is truly night and day.

Joel


I don't disagree. The issue just went completely over my head at the time I was doing my build.
AussieReg
Staff MemberAssociate Editor
AUTOMODELER
#007
_VISITCOMMUNITY
Victoria, Australia
Joined: June 09, 2009
KitMaker: 8,156 posts
AeroScale: 3,756 posts
Posted: Thursday, March 10, 2016 - 07:40 AM UTC
Gazza, I have just read through this thread from start to finish for the first time. Mate, you are truly insane! Very talented, very dedicated, but way gone! Seriously inspiring work so far, I love it and will be following along the rest of the journey.

Now, since you have been confirmed a certifiable, here is what I expect to see in the wall-hanging diorama . . .

I think I might be able to scrounge up 6 or 8 bombs from the spares box as tribute and I'm sure others here will do similar.

The modification on the spinner looks great, so much better and correctly proportional than the original kit part.


Carry on. Cheers, D
GazzaS
#424
_VISITCOMMUNITY
Queensland, Australia
Joined: April 23, 2015
KitMaker: 4,648 posts
AeroScale: 1,938 posts
Posted: Thursday, March 10, 2016 - 08:58 AM UTC
Brian, Joel, and Damian,
Thank you for your kind words. I'm really glad my change looks the part. However, that's tempered by knowing how much effort three more of them will take.

Re: Diorama. I haven't really considered doing much beyond a blacktop or concrete surface. This model will stretch my attention span to it's limit...
...but my goodness that's a lot of bombs!

Gaz
Kilo_Uniform
_VISITCOMMUNITY
Gauteng, South Africa
Joined: July 03, 2015
KitMaker: 280 posts
AeroScale: 141 posts
Posted: Thursday, March 10, 2016 - 10:43 AM UTC
Hi Gary

AMS!! Cray-cray or not - I'm along for the ride.

Keep up the good work!!

Regards,
Kobus
GazzaS
#424
_VISITCOMMUNITY
Queensland, Australia
Joined: April 23, 2015
KitMaker: 4,648 posts
AeroScale: 1,938 posts
Posted: Friday, March 11, 2016 - 04:36 AM UTC
Hi Everyone,
...yep, still scribing. (If this don't drive me cray-cray, Kobus, nothing will) I have a few allies in my struggle against the raised panel lines. One is the UMM-01 Scriber. One of it's main attributes is that it will obliterate the old raised panel line at the same time that it is scratching out a new one.

Another Ally in the struggle is Tamiya Masking Tape for curves. I'm using the 2mm size.
If you think scribing a flat panel is tough, scribing a nacelle or a fuselage band is far more difficult. But here is where the Tamiya tape comes in. It will stretch and fit the curves of your nacelle:


Or the oddly shaped panel. This bottle-shaped panel covers the turbo-supercharger on the engine of the B-29:


It isn't as strong laterally, so the movements of your scribe must be shorter and more gentle.

The white paste I'm using to fix my scribing errors is cheap acrylic paste I'd bought a couple years ago for doing a seascape. I recently used it to put the Zimmerit coating on a German tank and have decided to put it to other uses. I hope that when I foil over my errors that the two will hold together.

Thanks for looking!

Gaz
Joel_W
Staff MemberAssociate Editor
AUTOMODELER
_VISITCOMMUNITY
New York, United States
Joined: December 04, 2010
KitMaker: 11,666 posts
AeroScale: 7,410 posts
Posted: Friday, March 11, 2016 - 08:06 AM UTC
Gary,
Your one brave soul to be scribing a raised panel line B-29 in 1/48 scale. You sure that the very hot Australian summer sun hasn't gotten to you just a little bit?

Joel
GazzaS
#424
_VISITCOMMUNITY
Queensland, Australia
Joined: April 23, 2015
KitMaker: 4,648 posts
AeroScale: 1,938 posts
Posted: Friday, March 11, 2016 - 09:12 AM UTC
Despite the kit's size, you dont get the impression that it's highly detailed. But like all models, there is something above and beyond that a guy has to do. I'm just hoping I don't find too many more things to change.

Winter is slowly coming... So we won't be able to blame the heat much longer...lol

Gaz
Joel_W
Staff MemberAssociate Editor
AUTOMODELER
_VISITCOMMUNITY
New York, United States
Joined: December 04, 2010
KitMaker: 11,666 posts
AeroScale: 7,410 posts
Posted: Friday, March 11, 2016 - 08:05 PM UTC

Quoted Text

Despite the kit's size, you dont get the impression that it's highly detailed. But like all models, there is something above and beyond that a guy has to do. I'm just hoping I don't find too many more things to change.

Winter is slowly coming... So we won't be able to blame the heat much longer...lol

Gaz


Gary,
you're looking forward to fall/winter and cooler temps, and I'm looking forward to the exact opposite. I've had more then enough of freezing temps, snow, ice, and whatever Old Man Winter throws at us. Temps are finally staying in the 50-low 60s, so one can venture outside without having to be dressed up as an Eskimo.

The more you look, the more you'll find that can be detailed or upgraded. Landing gear is always high on that list, especially for 1/48+ bombers.

Joel
spaarndammer
_VISITCOMMUNITY
Noord-Holland, Netherlands
Joined: January 28, 2007
KitMaker: 1,945 posts
AeroScale: 388 posts
Posted: Saturday, March 12, 2016 - 12:07 AM UTC
Impressive work on the B-29 Gary. Already such a lot of work and you didn't even start with foiling!

I will follow this with interest!


Jelger
GazzaS
#424
_VISITCOMMUNITY
Queensland, Australia
Joined: April 23, 2015
KitMaker: 4,648 posts
AeroScale: 1,938 posts
Posted: Saturday, March 12, 2016 - 03:28 AM UTC
Thank you, Jelger!

Joel,
I'll most likely add some brake lines to the landing gear at least. Honestly, I haven't even researched them heavily, yet.

Gary
greif8
_VISITCOMMUNITY
Bayern, Germany
Joined: January 17, 2006
KitMaker: 673 posts
AeroScale: 492 posts
Posted: Saturday, March 12, 2016 - 02:37 PM UTC
Impressive work Gary. I think the prop hub looks fantastic. You are a braver man then I with all the scribing my friend. I would have already botched it enough times that it would look terrible.
Kilo_Uniform
_VISITCOMMUNITY
Gauteng, South Africa
Joined: July 03, 2015
KitMaker: 280 posts
AeroScale: 141 posts
Posted: Saturday, March 12, 2016 - 03:48 PM UTC
Hi Gary,

Nuts for sure! But I'm still following [and learning] with interest.

Regards,
Kobus
GazzaS
#424
_VISITCOMMUNITY
Queensland, Australia
Joined: April 23, 2015
KitMaker: 4,648 posts
AeroScale: 1,938 posts
Posted: Saturday, March 12, 2016 - 11:06 PM UTC
Hi Ernest,
Thank you!
I make many errors when I scribe. I don't have steady hands, and it's very easy to drift off line as much as an millimeter before you realise it. I keep a black marker nearby to mark each mistake, then I have to go back and fill them all in before I even reach for the sandpaper. I'm using a white quick drying acrylic paste which I hope will work well. However, I won't know until I apply foil.

Kobus,
Glad here! We both get to learn on this one.

Best wishes,

Gary
GazzaS
#424
_VISITCOMMUNITY
Queensland, Australia
Joined: April 23, 2015
KitMaker: 4,648 posts
AeroScale: 1,938 posts
Posted: Friday, March 18, 2016 - 10:48 AM UTC
Hello Friends,
Work has been slow lately on the B-29. On the good side, I can report that all of the raised panel lines on the main assembly parts have all been converted to recessed panel lines.

This enabled me to consider adding more panel lines to:

A. Add detail to the model. and...

B. Make foiling easier.

Here is where I have decided to split the barbette rings and observation blister rings into four panels after looking at some photos.

I like the rivet detail on the barbette rings, but realize they are wayyyyy too thick.

You can see that the B-29 was built to be very clean. Even the armament meshes into the fuselage gracefully

So, with a little work with the Dremel, a file, and some sandpaper I got to this stage for comparison between the port and starboard halves.


Here is a nice shot of the aft most ventral barbette. It just reminds me that every part of this plane has to be clean.


Not much, I know. I'm hoping that once the temperatures start to drop my productivity will increase.

Best Wishes,

Gaz
AussieReg
Staff MemberAssociate Editor
AUTOMODELER
#007
_VISITCOMMUNITY
Victoria, Australia
Joined: June 09, 2009
KitMaker: 8,156 posts
AeroScale: 3,756 posts
Posted: Friday, March 18, 2016 - 05:19 PM UTC
Nice work Gaz, very neat clean-up job on the barbette fairings.

Cheers, D
Joel_W
Staff MemberAssociate Editor
AUTOMODELER
_VISITCOMMUNITY
New York, United States
Joined: December 04, 2010
KitMaker: 11,666 posts
AeroScale: 7,410 posts
Posted: Friday, March 18, 2016 - 06:25 PM UTC
Gary,
Those fairings really look exceptional. An excellent job of thinning and refining them. I know it doesn't look like much work to the casual viewer, but I've done a lot of that type of model enhancement, so I know just how long a process it is.
Joel
KelticKnot
_VISITCOMMUNITY
Scotland, United Kingdom
Joined: May 11, 2015
KitMaker: 768 posts
AeroScale: 656 posts
Posted: Friday, March 18, 2016 - 06:45 PM UTC
Gary, i admire the attention to detail you are putting in. Getting those small details like the fairings to look less like clumsy injection molded plastic will lift the whole model i'm sure.
How long did the fusrlage rescribe take do you think?
Redhand
#522
_VISITCOMMUNITY
New Jersey, United States
Joined: January 20, 2013
KitMaker: 1,460 posts
AeroScale: 1,443 posts
Posted: Saturday, March 19, 2016 - 01:56 AM UTC
This is shaping up to be an epic build, Gary. I am most impressed!!
GazzaS
#424
_VISITCOMMUNITY
Queensland, Australia
Joined: April 23, 2015
KitMaker: 4,648 posts
AeroScale: 1,938 posts
Posted: Saturday, March 19, 2016 - 02:46 AM UTC
Hey Gentlemen,
Thank you very much for your kind words! One of the 'joys' of working with a kit like this is how much you turn up when researching some other factor.

Just looking at these two pictures of the real thing, I'm thinking that the turret covers are either a different material than the rest of the aircraft, or if they are alumuinum they are made in an entirely different way. They lack machining marks or slight scratches, even. And they don't seem to be polished like the rest of the machine. Further study is required, obviously.

@ Paul: Because I bounce from task to task, it's hard to gauge how long I actually spent scribing the fuselage over the last two weeks. At a guess, I reckon somewhere between 10-16 hours. Of course time is lost fixing mistakes and waiting for putty to dry.

I just used Bondic as a putty for the first time yesterday. It is dried in seconds with UV light. It's marvelous stuff in that capacity. I bought it originally as a cement, but found that the joins we want require amounts of cement too small for the Bondic to work well.

@ Brian: I can only humbly bow at your feet when it comes to epic. Right now, I'm bouyed by the beauty of the machine, and my hopes to emulate it. I hope to ride that wave all the way to completion.

Having a community to share the voyage motivates me as well.

Best Wishes,

Gary
greif8
_VISITCOMMUNITY
Bayern, Germany
Joined: January 17, 2006
KitMaker: 673 posts
AeroScale: 492 posts
Posted: Saturday, March 19, 2016 - 01:17 PM UTC
Exceptional work on the fairings, they look very well done.