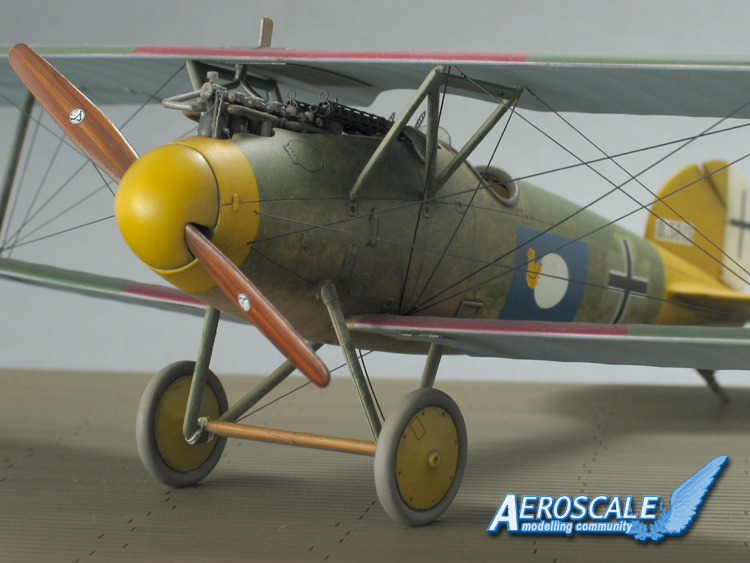
Canvas Falcons - Albatros D.V.

#041
Kobenhavn, Denmark
Joined: July 20, 2006
KitMaker: 10,069 posts
AeroScale: 3,788 posts
Posted: Wednesday, November 19, 2014 - 03:22 PM UTC
Here is my entry for this campaign: the Eduard 1/48 Albatros D.V. Looks to be a nice little build.
I was looking to build this for the WWI campaign, but realistically I will not have the time to finish this before the end of the year. In fact I will probably only cut the plastic in 2015.
I am really looking forward to build this kit. there are some cool color schemes included and it will be a good excuse to improve my rigging skills considerably. I really need to start working with that fishing line


Campaign'oholic - 252+ campaigns completed
Alberta, Canada
Joined: January 19, 2008
KitMaker: 6,743 posts
AeroScale: 6,151 posts
Posted: Wednesday, November 19, 2014 - 06:20 PM UTC
Jesper ,
Nice kit choice . I built this kit and it was enjoyable . Are you going to replace the under carriage struts ? The are short by 2.5 mm
Terri
#041
Kobenhavn, Denmark
Joined: July 20, 2006
KitMaker: 10,069 posts
AeroScale: 3,788 posts
Posted: Wednesday, November 19, 2014 - 08:18 PM UTC
Sounds good. It looks to be a good kit.
I will probably just leave the struts - except if I totally make the rigging look outstanding. Then I want everything to be perfect.
Campaign'oholic - 252+ campaigns completed
Merlin
 Senior Editor
#017
United Kingdom
Joined: June 11, 2003
KitMaker: 17,582 posts
AeroScale: 12,795 posts
Posted: Thursday, November 20, 2014 - 02:47 AM UTC
Hi Jesper
It's worth tackling the undercarriage - I didn't know about the problem when I built Eduard's 'D.Va, and the finished kit always bugged me, because it just didn't look quite right - overly stocky and pugnacious somehow...
All the best
Rowan

BEWARE OF THE FEW...
As I grow older, I regret to say that a detestable habit of thinking seems to be getting a hold of me. - H. Rider Haggard
MichaelSatin
Campaigns Administrator Colorado, United States
Joined: January 19, 2008
KitMaker: 3,909 posts
AeroScale: 2,904 posts
Posted: Thursday, November 20, 2014 - 07:08 AM UTC
You can do it Sarge!
Michael

On the bench:
Sorta depends on your definition of "on the bench"...
#041
Kobenhavn, Denmark
Joined: July 20, 2006
KitMaker: 10,069 posts
AeroScale: 3,788 posts
Posted: Thursday, November 20, 2014 - 11:36 AM UTC
Thanks for the support guys. I will tackle it. I will try to make this a great build

Campaign'oholic - 252+ campaigns completed
#041
Kobenhavn, Denmark
Joined: July 20, 2006
KitMaker: 10,069 posts
AeroScale: 3,788 posts
Posted: Tuesday, August 18, 2015 - 12:26 PM UTC
10 months later and I will finally get started for real on this kit.

Very much a WWI novice, so there will probably be a lot of novice questions.
First novice question: I am going to try to lengthen the struts by 2,5mm as previously suggested. Is that both the front and rear sets of struts?
Campaign'oholic - 252+ campaigns completed
California, United States
Joined: April 26, 2010
KitMaker: 346 posts
AeroScale: 292 posts
Posted: Wednesday, September 02, 2015 - 01:13 AM UTC
Quoted Text
First novice question: I am going to try to lengthen the struts by 2,5mm as previously suggested. Is that both the front and rear sets of struts?
The struts in question are the landing gear struts and yes, you want to lengthen both the front and the rear parts equally... One way to achieve this is to cut the ends that connect to the fuselage off with knife or saw, cut 2.5mm lengths of strong wire (brass tube, anything that would work as a pin) and use the latter as a spacer to connect the original parts into alignment. Goop with putty around whatever you use as a spacer, let dry and sand to shape.
There are aftermarket correction parts that can be had relatively cheap, but I don't recall the manufacturer / names at the moment.
That said, I've built at least 5 Eduard Albatros before the stubby landing gears began to bother me - you may not want to dive immediately into corrections if this is your first Early Aviation subject...
Best with the build!
Like, follow, find out what I've had for breakfast - your large scale frenemy starter kit.
#041
Kobenhavn, Denmark
Joined: July 20, 2006
KitMaker: 10,069 posts
AeroScale: 3,788 posts
Posted: Wednesday, September 02, 2015 - 02:16 AM UTC
Thanks for the comment. I am not too worried about lengthening the struts, I am more worried one strut will be 0.1mm longer than the other. I think that will show as a hanging wing. I will have a go at it anyway.
My real fear is the rigging, but there is only one way to get experience, so I will try it out
Campaign'oholic - 252+ campaigns completed
California, United States
Joined: April 26, 2010
KitMaker: 346 posts
AeroScale: 292 posts
Posted: Wednesday, September 02, 2015 - 02:34 AM UTC
Here's my 1/48 Eduard DV:

and my 1/32 Wingnut Wings DV:

Separated by about a year of modeling experience.
The short struts are possibly the worst offender, but slack lines, oversized buckles and other shape problems with Eduard kits are detriments that I didn't really notice until a lot more builds / study on the subjects later...
Wing alignment, symmetry, relatively spindly parts, getting the rigging right - you have a lot to tackle on the first go.
Like, follow, find out what I've had for breakfast - your large scale frenemy starter kit.
#041
Kobenhavn, Denmark
Joined: July 20, 2006
KitMaker: 10,069 posts
AeroScale: 3,788 posts
Posted: Friday, September 04, 2015 - 01:40 PM UTC
Proff of life!!
Plastic has been cut. Next are some PE parts and then some painting.
I will probably also start tackling the undercarriage. After studying the delicate parts I am having second thoughts. I might damage more than I fix .....
More to follow

Campaign'oholic - 252+ campaigns completed
#041
Kobenhavn, Denmark
Joined: July 20, 2006
KitMaker: 10,069 posts
AeroScale: 3,788 posts
Posted: Friday, September 04, 2015 - 06:18 PM UTC
Work started on the landing gear. Spacers have been added. I think I will wait with the smoothening of the gear until it has been installed on the fuselage.
More to follow

Campaign'oholic - 252+ campaigns completed
Ontario, Canada
Joined: July 22, 2012
KitMaker: 771 posts
AeroScale: 763 posts
Posted: Friday, September 04, 2015 - 07:55 PM UTC
Quoted Text
yes, you want to lengthen both the front and the rear parts equally
Seeing as the struts are V shaped - this would move the ends further apart as well, wont this affect the connection to the fuselage?
Matt Odom
I've been known to build a few things
#041
Kobenhavn, Denmark
Joined: July 20, 2006
KitMaker: 10,069 posts
AeroScale: 3,788 posts
Posted: Friday, September 04, 2015 - 10:15 PM UTC
Hhmmmm.... I had not thought about that. You have a point, Matt. I guess the struts needs to be bend at the curved part close to the wheels.
Campaign'oholic - 252+ campaigns completed
Merlin
Senior Editor #017
United Kingdom
Joined: June 11, 2003
KitMaker: 17,582 posts
AeroScale: 12,795 posts
Posted: Saturday, September 05, 2015 - 12:13 AM UTC
Hi Jesper
Yep - you'll need to ease the angle at the axle gently. But I wish I'd done the mod on my Eduard kit - the change makes a huge difference to the look and sit of the model.
All the best
Rowan
BEWARE OF THE FEW...
As I grow older, I regret to say that a detestable habit of thinking seems to be getting a hold of me. - H. Rider Haggard
#041
Kobenhavn, Denmark
Joined: July 20, 2006
KitMaker: 10,069 posts
AeroScale: 3,788 posts
Posted: Saturday, September 05, 2015 - 03:20 AM UTC
Rowan, yes very gently and just a little bit. Rough dryfitting indicates that the landing gear is only offset by 1mm.
Campaign'oholic - 252+ campaigns completed
#041
Kobenhavn, Denmark
Joined: July 20, 2006
KitMaker: 10,069 posts
AeroScale: 3,788 posts
Posted: Saturday, September 12, 2015 - 11:50 PM UTC
Some progress on my build. The PE is in the cockpit and the nice machine guns. The rigging is also in place for the upper wing and fuselage. I expect to string everything downwards when the wings are in place.
More to follow soon


Campaign'oholic - 252+ campaigns completed
#335
Auckland, New Zealand
Joined: September 03, 2013
KitMaker: 1,808 posts
AeroScale: 195 posts
Posted: Sunday, September 13, 2015 - 05:43 AM UTC
Jesper,
It's looking very good. I hadn't thought about rigging before painting. I am interested to see how that goes and not having to worry about paint damage.
cheers
Michael
Campaign:
Strip, Track and Trail - Porsche 917/20 - On the bench
Phantoms at 60 - F-4J Marines
Below 1000 tons - M50 minesweeper - Sailed for duty
#041
Kobenhavn, Denmark
Joined: July 20, 2006
KitMaker: 10,069 posts
AeroScale: 3,788 posts
Posted: Sunday, September 13, 2015 - 09:17 AM UTC
Thanks, Michael. With the amount of rigging necessary for this one I decided to get everything in place early. The method I use with require some sanding of the top wing, so has to be done before painting.
Fingers crossed it works
Campaign'oholic - 252+ campaigns completed
California, United States
Joined: April 26, 2010
KitMaker: 346 posts
AeroScale: 292 posts
Posted: Monday, September 14, 2015 - 11:45 PM UTC
Interesting full assembly before painting method - even more interesting with the rigging in place... Watching this one proceed.
What kind of line are you using?
Like, follow, find out what I've had for breakfast - your large scale frenemy starter kit.
#041
Kobenhavn, Denmark
Joined: July 20, 2006
KitMaker: 10,069 posts
AeroScale: 3,788 posts
Posted: Wednesday, September 16, 2015 - 04:39 PM UTC
Hi Ivan
Thanks for the comment. The color scheme is pretty simple so I think I can do it after rigging.
Anyway my rigging method might not be the right one, but it requires sanding of the top wing to hide the holes from the rigging, so best done before painting.
This is the fishing line I use.

Campaign'oholic - 252+ campaigns completed
Merlin
Senior Editor #017
United Kingdom
Joined: June 11, 2003
KitMaker: 17,582 posts
AeroScale: 12,795 posts
Posted: Thursday, September 17, 2015 - 12:16 AM UTC
Hi Jesper
I'll also be really keen to see how this turns out, because I've never tried adding the rigging at such an early stage.
All the best
Rowan
BEWARE OF THE FEW...
As I grow older, I regret to say that a detestable habit of thinking seems to be getting a hold of me. - H. Rider Haggard
#041
Kobenhavn, Denmark
Joined: July 20, 2006
KitMaker: 10,069 posts
AeroScale: 3,788 posts
Posted: Saturday, October 03, 2015 - 01:24 AM UTC
Slow but steady progress. The rigging is moving along, but not done yet. By my standard it is working pretty well so far.
Still some finishing touches before painting can begin.
More to follow


Campaign'oholic - 252+ campaigns completed
#424
Queensland, Australia
Joined: April 23, 2015
KitMaker: 4,648 posts
AeroScale: 1,938 posts
Posted: Saturday, October 03, 2015 - 01:40 AM UTC
Hi Jesper,
I like seeing your progress on the Abatross. For the life of me I cannot imagine painting around the rigging. I'll be watching hoping to learn more.
Best wishes,
Gary
"Artillery adds dignity, to what would otherwise be an ugly brawl."
Frederick The Great
#041
Kobenhavn, Denmark
Joined: July 20, 2006
KitMaker: 10,069 posts
AeroScale: 3,788 posts
Posted: Saturday, October 03, 2015 - 02:20 AM UTC
Gary, there are so few contact points that I think (and hope) it will not be a problem. Time will tell.
The method I have used here would require significant repainting if done after painting that I might just as well do the rigging before the painting.
More to follow
Campaign'oholic - 252+ campaigns completed