

Welcome to the The FROG Modellers campaign!
Please post your progress and campaign fellowship here
If you haven't already joined, you can Enlist Here.
Please post the photos of your completed build in the Official Campaign Gallery.
Air Campaigns
Want to start or join a group build? This is where to start.
Want to start or join a group build? This is where to start.
Hosted by Frederick Boucher, Michael Satin
Official: FROG Modellers Campaign

Jessie_C


Joined: September 03, 2009
KitMaker: 6,965 posts
AeroScale: 6,247 posts

Posted: Sunday, December 01, 2013 - 09:00 AM UTC
Robbd01

#323

Joined: February 13, 2013
KitMaker: 791 posts
AeroScale: 213 posts

Posted: Sunday, December 01, 2013 - 09:04 AM UTC
Bath and time stamp 

Cheers


Cheers


cinzano
Joined: January 13, 2009
KitMaker: 419 posts
AeroScale: 378 posts
Posted: Sunday, December 01, 2013 - 09:43 AM UTC
Its time to get after it!

With these FROG kits gotta deal with a few things I haven't had to fuss about since I was a kid. First things first. The flying stand has got to go so I better plug up the hole.
Cheers,
Fred
With these FROG kits gotta deal with a few things I haven't had to fuss about since I was a kid. First things first. The flying stand has got to go so I better plug up the hole.
Cheers,
Fred

JClapp
#259
Joined: October 23, 2011
KitMaker: 2,265 posts
AeroScale: 1,715 posts

Posted: Sunday, December 01, 2013 - 10:55 AM UTC
Glad to see activity on day one. 
Im away from my model building for another week, Ill get something going soon.
Im away from my model building for another week, Ill get something going soon.


Mcleod
Joined: April 07, 2010
KitMaker: 1,028 posts
AeroScale: 939 posts
Posted: Sunday, December 01, 2013 - 05:39 PM UTC
Getting in so I can start anytime.

This looks like a nice kit.

The mapleleaf even looks nice, compared to others of the era.


This looks like a nice kit.

The mapleleaf even looks nice, compared to others of the era.

JClapp
#259
Joined: October 23, 2011
KitMaker: 2,265 posts
AeroScale: 1,715 posts
Posted: Monday, December 02, 2013 - 12:05 AM UTC
The Frog decals certainly were printed nicely. Back in the day, I never know anything about setting decals, so they always fell off after a while. I wonder how they react to setting solutions and clear coat.

ljames0874

Joined: August 15, 2012
KitMaker: 408 posts
AeroScale: 365 posts

Posted: Monday, December 02, 2013 - 01:48 AM UTC
..... and we're off!


Here is the aftermarket I'm throwing at this kit, resin wingfolds and radar, plus Airwaves PE for the cockpit and airbrake, plus cockpit ladder and FOD covers. The Printscale decal set will be used on this build, as well as the FAW.1 I'm working on for the De Havilland campaign. This one will take me a good long while, as the first thing I intend doing is sanding off all the raised panel lines, and then re-scribing (using the panel lines on the FAW.1 as the template). Good luck everyone!
Here is the aftermarket I'm throwing at this kit, resin wingfolds and radar, plus Airwaves PE for the cockpit and airbrake, plus cockpit ladder and FOD covers. The Printscale decal set will be used on this build, as well as the FAW.1 I'm working on for the De Havilland campaign. This one will take me a good long while, as the first thing I intend doing is sanding off all the raised panel lines, and then re-scribing (using the panel lines on the FAW.1 as the template). Good luck everyone!

md72
#439
Joined: November 05, 2005
KitMaker: 4,950 posts
AeroScale: 3,192 posts

Posted: Monday, December 02, 2013 - 03:16 AM UTC
 I was already to make an official start last night. Got a borrowed close up lens, had a new photo place set up and then figured out that I'd managed to leave the camera battery charging back at the house, 4 hours away....
 Oh well, I'm planning on the Corsair IV, done in the New Zealand markings... The box also claims you can build a F4U-6 with this kit. Not quite, one of my sources claims that only one XF4U-6 was made, from an F4U-4 and it immediately became the prototype for the AU-1. So, I'm guessing the plastic in the box is actually a F4U-1D.

ljames0874
Joined: August 15, 2012
KitMaker: 408 posts
AeroScale: 365 posts
Posted: Thursday, December 05, 2013 - 03:41 AM UTC
Ok, first little piece of progress on the Sea Vixen. I have scratchbuilt a cockpit framework, by effectively cloning the shape of the cockpit of the other Sea Vixen I'm working on (De Havilland Campaign)in plasticard, and adding detail from Airwaves PE set. In the pic, the Xtrakit cockpit is on the left, and the scratchbuilt and PE Froggie cockpit is on the right.

Jessie_C
Joined: September 03, 2009
KitMaker: 6,965 posts
AeroScale: 6,247 posts
Posted: Thursday, December 05, 2013 - 04:42 AM UTC
I think your scratchbuilt cockpit looks better!
ljames0874
Joined: August 15, 2012
KitMaker: 408 posts
AeroScale: 365 posts
Posted: Thursday, December 05, 2013 - 05:03 AM UTC
Thanks Jessie - so do I!
JClapp
#259
Joined: October 23, 2011
KitMaker: 2,265 posts
AeroScale: 1,715 posts
Posted: Thursday, December 05, 2013 - 06:34 AM UTC
yes, that is nice scratchbuilding!
Ill be starting friday night. Frogovich 707 I think.
Ill be starting friday night. Frogovich 707 I think.
Jessie_C
Joined: September 03, 2009
KitMaker: 6,965 posts
AeroScale: 6,247 posts
Posted: Thursday, December 05, 2013 - 07:17 AM UTC
Quoted Text
The mapleleaf even looks nice, compared to others of the era.
'Tis a pity that they're RCAF maple leaves, and not proper RCN leaves like they ought to be. If you wish, a proper set of leaves (and unyellowed decals) is available.
Mcleod
Joined: April 07, 2010
KitMaker: 1,028 posts
AeroScale: 939 posts
Posted: Thursday, December 05, 2013 - 07:43 AM UTC
I was aware of those. In keeping with the ribbital essence of the campaign, I think I'll just hop along with the kit decals. If those should croak during application, though, I do have Mike Grant decals on hand.
JClapp
#259
Joined: October 23, 2011
KitMaker: 2,265 posts
AeroScale: 1,715 posts
Posted: Friday, December 06, 2013 - 03:58 AM UTC
Quoted Text
I was aware of those. In keeping with the ribbital essence of the campaign, I think I'll just hop along with the kit decals. If those should croak during application, though, I do have Mike Grant decals on hand.
good work, sir. ahem.
md72
#439
Joined: November 05, 2005
KitMaker: 4,950 posts
AeroScale: 3,192 posts
Posted: Monday, December 09, 2013 - 06:28 PM UTC
Finally got my act together:

Frog F4U corsair IV. Doubt that the F4U-6 is a real plane as they ony built 1 and then turned it into an AU-1.


Frog F4U corsair IV. Doubt that the F4U-6 is a real plane as they ony built 1 and then turned it into an AU-1.
JClapp
#259
Joined: October 23, 2011
KitMaker: 2,265 posts
AeroScale: 1,715 posts
Posted: Monday, December 09, 2013 - 08:49 PM UTC
well, we have a nice variety of kits underway!
Ive gotten a start on the Soviet era 707.

I dont have alot of hope for that decal, but we will see.
The wing to fuselage fit is pretty good.

and the correct dihedral is enforced by a set of keys inside the fuselage shell. pretty nice.
The fuselage halves dont match very well...

Itll take some work to make that fit together. the other end isnt any better.
Anyway, onward!
Ive gotten a start on the Soviet era 707.
I dont have alot of hope for that decal, but we will see.
The wing to fuselage fit is pretty good.
and the correct dihedral is enforced by a set of keys inside the fuselage shell. pretty nice.
The fuselage halves dont match very well...
Itll take some work to make that fit together. the other end isnt any better.
Anyway, onward!

amegan
#243

Joined: March 21, 2008
KitMaker: 996 posts
AeroScale: 915 posts

Posted: Tuesday, December 10, 2013 - 03:36 AM UTC
That looks like a tough one, nice subject tho'
Robbd01
#323
Joined: February 13, 2013
KitMaker: 791 posts
AeroScale: 213 posts
Posted: Sunday, December 22, 2013 - 11:24 AM UTC
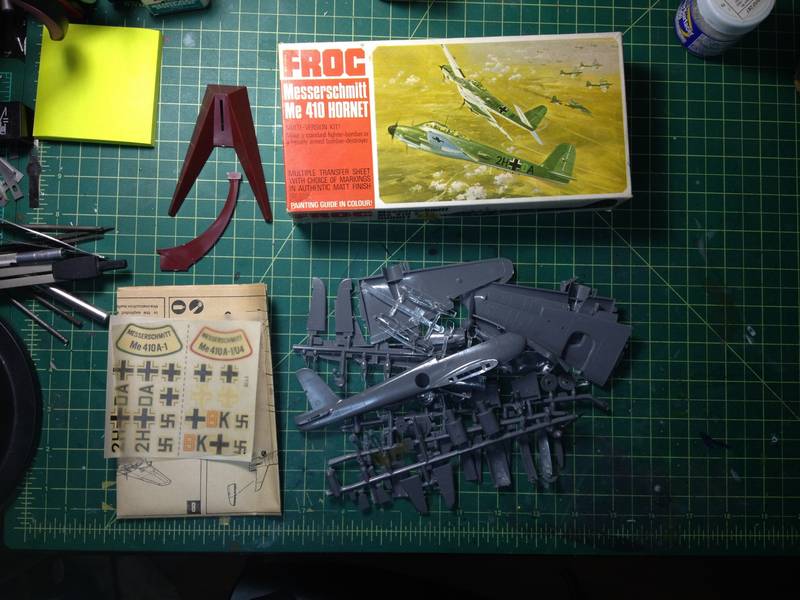
I thought I post my slow progress for the past couple of weeks.
All the pieces/parts

Fill in some holes since this version of the P-40 did not have drop tanks

Test fit the all important stand. A Frog must. Also looking at how to install the AM seat.

Figure since the fuselage halves are still apart I make the missing side windows.

Cheers
All the pieces/parts
Fill in some holes since this version of the P-40 did not have drop tanks
Test fit the all important stand. A Frog must. Also looking at how to install the AM seat.
Figure since the fuselage halves are still apart I make the missing side windows.
Cheers

warreni

Joined: August 14, 2007
KitMaker: 5,926 posts
AeroScale: 2,201 posts
Posted: Wednesday, December 25, 2013 - 06:02 PM UTC
Hello Everyone.
Well my Hasegawa D520 arrived the other day and after you see the problems with the decals in the Novo (ex-Frog) D520 I think you will be able to tell why I just had to order the Hasegawa D520.. just for the decals of course!
Here is the little plastic bag of goodies I got way-back-when when I bought someone's collection
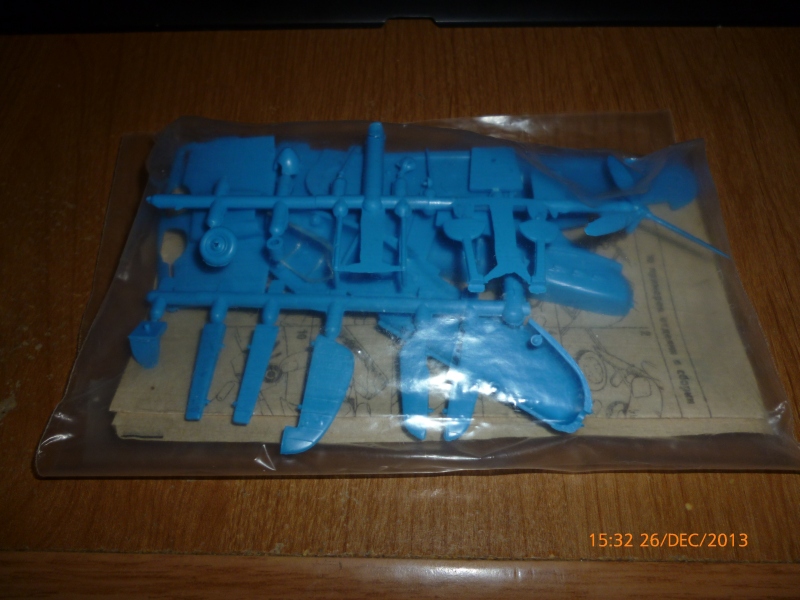
Notice no marking instructions as they would have been on the back of the absent box..
And here are the decals in the bag..
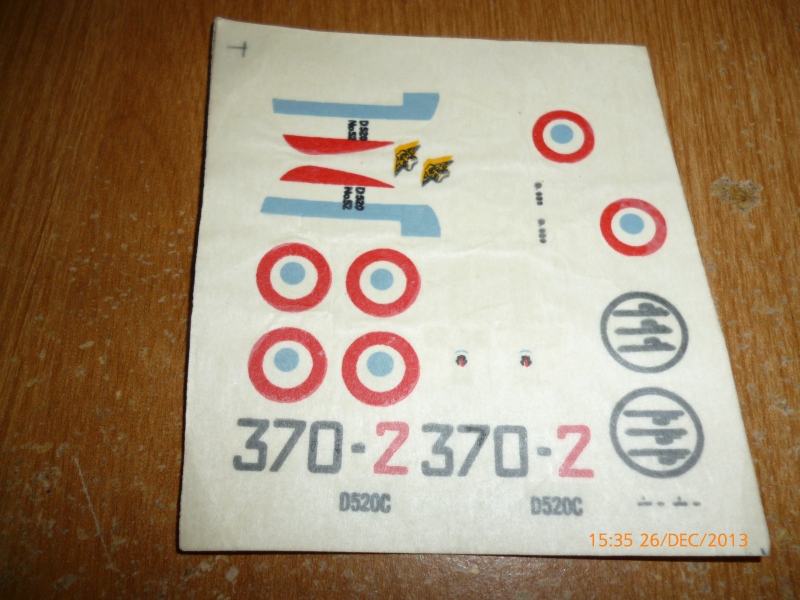
No yellowing but notice how the centres of the roundels are a little off.. and the colour is slightly all wrong??.. So that is two reasons for the Hasegawa kit, marking guide and decals..
And here is a picture of the collection of parts in the plastic bag..
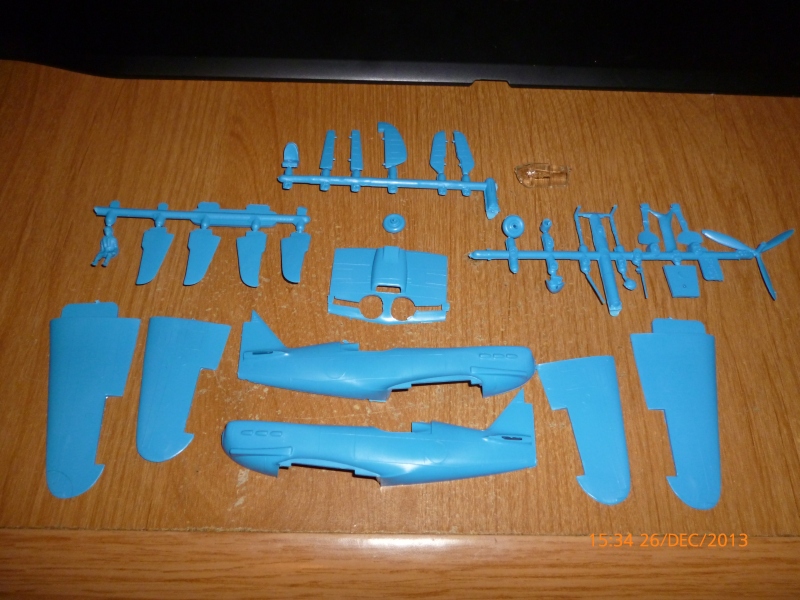
I did a couple of quick dry-fits and the fit is actually excellent between the fuselage halves. Mo filler needed at all!
With the tiny part count and the excellent fit I reckon it will take a matter of hours to build the tiny jewel (I hope!) and a little longer too paint it.
But as we all know plans never survive first contact with the enemy..
Oh, and how do I know it is ex-Frog when I couldn't read Russian to save my life to see that it is even a D520.. it still has its Frog designation '155' on the front of the instructions..
Cheers
Warren
Well my Hasegawa D520 arrived the other day and after you see the problems with the decals in the Novo (ex-Frog) D520 I think you will be able to tell why I just had to order the Hasegawa D520.. just for the decals of course!
Here is the little plastic bag of goodies I got way-back-when when I bought someone's collection
Notice no marking instructions as they would have been on the back of the absent box..
And here are the decals in the bag..
No yellowing but notice how the centres of the roundels are a little off.. and the colour is slightly all wrong??.. So that is two reasons for the Hasegawa kit, marking guide and decals..
And here is a picture of the collection of parts in the plastic bag..
I did a couple of quick dry-fits and the fit is actually excellent between the fuselage halves. Mo filler needed at all!
With the tiny part count and the excellent fit I reckon it will take a matter of hours to build the tiny jewel (I hope!) and a little longer too paint it.
But as we all know plans never survive first contact with the enemy..
Oh, and how do I know it is ex-Frog when I couldn't read Russian to save my life to see that it is even a D520.. it still has its Frog designation '155' on the front of the instructions..
Cheers
Warren

SmashedGlass
Joined: October 26, 2006
KitMaker: 105 posts
AeroScale: 62 posts

Posted: Thursday, December 26, 2013 - 04:30 AM UTC
Yes, as Warren has found out....
Whenever possible, obtain an original FROG boxing of a FROG mould; the molding and the decals will be much better
Whenever possible, obtain an original FROG boxing of a FROG mould; the molding and the decals will be much better
warreni
Joined: August 14, 2007
KitMaker: 5,926 posts
AeroScale: 2,201 posts
Posted: Friday, December 27, 2013 - 08:34 AM UTC
Quoted Text
Yes, as Warren has found out....
Whenever possible, obtain an original FROG boxing of a FROG mould; the molding and the decals will be much better
Sage advice, but I think most of the decals will be a bit crap as they are getting a bit old.
Don't forget I didn't actively buy this kit, it came with a collection..
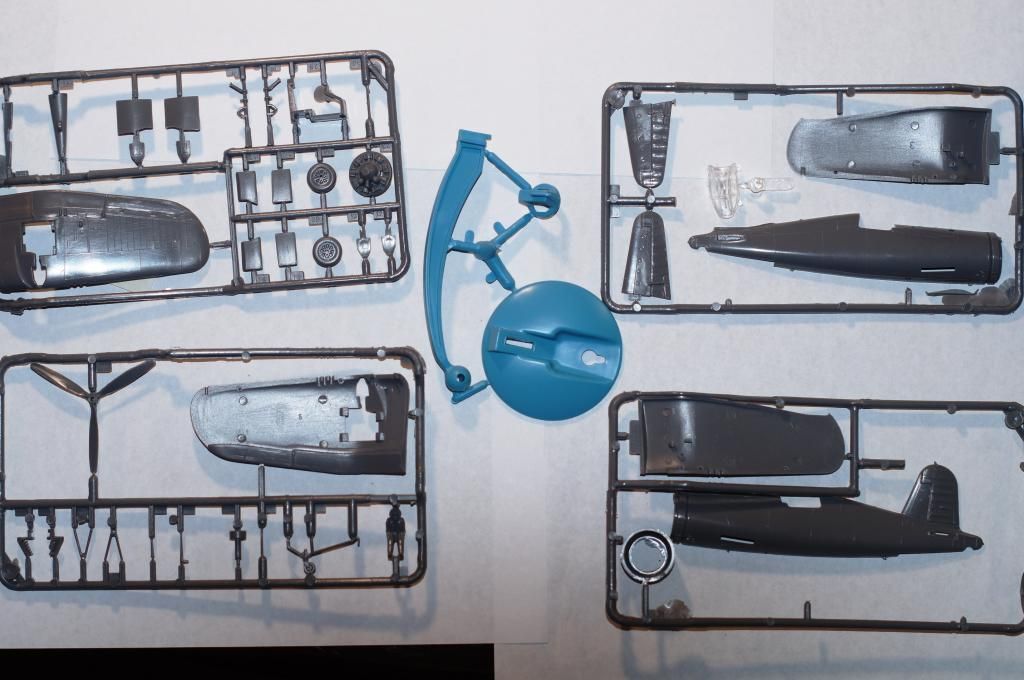
And I have made some more progress and found a large fit problem..
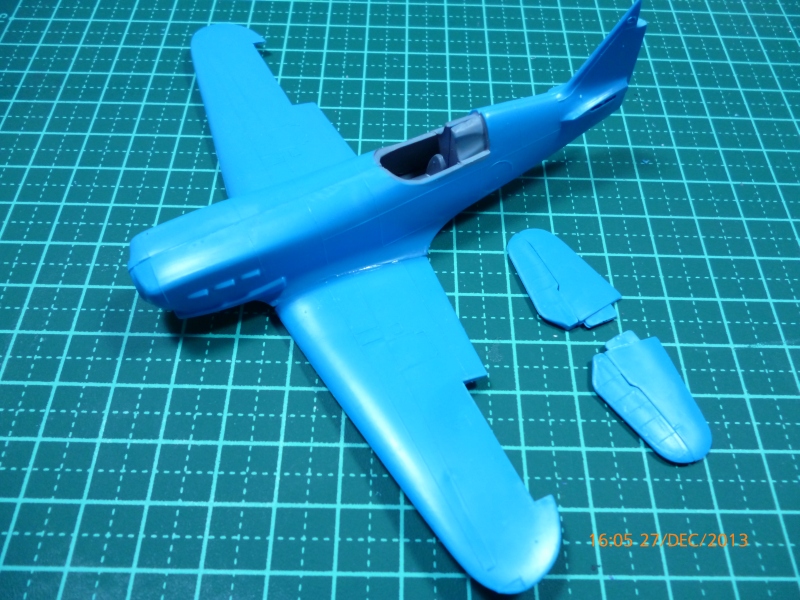
You see how the wings are attached here, well that is just the upper surfaces as the lower ones are a whole lot of fun. The outer panels are a beautiful fit but the centre section is a disaster. The fit at the front is hopeless with a 1mm (at least) drop from the rear of the engine to the top of the wing piece.. Oh well. I will report back on how the fix went.
Cheers
Warren
Mcleod
Joined: April 07, 2010
KitMaker: 1,028 posts
AeroScale: 939 posts
Posted: Friday, December 27, 2013 - 02:28 PM UTC
Quoted Text
I have made some more progress and found a large fit problem..
I share your joy, Warren. My SeaFury looked like a great kit, until I started putting her together.
It was designed for a folded wings option. With wings down, there was a severe gap on the bottom wing joint. Top wings not great either.
I've decided to rescribe the entire model. It'll take some filler and some sanding, but, I just can't stand that goofy raised detail look.
The cockpit is blacked out with minimal detail painting. Didn't even feel like installing tape harness. It never even came with a stick or an IP representation.

If I was still a kid with a tube of alphaletic glue, the model would take about 15 minutes to build.
warreni
Joined: August 14, 2007
KitMaker: 5,926 posts
AeroScale: 2,201 posts
Posted: Friday, December 27, 2013 - 09:33 PM UTC
So FROG stands for Flies Right Off the Ground does it? Well mine must be a FRIB.. Flies Right Into the Bin. I am afraid the wing fit problem is going to take far more time to fix than this kit is worthy of. If it was a rare subject, like the Blackburn Shark, I might persist, but their is a lovely Hasegawa kit out there of this plane so I am not wasting anymore time on this piece of sh... rubbish.. It is not like me to give up on a kit but this is just... junk...
Robbd01
#323
Joined: February 13, 2013
KitMaker: 791 posts
AeroScale: 213 posts
Posted: Saturday, December 28, 2013 - 12:33 AM UTC
Quoted Text
So FROG stands for Flies Right Off the Ground does it? Well mine must be a FRIB.. Flies Right Into the Bin. I am afraid the wing fit problem is going to take far more time to fix than this kit is worthy of. If it was a rare subject, like the Blackburn Shark, I might persist, but their is a lovely Hasegawa kit out there of this plane so I am not wasting anymore time on this piece of sh... rubbish.. It is not like me to give up on a kit but this is just... junk...
Don't give up... Think of it as an experience (in my case re-live) of what it was like to build models in the '60's and '70's. You can do it.
Cheers
 |

WEB HOSTING BY


Copyright ©2021 AeroScale and Kitmaker Network, a subsidiary of Silver Star Enterprises
All Rights Reserved. Please read our Conditions of Use and Privacy Policy.
All Rights Reserved. Please read our Conditions of Use and Privacy Policy.