

Now that is simply superb workmanship, just about the best engine I've seen anywhere!
Mikael, who is keenly anticipating the next installment.
Early Aviation
Discuss World War I and the early years of aviation thru 1934.
Discuss World War I and the early years of aviation thru 1934.
Hosted by Jim Starkweather
KotS GB 2011 Roland D.VIa Alex

OEFFAG_153

Joined: February 19, 2010
KitMaker: 1,473 posts
AeroScale: 1,450 posts

Posted: Monday, June 20, 2011 - 07:22 AM UTC

thegirl

Joined: January 19, 2008
KitMaker: 6,743 posts
AeroScale: 6,151 posts
Posted: Monday, June 20, 2011 - 12:18 PM UTC
You got my attention ! Most impressive Alex 

wing_nut

Joined: June 02, 2006
KitMaker: 1,212 posts
AeroScale: 468 posts
Posted: Tuesday, June 21, 2011 - 07:49 AM UTC
I just ordered this kit, and another D.Va, and have decided to send the engines to you to build. You have captured something very difficult. A "scale" finish. That is simply stunning.

gajouette
Joined: February 01, 2007
KitMaker: 365 posts
AeroScale: 356 posts

Posted: Thursday, July 21, 2011 - 02:01 AM UTC
Alex,
I'm in awe my friend. You truly are a Master Class modeler. I appreciate your tips on the wood shading too.
Highest Regards,
Gregory Jouette
I'm in awe my friend. You truly are a Master Class modeler. I appreciate your tips on the wood shading too.
Highest Regards,
Gregory Jouette

Mgunns
Joined: December 12, 2008
KitMaker: 1,423 posts
AeroScale: 1,319 posts

Posted: Thursday, July 21, 2011 - 04:22 AM UTC
Hi Alex:
The engine really looks outstanding, great work and the wood grain is equally outstanding. Looking forward to more as you progress through this kit.
Best
Mark

warreni

Joined: August 14, 2007
KitMaker: 5,926 posts
AeroScale: 2,201 posts

Posted: Thursday, July 21, 2011 - 11:31 AM UTC
Very nice work Sir. I am starting this one very soon and have some woodgrain decals to use with it as well.
I have been using the one base colour for ages now and the Clear Orange and Yellow are the best way to get the various tones. I was thinking of this scheme but it is not quite interesting enough for me and I am going to do the stripey scheme.
Very eye catching.
I will be keeping a close eye on your build. Be sure the engine cowls fit before you put the top wing and machine guns in place as it is almost impossible after that.

JackFlash
Joined: January 25, 2004
KitMaker: 11,669 posts
AeroScale: 11,011 posts
Posted: Wednesday, August 24, 2011 - 02:47 AM UTC
chukw1
Joined: November 28, 2007
KitMaker: 817 posts
AeroScale: 729 posts
Posted: Wednesday, August 24, 2011 - 03:59 AM UTC
Alex, this is a work of pure poetry- brilliant! I love your sense of color- and the presentation is as charming as it is unique.
Cheers!
chuk
Cheers!
chuk


USCHIvdROSTEN

Joined: December 11, 2010
KitMaker: 64 posts
AeroScale: 57 posts
Posted: Thursday, October 13, 2011 - 12:33 AM UTC
Thanks s much for the nice words!
Sorry for taking that long on the update, but modelling time is a rare
thing these days. The more I enjoy it if I have some.
It might be too late for any group build deadlines anyway but slowly&surely this project went further.
So, lets begin with the preps.

Dark yellow base coat plus a lil preshading.

Some more preshading telegraphs through a coat of flesh.

Decaling.
The decals we see here, was supposed to be an improvement for the WGF-48 "Fine" decals. That was before the Ronny Bar coop was fixed.
So actually these decals are kinda abandoned in the moment. Maybe they
will show up again on a new "mixed grain" decal set. We´ll see...
Since these decals are supposed to be combined with a oil glaze, the
results will be a lil more on the "dark side of wood". In terms of tone they look
almost like the Roland in the Krakow museum, which is about 90 years old.
Its obvious that the plane was brighter at the time it was built.
I really considered to remove all the paintwork and start again with the new
WGSF-48 "Superfine" Ronny Bar edition, but i fear to loose motivation on
working too long on one project. So I just gonna continue on this version
and bring it to an end one day.


Lets see how we can deal with the lozenge.
Pretty much like with every decal coming along as generic, I suppose. :-)

Transfering the shape of the piece to the backside of the decal.

Good to go.

When the rib tapes come in, this gonna be decal-over-decal-job so
I better care for a good grip. I put some white glue into the setter just
to make sure.

Here we have a buff base coat beneath a off-white coat.
Ok, lets see if all the work has been worth it.


I dont know what the next update will be about.
Some fittings and some markings maybe.
We´ll see.
cu then!
Thanks for tuning in!
best
Alex
Sorry for taking that long on the update, but modelling time is a rare
thing these days. The more I enjoy it if I have some.
It might be too late for any group build deadlines anyway but slowly&surely this project went further.
So, lets begin with the preps.
Dark yellow base coat plus a lil preshading.
Some more preshading telegraphs through a coat of flesh.
Decaling.
The decals we see here, was supposed to be an improvement for the WGF-48 "Fine" decals. That was before the Ronny Bar coop was fixed.
So actually these decals are kinda abandoned in the moment. Maybe they
will show up again on a new "mixed grain" decal set. We´ll see...
Since these decals are supposed to be combined with a oil glaze, the
results will be a lil more on the "dark side of wood". In terms of tone they look
almost like the Roland in the Krakow museum, which is about 90 years old.
Its obvious that the plane was brighter at the time it was built.
I really considered to remove all the paintwork and start again with the new
WGSF-48 "Superfine" Ronny Bar edition, but i fear to loose motivation on
working too long on one project. So I just gonna continue on this version
and bring it to an end one day.
Lets see how we can deal with the lozenge.
Pretty much like with every decal coming along as generic, I suppose. :-)
Transfering the shape of the piece to the backside of the decal.
Good to go.
When the rib tapes come in, this gonna be decal-over-decal-job so
I better care for a good grip. I put some white glue into the setter just
to make sure.
Here we have a buff base coat beneath a off-white coat.
Ok, lets see if all the work has been worth it.
I dont know what the next update will be about.
Some fittings and some markings maybe.
We´ll see.
cu then!
Thanks for tuning in!
best
Alex
OEFFAG_153
Joined: February 19, 2010
KitMaker: 1,473 posts
AeroScale: 1,450 posts
Posted: Thursday, October 13, 2011 - 12:55 AM UTC
Absolutely stunned your treatment of wood and texture are absolutely excellent!
Best Regards
Mikael
Best Regards
Mikael

lcarroll
Joined: July 26, 2010
KitMaker: 1,032 posts
AeroScale: 1,025 posts
Posted: Thursday, October 13, 2011 - 02:31 AM UTC
As I remaked last time in June your work is incredible. This one has it all; great shading, detail, and tone of the major components have resulted in excellent scale effect and realism. Hope you are as proud of your work as I am impressed by it! Keep the updates coming as we all look forward to more.
Cheers,
Lance

Cheers,
Lance
wing_nut
Joined: June 02, 2006
KitMaker: 1,212 posts
AeroScale: 468 posts
Posted: Thursday, October 13, 2011 - 11:47 AM UTC
The sound you just heard was a combination of my jaw hitting the floor and me packing up the bench because after that, anything else will pale in comparison. DAMN that's nice wood.
JackFlash
Joined: January 25, 2004
KitMaker: 11,669 posts
AeroScale: 11,011 posts
Posted: Thursday, October 13, 2011 - 02:50 PM UTC
Beautiful work Alex.
USCHIvdROSTEN
Joined: December 11, 2010
KitMaker: 64 posts
AeroScale: 57 posts
Posted: Sunday, October 16, 2011 - 09:15 PM UTC
Shame on me for always beeing that late on replys! Shame on me!
Sorry guys!
Thanks so much for the motivating feedbacks!
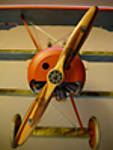
@Warren
Yes. The engine cowlings are a lil bit "loose" since they not really have an attachement point. Furthermore they overlap the fuselage too much somehow.
On the photos they align pretty tight with the fuselage. A dry-fit showed a different result.
I thinned them down pretty much and figured that, if i go to use them, i just gonna use one of them anyway to allow a look on the engine.
Thanks, Warren!
Chuck, Stephen, thanks a lot! Your comments are truly appreciated!
catch you guys on the next update! :-)
Cheers
Alex
Sorry guys!
Thanks so much for the motivating feedbacks!
@Warren
Yes. The engine cowlings are a lil bit "loose" since they not really have an attachement point. Furthermore they overlap the fuselage too much somehow.
On the photos they align pretty tight with the fuselage. A dry-fit showed a different result.
I thinned them down pretty much and figured that, if i go to use them, i just gonna use one of them anyway to allow a look on the engine.
Thanks, Warren!
Chuck, Stephen, thanks a lot! Your comments are truly appreciated!
catch you guys on the next update! :-)
Cheers
Alex
warreni
Joined: August 14, 2007
KitMaker: 5,926 posts
AeroScale: 2,201 posts
Posted: Monday, October 17, 2011 - 05:28 AM UTC
Agree with everyone else that the engine is the best part yet. Only problem is you will see none of it when the kit is finished.. 

67foxtrot
Joined: February 13, 2008
KitMaker: 36 posts
AeroScale: 35 posts
Posted: Thursday, November 17, 2011 - 10:19 AM UTC
Quoted Text
Agree with everyone else that the engine is the best part yet. Only problem is you will see none of it when the kit is finished..
Ah yes, that is true. However, I suspect that these photos will be around for quite a long while!
Dave
USCHIvdROSTEN
Joined: December 11, 2010
KitMaker: 64 posts
AeroScale: 57 posts
Posted: Wednesday, October 24, 2012 - 03:08 AM UTC
ough....
I entirely forgot about this Group build.
Oh my gosh....silly me....
Well, so please allow me to present a set of pic as a proof that this thing was finished as least.
I´m so sorry guys...


A very comprehensive set of photos can be found on my fotki picture host following this link.
http://public.fotki.com/MoeLDERS/roland-d-via/
Thanks everyone for the friendly comments and please apologize the malfunctions of my perforated brain.
Ouh boy, thats emberassing....
I entirely forgot about this Group build.
Oh my gosh....silly me....
Well, so please allow me to present a set of pic as a proof that this thing was finished as least.
I´m so sorry guys...
A very comprehensive set of photos can be found on my fotki picture host following this link.
http://public.fotki.com/MoeLDERS/roland-d-via/
Thanks everyone for the friendly comments and please apologize the malfunctions of my perforated brain.
Ouh boy, thats emberassing....
JackFlash
Joined: January 25, 2004
KitMaker: 11,669 posts
AeroScale: 11,011 posts
Posted: Wednesday, October 24, 2012 - 03:45 AM UTC
Excellent build. Thanks for sharing.
Mecenas
Joined: December 23, 2007
KitMaker: 1,596 posts
AeroScale: 1,275 posts
KitMaker: 1,596 posts
AeroScale: 1,275 posts

Posted: Wednesday, October 24, 2012 - 07:28 AM UTC
I'm amazed, stunned, speachless etc...
lcarroll
Joined: July 26, 2010
KitMaker: 1,032 posts
AeroScale: 1,025 posts
Posted: Wednesday, October 24, 2012 - 10:19 AM UTC
Alex,
Like the other of your builds I have seen, absolutely stunning. Great work all around!
Cheers,
Lance
Like the other of your builds I have seen, absolutely stunning. Great work all around!
Cheers,
Lance

Dwaynewilly
Joined: December 15, 2006
KitMaker: 365 posts
AeroScale: 344 posts
Posted: Wednesday, October 24, 2012 - 11:45 AM UTC
Alex,
That is really something special, beautiful work.
Regards,
Dwayne
That is really something special, beautiful work.
Regards,
Dwayne
OEFFAG_153
Joined: February 19, 2010
KitMaker: 1,473 posts
AeroScale: 1,450 posts
Posted: Wednesday, October 24, 2012 - 08:36 PM UTC
Simply WOW, that is a fantastic build the textures, the wear and tear, the display totally stunning!
Best Regards
Mikael
Best Regards
Mikael

redcap

Joined: November 06, 2005
KitMaker: 753 posts
AeroScale: 311 posts

Posted: Thursday, October 25, 2012 - 01:47 AM UTC
BRILLIANT from start to finish - very inspiring for us mere mortals! Thanks for a great 'build' and paint article.
Gary
Gary
DrIAce
Joined: August 14, 2011
KitMaker: 59 posts
AeroScale: 56 posts
Posted: Friday, October 26, 2012 - 09:58 AM UTC
Dittos to the above--Great Work !!!

GhostHawk

Joined: January 27, 2011
KitMaker: 268 posts
AeroScale: 264 posts
Posted: Friday, October 26, 2012 - 11:42 AM UTC
hello Alex...!!!
I haven't got enough English to your marvels...!!!
I hope to see more of this soon...
Bye
I haven't got enough English to your marvels...!!!
I hope to see more of this soon...
Bye
 |

WEB HOSTING BY


Copyright ©2021 AeroScale and Kitmaker Network, a subsidiary of Silver Star Enterprises
All Rights Reserved. Please read our Conditions of Use and Privacy Policy.
All Rights Reserved. Please read our Conditions of Use and Privacy Policy.