

Early Aviation
Discuss World War I and the early years of aviation thru 1934.
Discuss World War I and the early years of aviation thru 1934.
Hosted by Jim Starkweather
Roden 1:32 DH 2 My first real stringbag

guitarlute101

Joined: December 18, 2006
KitMaker: 1,121 posts
AeroScale: 1,063 posts
Posted: Saturday, January 22, 2011 - 02:43 PM UTC
Fantastic work Mikael. Your build is progressing wonderfully!
Mark

OEFFAG_153

Joined: February 19, 2010
KitMaker: 1,473 posts
AeroScale: 1,450 posts

Posted: Sunday, January 23, 2011 - 09:06 AM UTC
Quoted Text
Okay Mikael , now you went and done it ! Stephen has giving me a few ideas from his super build and now you with how you have choosen to display her . What a great idea and very fitting .
I feel some AMS heading on the lines of the Bluemax kit as my next pusher .
Also agree with you on Roden's kit . It is a nice kit , Des has shown us that already and Lars as well. Yeah, there has been some negative vibes out there aleady on the net .
Looking forward to seeing your solution for pinning the wings
Thank You so much Terri, nice that I've inspired one of my inspirer..u...e.rs uummmmm (is that a word in english?)
It would be great to see you tackle the Blue Max kit of the DH2

Oh and the pinning, Well I am making my second atempt as we speak some stiff 0.8 brass pins, epoxy glue and a lot of fingers crossed. It'l be dry tomorrow morning then we'll see

Mikael
OEFFAG_153
Joined: February 19, 2010
KitMaker: 1,473 posts
AeroScale: 1,450 posts
Posted: Sunday, January 23, 2011 - 09:08 AM UTC
Quoted Text
Fantastic work Mikael. Your build is progressing wonderfully!
Mark
Mark Thank You for your kind comments
Mikael
OEFFAG_153
Joined: February 19, 2010
KitMaker: 1,473 posts
AeroScale: 1,450 posts
Posted: Thursday, February 03, 2011 - 11:47 PM UTC
Hi All
Well before the fun can really start for me in the 2011 GB, I need to finish this build (I mostly try to finish current projects before starting anything new). This build is also a lot of fun though so I don't feel too preasured to force this one throgh.
Some progress since last time I posted here. Largest problem was getting the lower wings in position. Second atempt, using long 0.8 mm brass pins, proved successful and I felt very releived
After this some touching up, and a lot of detailing on the outside together with decaling took place, and I'm now at the point where its more or less a question of final assembly and rigging. This will probably prove a lot more, rather than less though...
Enough talk here are some pics:

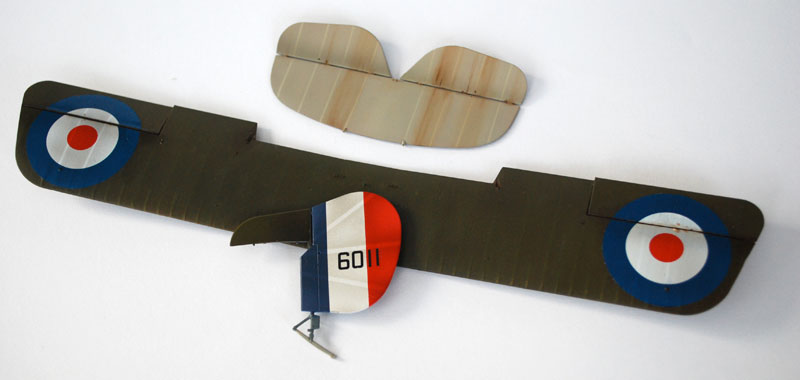
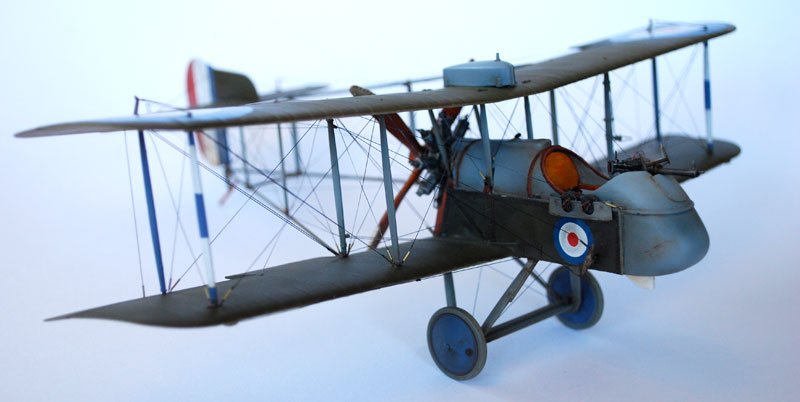
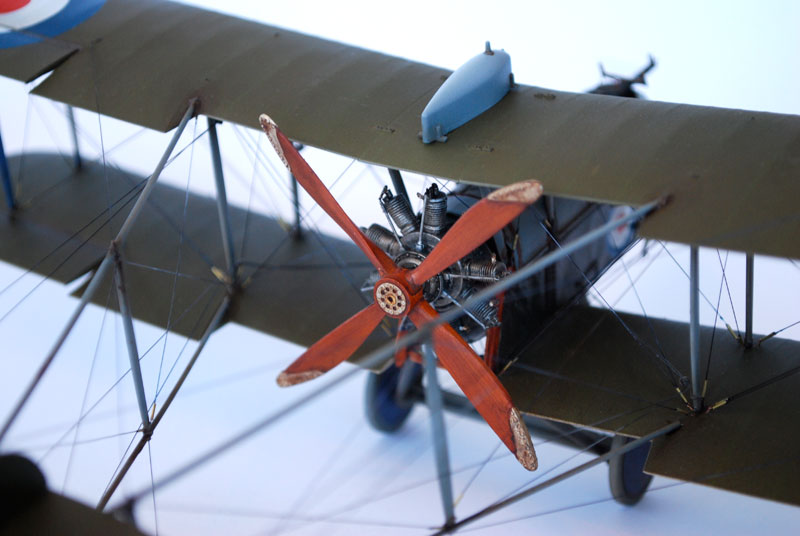
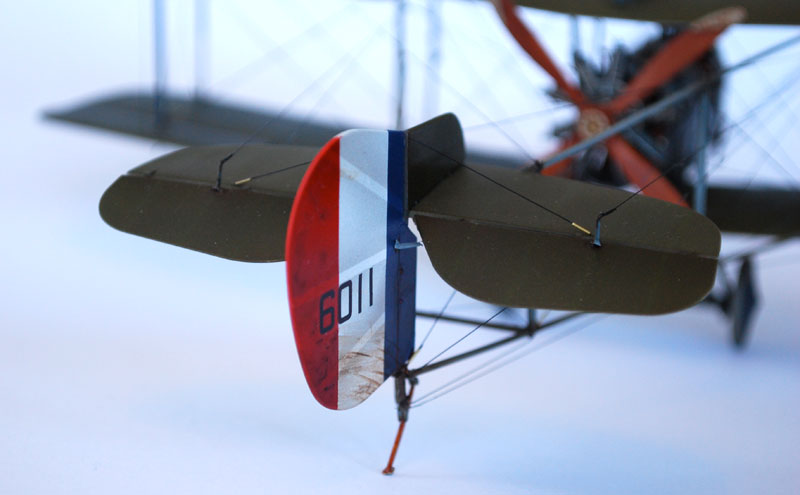
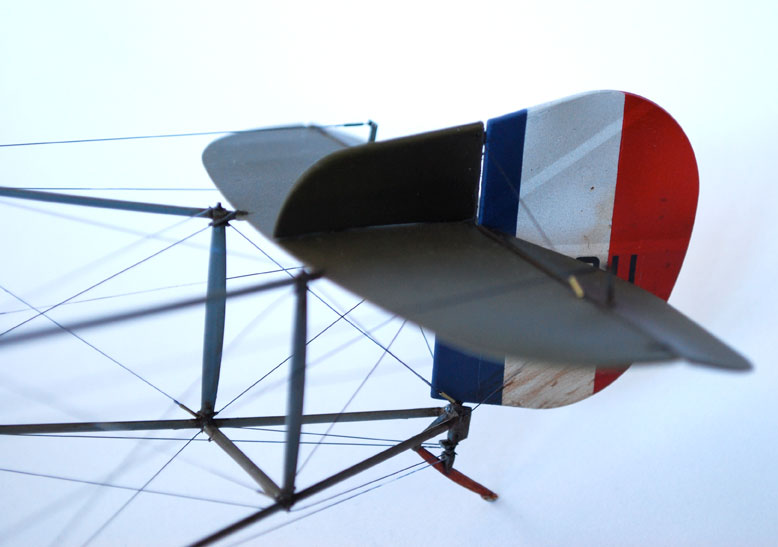
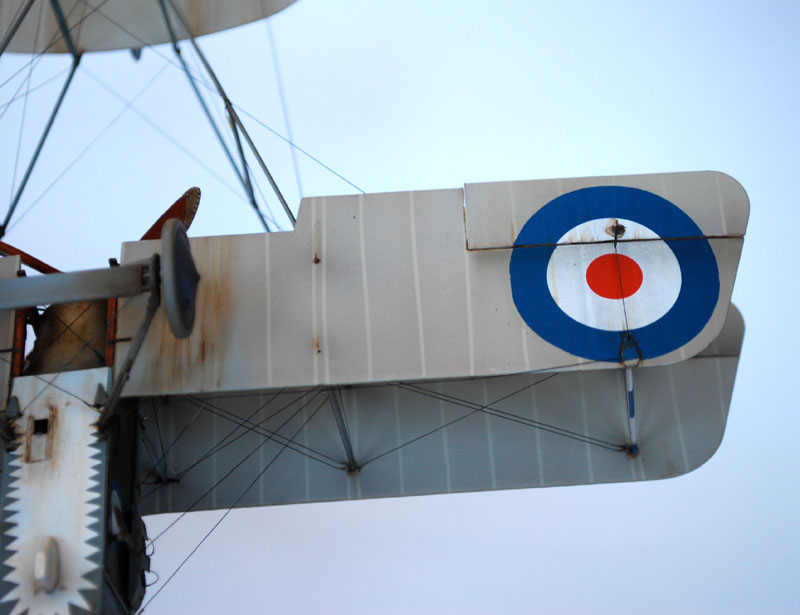
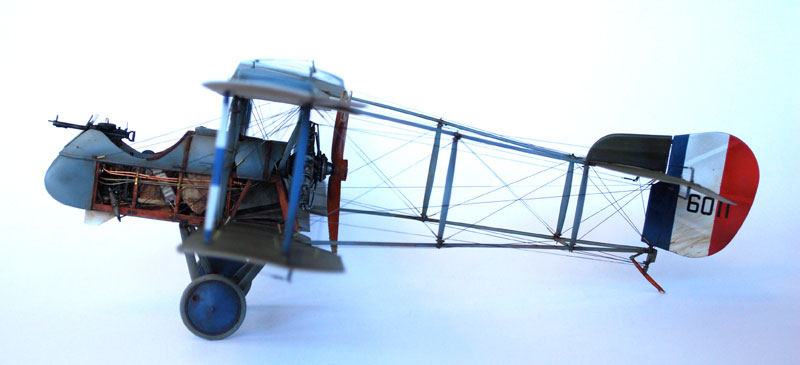
Upperwing and tail section revealing the serial 6011 of 24 Sqn. I'm keeping the PC10 surfaces pretty clean, as in my "storyline" the plane is freshly doped on the top surfaces, while some maintenace is done. This places the time to I think between mid/late June and 11 July 1916 just in time for the battle of the Somme...

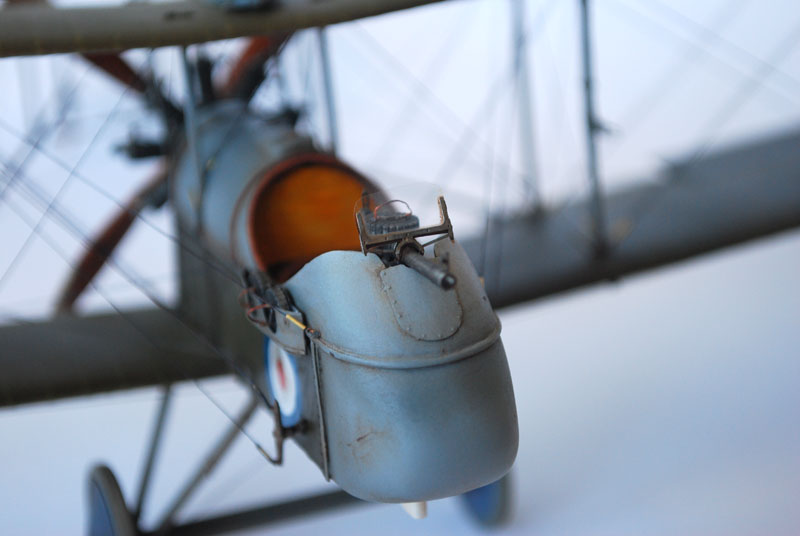
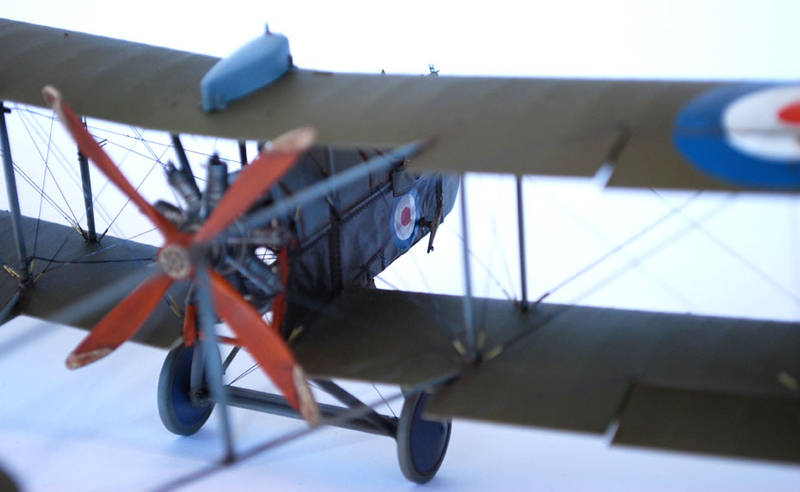
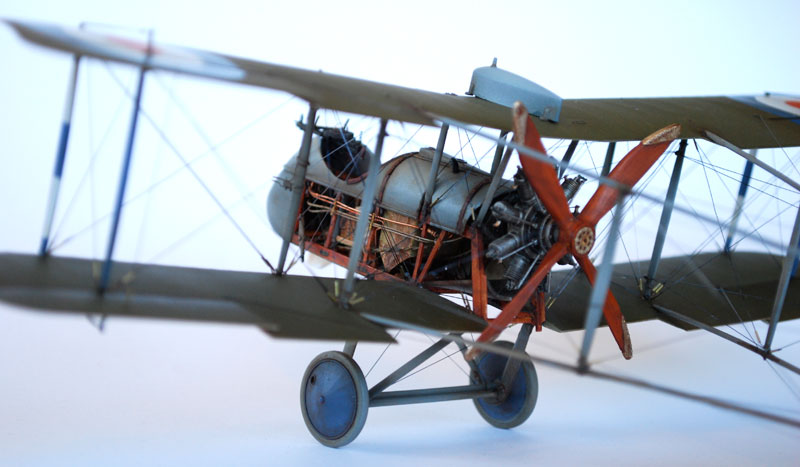
Struts and bits showing the marking of the outer struts of 24 Sqn. C flight DH2 6011 flown by 2 Lt . Kerr. It was shot down on 11 July 1916 suffering some damage. Its pilot was taken prisoner.
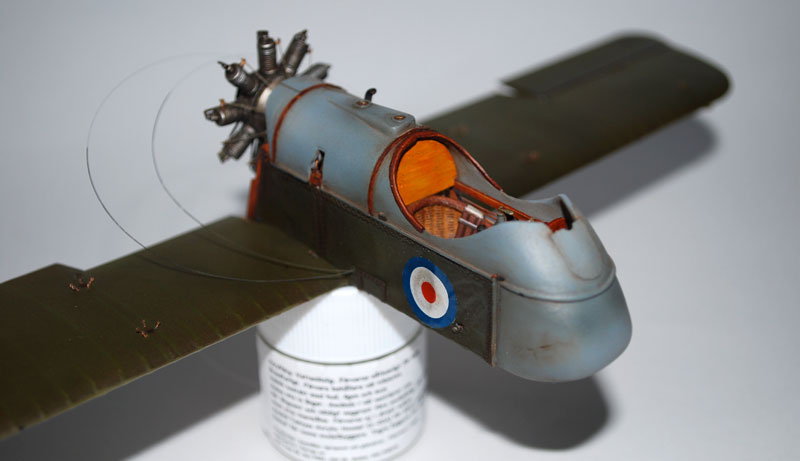
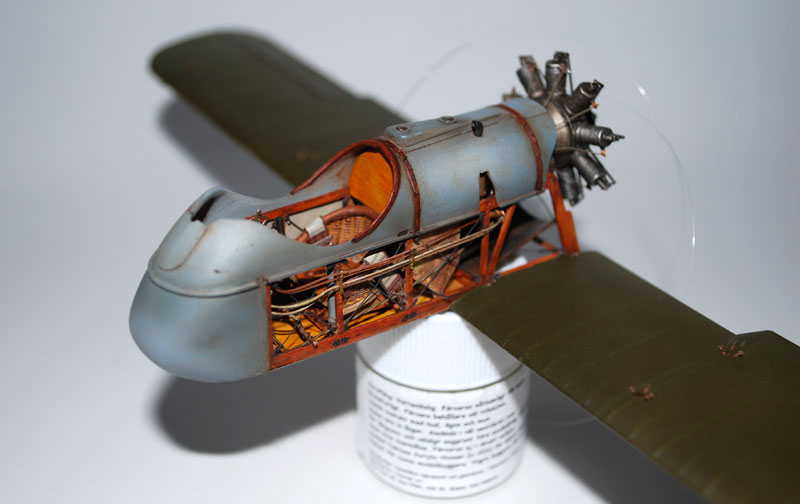
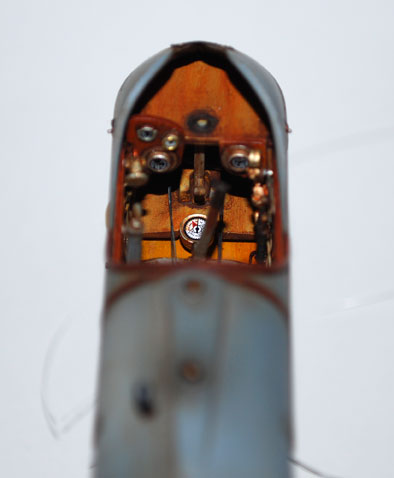
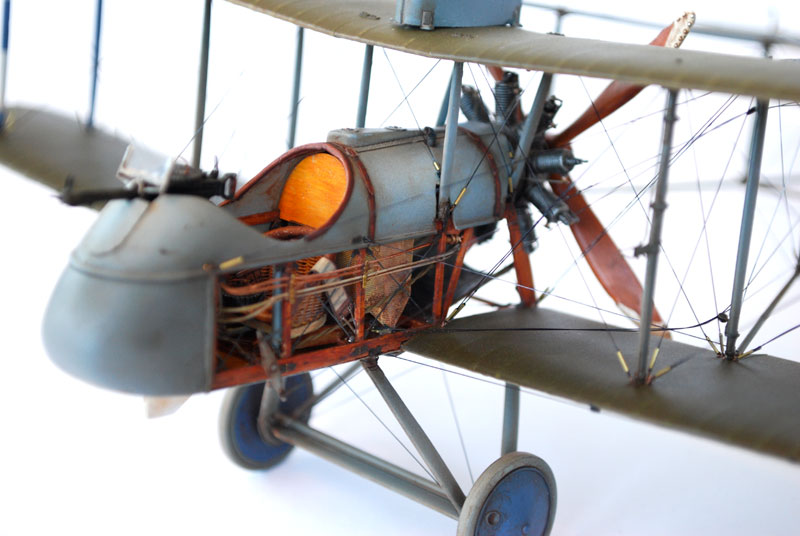
From Stephen excellent buildthread, I gather that the layout of the instrument panel here may not be entierly correct for this Mk of DH2?

The dogtooth pattern was cut from film and stuck onto a prepainted white bottom the result was pretty good from the start, only needing some touchups.
Thats it for now I guess next time I post on this build It'll be the finished item thogh how quick and easy that'll be I most unsure, it has been an easier build than I had first thought upto this point...
Any and all comments are as usual most welcome.
Mikael
Well before the fun can really start for me in the 2011 GB, I need to finish this build (I mostly try to finish current projects before starting anything new). This build is also a lot of fun though so I don't feel too preasured to force this one throgh.
Some progress since last time I posted here. Largest problem was getting the lower wings in position. Second atempt, using long 0.8 mm brass pins, proved successful and I felt very releived
After this some touching up, and a lot of detailing on the outside together with decaling took place, and I'm now at the point where its more or less a question of final assembly and rigging. This will probably prove a lot more, rather than less though...
Enough talk here are some pics:
Upperwing and tail section revealing the serial 6011 of 24 Sqn. I'm keeping the PC10 surfaces pretty clean, as in my "storyline" the plane is freshly doped on the top surfaces, while some maintenace is done. This places the time to I think between mid/late June and 11 July 1916 just in time for the battle of the Somme...
Struts and bits showing the marking of the outer struts of 24 Sqn. C flight DH2 6011 flown by 2 Lt . Kerr. It was shot down on 11 July 1916 suffering some damage. Its pilot was taken prisoner.
From Stephen excellent buildthread, I gather that the layout of the instrument panel here may not be entierly correct for this Mk of DH2?
The dogtooth pattern was cut from film and stuck onto a prepainted white bottom the result was pretty good from the start, only needing some touchups.
Thats it for now I guess next time I post on this build It'll be the finished item thogh how quick and easy that'll be I most unsure, it has been an easier build than I had first thought upto this point...
Any and all comments are as usual most welcome.
Mikael

Kornbeef

Joined: November 06, 2005
KitMaker: 1,667 posts
AeroScale: 1,551 posts

Posted: Friday, February 04, 2011 - 01:18 AM UTC
This is going to be a shining gem of a build. One you can be proud of.
Keith.
Keith.

Mgunns
Joined: December 12, 2008
KitMaker: 1,423 posts
AeroScale: 1,319 posts

Posted: Friday, February 04, 2011 - 02:16 AM UTC
Hi Mikael:Outstanding work my friend. I really like the preshading on the roundels on the wings and the tail assembly. Nice touch!
Looking forward to seeing it finished and your comments on the rigging.
Best
Mark

veector73

Joined: February 02, 2011
KitMaker: 11 posts
AeroScale: 10 posts

Posted: Friday, February 04, 2011 - 05:56 AM UTC
Hi Mikael,
I will be repetitive but it was already said a few times: most impressive build. It's a real pleasure to follow your progress. I can spend countless hours just watching your pictures (instead of building my own kit! )
)
Could you please reveal what kind of paints you used for PC-10? If it's your own cooking, could you pass the receipt (colours and ratios)? If possible of course.
Best regards,
Tomasz
I will be repetitive but it was already said a few times: most impressive build. It's a real pleasure to follow your progress. I can spend countless hours just watching your pictures (instead of building my own kit!
)Could you please reveal what kind of paints you used for PC-10? If it's your own cooking, could you pass the receipt (colours and ratios)? If possible of course.
Best regards,
Tomasz
dmopath
Joined: July 02, 2010
KitMaker: 175 posts
AeroScale: 174 posts
Posted: Friday, February 04, 2011 - 09:07 AM UTC
Hi Mikael
She is a beauty and no mistake! Ah, but the time for rigging is fast approaching. I am anxious to see how you do it.
She is a beauty and no mistake! Ah, but the time for rigging is fast approaching. I am anxious to see how you do it.
thegirl

Joined: January 19, 2008
KitMaker: 6,743 posts
AeroScale: 6,151 posts
Posted: Saturday, February 05, 2011 - 12:28 AM UTC
Very , very well done so far Mikael ! Glad to see that you found a way to pin the wings which worked out for you ! Your very close to the final stage of assembly . Looking forward to seeing how you rig the tail booms .
OEFFAG_153
Joined: February 19, 2010
KitMaker: 1,473 posts
AeroScale: 1,450 posts
Posted: Sunday, February 06, 2011 - 08:31 PM UTC
Hi All, and Thank You so very much for your kind and encouraging words, they really mean a lot to me 
Hello Tomasz Glad you like my build I use Tamiya paints and my recipie (which is similar to what I think Terri and others here use) is XF62 (Olive Drab), and then some XF10 (Flat Brown) mixed into this. The amount of brown depends on what you're after... The more brown the more choclate hue in the PC10. For this build I onle poured a small amount in but I preshaded using XF10, soo....
Hope this helps.
Thank You very much Dennis I'm feeling a bit anxious too
Terri thank You so very very much I'm a bit undecided on how to tackle the tailbooms one thing I'm sure of is that I woun't drill into them too much though...
However wings are the first item on the agenda and I'm now busy tying all the strands to the lower wing, using "Bobs buckles"... There are quite a few of them and it is starting to look a bit confusing. I keep telling myself that its not more difficult than any other rigging job, only more...
Best Regards
Mikael
Quoted Text
Could you please reveal what kind of paints you used for PC-10? If it's your own cooking, could you pass the receipt (colours and ratios)? If possible of course.
Hello Tomasz Glad you like my build I use Tamiya paints and my recipie (which is similar to what I think Terri and others here use) is XF62 (Olive Drab), and then some XF10 (Flat Brown) mixed into this. The amount of brown depends on what you're after... The more brown the more choclate hue in the PC10. For this build I onle poured a small amount in but I preshaded using XF10, soo....
Hope this helps.
Quoted Text
She is a beauty and no mistake! Ah, but the time for rigging is fast approaching. I am anxious to see how you do it.
Thank You very much Dennis I'm feeling a bit anxious too
Quoted Text
Very , very well done so far Mikael ! Glad to see that you found a way to pin the wings which worked out for you ! Your very close to the final stage of assembly . Looking forward to seeing how you rig the tail booms .
Terri thank You so very very much
I'm a bit undecided on how to tackle the tailbooms one thing I'm sure of is that I woun't drill into them too much though... However wings are the first item on the agenda and I'm now busy tying all the strands to the lower wing, using "Bobs buckles"... There are quite a few of them and it is starting to look a bit confusing. I keep telling myself that its not more difficult than any other rigging job, only more...
Best Regards
Mikael
veector73
Joined: February 02, 2011
KitMaker: 11 posts
AeroScale: 10 posts
Posted: Sunday, February 06, 2011 - 09:54 PM UTC
Hi Mikael,
Thanks for the tip on paints and colours you used for PC-10. It helps!
When it comes to rigging...It's only few strands more than the everage WWI project. Nothing more...Just a few strands... Anyway, I keep my fingers crossed for you.
Take care,
Tomasz
Thanks for the tip on paints and colours you used for PC-10. It helps!
When it comes to rigging...It's only few strands more than the everage WWI project. Nothing more...Just a few strands...
Anyway, I keep my fingers crossed for you.Take care,
Tomasz
OEFFAG_153
Joined: February 19, 2010
KitMaker: 1,473 posts
AeroScale: 1,450 posts
Posted: Friday, February 11, 2011 - 02:28 AM UTC
Hi All
I know I promised the final item in my last build post... But I thoght I'd share some of this stage as well before posting the finished model.
Rigging and construction has met with very few issues or surprises. I have to say that Roden certainly has done a great job engineering this kit struts and booms are almost dead on right with very littlle to correct, Putting on the upperwing was also lot less hastle than anticipated... This has partly to do with a new jig I built the other day... (see below )
Here are som in progress pics;
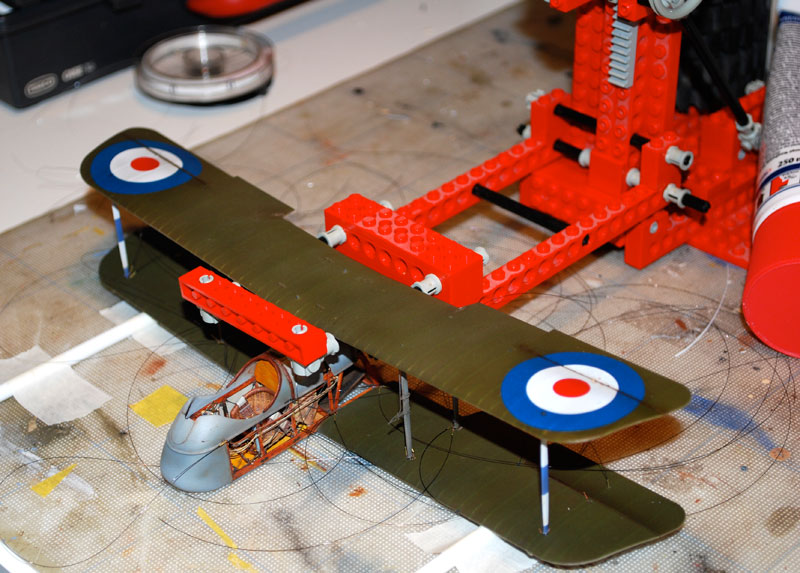
I did the upperwing slowly and steadily, putting in a pair of struts at a time, letting the cure before I put in the next. My new jig made entirely out of lego held the wing in position.
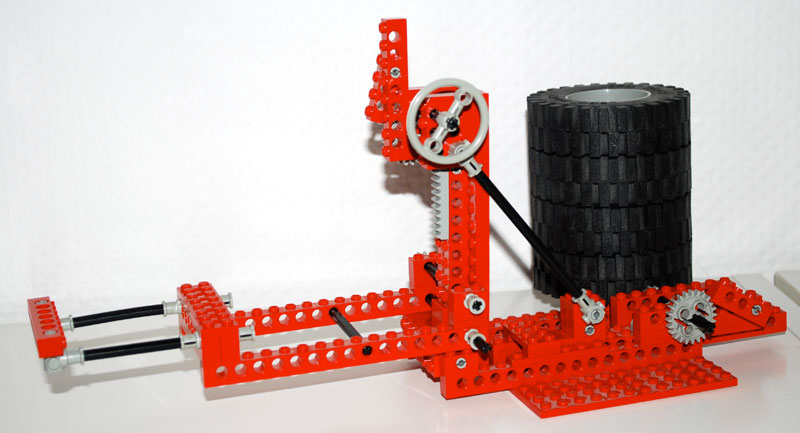
I built it using an old lego tec kit from the 80s and its adjustable up/down and forward/backward. There are "stops" on the cogwheels that hold the arms in the correct positions, and the tolerance is good enough to do very fine adjustments...
Here's another pic of it:

With all struts in place I tied the last rigging lines to the bottom wing. Getting the wing in place was done by turning the whole thing upside down, making the locaion of the struts in the holes pretty easy. I had also pinned all struts, and the booms (something Roden had omitted on the booms and made locating them very much simpler)
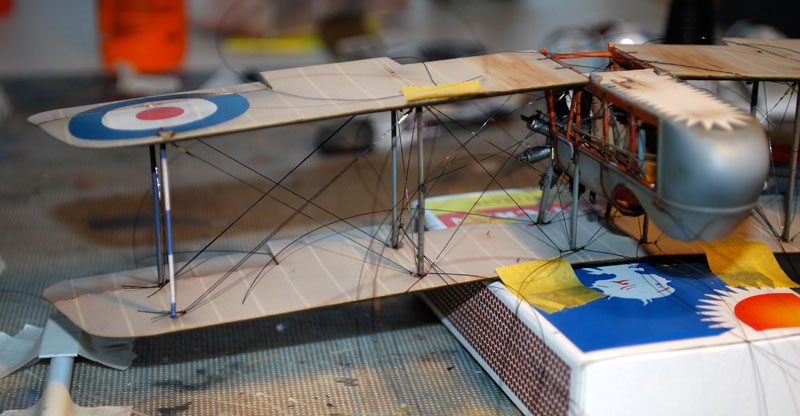
After the wing had cured in place, it was a matter of finding the righ line an locating it to rhe right point. I taped the model upside down on an old matchstick box to help me move it around.
As I write this all lines in between the wings are in place, and the tail and booms are now in place waiting to cure. I shall rig this as well before trying to move it around for the landing gear...
So almost done now, only a few lines and bits left to do
All and any comments are most welome as usual
Mikael
I know I promised the final item in my last build post... But I thoght I'd share some of this stage as well before posting the finished model.
Rigging and construction has met with very few issues or surprises. I have to say that Roden certainly has done a great job engineering this kit struts and booms are almost dead on right with very littlle to correct, Putting on the upperwing was also lot less hastle than anticipated... This has partly to do with a new jig I built the other day... (see below
)Here are som in progress pics;
I did the upperwing slowly and steadily, putting in a pair of struts at a time, letting the cure before I put in the next. My new jig made entirely out of lego held the wing in position.
I built it using an old lego tec kit from the 80s and its adjustable up/down and forward/backward. There are "stops" on the cogwheels that hold the arms in the correct positions, and the tolerance is good enough to do very fine adjustments...
Here's another pic of it:
With all struts in place I tied the last rigging lines to the bottom wing. Getting the wing in place was done by turning the whole thing upside down, making the locaion of the struts in the holes pretty easy. I had also pinned all struts, and the booms (something Roden had omitted on the booms and made locating them very much simpler)
After the wing had cured in place, it was a matter of finding the righ line an locating it to rhe right point. I taped the model upside down on an old matchstick box to help me move it around.
As I write this all lines in between the wings are in place, and the tail and booms are now in place waiting to cure. I shall rig this as well before trying to move it around for the landing gear...
So almost done now, only a few lines and bits left to do
All and any comments are most welome as usual
Mikael
dmopath
Joined: July 02, 2010
KitMaker: 175 posts
AeroScale: 174 posts
Posted: Friday, February 11, 2011 - 02:48 AM UTC
Hi Mikael
Magnificent work! I love the jig.
Your results with the rigging makes me want to take the turnbuckle plunge when I start on this kit (it will be next on the to-to list).
Magnificent work! I love the jig.
Your results with the rigging makes me want to take the turnbuckle plunge when I start on this kit (it will be next on the to-to list).
veector73
Joined: February 02, 2011
KitMaker: 11 posts
AeroScale: 10 posts
Posted: Friday, February 11, 2011 - 07:27 AM UTC
WOW Mikael! You've been definitely busy with your little crate I mean, that is SOME progress here...And very nicely executed! 
Cheers,
Tomasz
I mean, that is SOME progress here...And very nicely executed! Cheers,
Tomasz

JackFlash
Joined: January 25, 2004
KitMaker: 11,669 posts
AeroScale: 11,011 posts
Posted: Friday, February 11, 2011 - 12:07 PM UTC
Thumbs up! Looking good!

CaptainA
Joined: May 14, 2007
KitMaker: 3,117 posts
AeroScale: 2,270 posts
Posted: Saturday, February 12, 2011 - 01:02 AM UTC
I also love your rig-jig. You look to be in the home stretch, and I have really learned a lot about this aircraft. I think you have done an outstanding job on this build. The extra work, and the rigging are fantastic. I am anxiously awaiting final pics.

JackFlash
Joined: January 25, 2004
KitMaker: 11,669 posts
AeroScale: 11,011 posts
Posted: Saturday, February 12, 2011 - 03:35 AM UTC
Now thats an interesting jig!
Mgunns
Joined: December 12, 2008
KitMaker: 1,423 posts
AeroScale: 1,319 posts
Posted: Saturday, February 12, 2011 - 11:24 AM UTC
Quoted Text
Now thats an interesting jig!
Indeed!
thegirl
Joined: January 19, 2008
KitMaker: 6,743 posts
AeroScale: 6,151 posts
Posted: Sunday, February 13, 2011 - 03:10 AM UTC
Awesome Mikael !
Just hope that you give them spiders a few days off when they have finished the rigging
Just hope that you give them spiders a few days off when they have finished the rigging

lcarroll
Joined: July 26, 2010
KitMaker: 1,032 posts
AeroScale: 1,025 posts
Posted: Sunday, February 13, 2011 - 03:46 AM UTC
Quoted Text
Awesome Mikael !
Just hope that you give them spiders a few days off when they have finished the rigging
Mikael,
I have followed this build closely from the beginning and have to add my compliments to the others. Simply put, beautiful work.
As for Terri's comment on the rigging crew, with all respect she missed the obvious. Send those little buggars north and we'll put em to work!
Really looking forward to the photos of the completed beast; she's a real beauty.
OEFFAG_153
Joined: February 19, 2010
KitMaker: 1,473 posts
AeroScale: 1,450 posts
Posted: Monday, February 14, 2011 - 07:45 AM UTC
Hi everyone and Thank You for your kind and encouraging comments on my build they really warm my heart on a pretty cold wintersnight
Thank You Stephen, Carl and Mark I had a brainwave, remembering the old box of lego, and recalling that I once made a forklift when I was about 13 years old So a jig seemed like a plausible thing
Terri and Lance Thank You, I might indeed send the little spiders away for a bit of R&R my next project the Hansa W.29 doesn't seem to require their services too much
Bestest and Warmest Regards to you all!
Mikael
Quoted Text
Now thats an interesting jig!
Thank You Stephen, Carl and Mark I had a brainwave, remembering the old box of lego, and recalling that I once made a forklift when I was about 13 years old So a jig seemed like a plausible thing
Quoted Text
Awesome Mikael !
Just hope that you give them spiders a few days off when they have finished the rigging
Terri and Lance Thank You, I might indeed send the little spiders away for a bit of R&R my next project the Hansa W.29 doesn't seem to require their services too much
Bestest and Warmest Regards to you all!
Mikael
OEFFAG_153
Joined: February 19, 2010
KitMaker: 1,473 posts
AeroScale: 1,450 posts
Posted: Monday, February 14, 2011 - 07:52 AM UTC
Hi again,
Just a quick note to say that rigging is progressing, albeight a bit slower than anticipated I keep thinking, its just a couple more and then... Well there seems to always be "just a couple more".
The booms are securly in place, together with the tail, and this is almost all rigged. Only remains the control wires, but the control horns keep coming off as a tension the lines
Well I will take it as it comes don't rig when you're angry or frustrated...
Mikael
thegirl
Joined: January 19, 2008
KitMaker: 6,743 posts
AeroScale: 6,151 posts
Posted: Monday, February 14, 2011 - 08:28 AM UTC
Quoted Text
Hi again,
Just a quick note to say that rigging is progressing, albeight a bit slower than anticipated I keep thinking, its just a couple more and then... Well there seems to always be "just a couple more".
The booms are securly in place, together with the tail, and this is almost all rigged. Only remains the control wires, but the control horns keep coming off as a tension the lines
Well I will take it as it comes don't rig when you're angry or frustrated...
Mikael
That is soooo true ! When I'm angry or even frustrated I will not do any rigging at all , just leads itself to unfavorible results . Looking forward to seeing how the booms turn out
OEFFAG_153
Joined: February 19, 2010
KitMaker: 1,473 posts
AeroScale: 1,450 posts
Posted: Sunday, February 20, 2011 - 08:52 AM UTC
Hi everyone
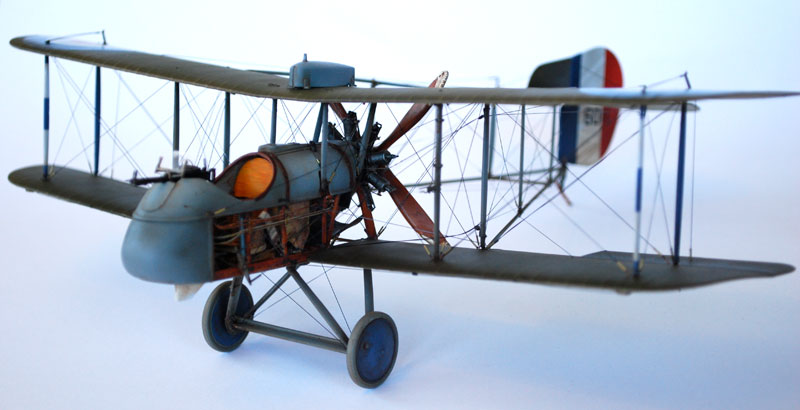
well I can finally say the words Its Done!!! (Apart from a few sagging lines that is going to need a bit of heat treatment, and the piping to the gravity tank that I just noticed I had forgotten Oh well )
)
It was a bit of a hard finish to an otherwise very pleasant, and surprisingly hasstle free build. I don't quite know what was wrong, but the final rigging strands kept tangling themselves, control horns came off and a large and ugly blob of epoxy glue got stuck where it shouldn't. All of it mainly my own faults and nothing to do with the kit itself which I think is a credit to Roden! I have read some griping on the quality of this kit elesewhere but I have had a very positive experience with this build. Even though I abused the narcelle and cut it to bits, it was still possible to line everything up again and put the top wing and booms on without any problems what so ever Great engineering Roden!
Rigging was not as hard as I'd expected and using bobs buckles made it simpler I guess but I think you'd need a couple of british planes under your belt before you atempt to rig this one. But as long as you plan ahead, and take your time, its not much more complex only more!
That's about it I guess Oh yes I almost forgot here are some pics too


Hope you've enjoyed looking at this build as much as I've enjoyed doing it next project will be the WNW Hansa Brandenburgh W.29 for the GB.
Thank You for looking in all and any commnets are as usual most welcome.
Mikael
P.S. @ WNW hope you'll bring on the FE2b soon I feel ready for it now
well I can finally say the words Its Done!!! (Apart from a few sagging lines that is going to need a bit of heat treatment, and the piping to the gravity tank that I just noticed I had forgotten Oh well
) It was a bit of a hard finish to an otherwise very pleasant, and surprisingly hasstle free build. I don't quite know what was wrong, but the final rigging strands kept tangling themselves, control horns came off and a large and ugly blob of epoxy glue got stuck where it shouldn't. All of it mainly my own faults and nothing to do with the kit itself which I think is a credit to Roden! I have read some griping on the quality of this kit elesewhere but I have had a very positive experience with this build. Even though I abused the narcelle and cut it to bits, it was still possible to line everything up again and put the top wing and booms on without any problems what so ever Great engineering Roden!
Rigging was not as hard as I'd expected and using bobs buckles made it simpler I guess but I think you'd need a couple of british planes under your belt before you atempt to rig this one. But as long as you plan ahead, and take your time, its not much more complex only more!
That's about it I guess Oh yes I almost forgot here are some pics too
Hope you've enjoyed looking at this build as much as I've enjoyed doing it next project will be the WNW Hansa Brandenburgh W.29 for the GB.
Thank You for looking in all and any commnets are as usual most welcome.
Mikael
P.S. @ WNW hope you'll bring on the FE2b soon I feel ready for it now
guitarlute101
Joined: December 18, 2006
KitMaker: 1,121 posts
AeroScale: 1,063 posts
Posted: Sunday, February 20, 2011 - 09:16 AM UTC
Stunning build Mikael! Beautiful all around!
Mark
 |

WEB HOSTING BY


Copyright ©2021 AeroScale and Kitmaker Network, a subsidiary of Silver Star Enterprises
All Rights Reserved. Please read our Conditions of Use and Privacy Policy.
All Rights Reserved. Please read our Conditions of Use and Privacy Policy.