FM-2 Wildcat - HobbyBoss/Vector 1/48
Germany
Joined: September 07, 2005
KitMaker: 5,609 posts
AeroScale: 5,231 posts
Posted: Wednesday, May 26, 2010 - 03:27 AM UTC
Hello Gang
looking at the campaign site I just noticed that I only have a good month left for Aces 2 so it is time to start this model that itches me since half a year. As I only found one useable picture of a FM-2 in Wildcat aces (I just have not much on non Luftwaffe aircraft) it will be Harold Nathan Funk 6.5 kill ace and if I understodd that right ace in a day. Here is what we have:
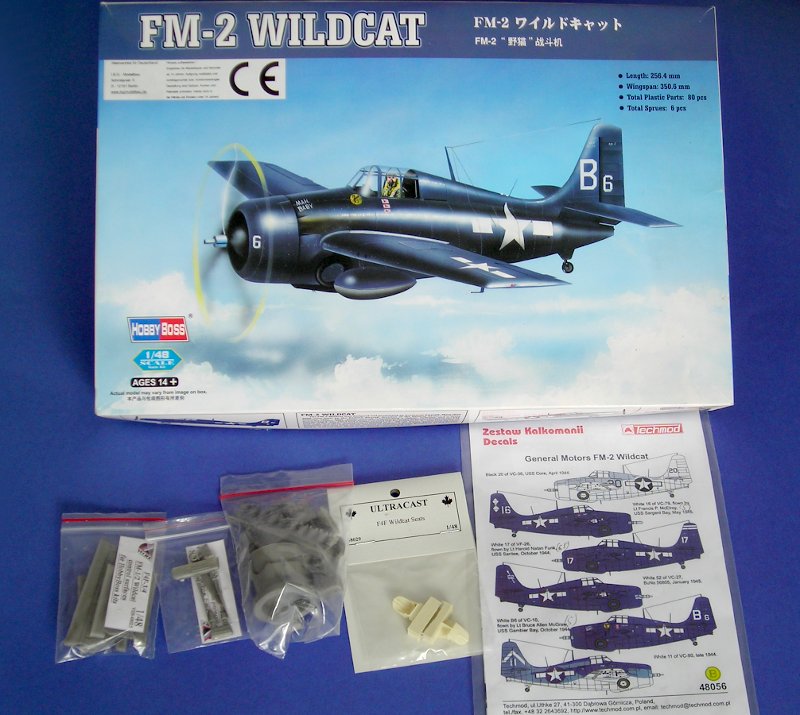
not sure I can make this conversion in a month, but I will try.
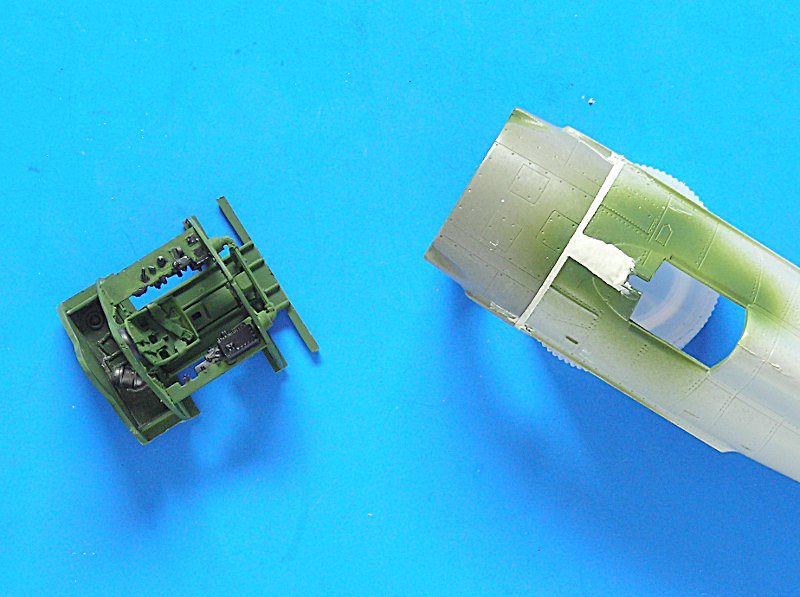
The model is untouched and I start right now. I thought I had an Eduard Zoom for the dashboard (obviously not), but as you can see next to nothing of it that's not a big problem (just ask Jean Barby

) I bought the Ultracast Wildcat seats which will bring some interesting aspect in the pit. ... also the correction will be difficult enough, so there is no need for superdetail ....
all the best
Steffen
DULCE ET DECORUM EST PRO HOBBY MORI
Merlin
 Senior Editor
#017
United Kingdom
Joined: June 11, 2003
KitMaker: 17,582 posts
AeroScale: 12,795 posts
Posted: Wednesday, May 26, 2010 - 03:35 AM UTC
Hi Steffen
What a coincidence! - I was thnking about exactly this conversion last night (and Sergey's P-51 wheelwell too)! I'm looking forward to seeing how you get on, because it'll be a while before I have time to tackle it.
All the best
Rowan

BEWARE OF THE FEW...
As I grow older, I regret to say that a detestable habit of thinking seems to be getting a hold of me. - H. Rider Haggard
Germany
Joined: September 07, 2005
KitMaker: 5,609 posts
AeroScale: 5,231 posts
Posted: Wednesday, May 26, 2010 - 04:24 AM UTC
Hi Rowan
Well, this build is itching me since last year when I got it .. the first quarter I was pretty much occupied to find some will to live, but since a while I can build again and as I found a picture of this machine (which I need to qualify for Aces 2) I thought it would be a great idea.
Often think of Sergey too ... have you seen his Zvezda Bf 109 build at HS PP? ... great stuff and seeing this I must get one of those kits. I still owe you (and him) the LaGG-3 cockpit set article (which is already done and published in German) and the IL-2 spinner .. don't like to owe people things

But back on topic: this is what I did the past 15 minutes:
one has to be careful, but it is easy ...
all the best
Steffen
DULCE ET DECORUM EST PRO HOBBY MORI
Germany
Joined: September 07, 2005
KitMaker: 5,609 posts
AeroScale: 5,231 posts
Posted: Thursday, May 27, 2010 - 02:15 AM UTC
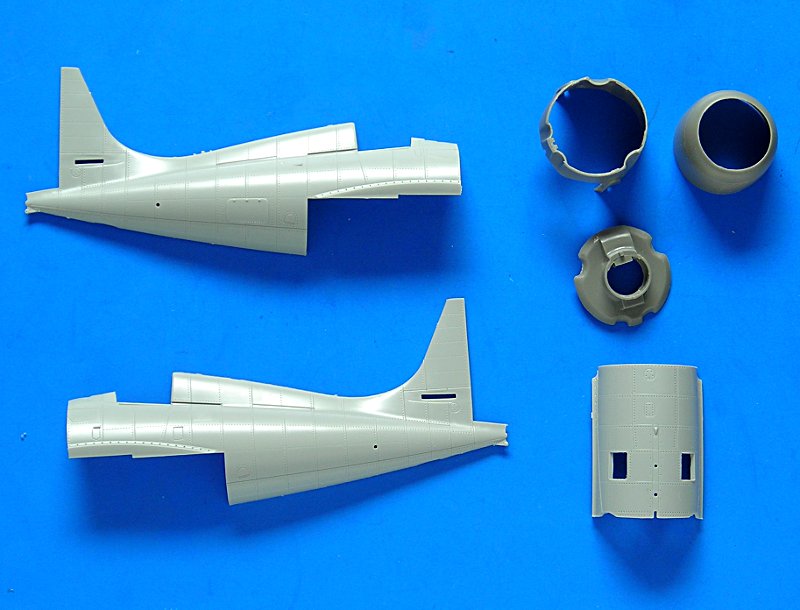
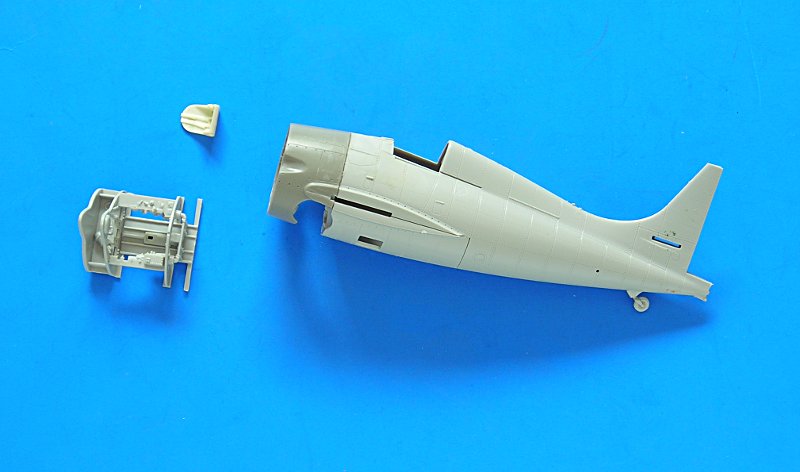
As you know me i do not stick closely to instructions, which allowed me to show again my talent in fixing things .. forgot the tail wheel.
Also I glued the fuselage parts together and attached the Vector front end to it. Fit was good, but I will need to fill and sand the gap. the lower fuselage is not yet glued, but has the firewall attached. This will probably be a bit tricky later on when I have the motor mounts attached, but at the moment I think I can cope with that.
all the best
Steffen
DULCE ET DECORUM EST PRO HOBBY MORI
California, United States
Joined: November 28, 2007
KitMaker: 817 posts
AeroScale: 729 posts
Posted: Thursday, May 27, 2010 - 09:52 AM UTC
Excellent! I'm quite happy to see you undertaking this conversion, my friend- cheers! Vector's offerings are so nice- I've been curious bout this set in particular. Which scheme will she wear- tricolor, maybe?
chuk
[url]http://chukw.blogspot.com/[/url]
Buenos Aires, Argentina
Joined: September 07, 2006
KitMaker: 918 posts
AeroScale: 688 posts
Posted: Thursday, May 27, 2010 - 12:34 PM UTC
Hi Steffen,
A very interest project you have in your hand, I´m going to pay attention to the progress of it
Germany
Joined: September 07, 2005
KitMaker: 5,609 posts
AeroScale: 5,231 posts
Posted: Thursday, May 27, 2010 - 07:00 PM UTC
Thank you Chuk and Daniel!
It will be plain GSB (Harold Nathan Funk VF-26 ) and I will try to approach the look of the aircraft as seen on the picture in Osprey AoA 3 p. 65. All in all I will rather go OOB (which may sound strange with all the Vector parts, but most of them are straight replacements).
all the best
Steffen
DULCE ET DECORUM EST PRO HOBBY MORI
England - North, United Kingdom
Joined: April 10, 2005
KitMaker: 78 posts
AeroScale: 43 posts
Posted: Thursday, May 27, 2010 - 08:47 PM UTC
Steffen
Wasn't the Vector set designed for the Tamiya F4F-4?
When I built my Hobbyboss FM-2, the only corrections needed were to the fin and exhaust outlets.
Don't forget to use the right engine from the kit and to fill in the underside windows.
Good luck.
IAN
Germany
Joined: September 07, 2005
KitMaker: 5,609 posts
AeroScale: 5,231 posts
Posted: Thursday, May 27, 2010 - 08:55 PM UTC
Hi Ian
No the conversion is for the Hobbyboss kit which is the better kit (just ask Sergey). I already glued in the windows and will paint them ... if you want to read something about the many shortcomings of the HB FM-2 kit there are a lot of threads on Hyperscale (not sure if I linked them in my review of the set here on Aeroscale) most visible: too long fuselage; too short cowl; diameter wrong see here
https://aeroscale.kitmaker.net/review/4624for more detail and pix. As you will find there is a nice engine included so no need for the crappy (in comparison) HB stuff
thanks for watching
all the best
Steffen
P.S. to add a bit more constructive content:
base interior paint and some putty
DULCE ET DECORUM EST PRO HOBBY MORI
Germany
Joined: September 07, 2005
KitMaker: 5,609 posts
AeroScale: 5,231 posts
Posted: Friday, May 28, 2010 - 02:27 AM UTC
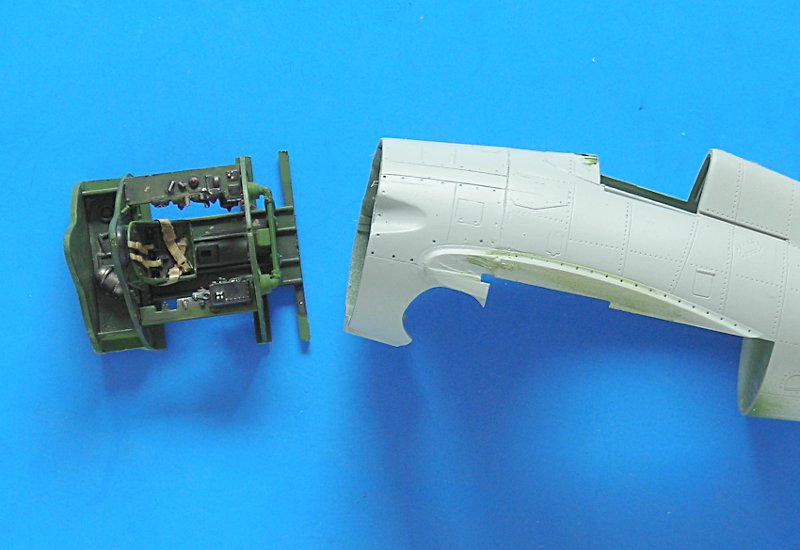
It is coming together. The fuselage is looking good to my eye I just need to restore the raised hinges. The pit only needs some more "metal" details for the seat belts and maybe dials for teh dash, but you can't see nothing of it ...
all the best
Steffen
DULCE ET DECORUM EST PRO HOBBY MORI
New South Wales, Australia
Joined: March 18, 2008
KitMaker: 347 posts
AeroScale: 223 posts
Posted: Friday, May 28, 2010 - 11:20 AM UTC
Great job on the pit Steffen. Can't waitto see how it all comes together!
Assumption is the mother of all f*#k ups.
Merlin
Senior Editor #017
United Kingdom
Joined: June 11, 2003
KitMaker: 17,582 posts
AeroScale: 12,795 posts
Posted: Friday, May 28, 2010 - 09:58 PM UTC
Hi Steffen
Looking good! At this rate you've an excellent chance of meeting the deadline you've set for yourself!
All the best
Rowan
BEWARE OF THE FEW...
As I grow older, I regret to say that a detestable habit of thinking seems to be getting a hold of me. - H. Rider Haggard
Germany
Joined: September 07, 2005
KitMaker: 5,609 posts
AeroScale: 5,231 posts
Posted: Friday, May 28, 2010 - 10:09 PM UTC
Thank you Nick and Rowan
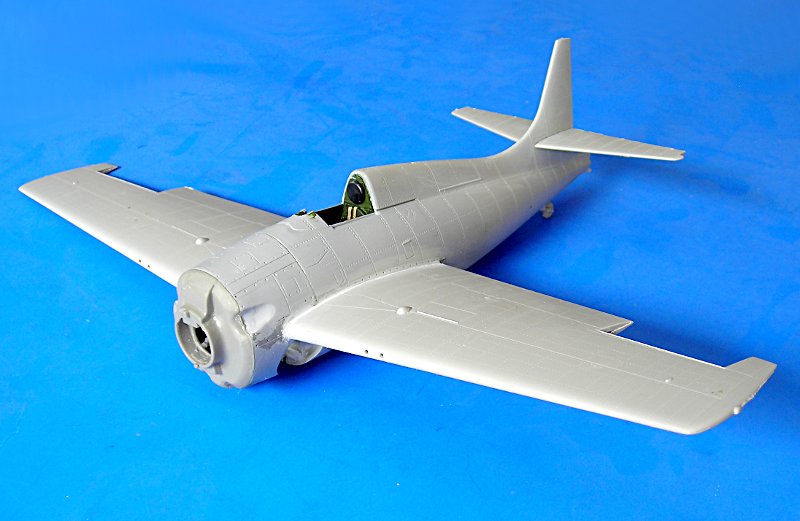
Yes it is looking good and as I do not plan to do something fancy with this kit .... but better not praise the day before the evening. Yesterday evening I completed the fuselage and glued the wings together after I thinned the trainling edges a bit and cut out the ailerons. I left out the guns intetionally, maybe I'll use some AM stuff or plain hypodermic needle. As you can see there is not much to see in the pit (dash was left as is)

This morning I sanded the wings and attached them to the fuselage. Again little problems except of a slight gap. I found the dehedral a bit much and checked some pix, but it seems o.k.
meanwhile I puttied the wing root and will leave this to dry over night. Proably I will start the work in the wheel bay later today....
all the best
Steffen
DULCE ET DECORUM EST PRO HOBBY MORI
Germany
Joined: September 07, 2005
KitMaker: 5,609 posts
AeroScale: 5,231 posts
Posted: Saturday, May 29, 2010 - 06:08 AM UTC
The Vector correction really adds a lot of detail in the wheel bay (hardly to be seen later) but it is nice to know it is there and if you look you will also see it.
As I thought this is quite a fiddly construction due to my preference for glueing the correction to the fuselage first. OTOH I think it is easier to see a mistake there than a glue mark in the bay. Also I made myself the life hard as I forgot to re-attach the oil tank before glueing .. but as you see I got it in. There are still two rods to be installed, but I think this is not too difficult.
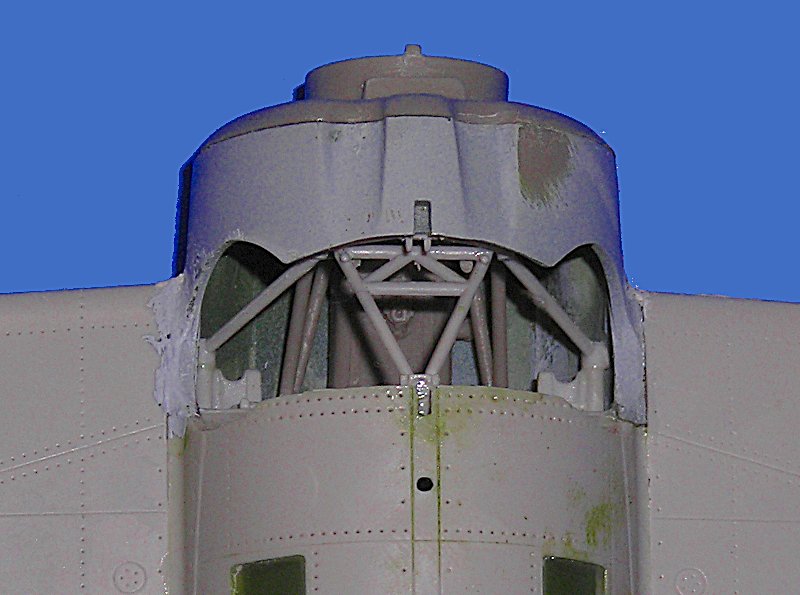
The engine will just plug in through the hole in the front (great design!) .. when I have assembled the motor, but I guess this will not before next weekend as J-L and I will do a small trip eastward next week ...
still there is enough to do with some sanding and control surfaces to add .... maybe some paint in the bay tomorrow.
all the best
Steffen
DULCE ET DECORUM EST PRO HOBBY MORI
Merlin
Senior Editor #017
United Kingdom
Joined: June 11, 2003
KitMaker: 17,582 posts
AeroScale: 12,795 posts
Posted: Saturday, May 29, 2010 - 07:50 AM UTC
Hi Steffen
That is impressive detail and an excellent fit. But isn't it going to be a devil to paint, now it's fitted?
All the best
Rowan
BEWARE OF THE FEW...
As I grow older, I regret to say that a detestable habit of thinking seems to be getting a hold of me. - H. Rider Haggard
Germany
Joined: September 07, 2005
KitMaker: 5,609 posts
AeroScale: 5,231 posts
Posted: Saturday, May 29, 2010 - 07:59 AM UTC
Hi Rowan
it is all light grey, so no problem ....
cheers
Steffen
DULCE ET DECORUM EST PRO HOBBY MORI
Merlin
Senior Editor #017
United Kingdom
Joined: June 11, 2003
KitMaker: 17,582 posts
AeroScale: 12,795 posts
Posted: Saturday, May 29, 2010 - 08:45 AM UTC
Hi Steffen
Cool. I thought I thought there might be going on in there colour-wise.
All the best
Rowan
BEWARE OF THE FEW...
As I grow older, I regret to say that a detestable habit of thinking seems to be getting a hold of me. - H. Rider Haggard
Germany
Joined: September 07, 2005
KitMaker: 5,609 posts
AeroScale: 5,231 posts
Posted: Sunday, May 30, 2010 - 12:53 AM UTC
Hi Rowan
Sure I could invest hours of hours of detail painting the well, but i thing this is not worth it. It will be light grey and get several dark washes to bring out the structure. If I miss one or another spot and some interior green showing through, this will also be no problem "historywise"...
Here is another picture. Though there is not much visible difference I put in quite some work sawing, filling and sanding ...
Just re-read your comment:
Quoted Text
That is impressive detail and an excellent fit.
sadly you cannot see much of the detail actually there in my photo. I do not have an endoscopic camera to show the detail. and as I wrote above I was a bit impatient as I finally got the test fit (fiddly thing to meet the mounting holes) done that I glued it straight away and did not take any photos of the fire wall which has a lot of detail attached. I do apologize!

all the best
Steffen
DULCE ET DECORUM EST PRO HOBBY MORI
Germany
Joined: September 07, 2005
KitMaker: 5,609 posts
AeroScale: 5,231 posts
Posted: Saturday, June 05, 2010 - 05:53 AM UTC
Just to show some progress:

the engine crankcase is just primered and will get a dark blue grey colour before I attach the cylinders and push rods (steel wire)
all the best
Steffen
DULCE ET DECORUM EST PRO HOBBY MORI
litespeed
News Reporter England - North West, United Kingdom
Joined: October 15, 2009
KitMaker: 1,976 posts
AeroScale: 1,789 posts
Posted: Saturday, June 05, 2010 - 07:04 AM UTC
Hi Steffen
The components for the radial engine look very impressive. Enjoying the build so far.
tim
Germany
Joined: September 07, 2005
KitMaker: 5,609 posts
AeroScale: 5,231 posts
Posted: Sunday, June 06, 2010 - 08:30 PM UTC
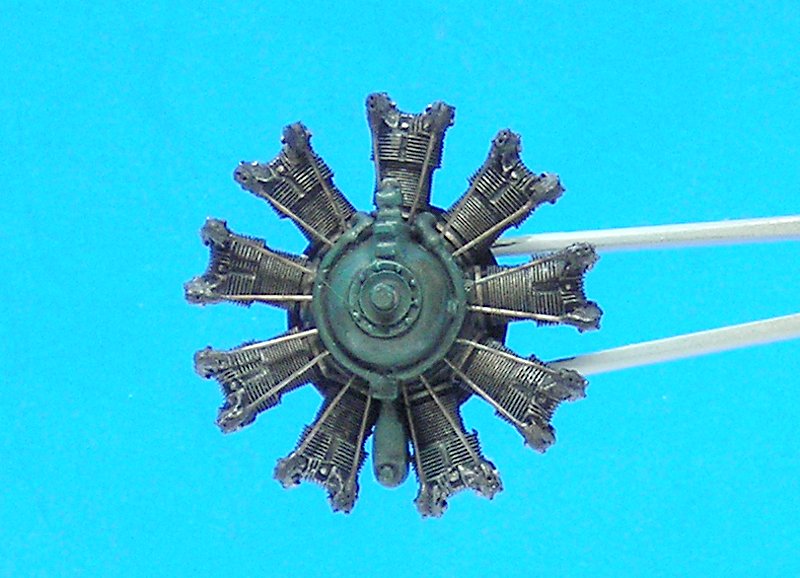
So here is a little progress on the engine. I have just seen a R-2800 over at HS Plastic Pix and my R-1820 is not as good, but I like it so far...
all the best
Steffen
DULCE ET DECORUM EST PRO HOBBY MORI
Merlin
Senior Editor #017
United Kingdom
Joined: June 11, 2003
KitMaker: 17,582 posts
AeroScale: 12,795 posts
Posted: Sunday, June 06, 2010 - 08:45 PM UTC
Hi Steffen
Very nice! You've done a fine job highlighting the lovely detail in Sergey's engine.
All the best
Rowan
BEWARE OF THE FEW...
As I grow older, I regret to say that a detestable habit of thinking seems to be getting a hold of me. - H. Rider Haggard
Germany
Joined: September 07, 2005
KitMaker: 5,609 posts
AeroScale: 5,231 posts
Posted: Sunday, June 06, 2010 - 09:49 PM UTC
Thanks Rowan!
(and I forgot to thank Tim as well for his kind comment!)
I needed to file the cylinder heads slightly to fit it under the cowl. I am sure this is a construction mistake on my end and it is really only a small fraction of a mm. Though I will leave this all off until after painting to ease masking of the wheel well and avoid masking the engine (that still needs a lot of work until I can think of paint)
all the best
Steffen
DULCE ET DECORUM EST PRO HOBBY MORI
Attica, Greece / Ελλάδα
Joined: May 01, 2008
KitMaker: 1,437 posts
AeroScale: 1,241 posts
Posted: Monday, June 07, 2010 - 12:51 AM UTC
I like it very much until now
The cockpit, the engine

But I HATE this aircraft VERY MUCH


Cheers Nick
New Hampshire, United States
Joined: November 09, 2008
KitMaker: 615 posts
AeroScale: 459 posts
Posted: Monday, June 07, 2010 - 02:07 AM UTC
Hi Steffen,
I have been watching your build closely since it began since I would like to do one myself. I am, as always, impressed by your work. I am looking forward to the next update.
Later

P-61 Black Widows, the Group Build
Veni, Vidi, Velcro; I came, I saw, I stuck around