_GOTOBOTTOM
World War II
Discuss WWII and the era directly before and after the war from 1935-1949.
Hosted by Rowan Baylis
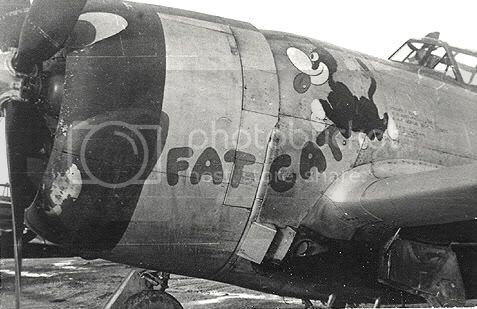
P-47D "FAT CAT"
f1matt
_VISITCOMMUNITY
Manitoba, Canada
Joined: August 13, 2006
KitMaker: 1,021 posts
AeroScale: 184 posts
Posted: Thursday, April 24, 2008 - 08:13 PM UTC
Hello everyone. Here's what I will be building for my second blog. The first for me at Aeroscale.

P-47D-22-RE Razorback named FAT CAT. She was part of the 509th FS, 405th FG and was flown by Lieutenant Henry Bakken.



I'm building Tamiya's gorgeous 1/48 scale rendition of this monster. The decals are from Eagle Strike. Sheet 48098 named "Thunderbolts of the 405 F.G. American Jabos Pt.VII". I have a set of spoked diamond tread resin wheels from Ultracast (48121). Two etch sets from Eduard will be going in. A general Zoom set (FE 226) and a set of P-47 placards (FE 197). Finally to make life a little easier come painting I decided I might as well get a set of Eduards flexible masks (EX 010).

In a move that will no doubt send shock waves through the modeling community I decided to start this project with the cockpit.

A very nicely detailed cockpit that I'm sure everyone has seen already. This is why I opted to simply go with the Zoom set instead of a full resin replacement.

Various details were removed with an X-acto knife or file in preparation for the Zoom set. After that it was off to paint. The instrument panel had a few wires inserted into the back to replicate wires leading to the various instruments. The clear film with the instrument faces was painted white on one side and then glued down onto the panel. Over this went another layer in the panel sandwich. This top layer has some incredible detail printed on it.

Still more work to do on the panel but here's what it looks like now.


The cockpit was painted using Tamiya acrylics. The green was mixed from J.A. green XF-13 and flat blue XF-8. A darker shade to represent shadows was sprayed on using the same base green mix only with some NATO black (XF-69) added. Mixing some yellow green XF-4 into the base shade gave me a highlight colour. Various details were picked out with NATO black and silver.

Some weathering was done by mixing a few different shades of green and adding little scrapes and scratches in a random fashion. The deeper scratches were picked out with small amounts of Testors silver. The seat received a fair amount of silver as I figured my P-47 was a well used war bird. Still have to add the throttle quadrant and paint the headrest.


Before I finished up for the night I applied some pin washes using paynes grey. A little European dust was used to dirty up the floor. This pigment (Mig) was mixed with water first then painted on. Once dry the excess was removed with a stiff brush leaving the pigment in the depressions where dirt would naturally accumulate. Also I had to try out the colour etch seat harness.


So that's where she is now. I work the next three days so I hope to finish up the cockpit Monday.

One more thing. I have yet to successfully finish a NMF project so I'm a little nervous about this one. This will be attempt number three. You know what they say about threes don't you?


-Matt
SGTJKJ
#041
_VISITCOMMUNITY
Kobenhavn, Denmark
Joined: July 20, 2006
KitMaker: 10,069 posts
AeroScale: 3,788 posts
Posted: Thursday, April 24, 2008 - 08:17 PM UTC
Excellent choice of colour scheme, Matthew. The cockpit looks absolutely stunning. I almost feel like this one is flyable with all those details.

Looking forward to see more
f1matt
_VISITCOMMUNITY
Manitoba, Canada
Joined: August 13, 2006
KitMaker: 1,021 posts
AeroScale: 184 posts
Posted: Thursday, April 24, 2008 - 08:36 PM UTC
Wow that didn't take long for the first response . Thanks Jesper. It's easy when Tamiya and Eduard have your six covered. I knew I had to build this very bird when I saw it in an issue of AIr Modeller recently (okay, recently for me). It had all the aspects I was looking for in a Jug. It's a Razorback. NMF finish. It's dirty. Has a great name and artwork on it. D-day markings. Even has a nice splash of colour with the red canopy. How could I say no?

To quote Jesse James. "Now all that's left to do, is everything".

Well, almost.

-Matt
lampie
#029
_VISITCOMMUNITY
England - East Midlands, United Kingdom
Joined: December 23, 2005
KitMaker: 6,249 posts
AeroScale: 3,270 posts
Posted: Thursday, April 24, 2008 - 10:20 PM UTC
Hi Matt.
Its about time you started this!
That instrument panels stunning. Im slightly behind you with my lastest Tamiya P47.
Im really looking forward to seeing this come together.

:-[ ] The drop tanks in the photo look like they are the "teardrop" type, more usually seen on P-38's and arent included with the Razorback kit. The P-47M kit has them though. If you dont know anybody local that has some in their spares box I could send you a couple.

Nige
ricknroll
_VISITCOMMUNITY
Oregon, United States
Joined: September 02, 2005
KitMaker: 39 posts
AeroScale: 4 posts
Posted: Monday, April 28, 2008 - 09:49 AM UTC
Well, well, here you are. I'm digging this already, the cockpit looks smashing. It'll be fun watching for any cross-over of techniques from armor to wings. For instance....the chipping and Mig's I'm guessing are influenced by the darkside.

On a side note....thanks for the lead on the 82nd emblems, everybody is very happy.

Take Care,
Rick
WingTzun
_VISITCOMMUNITY
Illinois, United States
Joined: February 01, 2006
KitMaker: 853 posts
AeroScale: 137 posts
Posted: Monday, April 28, 2008 - 11:32 AM UTC
Nice job Matt. You can't go wrong with a "Jug" -one of my favorite planes, especially the Razorback. Like your choice in decals. I'm subscibing to this post
f1matt
_VISITCOMMUNITY
Manitoba, Canada
Joined: August 13, 2006
KitMaker: 1,021 posts
AeroScale: 184 posts
Posted: Monday, April 28, 2008 - 06:31 PM UTC
Thanks for the offer Nige. I think they would make an interesting addition. I'll pm you about the details. I see you started your latest P-47 as well. Fantastic colour scheme on that one. Like yours, I plan on mine being mostly OOB. Well.... kind of. My main focus will be on the natural metal finish. Fingers crossed.

Rick, your absolutely right about the '"pigs and chips" (sounds like some strange snack food). I've learned a lot about armour modeling in the last year and I think quite a bit can be applied to this project. Especially with something as rugged as a Jug. And if you need anything else just ask.

Thanks Dave. There's just something about the lines of a Razorback.


Spent the day working on finishing the cockpit. The gunsight still needs work, but other than that this area is complete. I think.

Added many of small items from the Eduard zoom sets. The throttle quadrant was tricky but still fun to put together. The pre-coloured placards look great. An easy way to add very fine detail to your cockpit. No matter what type of plane your building.


I'm not sure why but the gunsight is slightly off center. Locating the sight seemed easy enough. Surprised I managed to mess it up. Guess I'll live with it as from most angles it isn't to obvious and I don't want to get bogged down with trying to fix every little detail. I'll save that for later.


The headrest was painted in a base coat of acrylics. Shading was applied with oils to give it more of a three dimensional look. The top right corner received the brightest highlights while the lower left hand corner got the darkest shadows. I was inspired by Adam Wilder to try a technique he's been working on. Albeit on a much smaller scale. His work, playing with shadows and highlights is quite fascinating. Now if only I could take decent pictures to show all of you.


Painted some Tamiya XF-4 yellow green on various other parts as well today. It should start to look like an airplane soon.

-Matt
lampie
#029
_VISITCOMMUNITY
England - East Midlands, United Kingdom
Joined: December 23, 2005
KitMaker: 6,249 posts
AeroScale: 3,270 posts
Posted: Monday, April 28, 2008 - 10:23 PM UTC
Great looking cockpit Matt!
That throttle quadrant is a lot better than the kits moulded one.
Let me know about the drop tanks.
Ive added wire to the instrument panel in the past. Adding wires to each separate instrument looks good but its purely representative. Pages of a parts manual I have show a couple of the gauges linked but the main wiring loom is connected to a multi-pin plug in the bottom right hand corner of the panel when seen from the rear.
On the subject of NMF, Im in the process of writing a feature about my experiences with Alclad2.
Keep posting the photos!
Nige
Yeti123
_VISITCOMMUNITY
Michigan, United States
Joined: February 11, 2008
KitMaker: 311 posts
AeroScale: 278 posts
Posted: Tuesday, April 29, 2008 - 12:41 AM UTC
Matt:

Beautiful cockpit. This scheme is really going to look great. There is so much you can do with a Jug and I can't wait to see the rest of yours.
lampie
#029
_VISITCOMMUNITY
England - East Midlands, United Kingdom
Joined: December 23, 2005
KitMaker: 6,249 posts
AeroScale: 3,270 posts
Posted: Wednesday, April 30, 2008 - 02:14 AM UTC
Hi Matt.
Looking very good!
Points of interest for you...
Drop Tanks,,in the post,,check your PM's.
Magnetos. Check the SIG, ( and your PM's LOL )
Gun sight!,I knew there was something Id forgotten to answer!
Dont panic,,you havent goofed.
Its supposed to be off centre.


Nige
f1matt
_VISITCOMMUNITY
Manitoba, Canada
Joined: August 13, 2006
KitMaker: 1,021 posts
AeroScale: 184 posts
Posted: Wednesday, April 30, 2008 - 10:58 AM UTC
Thanks Taylor. I'm pretty anxious myself to see how it turns out.

And Nige strikes again. So I didn't foul up placement of the sight. I thought I had glued it in the right spot but when I took a look at it later I was worried. All for not. At least someones been doing his homework. Thanks. Again.

After sending one PM after another today I managed to get some work done before.....work .

Cockpit meet fuselage. Fuselage meet cockpit. I think I see a future in this couple.


After drilling a hole on both sides of the fuselage (to accept parts E6 x2) it turned out that those parts shouldn't be on my particular Jug. Some stretched sprue was used to fill the holes (just below of the windscreen) and this just needs to be sanded down.


The wing spars and turbo were glued in place before the fuselage halves were joined.


Some filling and sanding will get rid of any remaining seams. The wings and horizontal stabilizers are next up.

-Matt
lampie
#029
_VISITCOMMUNITY
England - East Midlands, United Kingdom
Joined: December 23, 2005
KitMaker: 6,249 posts
AeroScale: 3,270 posts
Posted: Wednesday, April 30, 2008 - 11:27 AM UTC
Hi Matt.
Theres some simultaneous T'bolt building going on here
Ive got the fusalage halves together on my "M" today, in between PM's


Quoted Text

After drilling a hole on both sides of the fuselage (to accept parts E6 x2) it turned out that those parts shouldn't be on my particular Jug. Some stretched sprue was used to fill the holes (just below of the windscreen) and this just needs to be sanded down.


These parts represent extra mirrors, added to Bud Mahurins Razorback at Halesworth and werent a standard P47 part.
On the subject of drilling holes though, be sure to drill the holes for the underwing pylons before you join the wing halves together. Also, dont add these pylons until youve decalled, as they go over the "star and bar".
Nige
f1matt
_VISITCOMMUNITY
Manitoba, Canada
Joined: August 13, 2006
KitMaker: 1,021 posts
AeroScale: 184 posts
Posted: Wednesday, April 30, 2008 - 07:16 PM UTC

Quoted Text

These parts represent extra mirrors, added to Bud Mahurins Razorback at Halesworth and werent a standard P47 part.
On the subject of drilling holes though, be sure to drill the holes for the underwing pylons before you join the wing halves together. Also, dont add these pylons until youve decalled, as they go over the "star and bar".
Nige


Ah so that's what they are. Interesting. The holes in the wings have been drilled out and I'll make sure to wait until after decals to install the pylons.

-Matt
lampie
#029
_VISITCOMMUNITY
England - East Midlands, United Kingdom
Joined: December 23, 2005
KitMaker: 6,249 posts
AeroScale: 3,270 posts
Posted: Thursday, May 01, 2008 - 02:27 AM UTC
Hi Matt.
You can see them quite clearly in this photo.

Nige
f1matt
_VISITCOMMUNITY
Manitoba, Canada
Joined: August 13, 2006
KitMaker: 1,021 posts
AeroScale: 184 posts
Posted: Friday, May 02, 2008 - 11:44 AM UTC
Great photo Nige. I've never seen that one before. It also has a good view of the gunsight. Now I know where to place some more of the Eduard PE pieces I have.

I wonder if to save time I should just copy and paste text from Ugly Duckling? I might as well cause I'm at the exact same stage as Lampie.

Well here is what I have been up to today. The fuselage got a light coat of Tamiya XF-4 yellow green. I needed to paint the inside of the wheel wells (molded onto the fuselage halves) and I figured I might as well paint the seams to. This would help me see what cleaning up I have to do. Then I figured it was such a nice shade of green, well .... I might as well just paint the whole darn thing.


The first time I built this kit I followed the instructions exactly. Not quite so this time. The instructions tell you to build the wings completely and then slide them onto the wing spars. I had prepainted all of the wheel well areas yellow green as it would be difficult to reach certain areas after assembly. Then the wings were slid into place. Unfortunately the tolerances are rather tight (normally a good thing). But the paint was scraped off as the wing was slid into place.

To avoid this I again prepainted the wheel wells.


But this time, only the top halves of the wings were attached first.


The fit of the parts is good enough that the wings easily stay in place while awaiting glue. And the paint was not damaged at all this time. Hey it's starting to look like something.


Next the lower wing halves are added.


Tenax-7R was used to glue the wings together as it is a very strong liquid glue and dries incredibly fast. Use this glue in a well ventilated area only. The elastic bands were added to help keep everything in place as the glue set, but it grips so well they probably weren't needed.

Next up are the two horizontal stabs. This is pretty straight forward. just make sure they line up straight.


Because of how well the kit is engineered I can add the cowling without gluing anything. Just for looks for now.


Now that many of the main pieces are on I will go over the seams and fix what ever needs work. Finish the gunsight. Add the windscreen. Build the engine. It's getting there.

-Matt
lampie
#029
_VISITCOMMUNITY
England - East Midlands, United Kingdom
Joined: December 23, 2005
KitMaker: 6,249 posts
AeroScale: 3,270 posts
Posted: Friday, May 02, 2008 - 12:27 PM UTC
Looking great Matt!
The fit is really tight over that wing spar isnt it?
Theres a join mark on top and bottom of that spar which if you scrape it away makes all the difference
I love the lines of a Razorback!,,Thats how Kartvelli intended a P-47 to look! The "Bubbletops" never seemed to handle as well as the old Razorbacks, lateral stablity was a problem as evidenced by the number of different rear fusalage fillets fitted both at the factories and in the field.
Are you going to wire the engine up?
The Razorback canopy fits really well and its possible to paint the olive drab and ensure the canopy is blended nicely with the rest of the paintjob, not that its going to be an issue on your build with the canopy having a red frame
Are you going to be using Alclad for the NMF?
Our two threads are running together quite nicely at this point, but pretty soon each build will start to look very different when the paint and decals start to go on.
Its a shame your in Canada and Im in the UK as a photo feature with the 2 T'bolts together would look spectacular.
Nige
chris1
_VISITCOMMUNITY
Auckland, New Zealand
Joined: October 25, 2005
KitMaker: 949 posts
AeroScale: 493 posts
Posted: Friday, May 02, 2008 - 08:04 PM UTC
Hi Matthew
Your P47 is lookin' good
May I ask how did you do the chipping on the seat and 'pit floor?

I need to do the same for an F4u I'm working on

Cheers
Chris
f1matt
_VISITCOMMUNITY
Manitoba, Canada
Joined: August 13, 2006
KitMaker: 1,021 posts
AeroScale: 184 posts
Posted: Sunday, May 04, 2008 - 06:18 PM UTC
I'll have to remember about that join line on "the next one". Ya it's too bad about being across the pond. I'd sure like to photograph Fat Cat at her old aerodrome. I know I'm going to visit Great Britain someday. It's only a matter of time. I'm looking forward to it.

No problem Chris. Nothing fancy required for the chipping. I always use Testors silver. The one in the little bottle. I used a 10/0 brush to apply the chips. Think of where the pilot sits. Where he and his kit would rub up against the seat. How he would step into the cockpit as well. How old is your aircraft? Obviously a newer aircraft will have less chipping then a war weary bird.


Well I reached the step no one likes. Seam filling. It has to be done so let's get it over with. Thankfully this is a Tamiya T-bolt so not much is required. But it will be a silver T-bolt so it has to be darn near perfect. No filler was required on the wing roots. Or at the horizontal stabs. But the fuselage needed a little work. Not because of any gaps though. Just to make sure there is a smooth transition from one part to the next. I like to use a product that was introduced to me recently. Mr Hobby's Mr Dissolved Putty. It's exactly what it says. Dissolved putty. It goes on thin enough to spread around but it's thick enough to fill small gaps. It is even self leveling since it is thin. Dries quick too. I use a needle to apply it. Once it has set the sanding sticks come out. Tape is applied along the seam to reduce damage to panel lines caused by sanding. Once the putty is sanded smooth the polishing stick comes out to make it real glossy. And then the panel lines are repaired. There is less damage with the tape in place but you can't prevent all of it. An x-acto blade is used to mark out the missing part of the panel line. This gives me a guide. Then I gently go over the line with an old airbrush needle. Don't try to make the line in one pass. Go over it several times. Press gently. We want a panel line. Not the Grand Canyon. Pressing too hard will likely send the needle off course scratching the surface. Not what we want. To replace rivet detail that's been lost simply poke the plastic with the same needle. Make sure to go back over the newly scribed line with a polishing stick.

The gunsight is 99% done. I replaced the over scale glass with thin clear plastic from the spares box. Not sure if it is exactly the right size but hey it looks like good to me. The thick armoured glass was painted and attached to the windscreen. Then the entire windscreen assembly was glued onto the fuselage. Some Mr. Dissolved Putty was applied to the fine seam around the windscreen. This will be sanded down once dry. So here's how she looks now.


Coming at ya!


Just need to mask the cockpit and wheel wells. Then it's off for a coat of primer. I work the next couple of days so I should have another update Wednesday.

-Matt
ricknroll
_VISITCOMMUNITY
Oregon, United States
Joined: September 02, 2005
KitMaker: 39 posts
AeroScale: 4 posts
Posted: Monday, May 05, 2008 - 06:09 AM UTC
Looks good Matt. I appreciate the filling and sanding tips.....not being a plane builder I haven't had much experience with the super fine work that's required for wings side of the world. I'd not heard about taping to protect the neighbors while sanding trick...that's a good one.

The Mr. Disloved Putty sounds like the bomb...sounds similar to my mix of Squadron Green mixed w/Tamiya Liquid Thin....but premixed and ready to go.

Always find your builds a joy to follow,
Rick
dcandal
_VISITCOMMUNITY
Buenos Aires, Argentina
Joined: September 07, 2006
KitMaker: 918 posts
AeroScale: 688 posts
Posted: Monday, May 05, 2008 - 06:33 AM UTC
That´s a great job that you are doing, very nice
f1matt
_VISITCOMMUNITY
Manitoba, Canada
Joined: August 13, 2006
KitMaker: 1,021 posts
AeroScale: 184 posts
Posted: Monday, May 05, 2008 - 07:21 PM UTC
Thanks Daniel. It should start to look a lot more interesting once I get some paint on it.

Yeah, building aircraft models is a little different from the heavy armoured stuff. I plan on going back to the dark side soon after this one's done. Here is a picture of the putty I've been using. And you are exactly right about it's description Rick. It's thinner then yogurt but thicker then milk.


I tried to take a picture of the putty dripping off the needle to help show it's thin consistency.


I can't wait to start playing with the Alclad paints. Going to try experimenting with pre and post-shading. I've never done that with metallic paints. Should be interesting.

And I do plan on wiring the engine.

-Matt
f1matt
_VISITCOMMUNITY
Manitoba, Canada
Joined: August 13, 2006
KitMaker: 1,021 posts
AeroScale: 184 posts
Posted: Sunday, June 29, 2008 - 07:15 PM UTC
Yikes. Has it really been that long? Until Sunday I hadn't done much with Fat Cat. Just shoot on some primer. Look for blemishes. Fill. Sand. More primer. And repeat. Truly exciting stuff. But that's all over now. Alright I finished that stuff a few weeks ago but other things have been keeping my attention. Anyway this past weekend the masks from Eduard went on. These things make life so much easier. Masking canopies can be such a nightmare for me but not with these babies. What they didn't cover was the big gap called a cockpit. This was carefully stuffed full of tissue paper. Some low-tac masking tape and Mr. Masking Sol finished the job. Once that was out of the way I sprayed the whole model (and all sub assemblies) with NATO black from Tamiya.


Note that the black wasn't sprayed on in a uniform fashion.


Now out comes the first layer of Gunze light grey. Thinned with only tap water. The pressure could have been lower but this is only the first step of many.


Along with traditional pre-shading I thought I would give the technique known as modulation a try. There is a good feature on this technique over at Armorama. Light grey was sprayed onto areas that would receive more light. Any place that would be in the shadows is left black.


Can't forget the sub-assemblies. I certainly haven't mastered this technique. The flaps need more attention. it's not only good for curved surfaces. Modulation (in moderation) can help make flat panels more interesting too. At least that's the idea.


Here are the drop tanks that Nige kindly sent me. Some plastic strip was glued on to give me a handle. Makes spraying them much easier.


The tricky part with modulation is feathering the area between the light and dark so it looks natural. Even the canopy and propeller got in on the action.


This is only the start of my pre-shading. Many more layers to come. I suppose once that is all done I will have to spray on a layer of gloss or semi gloss to get it ready for the Alclad.

-Matt
f1matt
_VISITCOMMUNITY
Manitoba, Canada
Joined: August 13, 2006
KitMaker: 1,021 posts
AeroScale: 184 posts
Posted: Monday, June 30, 2008 - 04:08 AM UTC
Two updates in two days. I'm just flying! Well I woke up early (for me anyway) so I managed to squeeze in some painting before work. The next step in my pre-shading is to spray on some Tamiya flat black over the panel lines.


Now it's back to the highlights. Tamiya flat white. Which for some reason just didn't want to go on smooth today. I kept playing with the amount of thinner. Adjusted the air pressure. it got a little better but not much. Good enough to spray at least. Just.


Could I call it a nightfighter and say it's complete?


Here she is along with the highlighted sub assemblies. Flaps look a little better now.


So pre shading is almost done. Maybe some tweaks here and there. Then it'll be time for some colour.

-Matt
ricknroll
_VISITCOMMUNITY
Oregon, United States
Joined: September 02, 2005
KitMaker: 39 posts
AeroScale: 4 posts
Posted: Wednesday, July 02, 2008 - 11:05 AM UTC
Geez, about time Matt.

Good show with the modulation, it's great to see people moving it to other areas than armor. I don't know if you caught it or not, but Spencer tried to apply the technique to wings a little while ago and became frustrated with his results. (See Mig's forum). By the looks of it you've got a pretty good handle on it.

Adding the metal finish will certainly add a new (and challenging) dimension to the technique.

Best of luck, I'll be following.

Rick

CaptainA
_VISITCOMMUNITY
Indiana, United States
Joined: May 14, 2007
KitMaker: 3,117 posts
AeroScale: 2,270 posts
Posted: Thursday, July 03, 2008 - 08:02 AM UTC
It is looking great,
 _GOTOTOP