_GOTOBOTTOM
World War II
Discuss WWII and the era directly before and after the war from 1935-1949.
Hosted by Rowan Baylis
1/72 MPM Bristol Blenheim mk.I
Merlin
Staff MemberSenior Editor
AEROSCALE
#017
_VISITCOMMUNITY
United Kingdom
Joined: June 11, 2003
KitMaker: 17,582 posts
AeroScale: 12,795 posts
Posted: Saturday, August 30, 2008 - 10:30 PM UTC
Hi Eetu

That's superb work on the cockpit! I did a real double-take on the scale - I thought I must be looking at 1/48!

All the best

Rowan
TedMamere
_VISITCOMMUNITY
Moselle, France
Joined: May 15, 2005
KitMaker: 5,653 posts
AeroScale: 4,347 posts
Posted: Sunday, August 31, 2008 - 01:34 AM UTC
Hi Eetu!


Quoted Text

That's superb work on the cockpit! I did a real double-take on the scale - I thought I must be looking at 1/48


Same here. that's a fantastic job you've done.

The glazing remembers me of something...

Jean-Luc
lampie
#029
_VISITCOMMUNITY
England - East Midlands, United Kingdom
Joined: December 23, 2005
KitMaker: 6,249 posts
AeroScale: 3,270 posts
Posted: Sunday, August 31, 2008 - 08:48 AM UTC
Slow and steady process Eetu, and the Blenheims coming together really nicely now.
Its a pleasure watching it all come together.
Great project!
Nige
Emeritus
_VISITCOMMUNITY
Uusimaa, Finland
Joined: March 30, 2004
KitMaker: 2,845 posts
AeroScale: 1,564 posts
Posted: Saturday, November 08, 2008 - 12:43 AM UTC
In case you were wondering, I haven't thrown in the towel yet.

Question: How much time can it take to build simple gratings to two intakes and apply a coat of primer from a spray can?
Yes, over two months...

A lesson learnt: store your masked but not yet primed models in an air-tight container of some sort. Picking up dust, hair and other junk from the edges of the tape with tweezers is smashing good fun.

But enough talking, here's some progress:


After much planning and pondering (i.e. procrastination), I decided to skip the vertical grating from the intakes. The two horizontal ones were fiddly enough on their own without having to make cuts in them to fit the vertical pieces. As scrap PE turned out to be much too thick, I used aluminium from mincemeat pie molds instead.

Next step: preshading.


I just hope to get that done in less than two months...
kenner
_VISITCOMMUNITY
Ontario, Canada
Joined: October 14, 2007
KitMaker: 122 posts
AeroScale: 119 posts
Posted: Saturday, November 08, 2008 - 02:19 PM UTC
The horizontal gratings DO look nice.
(mmm, mincemeat)

Emeritus
_VISITCOMMUNITY
Uusimaa, Finland
Joined: March 30, 2004
KitMaker: 2,845 posts
AeroScale: 1,564 posts
Posted: Thursday, January 21, 2010 - 08:50 AM UTC


Yep, I was right. I got the preshading done in less than two months. But that's it...

So anyway, now after more than a year, I've managed to get this one going again, laid down some paint, discovered & chose to ignore some mistakes, changed my mind on the aircraft to depict, ended up disappointed with some decals, etc... Just my usual luck I guess. ...

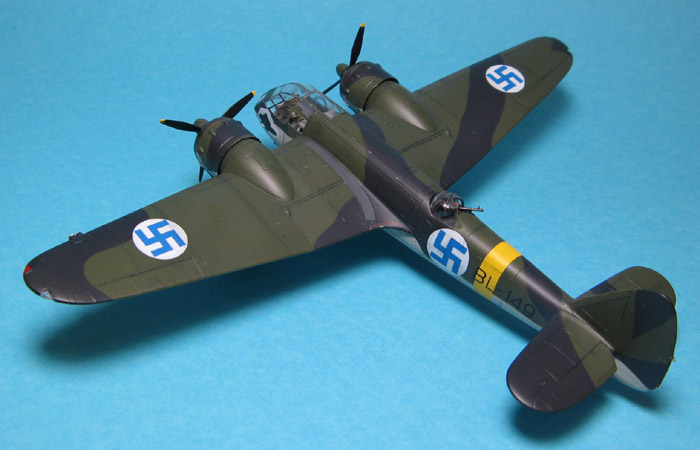
Last year I picked up AML's Finnish Blenheims decal sheet, and decided to cut down on the amount of guesswork on the camo pattern by choosing to model BL-149 instead of BL-158 I originally had in mind. Most convinient, I said to myself. Pretty colourful & unique markings and belonging to the 2nd series too (the resin bomb bay doors I used are characteristic of this series).


Not much special to write about painting. The yellow wintip undersides and fuselage bands I had painted earlier, so that left the undersides (vallejo deck tan) and the upperside camo pattern of green (vallejo model air US dark green) and black (50/50 mix of Xtracrylics night black and RLM66). When dry, I gave it a coat of Future in preparation for the decals.
When masking the camo pattern, I noticed my mistake of painting the fuselage band following MPM's instructions for BL-143. That particular aircraft of course had to have the fuselage band positioned further to the front than usual... Pondering the choices for a moment, I came to the conclusion that fixing the band was too much trouble and not worth the effort considering how I messed up with the cockpit greenhouse already. So I decided to compensate by moving the national markings a bit further than normal.

Despite the sharp printing and registration and good colors, tje AML decals were a disappointment. The main culprit was that the white color was quite translucent, showing paint demarcation lines between the light grey and the darker upper colors, and an ugly effect resembling numerous tiny air bubbles trapped underneath even though I'm certain there aren't any.

I had in mind to remove the national markings and use Techmod's instead, but decided not to, because of all the other mistakes already done (pearls to swines...).

The carrier film was a bit stiff and fragile, but not a big issue after I had noticed that and carried on more carefully. The decals snuggled down with Microsol. They took a bit longer to react to the solvent than some other AM decals I've used before, but that was no issue.

The registry codes going to the right side of fuselage were inaccurate when compared to photos of the real McCoy and the decals sheet's instructions as well!

The font used the registration markings were larger than on the kit's sheet and Techmods, so I replaced them completely, using the 'BL-14' portion cut from MPM's decals and number 9s from Techmod.

Now I just hope to get this thing done so I could move on to more fortunate projects...

robot_
_VISITCOMMUNITY
United Kingdom
Joined: March 08, 2009
KitMaker: 719 posts
AeroScale: 691 posts
Posted: Thursday, January 21, 2010 - 09:43 AM UTC
Great to see you finishing this Eetu! I can't wait to see it with the masking off. This thread will certainly be very useful when I build my 'speed Blenhiem' PR bird (L1348).
magnusf
_VISITCOMMUNITY
Stockholm, Sweden
Joined: May 02, 2006
KitMaker: 1,953 posts
AeroScale: 1,902 posts
Posted: Thursday, January 21, 2010 - 09:55 AM UTC
Keeping an eye on you


Magnus
Emeritus
_VISITCOMMUNITY
Uusimaa, Finland
Joined: March 30, 2004
KitMaker: 2,845 posts
AeroScale: 1,564 posts
Posted: Friday, January 22, 2010 - 07:05 AM UTC
Thanks!


Quoted Text

I can't wait to see it with the masking off. This thread will certainly be very useful when I build my 'speed Blenhiem' PR bird (L1348).


Me neither. I'm curious to see how well that Tamiya tape comes off after over a year on the clear parts. I got a feel it'll go just fine, though, at least judging from the turret I finished a little while ago. The tape came off very well, and without scoring along the edges of the frames beforehand, as I reasoned I'd probably do more harm than good swinging a knife on such a small parts with numerous curved pieces of framing. And that tape had been on the part for almost a whole year! The paint on it wasn't much younger either.

I got a quick update on the build as well:
After looking at those national markings for a while I decided I just couldn't stand the ugly translucent whites, so I put a second set of decals over the first ones.
As the AML sheet only had two more insignias of the same size with a white background, I put those to bottom of the wings and used left-overs from a Revell Hawker hurricane sheet for the rest (Yes, swastika decals on a Revell kit!). The hurricane markings are a slightly larger than the AML ones and the blue is bit lighter, but it's hardly noticable.
I would have used Techmod's markings instead, but there wasn't suitably sized insignias in either the 1:72 or 1:48 sheet. The closest sizes were either a bit smaller than AML (not an option) or clearly too large. "Now why wouldn't you just lift off the first set with tape then?", you might ask. Simple, I had already coated the decals with Future...


^ Notice how the white is still slightly transparent with two AML insignias laid over each other, pretty close to how a single Techmod decal looks over the same colors.

While I was at it, I also masked and painted the non-skid surface on the top of the left wing root.


This post was removed.
Emeritus
_VISITCOMMUNITY
Uusimaa, Finland
Joined: March 30, 2004
KitMaker: 2,845 posts
AeroScale: 1,564 posts
Posted: Wednesday, February 03, 2010 - 07:30 AM UTC
Well, since you were so eager to see it with the masks off, here's a bit of sneak peek:


That Tamiya tape truly is outstanding stuff! It had been in place since late-August 2008, got painted over, and came off that cleanly without any scoring along the edges with a hobby knife.

I'm nearing the finish line over here!

magnusf
_VISITCOMMUNITY
Stockholm, Sweden
Joined: May 02, 2006
KitMaker: 1,953 posts
AeroScale: 1,902 posts
Posted: Wednesday, February 03, 2010 - 08:44 AM UTC
Beautiful!


Magnus
md72
#439
_VISITCOMMUNITY
Washington, United States
Joined: November 05, 2005
KitMaker: 4,950 posts
AeroScale: 3,192 posts
Posted: Wednesday, February 03, 2010 - 08:59 AM UTC
Wow, just wow. That is some dedication to getting it right. Can't till the final pics.
thegirl
_VISITCOMMUNITY
Alberta, Canada
Joined: January 19, 2008
KitMaker: 6,743 posts
AeroScale: 6,151 posts
Posted: Wednesday, February 03, 2010 - 05:10 PM UTC
Eetu , you have done a super job on this build so far and it has been a great following you progress
Emeritus
_VISITCOMMUNITY
Uusimaa, Finland
Joined: March 30, 2004
KitMaker: 2,845 posts
AeroScale: 1,564 posts
Posted: Friday, February 05, 2010 - 02:14 AM UTC
Thanks! Much appreciated.

Now I think I got it pretty much finished. But there still was a couple of surprises left. Firstly, I was wrong thinking I had got the landing gear bay parts glued nice and level with the bottom wing halves. When fitting the langing gear, one side side was OK (but not perfect), the other wasn't. With no way of tilting the gear bay part anymore, I resorted to sticking the gear in place with 2-part epoxy. With the epoxy cured, I attached all the support struts with superglue. All those struts were moulded on the outer rim of the small parts sprue, and were marred by mould misalignment, so I made new ones from styrene rod. Not that pretty I admit,

Some exhaust and gun powder stains were then applied with pastel dust. Final assembly was quick, the pitot tube, turret components, and the scratch-built wire antenna tube glued in with superglue. The props were trickier though. Either the holes in the engines were too big, the prop axels too thin, or a bit of both. Anyway, the fit was sloppy, and I resorted to thin strips of masking tape as a quick solution. When fitting the props, I also noticed I had ended up with at least one slightly wonky prop blade despite carefully eyeballing them in place. For the pics, I let it be and took photos so that it doesn't stick out (that much, I hope...). I'll have to see if I can bend the offending item to a better position, but I don't have high hopes for that, as it's superglued. If I can't fix it, I'll have to look for replacements.

But enough rambling, here's the thing finally finished. (well, nearly almost anyway, I'll have to sort out the props)
Hope you like it.


Oh, don't take these navigation lights as reference material. It appears that only the bulbs were coloured on the real thing.


Edit: July 12th 2017 - Phew! Another build blog's worth of pictures updated from PB to Imgur links, half-a-dozen or so to go...
Hey, if someone still comes around to check out these decade old threads I've updated with new picture links, let me know my pedantic dabbling hasn't been in vain!
NickZour
_VISITCOMMUNITY
Attica, Greece / Ελλάδα
Joined: May 01, 2008
KitMaker: 1,437 posts
AeroScale: 1,241 posts
Posted: Friday, February 05, 2010 - 03:31 AM UTC
Very nice


Cheers Nick
md72
#439
_VISITCOMMUNITY
Washington, United States
Joined: November 05, 2005
KitMaker: 4,950 posts
AeroScale: 3,192 posts
Posted: Friday, February 05, 2010 - 03:58 AM UTC
Looks Great!

THanks for sharing it with us.
chukw1
_VISITCOMMUNITY
California, United States
Joined: November 28, 2007
KitMaker: 817 posts
AeroScale: 729 posts
Posted: Friday, February 05, 2010 - 04:03 AM UTC
I cannot say enough good things about this model- so beautiful! Cheers, Magnus- it's been great watching this come together. Sharp!

chuk
robot_
_VISITCOMMUNITY
United Kingdom
Joined: March 08, 2009
KitMaker: 719 posts
AeroScale: 691 posts
Posted: Friday, February 05, 2010 - 09:54 AM UTC
Beautiful Eetu- and great photos too. The hard work on the cockpit is clearly viewable through the canopy. An inspiring build for me!
Mecenas
Joined: December 23, 2007
KitMaker: 1,596 posts
AeroScale: 1,275 posts
Posted: Friday, February 05, 2010 - 08:38 PM UTC
Congratulations Eatu, this is a real masterpiece. Hard to believe this is a 72 scale...
Emeritus
_VISITCOMMUNITY
Uusimaa, Finland
Joined: March 30, 2004
KitMaker: 2,845 posts
AeroScale: 1,564 posts
Posted: Saturday, February 06, 2010 - 07:08 AM UTC
Many thanks for all the compliments and kind words. Much appreciated.
warreni
_VISITCOMMUNITY
South Australia, Australia
Joined: August 14, 2007
KitMaker: 5,926 posts
AeroScale: 2,201 posts
Posted: Wednesday, April 17, 2013 - 03:51 AM UTC

Quoted Text

Many thanks for all the compliments and kind words. Much appreciated.


G'day Eetu.

I was thinking of buying one of these, but seeing my hobby time is now much reduced due to actually having a job I think this one may take more time than I am willing to invest.

You did a wonderful job Eetu with what looks to have been a tricky kit.

You have saved me about $30!

Cheers
Warren
 _GOTOTOP