135
Decal Dilemas

Conclusion.

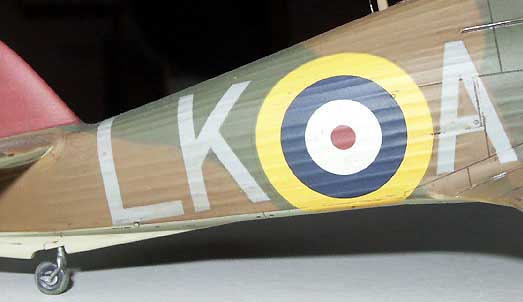
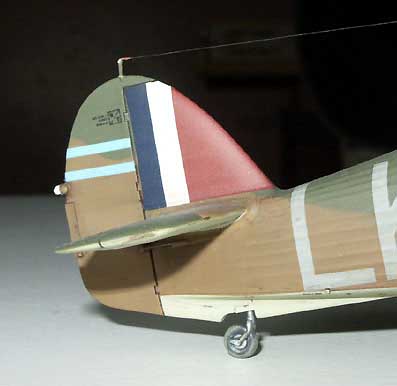
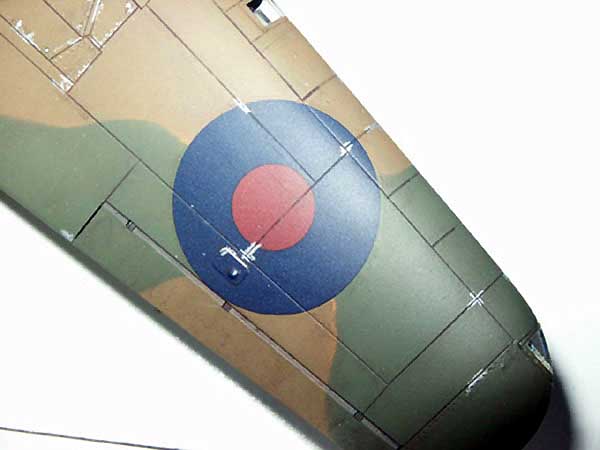
Pictures of a 1/48 Hasegawa Hawker Hurricane.

I have included these pictures of a finished model (the Spitfire isn’t finished yet), with a similar camouflage, to show what the finished product looks like. This model has been treated the same as the Spitfire and has received washes and weathering and a final matt coat. It is this final matt coat that brings everything together. Note that although the code letters had a similarly large area of decal film, as the codes on the Spitfire, it has become totally invisible. Not even the edge is discernible. One thing to take note of, however, is the markings on the tail fin. These were trimmed as the carrier film makes them over large for the fin. If they are not trimmed you will have difficulty in getting the overhanging areas of decal film to conform around the fin without leaving ridges.

Project Photos
CLICK TO ENLARGE


About the Author

About Mal Mayfield (Holdfast)
FROM: ENGLAND - SOUTH WEST, UNITED KINGDOM

Hi, my name is Mal Mayfield and I have been modelling seriously for about 25 years. My main interest is 1/48 scale second world war. I build all types and all combatants. I have built 1/35 scale "targets" and 1/72 scale modern aircraft, plus a couple of cars. I have also dabbled with figure painting...


Comments

That is a really well done and informative article. It's articles like this and modelers like Mal and the rest of you that makes this a great modeling site Wayne
JAN 31, 2004 - 03:07 PM
Nice job with your article. Thanks for taking the time to share with everyone. Very easy to understand.
JAN 31, 2004 - 03:12 PM
What you will need. 1) Shallow container for water. A saucer is ideal. 2) Scissors. 3) Scalpel or hobby knife. 4) Steel Ruler. 5) Tweezers. 6) Setting solutions (I'm using Aero Set/Sol) 7) Brushes to apply the solutions (one for each so there is no cross-contamination). Folded paper towel. 9) Something to support the model. I use a homemade stand but an empty box will do. 10) A Taz mug with some whiskey in case the decals silver or strip No, really .. great article. Zverko
FEB 02, 2004 - 08:10 AM
:-) Thanks guys, and Zverko. Of course the Taz mug is optional and it contains tea (this time anyway) cos the decals won't silver or strip :-) If you follow the rules Mal
FEB 02, 2004 - 08:57 AM
Great job on this feature. it was layed out nicely and the pics showed detail well, looking forward to see the finished Spit. Wingman out.
FEB 02, 2004 - 09:32 AM
Thanks very much for this article. I have only one comment, there are OTHER things to apply decals to than aircraft. I was going to try using Micro Set/Sol on an tank kit this weekend. I'm glad I saw this article first as I probably would have freaked from the "wrinkling" he mentions after applying the Sol. This article has probably saved me a lot of grief.
FEB 02, 2004 - 11:32 AM
so many photos and the article is easy to understand and very helpful...great job..thank you WOLF.
FEB 02, 2004 - 12:07 PM
Having asked a few questions recently about Kleer/Future I have read Mal's previous excellent feature of the same subject and now the decal one....can't wait for the third one to conclude. Great stuff Mal....The Lord of the Rings (roundels). Cheers Peter
FEB 03, 2004 - 01:04 AM
Nice article! Can be very useful in the future!
FEB 03, 2004 - 01:52 AM
:-) Glad to help, I'm trying to get the complete build of this Spitfire on to the aircraft gallery "on the workbench" under Spitfire Mk I. When I can sort out how to keep the pics in the correct order, I'll start adding pics. I aim to bring the build up to date within a couple of weeks, or less. Keep taking a look, and if there's anything you think would make a useful article, just let me know. I'm planning ones on using Blue/White Tack as masks and using Parafilm-M. Mal
FEB 03, 2004 - 09:36 AM